Samson Go Mic Mobile Quick Start Manual
Professional wireless system for mobile filmmaking
Hide thumbs
Also See for Go Mic Mobile:
- Quick start manual (110 pages) ,
- Owner's manual (28 pages) ,
- Manual (12 pages)
Advertisement
Table of Contents
- 1 Important Safety Information
- 2 Charging the Go MIC Mobile Receiver Battery
- 3 Go MIC Mobile Receiver (GMM) Callouts
- 4 HXD2 Handheld Transmitter Callouts
- 5 PXD2 Belt Pack Transmitter Callouts
- 6 Getting Started - Pairing
- 7 Getting Started - Audio Connections
- 8 Connecting to an Ios Device (Iphone, Ipad or Ipod Touch)
- 9 Open a Recording or Video Application and Start Recording
- 10 Connecting to an Android Device with the Digital Audio Output
- 11 Getting Started - Setting the System Volume
- 12 MIX / 2 CH Switch
- 13 Getting Started - Mounting to a Smartphone
- 14 Affixing to a Cold Shoe Adapter
- 15 Specifications
- Download this manual
Advertisement
Table of Contents

Related Manuals for Samson Go Mic Mobile


Summary of Contents for Samson Go Mic Mobile
- Page 1 Go Mic Mobile Professional Wireless System for Mobile Filmmaking Quick Start Guide...
- Page 2 NOT EXPOSE THIS APPLIANCE TO RAIN SERVICE PERSONNEL. OR MOISTURE. TO PREVENT ELECTRICAL SHOCK, MATCH WIDE BLADE PLUG TO WIDE SLOT AND FULLY INSERT. Copyright 2017, Samson Technologies Corp. v1.1 Samson Technologies Corp. 278-B Duffy Ave Hicksville, NY 11801 www.samsontech.com...
- Page 3 Owner’s Manual Important Safety Information Read these instructions. 13. Unplug the apparatus during lightning storms, or when unused for long periods Keep these instructions. of time. Heed all warnings. 14. Refer all servicing to qualified personnel. Follow all instructions. Service is required when the apparatus Do not use this apparatus near water.
- Page 4 WARNING: The battery (battery or batteries or battery pack) shall not be exposed to excessive heat such as sunshine, fire or the like. Hereby, Samson Technologies Corp., declares that this Go Mic Mobile Wireless System is in compliance with the essential requirements and other relevant provisions of Directive 2014/53/ EU.
- Page 5 RA number prior to shipping your unit. Please retain the original packing materials and, if possible, return the unit in its original carton. If your Go Mic Mobile Wireless System was purchased outside of the United States, contact your local distributor for warranty details...
- Page 6 USB port” it will take 10 hours. The max run time from a full battery is approximately 7–13 hours. Note: The Go Mic Mobile receiver does not recharge from the Micro USB port, so the battery level will decrease if plugged into a computer. If you want to power the receiver while it is connected to a device, you will also need to connect the Mini USB port to the computer or AC adapter.
- Page 7 OUT Jack - Use this 3.5mm jack when connecting to an analog input or headphones. 10. USB CHARGE Port - Use this Mini USB jack to connect the Go Mic Mobile Receiver to the included AC adapter to charge the receiver’s internal battery.
- Page 8 Go Mic Mobile Go Mic Mobile Receiver (GMM) Callouts 12. Adjustable Mounting Arm - This mounting arm is adjustable to affix the GMM Receiver to a smartphone. To adjust, loosen the Lock Screw on the top of the GMM Receiver. To fix the arm in place, tighten the Lock Screw.
- Page 9 Press >5 seconds to enter pairing mode. Battery Cover - Unscrew the battery cover and slide down to open the Go Mic Mobile Handheld battery compartment. Battery Holder - Open the battery holder by pressing the tab and lifting the cover. Insert...
- Page 10 Go Mic Mobile PXD2 Belt Pack Transmitter Callouts Input Connector - Connect the input device via the mini-XLR connector. The PXD2 is supplied with a lavalier microphone. Status Indicator - This LED displays the operation mode Power/Pair Switch - Press <5 seconds to turn the unit on or off.
- Page 11 Owner’s Manual Getting Started - Pairing The Go Mic Mobile system will come paired from the factory. If you need to re-pair the system for any reason follow these steps: 1. Turn on the Go Mic Mobile Receiver (GMM) and Go Mic Mobile transmitter by pressing their Power/Pair buttons for less than 5 seconds.
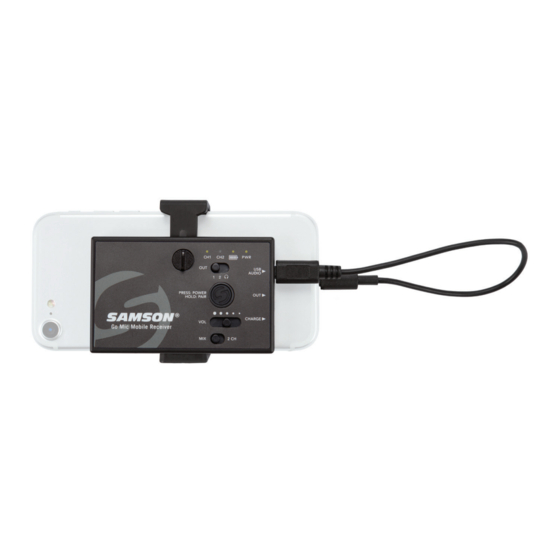
- Page 12 Go Mic Mobile Getting Started - Audio Connections The Go Mic Mobile can be connected to a smartphone using the Micro USB digital output or 3.5mm analog output. Connecting to an iOS device (iPhone, iPad or iPod Touch) Using the included Micro USB to Lightning cable, connect the cable to the USB Audio Output jack on the GMM to the Lightning connector on the iOS device.
- Page 13 (signal sent from the transmitter) is overloaded. To set the level of the transmitters, while talking into the Go Mic Mobile Transmitter, turn the Gain control (inside the battery compartment) up until you reach a good recording level.
- Page 14 Arm with the small insert piece. 3. Replace the Lock Screw 4. Position the included shoe mount adapter on the bottom of the Go Mic Mobile Receiver, take note that the shoe mount adapter is keyed so it will stay in position when attached to the receiver.
-
Page 15: Specifications
PXD2 Belt Pack Transmitter Input Connector Mini-XLR (P3) RF Power <10 mW EIRP Power Requirements Two AA (LR6) alkaline batteries Battery Life 20 hours At Samson, we are continually improving our products, therefore specifications and images are subject to change without notice. - Page 16 Pro (9.7-inch), iPad Pro (12.9-inch), iPad mini 4, iPad Air 2, iPad mini 3, iPad AIr, iPad mini 2, iPad mini, iPad (4th generation) iPod touch (6th generation), iPod touch (5th generation) Samson Technologies Corp. 278-B Duffy Ave Hicksville, New York 11801...
Need help?
Do you have a question about the Go Mic Mobile and is the answer not in the manual?
Questions and answers