Advertisement
Available languages
Available languages
Advertisement
Table of Contents

Related Manuals for Radialight WINDY


Summary of Contents for Radialight WINDY
- Page 1 Leggere il manuale d'uso. Conservare con cura le istruzioni per ogni futura consultazione. Please retain these instructions in a safe place for further reference. Lees de bedieningshandleiding. Bewaar deze instructies zorgvuldig voor toekomstig gebruik.
- Page 2 Volume Volume Volume 196mm 50cm 15cm Ø:6mm / L:35mm 15cm 15cm 60cm 88mm...
- Page 7 ITALIANO MANUALE DI INSTALLAZIONE E D’USO Si prega di leggere attentamente queste istruzioni, prima di utilizzare il prodotto, in modo da evitare danneg- giamenti o comunque il verificarsi di situazioni di pericolo. Qualsiasi utilizzo del prodotto diverso da quanto indicato nel presente manuale può causare incendi, pericoli elettrici o ferite e rende nulla qualsiasi garanzia. La garanzia non si applica ad alcun difetto, deterioramento, perdita, ferimento o danneggiamento riconducibili ad un uso non corretto del prodotto.
- Page 8 ga: 230V~, 50Hz. • Questo termoventilatore ha un grado di protezione IPX4 e può quindi essere utilizzato nei bagni PURCHE’ NON SIA INSTALLA- TO ENTRO IL PERIMETRO DELLA VASCA O DELLA DOCCIA. Il prodotto non può quindi essere installato nelle aree indicate come Volume 1 nello schema di figura 1.
- Page 9 2. M ontaggio a Muro • Installare il termoventilatore in posizione verticale con la griglia di uscita dell’aria rivolta verso il basso. • Questo termoventilatore è in doppio isolamento elettrico (classe II) pertanto la connessione di terra non è richie- sta.
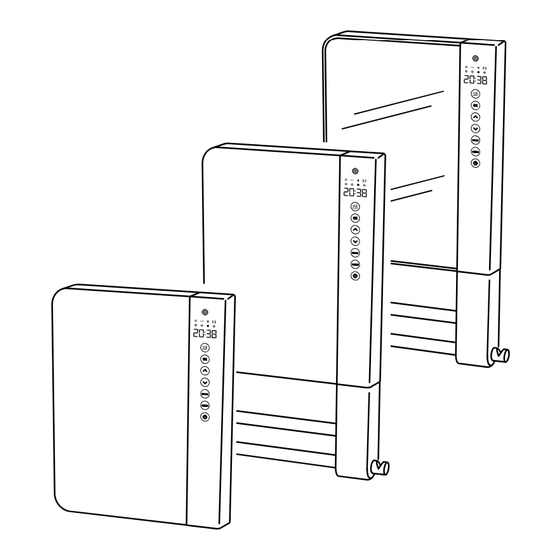
- Page 10 5. d escrizione dei coMandi e del FunzionaMento • Il termoventilatore è dotato di un pulsante di accensione e spegnimento posto sul fianco sinistro. Spegnendo il prodotto i componenti elettrici interni non saranno più sotto tensione. • I seguenti controlli sono integrati sul frontale del prodotto (figura 11): Sensore di presenza Indicatore led modalità...
-
Page 11: Pulsante Menu
6. u tilizzo del erMoventilatore PULSANTE DI ACCENSIONE/SPEGNIMENTO (situato sul lato sinistro del prodotto) L'alimentazione del prodotto è controllata tramite un pulsante elettromeccanico di accensione e spegnimento. Spe- gnere il prodotto tramite questo pulsante causa l’interruzione di alimentazione della scheda elettronica provocando, dopo 30 minuti di interruzione, la perdita delle impostazioni immesse. - Page 12 Selezionare i minuti Le 2 cifre dei minuti Premere il tasto OK correnti lampeggiano per confermare usando i tasti Impostazione del giorno della settimana Attivare la visualizzazione/modifica del giorno della settimana premendo il tasto fino a visualizzare la scritta "dAY ". Dopo 3 secondi: Selezionare il giorno Le 2 cifre del giorno...
- Page 13 Le 2 cifre del giorno appena impostato Selezionare il giorno : P1 tornano a lampeggiare Premere il tasto OK desiderato affinchè si possa proce- per confermare usando i tasti dere con la selezione di un altro giorno Le 2 cifre del program- Selezionare il program- Premere il tasto OK ma lampeggiano...
- Page 14 PULSANTE MODE La pressione del pulsante permette di selezionare uno delle 4 modalità di funzionamento descritte nel paragrafo 5. Modalità ANTIGELO Il termostato viene automaticamente impostato alla tem- peratura di 7±3°C. FroS Il led corrispondente alla temperatura Antigelo si accen- In questa modalità...
- Page 15 PULSANTI DI SELEZIONE I pulsanti di selezione vengono utilizzati all'interno dei diversi menù per visualizzare e/o impostare i vari parametri personalizzabili come indicato nelle diverse sezioni del presente manuale. In qualsiasi momento è possibile inoltre controllare la temperatura Comfort preimpostata premendo una sola volta i tasti .
-
Page 16: Risoluzione Dei Problemi
7. r isoluzione dei ProBleMi • In caso di surriscaldamento, il protettore di sicurezza all’interno del prodotto disattiva sia la resistenza che il motore. In questo caso: Spegnere il termoventilatore e lasciarlo raffreddare per circa 15/20 minuti; Assicurarsi che il filtro antipolvere non sia ostruito e pulire se necessario. Ricordarsi di ricollocarlo nella sua posizione originaria prima di riattivare il prodotto;... - Page 17 Informazioni obbligatorie per gli apparecchi per il riscaldamento d’ambiente locale elettrici Identificativo del modello: WINDY Sim- Dato Valore Unità Dato Unità bolo Potenza termica Tipo di potenza termica, solo per gli apparecchi per il riscaldamento d’ambiente locale elettrici ad accumulo (indicare una sola opzione)
- Page 18 ENGLISH INSTALLATION AND OPERATING MANUAL Before operating the heater, please read these instructions thoroughly to avoid damage and hazardous situa- tions. Any use of this heater other than that stipulated in this instruction manual may cause fire, electric shock or injury, and voids all warranties. Warranty does not apply to any defect, deterioration, loss, injury or damage caused by, or as a result of, the misuse or abuse of this heater.
-
Page 19: Wall Mounting
IS NOT INSTALLED WITHIN THE PERIMETER OF BATH TUBS OR SHOWERS. This means that it cannot be installed in the are- as marked as VOLUME 1 in picture 1. • During function, place the heater in a safe position: at least 1m far from inflammable objects or furnitures; leaving not less than 1m of free space in front of the heater;... - Page 20 The presence sensor allows a reduced energy consumption, lowering automatically the ambient temperature when no presence is detected in the room for at least 10 minutes. Once someone is detected, Windy comes automatically back to the set comfort temperature. The automatic electronic power selection, instead, manages the consumption through an accurate and comfortable regulation keeping constant the selected temperature - according to what has previously been set on the electronic thermostat.
-
Page 21: Main On/Off Switch
The product can be used choosing between 4 different operating modes: ANTI-FREEZE PROGRAMMED AUTOMATIC BASIC Anti-freeze mode The thermostat is set to keep 7 ± 3 ° C. The function is activated manually or automatically when no presence in the room is detected for at least 36 hours. -
Page 22: Standby Button
STAND-BY BUTTON Use the button to switch On or set in Stand-by the product. When ON is pressed the set working temperature LED lights up. Example of activation in Comfort. MENU BUTTON button allows access to the product settings - time, day, weekly program and open window detection adjustment. - Page 23 Weekly program setting The programming function allows you to choose - for each day of the week - one of the following three preset operating program: Comfort Comfort Comfort Comfort Comfort Activate programming display/change ProG by pressing the button untile the writing "ProG" appears. After 3 seconds: : P1 Select the day by using...
- Page 24 At the end of the procedure, after the last day - Sun- Press the OK key to exit the program- day - is displayed, press the button again allows ming to terminate the programming. The message "End" appears on the display. At any time it is possible to exit by pressing the key to save your changes.
-
Page 25: Mode Button
MODE BUTTON Pressing the button allows to select one of the 4 operating modes described in paragraph 5. ANTI-FREEZE mode The thermostat temperature is automatically set to 7 ± 3 ° C. FroS The LED light corresponding to the Anti-freeze mode lights up. -
Page 26: Selection Buttons
SELECTION BUTTONS Selection buttons are used within the menus to display and/or set the several customizable parameters as shown in the various sections of this manual. You can check the set Comfort temperature at any time by pressing a single time the key. -
Page 27: Troubleshooting
7. t rouBleshooting • In the event of overheating, the safety device on the appliance automatically disabled the heating elements and motor. In this case: Turn off the fan heater and allow it to cool down for about 15/20 minutes. Make sure the dust filter is not totally obstructed and clean if necessary. - Page 28 Information requirements for electric local space heaters Model identifier(s): WINDY Item Symbol Value Unit Item Unit Heat output Type of heat input, for electric storage local space heaters only (select one) Nominal heat manual heat charge control, with integrated thermostat...
- Page 29 NEDERLANDS HANDLEIDING VOOR INSTALLATIE EN GEBRUIK Lees deze instructies zorgvuldig door voordat u het product in gebruik neemt zodat schade of het ontstaan van gevaarlijke situaties wordt voorkomen. Elk gebruik van het product dat verschillend is dan dit vermeld in deze handleiding kan brand, elektrische gevaren of letsels veroorzaken en laat elke garantie vervallen.
- Page 30 • Zorg ervoor dat de netvoeding overeenkomt met de gegevens van de gegevensplaat : 230V ~, 50 Hz. • Deze heteluchtverwarmer heeft een zekere mate van bescher- ming IPX4 en kan daarom gebruikt worden in badkamers, zolang deze niet GEINSTALLEERD WORDT BINNEN DE OMTREK VAN HET BAD OF DE DOUCHE.
- Page 31 2. M onteren • Installeer de heteluchtverwarmer rechtop met de luchtuitlaatrooster naar beneden gericht. • Dit apparaat is dubbel geïsoleerd (klasse II) de aarde- aansluiting is dus niet vereist is. • Deze heteluchtverwarmer moet worden geïnstalleerd in overeenstemming met de regels die gelden in het land van installatie.
- Page 32 5. B eschrijving esturingseleMenten erking • De heteluchtverwarmer is uitgerust met een aan/uitschakelaar gelegen aan de linkerkant. Bij het uitschakelen van het product blijven de interne elektrische componenten niet langer onder spanning. • De volgende besturingselementen zijn geïntegreerd op de voorzijde van het product (figuur 11): A - Aanwezigheidssensor B - Antivries modus led-indicator C –...
- Page 33 6. g eBruik eteluchtverWarMer AAN/UIT-TOETS (geplaatst aan de linkerkant van het product) De voeding van het product wordt gecontroleerd door een elektromechanische aan/uit-knop. Het uitschakelen van het product via deze knop zorgt voor de onderbreking van de voorziening van het elektronisch paneel, na 30 minuten onderbreking, het verlies van de ingevoerde instellingen.
- Page 34 De huidige minuten De 2 cijfers van de De toets OK Indrukken selecteren bij middel van minuten knipperen om te bevestigen de toetsen Instellen van de dag van de week Activeer het afbeelden/wijzigen van de weekdag door het drukken op totdat het opschrift "dAY "...
- Page 35 De 2 cijfers van de dag, Selecteer de gewenste : P1 net ingesteld knipperen De toets OK Indrukken dag bij middel van de zodat een andere dag om te bevestigen toetsen kan worden begonnen Selecteer het gewenste programma bij middel De 2 cijfers van het De toets OK Indrukken programma knipperen...
- Page 36 MODUS-TOETS Het drukken op de toets maakt het mogelijk een van de 4 werkingsmodi beschreven in paragraaf 5 te selecteren. ANTIVRIES modus De thermostaat is automatisch ingesteld op een tempe- ratuur van 7 ± 3° c. FroS De LED overeenkomend met de antivriestemperatuur licht op.
- Page 37 SELECTIETOETSEN De selectietoetsen worden gebruikt binnen verschillende menu's om de verschillende aanpasbare parameters af te beelden en/of in te stellen zoals aangegeven in de verschillende delen van deze handleiding. Op elk gewenst moment kunt u ook de vooraf ingestelde comfort-temperatuur controleren door eenmaal te drukken op de toetsen .
- Page 38 7. o Plossen roBleMen • In geval van oververhitting, schakelt de veiligheid binnen binnenin het product zowel de weerstand als de motor uit. In dit geval: De heteluchtverwarmer uitschakelen en laten afkoelen gedurende ongeveer 15/20 minuten; Zorg ervoor dat de stoffilter niet geblokkeerd is en reinig indien nodig. Vergeet niet deze in de oorspronke- lijke positie terug te plaatsen voordat het product opnieuw wordt ingeschakeld;...
- Page 39 Verplichte informatie voor de lokale elektrische ruimteverwarmingstoestellen Typeaanduiding(en): WINDY Waar- Een- Item Item Eenheid Symbool heid Warmteafgifte Type warmte-input, uitsluitend voor elektrische warmteopslagtoestellen (selecteer één) Nominale warmte- Handmatige sturing van de warmteopslag, met geïntegreer- neen afgifte de thermostaat Minimale warmte-...
- Page 40 WINDY_R3_20180919...
Need help?
Do you have a question about the WINDY and is the answer not in the manual?
Questions and answers