Table of Contents
Advertisement
Advertisement
Table of Contents

Related Manuals for Demco Tow-It 2


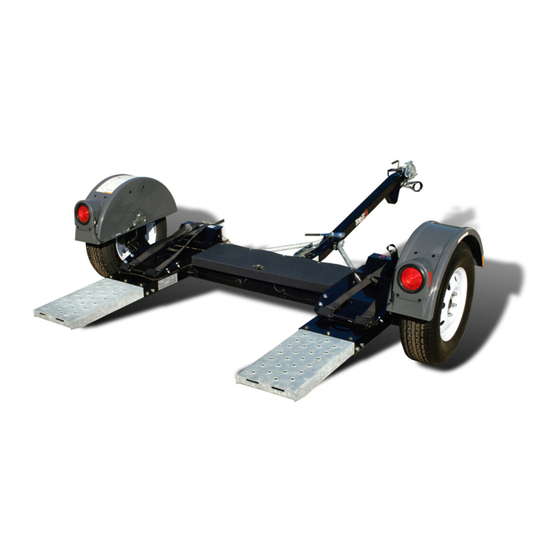
Summary of Contents for Demco Tow-It 2
- Page 1 4/18 RD20019 Rev. 7 Page 1...
- Page 2 Page 2...
-
Page 3: Table Of Contents
• All vehicles to be towed on Demco Tow Dollies must be towed with the front axle on the dolly. It is recommended that two people set-up and load this piece of equipment If you are planning to tow a new or late model full size car, we recommend the 8-1/2’... - Page 4 If you have questions not answered in this manual, require additional copies, or if your manual is damaged, please contact your dealer or Demco, 4010 320th Street, Boyden, IA 51234 ph: (712) 725-2311 Toll Free: 1-800-543-3626 Fax: (712) 725-2380 http://www.demco-products.com...
- Page 5 SAFETY...YOU CAN LIVE wITH IT EqUIPMENT SAFETY gUIDELINES Every year many accidents occur which could have been avoided by a few seconds of thought and a more careful approach to handling equipment. You the operator, can avoid many accidents by observing and following precautions in this section. To avoid personal injury, study the following precautions and insist those working with you, or you yourself, follow them.
- Page 6 • Align the decal over the specified area and carefully press the small portion with the exposed sticky backing in place. • Slowly peel back the remaining paper and carefully smooth the remaining portion of the decal into place. • Small air pockets can be pierced with a pin and smoothed out using the piece of decal backing paper. TIrE SAFETY • Failure to follow proper procedures when mounting a tire on a rim can produce an explosion which may result in a serious injury or death.
- Page 7 DUrINg OPErATION • SAFETY CHAIN -A safety chain must be obtained and installed. Always follow state and local regulations regarding safety chain and auxiliary lighting when towing equipment on a public high way. Be sure to check with local law enforcement agencies for your own particular regulations.
- Page 8 • Comply with state and local laws governing highway safety on public roads. • Use approved accessory lighting flags and necessary warning devices to protect operators of other vehicles on the highway during transport. Various safety lights and devices are available from your dealer. • Local laws should be checked for all highway lighting and marking requirements.
- Page 9 PrECHECK AND LOADINg Safety is of utmost importance at all times. There are several items that must be checked each time before using and while using the tow dolly. Make sure all bolts are properly tightened and those requiring a set torque are up to specifications: Lug Nuts - 120 ft.
-
Page 10: Loading Angle Clearance Guide
The owner assumes all responsibility for wArNINg TOwED VEHICLE the towing vehicle’s fitness and suitability Check your vehicle owners manual or wEIgHT & SIZE LIMITATIONS: to perform the towing task in a safe, legal, registration for vehicle weight. Towing and reliable manner. These responsibili- ties include, but are not limited to: vehicle must be larger and at least 1000 Tread Width... -
Page 11: Bolt Torque
BOLT TOrqUE TOrqUE DATA FOr STANDArD NUTS, BOLTS, AND CAPSCrEwS. Tighten all bolts to torques specified in chart unless otherwise noted. Check tightness of bolts periodically, using bolt chart as guide. Replace hardware with same grade bolt. NOTE: Unless otherwise specified, high-strength Grade 5 hex bolts are used throughout as- sembly of equipment. -
Page 12: Decal Location
Decal Location WINCH OPERATING INSTRUCTIONS Remove winch lock pins (A) from strap winches on front of tow dolly. Release winch: Grasp handle (B) squeeze trigger (C) push down and pull all excess strap from winch. Lay tire strap to outside of tow dolly. Tighten straps: Place tire straps over tires centering straps and winches to tires. -
Page 13: Assembly Instructions
Tow-It 2 ASSEMBLY INSTrUCTIONS 1. Place the mainframe on blocks or some other sturdy Latch Handle support so that the frame rests approximately 8”- Installation 10” off the ground. Attach the tilt bed ramps (#1) as shown using three 7/16” x 1” grade 8 bolts (#2) and lock nuts (#3) on the top of each ramp and 4. - Page 14 7. When assembling the tie-down strap to the tow dolly 6. Remove the 7/16” x 1-1/4” bolt (#24), flatwasher, winch, make sure the tie-down strap does not contain and locknut from the outer front panel of each any twists and the overlaps are to the inside. Thread wheel platform tire stop.
-
Page 15: Wiring Instructions
FENDEr ASSEMBLY Install fender backup plate and three 3/8 x Fish the three wires from the mainframe 1-1/2” bolts. Put nylon lock nuts inside of through the rear hole in the fender trough. fender and tighten. Pull all wire from light hole in housing and install the snapper hose clip approximately 1-1/2”... - Page 16 TESTINg CIrCUITrY plug connection under the tongue of the tow 1. With headlights in “ON” position, the taillight dolly to make sure wire colors are not crossed should be lighted. at that point. If plug connection is correct, cor- 2. Start engine and have someone depress brake rect problem by reversing yellow and green pedal.
-
Page 17: Parts Breakdown
SUrgE BrAKE ASSEMBLY NOTE: The spring return system has a small nut wedged in the spring area for pre-load installation. Do not remove nut. Nut will automatically drop out during first braking period. Slide 1”O.D. x 5/8”I.D. bushing over end of rubber brake line Attach wheels to the mainframe. - Page 18 ITEM PArT # DESCrIPTION qTY. ITEM PArT # DESCrIPTION qTY. 11590 FRONT HALF TRAILER WIRING HARNESS 03574-95 LATCH HANDLE 15921 REAR HALF TRAILER WIRING HARNESS 03434 EYE BOLT, .3125-18UNC X 4 13047 GROMMET .50 04221 BOLT, .3125-18UNC X 2.50 HEX HEAD 12925 10000# 2”...
-
Page 19: Da91 Actuator Parts Breakdown
Page 19... -
Page 20: 10" Disc Brake Parts Breakdown And List
MODEL DA91 ACTUATOr PArTS BrEAKDOwN **12 **16 5482 Master Cylinder repair Kit (gasket included) **10 5876 eZ-Latch Coupler repair Model 91 ACTUATOr PArTS LIST 2” eZ-Latch Coupler rATED rEF. AT 10000# PArT NO. qTY. DESCrIPTION 12925 10000# 2” eZ-Latch Coupler 01896 1/2”-13UNC x 4”... -
Page 21: Fender Assembly
DISC BrAKE PArTS BrEAKDOwN AND PArTS LIST PArTS LIST REF. PART REqD qTY. DESCRIPTION 13920-92 Caliper Mounting Plate 03927-92 Rotor ASSEMBLY 13825-92 Disc Brake Caliper Complete 1. Begin by mounting the Hub Assembly and 13824 Brake Pads (for one complete axle) the Caliper Mounting Bracket (#1) to the SB544 Brake Line .188 x 44”... -
Page 22: Tow Dolly Options
FENDEr ASSEMBLY PArTS LIST rEF. NO. PArT NO. qTY. DESCrIPTION 5978 Left Fender Assembly 5979 right Fender Assembly 04425 Tinnerman U-clamp 04508 Amber Reflector (not shown) 04804 Red Reflector (not shown) 14722 3/16” x 1/2” Pop Rivet 05443 Nylon Cable Hanger 11209 4”... - Page 23 OPTIONAL wINCH rEF. NO. PArT NO. qTY. DESCrIPTION KK2w Optional winch 04620 Winch Mechanism (1400 capacity) 04621 Replacement Handle 01738 Strap Assembly (includes strap & hook) 02207 3/8”-16UNC x 3” Hex Hd. Bolt 02592 3/8”-16UNC Nylon Insert Locknut 02769 3/8”-16UNC x 4” Hex Head Bolt 00059 3/8”...
-
Page 24: Operating Instructions
Please order replacement parts by PArT NO. and DESCrIPTION. 4010 320th St., BOYDEN, IA. 51234 PH: (712) 725-2311 FAX: (712) 725-2380 TOLL FrEE: 1-800-54DEMCO (1-800-543-3626) www.demco-products.com go online to www.demco-products.com for Demco warranty policies, operator manuals & product registration. Page 24...
Need help?
Do you have a question about the Tow-It 2 and is the answer not in the manual?
Questions and answers