Table of Contents
Advertisement
Quick Links
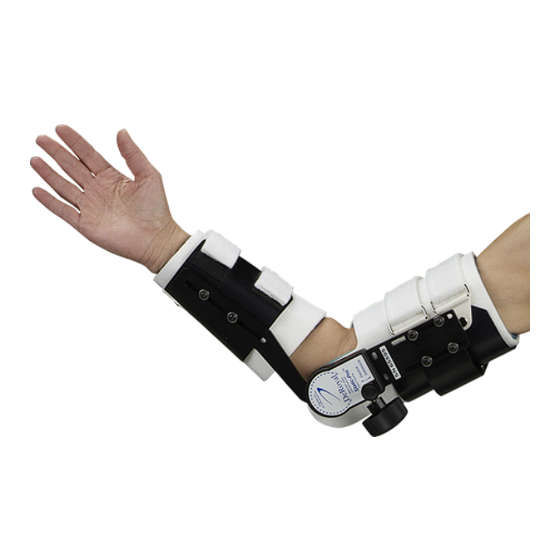
Static-Pro
®
Elbow
Static Progressive Orthosis
Single Patient Use
Rx Only
IMPORTANT INFORMATION
Please read all instructions, warnings and
Precautions before use.
INTENDED USE
The DeRoyal Static-Pro
®
elbow orthosis was
designed for the treatment of joint stiffness, and
established soft tissue contractures, which may have
resulted from trauma, immobilization, or neurological
disorders. The orthosis should only be used under
the supervision of a qualified health care professional.
Protocols for use vary depending on the diagnosis
and should be determined after consulting with the
patient's physician. The Static-Pro
®
assists in either
flexion or extension in one unit.
CONTRAINDICATIONS
The Static-Pro
®
orthosis should not be used if any
of the following conditions exist: Severe spasticity,
severe osteoporosis, and/or thrombophlebitis. If
pain, numbness, swelling, or skin irritation occurs
while wearing the orthosis, the device should be
removed. The patient should be re-evaluated and
appropriate adjustments made.
INSTRUCTIONS FOR USE
IMPORTANT: Before applying
the orthosis, disengage the
gearing mechanism by
pulling the engagement knob
(1) outward and at the same time pivot the position
adjustment knob (2) back toward the back of unit. The
forearm cuff should move freely. Note: The adjustment
knob (2) should be positioned under the elbow, in
order to allow the device to achieve full flexion.
3
4
1
2
1. Sizing and Molding
the biceps and
forearm cuffs: The
biceps and forearm
cuffs are designed to
be trimmed to fit each
patient. Using scissors,
trim enough panels from both sides of each
cuff so that the ends of the cuffs do not
overlap when on the patient. Note: The blue
foam liner should extend 1/2" beyond the
white Wire-Foam
™
. To adjust the position of
the forearm and biceps cuffs, loosen the
screws (4), position the cuffs, and retighten
the screws.
2. Donning the unit: Unfasten forearm and
biceps straps. Place orthosis on the arm, with
the hinge on the medial (inside) side of the
arm. Note: The unit can also be placed on the
lateral side (outside) of the arm; however, the
black knob is easier to adjust when wearing
the unit on the medial side. Position the axis
of the hinge centered at the elbow joint. Mold
the biceps cuff and the forearm cuff around
the arm, and fasten the straps with the hook
and loop closure for a snug, comfortable fit.
Note: Pulling on the welded end of each strap
will tighten the strap.
3. Position elbow: Position the elbow at its
active end range, in either flexion or extension.
The active end range is the extent to which the
arm can be flexed or extended without help.
4. Engage gearing mechanism: Pull the
engagement knob (1) outward and pivoting
the position adjustment knob (2) forward
towards the wrist. The black engagement knob
Static-Pro
®
Elbow
Static Progressive Orthosis
Single Patient Use
Rx Only
IMPORTANT INFORMATION
Please read all instructions, warnings and
precautions before use.
INTENDED USE
The DeRoyal Static-Pro
®
elbow orthosis was
1
designed for the treatment of joint stiffness, and
established soft tissue contractures, which may have
resulted from trauma, immobilization, or neurological
disorders. The orthosis should only be used under
the supervision of a qualified health care professional.
Protocols for use vary depending on the diagnosis
and should be determined after consulting with the
patient's physician. The Static-Pro
flexion or extension in one unit.
CONTRAINDICATIONS
The Static-Pro
®
orthosis should not be used if any
of the following conditions exist: Severe spasticity,
severe osteoporosis, and/or thrombophlebitis. If
pain, numbness, swelling, or skin irritation occurs
while wearing the orthosis, the device should be
removed. The patient should be re-evaluated and
appropriate adjustments made.
INSTRUCTIONS FOR USE
IMPORTANT: Before applying
the orthosis, disengage the
gearing mechanism by
pulling the engagement knob
(1) outward and at the same time pivot the position
adjustment knob (2) back toward the back of unit. The
forearm cuff should move freely. Note: The adjustment
knob (2) should be positioned under the elbow, in
order to allow the device to achieve full flexion.
4
2
1. Sizing and Molding
the biceps and
forearm cuffs: The
biceps and forearm
cuffs are designed to
be trimmed to fit each
patient. Using scissors,
trim enough panels from both sides of each
cuff so that the ends of the cuffs do not
overlap when on the patient. Note: The blue
foam liner should extend 1/2" beyond the
white Wire-Foam
™
the forearm and biceps cuffs, loosen the
®
assists in either
screws (4), position the cuffs, and retighten
the screws.
2. Donning the unit: Unfasten forearm and
biceps straps. Place orthosis on the arm, with
the hinge on the medial (inside) side of the
arm. Note: The unit can also be placed on the
lateral side (outside) of the arm; however, the
black knob is easier to adjust when wearing
the unit on the medial side. Position the axis
of the hinge centered at the elbow joint. Mold
the biceps cuff and the forearm cuff around
the arm, and fasten the straps with the hook
and loop closure for a snug, comfortable fit.
Note: Pulling on the welded end of each strap
will tighten the strap.
3. Position elbow: Position the elbow at its
active end range, in either flexion or extension.
The active end range is the extent to which the
arm can be flexed or extended without help.
4. Engage gearing mechanism: Pull the
engagement knob (1) outward and pivoting
the position adjustment knob (2) forward
towards the wrist. The black engagement knob
3
1
1
. To adjust the position of
Advertisement
Table of Contents

Related Manuals for DeRoyal Static-Pro Elbow


Summary of Contents for DeRoyal Static-Pro Elbow
- Page 1 The biceps and forearm biceps and forearm INTENDED USE cuffs are designed to INTENDED USE cuffs are designed to The DeRoyal Static-Pro ® elbow orthosis was be trimmed to fit each The DeRoyal Static-Pro ® elbow orthosis was...
- Page 2 8. Changing softgoods: Remove the four +46 8 506 766 00 +46 8 506 766 00 ©2005 DeRoyal. All Rights Reserved. ©2005 DeRoyal. All Rights Reserved. screws on the biceps plate (3) to remove the screws on the biceps plate (3) to remove the www.mediroyal.se...
Need help?
Do you have a question about the Static-Pro Elbow and is the answer not in the manual?
Questions and answers