Jensen JDVD1500 Installation And Operation Manual
Cd / mp3 / wma / dvd player / receiver
Hide thumbs
Also See for JDVD1500:
- Installation and operation manual (24 pages) ,
- Installation and operation manual (29 pages)

Related Manuals for Jensen JDVD1500


Summary of Contents for Jensen JDVD1500
- Page 1 JDVD1500 CD / MP3 / WMA / DVD PLAYER / RECEIVER Installation and Operation Manual...
- Page 2 JDVD1500 INTRODUCTION System Features Features of the Jensen JDVD1500 mobile audio system include: • 3-Wire power (ACC, Batt, Gnd) • Detachable faceplate • 1-DIN (sleeve-mount) chassis design • Segmented LCD Display • Blue LED panel illumination • Electronic AM/FM tuner (US) •...
-
Page 3: Safety Information
JDVD1500 • IR repeater eye ready (IRPMRPT sold separately) • Regulatory Certifications: FCC Content List • Jensen Heavy Duty Radio • Hardware Kit • Installation Manual • Quick reference Guide WARNING: SAFETY INFORMATION • TO REDUCE THE RISK OF FIRE OR ELECTRIC SHOCK, DO NOT EXPOSE THIS When Driving EQUIPMENT TO RAIN OR MOISTURE. -
Page 4: Disc Notes
JDVD1500 • • DVD ROM DISC NOTES • DVD RAM Compatible Disc Types NOTE: DVD-R and DVD-RW discs will not play unless the recording session is closed and DVD Video the DVD is finalized. DVDs contain excellent sound and video quality due to Dolby Digital and MPEG2 encoding. A DVD is 12 cm in diameter and can hold more than seven times the data of a CD-ROM. -
Page 5: Important Notes
JDVD1500 Before You Begin After completing the wiring connections, turn the unit on to confirm operation (vehicle accessory switch must be on). If the unit does not operate, recheck all wiring until the problem Disconnect Battery is corrected. Once proper operation is achieved, turn the accessory switch off and proceed Before you begin, always disconnect the battery negative terminal. - Page 6 JDVD1500 actory maximum screw size. Longer screws may damage Mounting components inside the Bracket chassis. Hook Wire the new radio to the (Remove) vehicle as outlined in the Universal Installation instructions. When wiring is complete, reconnect the battery negative terminal.
- Page 7 JDVD1500 WIRING...
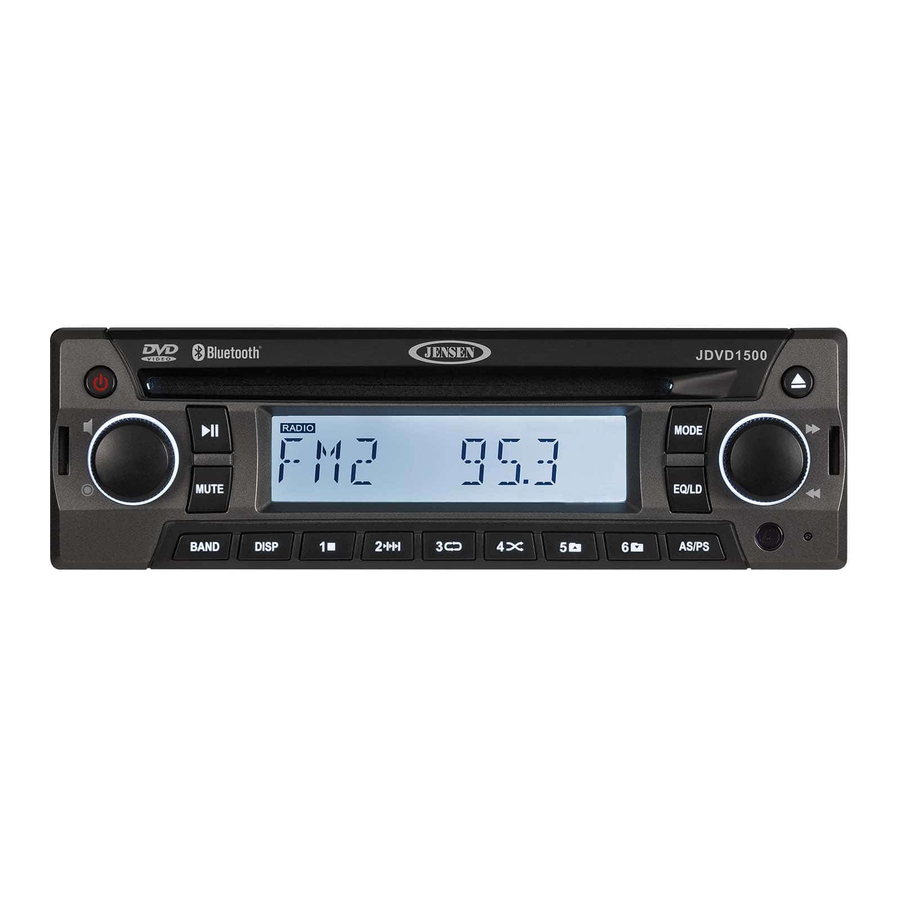
- Page 8 JDVD1500 CONTROLS AND INDICATORS The buttons located on the unit and the remote control that perform the same function are assigned the same number for reference on the diagrams and in the text. Front Panel Operation Power Eject Audio Control Button...
- Page 9 JDVD1500 Ref # Button Function Turn the unit ON or OFF /POWER /EJECT Eject the disc Button Function TITLE Display the TITLE menu stored on DVD disc >>|/TRACK Skip to the next track/chapter TUNE- Tune down one step Stop disc playback <</TRACK...
-
Page 10: Basic Operation
JDVD1500 Remote Control Functions Display the SETUP menu ZOOM Increase the picture size Feature not used on this model 10/0 <, > /\, \/ Select items left/right and ahead/back in menu mode ENTER Confirm selection of track/chapter LANG Change the audio sound track on multi-audio sound track DVD discs. -
Page 11: Audio Menu
JDVD1500 Power On/Off ( Auxiliary Input Operation You can connect another audio system to the unit through the AUX IN terminals on the back (AUX Press the button (1) on the front of the unit ON or OFF. IN) of the unit. Once the device is connected, press the MODE button (16) on the front panel or the SOURCE button on the remote control to select “AUX ”... -
Page 12: System Menu
JDVD1500 Fader (FAD) Use Volume Control knob(4) to adjust the Fader between the front and rear speakers from “R 7” (full rear) to “F 7” (full front). “0” represents an equal balance between the front and rear speakers. SYSTEM MENU Press and hold the audio control button(3) to access the System Menu. - Page 13 JDVD1500 Preset Stations Six numbered preset buttons store and recall stations for each band. Store a Station Select a band (if needed), then select a station. Press and hold a preset button (9-14) for three seconds. The preset number will appear in the display.
-
Page 14: Audio Cd Operation
JDVD1500 Random Play (4/RDM) Press the 4/RDM button (12) during disc play to play all tracks on a CD in random, shuffled order. AUDIO CD OPERATION Press 4/RDM again to stop random play. Insert and Eject Disc Insert a disc into the disc slot (22), label-side up, with the unit turned on. The unit will play the first track on the disc. -
Page 15: Mp3/Wma Operation
R/RW using the buttons on the receiver (or optional remote) as described below. Many types of When a video monitor is installed, a screen similar to the following will appear when an MP3 disc is software are available for converting audio files into MP3/WMA formats. Jensen recommends Nero, played. - Page 16 JDVD1500 • Press 3/RPT four times to repeat play the whole disc. Random Play (4/RDM) Press the 4/RDM button (12 during disc play to play all files on a disc in random, shuffled order. Press 4/RDM again to turn random play off.
- Page 17 JDVD1500 Once a DVD disc is inserted into the unit, the unit will automatically start playback from the Rotate the volume know forward or backward one step on the control panel or remote control beginning of the disc. Once the preview tracks have been played, the DVD MENU, ROOT or TITLE to advance to the next or previous chapter on the disc.
- Page 18 JDVD1500 Goto Search the “PROG” screen. Perform the following steps to use the GOTO feature to access a specific location on a disc: Use the number buttons on the remote control to enter a track number in each field. Press the >/|| button (18) on the remote control or highlight “PLAY” on screen and then DVD Title/Chapter Search press the ENTER button (5) to begin playback in the numbered order indicated.
- Page 19 JDVD1500 • C –00 :34 :37 – remaining playing time for current track • 1/5 ENG – English is the selected audio language out of 5 possible choices • 5.1 CH – The current language is recorded in 5.1 surround sound •...
-
Page 20: Bluetooth Operation
JDVD1500 • C –00 :34 :37 – remaining playing time • T 00:02:18 – total elapsed playing time for current track • C –00 :34 :37 – remaining playing time for current track Remote Control Direct Track Entry To select a track directly, use the number pad on the remote control (10). For single digit entries, press the corresponding number. - Page 21 NOTE: Please note that some Bluetooth menu options are only available while the unit is in • LOCK/UNLOCK: The JDVD1500 can store up to 5 devices for Bluetooth Bluetooth Audio mode. connection. The devices are stored in FIFO (First In First Out) order. To prevent a device from being bumped from the list when more than 5 devices are used, you must lock the device.
-
Page 22: System Setup
JDVD1500 Press the (setup) button on the remote control to access the SETUP menu. Use the arrow (< > buttons to choose between from the following menu categories: • SYSTEM Setup • LANGUAGE Setup • AUDIO Setup • Video Setup •... -
Page 23: Audio Setup
JDVD1500 RATING: Select the parental control level for all DVD play. The security password is required to make changes to this feature. DEFAULT: Use this item to restore default settings at any time. AUDIO SETUP Language Setup SPDIF/OFF The Language Setup menu controls the following features:... -
Page 24: Video Setup
JDVD1500 Video Setup DIGITAL SETUP VIDEO SETUP LINE OUT OP MODE BRIGHTNESS RF REMOD DYNAMIC RANGE CONTRAST DUAL MONO SATURATION SHARPNESS OP Mode: Select LINE OUT or RF REMOD. Dynamic Range: Select FULL, 6/8, 4/8, 2/8 or OFF. Brightness: Adjust the brightness of the screen from the following levels: 12, 10, 8, 6, 4, 2 or 0. -
Page 25: Troubleshooting
JDVD1500 TROUBLESHOOTING SPECIFICATIONS DVD/CD Symptom Cause Solution No power The vehicle ignition is not on If the power supply is properly connected to the vehicle accessory terminal, switch the ignition key to “ACC”. The fuse is blown Replace the fuse. - Page 26 JDVD1500 Signal to Noise Ratio..........> 90dB...
- Page 27 JDVD1500 STATEMENT This device complies with Part 15 of the FCC rules. Operation is subject to the following two conditions: 1) this device may not cause harmful interference, and 2) this device must accept any interference received, including interference that may cause undesired operation.
- Page 28 DV2011 ASA Electronics Corporation www.asaelectronics.com www.jensenrvdirect.com ©2010 ASA Electronics Corporation v.123010...
Need help?
Do you have a question about the JDVD1500 and is the answer not in the manual?
Questions and answers