Table of Contents
Advertisement
Quick Links
Advertisement
Table of Contents

Related Manuals for Polychem PHT801


Summary of Contents for Polychem PHT801
- Page 1 S LIST PHT801/1201 OPERATION MANUAL | SPARE PARTS LIST PNEUMATIC PLASTIC STRAPPING TOOL READ ALL INSTRUCTIONS BEFORE OPERATING THE TOOL .com G THE TOOL POLYCHEM CORPORATION 6277 HEISLEY ROAD, MENTOR, OHIO 44060 PHONE: 440.357.1500, FAX: 440.352.9553 WWW.POLYCHEM.COM ED. 01/11...
-
Page 3: General Safety Instructions
TABLE OF CONTENTS 1) Safety instructions 2) Technical data 3) Warranty and liability 4) Installation 5) Operating elements / adjustments 6) Operation 7) Servicing and cleaning 8) Troubleshooting 9) Layout – spare parts list 1.) SAFETY INSTRUCTIONS READ THE OPERATING INSTRUCTIONS CAREFULLY WEAR EYE, FACE, AND HAND PROTECTION WHEN OPERATING THE TOOL. -
Page 4: Technical Data
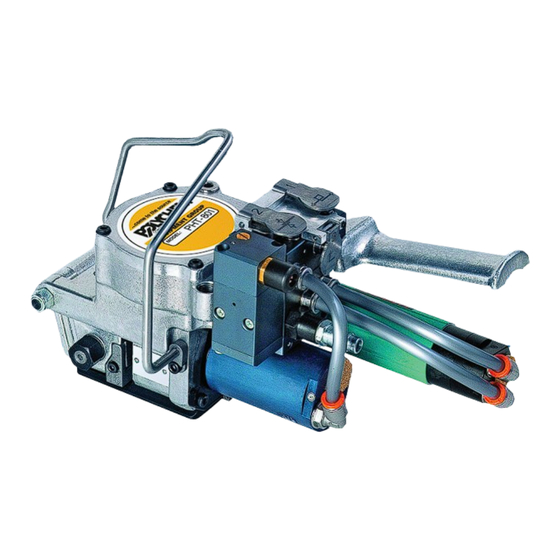
Always use dry, clean and lubricated compressed air. 2.) TECHNICAL DATA DESCRIPTION OF THE TOOL: The tool model PHT801/1201 is designed to strap packages with plastic strap. The strap is fed around the package manually and inserted in the tool, tensioned, cut and friction welded by the tool. -
Page 5: Warranty
3.) WARRANTY Polychem Corporation warrants all its tools and battery chargers during a period of 6 months from the shipping date document. Wear parts are warranted for 45 days, otherwise wear parts are excluded from regular warranty, wear parts are shown on spare parts list (in tool manual). -
Page 6: Operating Elements And Adjustments
5.) OPERATING ELEMENTS AND ADJUSTMENTS DO NOT OPERATE THE TOOL WITHOUT STRAP, YOU COULD DAMAGE THE FEEDWHEEL AND THE WELDING / CUTTING GROUP LEVER 2 – CUTTING / WELDING LEVER 1 – TENSIONING LEVER 3 – RELEASE FEEDWHEEL TENSION HANDLE MOTOR WELDING MOTOR Adjustment of welding - cutting time... - Page 7 ( A ) ( B ) ( C ) Welding time adjustment Clutch adjustment Tension motor adjustment force Feed wheel gap adjustment ( D1 ) ( D2 ) ( D3 ) ( D4 ) 0.2mm 0.008” It is possible to adjust the gap between feed wheel and grippers in order to change the pressure on the strap;...
-
Page 8: Strap Size Conversion
Rear strap guide (3) ( E3 ) To set the tool for 13mm (½”) (Only for PHT801 tool) - 16mm (5/8”) - 19mm (¾”) strap sizes follow the below instructions: Turn strap guides 1 and 3 in 16mm(5/8”) position (pic.E1-E3)- Replace strap guide 2 19 >... -
Page 9: Operation
6.) OPERATION Wrap the parcel to be bound with the strap, as showed in pic.F1, hold the end of the strap with left hand and overlap the strap with right hand ( beware that the strap must be clean, oil and grease free);... -
Page 10: Seal Check
Push lever #3 for around one second to release the feed wheel tension force (pic. F8), open the tool by squeezing the handle and motor together and then remove the tool by pulling it to the right (pic. F8). ( F8 ) ( F9 ) Seal check A regular seal check is very important and it can be visually examined as follows:... -
Page 11: Cutter Replacement
7.) SERVICING - CLEANING DISCONNECT TOOL FROM COMPRESSED AIR LINE BEFORE ANY SERVICE OR CLEANING Periodically clean the tool from strap dust, particularly the feed wheel, the gripper plates and the cutter. Use compressed air or a wire brush (do not use other tools or keys) (pic. H1,H2) ( H1 ) ( H2 ) Cutter replacement... - Page 12 Feed wheel replacement Remove the pushing spring (pic.M1), disconnect the motor pipes (pic.M2), remove the 6 bottom plate screws (pic.M3), unscrew the holding screw (pic.M4), remove the nut on the pivot shaft (pic.M5) and remove the shaft from main frame (pay attention to the shim) (pic M6). Remove the feed wheel shaft nut (pic.M7) Remove the front cover, bushing, spacers, and feed wheel (pic.
-
Page 13: Troubleshooting
Welding gripper replacement Remove the cutter as shown in L1 to L5 sequence; remove the bottom plate as Pic. N1, remove the safety circlip from welding gripper pin (pic.O1), remove the pin from welding gripper (pic.O2), and remove welding gripper (pic. O3) and replace the worn part. Reassemble all parts in reverse order. It is advised to replace the safety circlip with a new one. - Page 14 Tensioning problem— the tool comes back after tensioning Probably damage to the “holding tension system” ( contact the after sale service) Air leak Check hose connections and fittings ( contact the after sale service) Seal time is too short; The upper strap isn’t completely cut; the cutting is inconsistent Improper weld time.
- Page 15 9.) LAYOUT-SPARE PARTS LIST Ed. 06/17 POLYCHEM ITEM DESCRIPTION QTY PART # 189604 A000014 ASSEMBLED GEARBOX BODY TENSION MOTOR ASSEMBLED 189571 A000034 TENSION MOTOR ASSEMBLED 189572 A000035 189570 A000086 ASSEMBLED FRONT COVER 186897 B100032 PIPE 6x8 (Length meters) 189122 B100296 GRUB 1/4"...
- Page 16 ELASTIC PIN 5X16 UNI6874 PNEUMATIC MOTOR 189134 B900348 0607951449 189132 D000620 MEDIUM CUTTER SPRING 189157 D000780 LOCKING STRAP PLATE § 189151 D001250 WELDING FOOT PHT801 1/2” § 189133 D001260 CUTTER § 189582 D001550 MAIN FRAME 189583 D001560 PISTON COVER 189282 D001620...
- Page 17 POLYCHEM ITEM DESCRIPTION PART # 189597 D003970 FRONT STRAP GUIDE 1/2" FRONT STRAP GUIDE 5/8” – 3/4" 189598 D003980 189764 D004570 WELDING FOOT 5/8” – 3/4" § 189765 D004850 CUTTER PIN 189766 D004860 PISTON § WEARING PART PART THAT SHOULD BE...
- Page 18 PHT801-1201...
- Page 19 BOSCH 0 607 951 449 – ITEM B900348 400-0036 WELDING MOTOR No. QTY CODE DESCRIPTION JDE PART # 3 605 125 063 MOTOR HOUSING 3 604 090 009 STATOR / 550W 3 604 220 005 ROTOR 189222 3 605 700 167 BEARING FLANGE 1 900 905 127 DEEP-GROOVE BALL BEARING / 6000-2Z/C3 DIN 625 3 605 700 010 BEARING FLANGE 1 900 905 029 DEEP-GROOVE BALL BEARING / DIN 625-608-2Z-C3 2 600 200 007 SPACER RING 3 600 202 004 SPACER RING 190193 2 916 011 012 PLAIN WASHER / DIN 125-A5,3-ST 190192 2 911 061 150 HEX SCREW / DIN 933-M5x8-8.8 3 606 337 209 CARRIER...
- Page 20 BOSCH 0 607 951 450 – ITEM A000035 401-0005 TENSION MOTOR PHT1201...
- Page 21 SPARE PARTS LIST A000035 (401- Nr. CODE QTY DESCRIPTION POLYCHEM PART # 3 600 760 114 MOTOR HOUSING / BLUE 189730 3 604 090 002 STATOR / 370W 3 604 220 025 ROTOR 3 605 700 005 BEARING F LANGE 189728 3 600 905 039 DEEP-GROOVE BALL BEARING / 190004 9x24x7MM 3 605 700 006 BEARING F LANGE 3 600 905 148 DEEP-GROOVE BALL BEARING / DIN 190005 625-7x19x6 2 600 202 013 SPACER RING 2 600 202 014 SPACER RING 2 916 011 012 PLAIN WASHER / DIN 125-A5,3-ST...
- Page 22 BOSCH 0 607 951 451 – A000034 401-0004 TENSION MOTOR PHT801...
- Page 23 A000034 (401-0004) SPARE PARTS LIST Nr. CODE QTY DESCRIPTION POLYCHEM PART # 1 3 600 760 114 MOTOR HOUSING / BLUE 189730 2 3 604 090 002 STATOR / 370W 3 3 604 220 025 ROTOR 5 3 605 700 005 BEARING FLANGE 189728 6 3 600 905 039 DEEP-GROOVE BALL BEARING / 9x24x7mm 190004 7 3 605 700 006 BEARING FLANGE 8 3 600 905 148 DEEP-GROOVE BALL BEARING / DIN 625-7x19x6 190005 9 2 600 202 013 SPACER RING 10 2 600 202 014...
- Page 24 SECTION 8-B N" 32+40 5 ' .
- Page 25 SPARE PARTS LIST B200347 (400-8011) No. CODICE / CODE POLYCHEM DESCRIPTION Q.TA' / Q.TY PART # 10.077.0 NEEDLE 1/8,1 12.002.1 REGULATOR NIPPLE OR 2043 189296 OR 2043 OR 102 189499 OR 102 12.103.1 GASKET HOLDER REG.908 189983 5x3x11 OR NBR 70 5x3x11 12.104.0...
-
Page 26: Ce Declaration Of Conformity
OR2050 OR2050 CE DECLARATION OF CONFORMITY Polychem Corporation declares under own responsibility that the under mentioned machinery, to which this declarations refers, is in conformity with 2006/42/CE Directive and successive modifications, as well as with standards EN12100-1 / EN12100-2 MODEL:...
Need help?
Do you have a question about the PHT801 and is the answer not in the manual?
Questions and answers