Fisher Minute Mount 2 Owner's Manual
Hide thumbs
Also See for Minute Mount 2:
- Owner's manual (112 pages) ,
- Mechanic's manual (68 pages) ,
- Installation instructions manual (8 pages)

Related Manuals for Fisher Minute Mount 2


Summary of Contents for Fisher Minute Mount 2
- Page 1 Fisher Engineering August 1, 2001 Lit. No. 26982 Owner's Manual CAUTION Read this manual before operating or servicing snowplow. This document supercedes all editions with an earlier date.
-
Page 2: Snowplow Owner's Data Sheet
SNOWPLOW OWNER'S DATA SHEET Owner's Name: Date Purchased: Outlet Name: Phone: Outlet Address: Vehicle Model/Year: Plow Model/Year*: Snowplow Type/Size: Weight: lbs/kg Ballast: No___ Yes___ Amount _______________lbs/kg Insta-Act Hydraulic Power Unit Serial Number: ® Blade Serial Number (located above installation label) _______________________________________________ * The year of manufacture is found on the blade size label. -
Page 3: Preface
When service is necessary, bring your snowplow to equipped with all the vehicle manufacturer's and our your local FISHER outlet. They know your snowplow required options for snowplowing. This will help ensure best and are interested in your complete satisfaction. -
Page 4: Table Of Contents
Table of Contents Snowplow Owner's Data Sheet ....................2 Preface ............................3 Safety Information ........................5 Vehicle Application Information ....................8 Getting To Know Your Snowplow ................... 9 Minute Mount 2 System ....................9 ® Blades ..........................10 Common Attachment Kit ....................9 Peculiar Attachment Kit .................... -
Page 5: Safety Information
TRANSPORT SPEED SHOULD NOT EXCEED 45 MPH. REDUCE SPEED UNDER ADVERSE TRAVEL CONDITIONS. PLOWING SPEED SHOULD NOT EXCEED 10 MPH. REMOVE SLACK FROM CARRYING CHAIN BEFORE TRAVELING. SEE YOUR FISHER OUTLET FOR APPLICATION RECOMMENDATIONS. 21793 Instruction Label ATTACH 1. Verify that release handle is lowered. - Page 6 CAUTION Never operate a vehicle in an enclosed area Plowing speed should not exceed 10 mph. without venting exhaust to the outside. CAUTION See your FISHER® outlet for application recommendations. August 1, 2001 Lit. No. 26982...
- Page 7 HYDRAULIC SAFETY FUSES NOTE: The FISHER vehicle control harness ® WARNING contains two automotive-style fuses. One fuse is Hydraulic oil under pressure can cause skin for the snowplow park/turn lamp power and the injection injury. If you are injured by hydraulic other is for the snowplow control power.
-
Page 8: Vehicle Application Information
Safety Standards (FMVSS). The vehicle with the snowplow installed must NOTE: The ballast retainer kit is for snowplow comply with the vehicle manufacturer's stated vehicles requiring ballast. See your FISHER outlet ® gross vehicle and axle weight ratings (found on the for the correct amount of ballast required. -
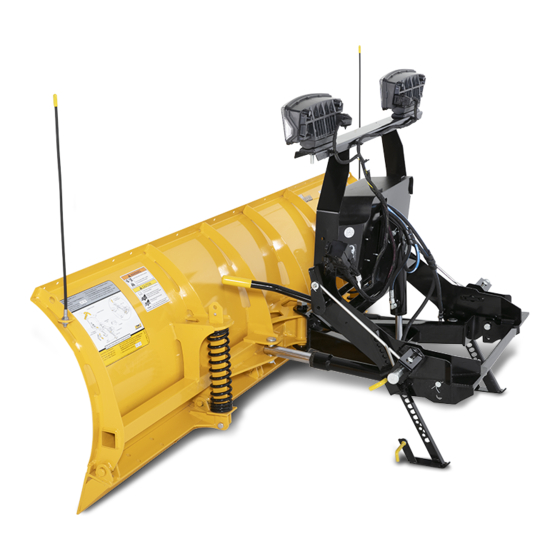
Page 9: Getting To Know Your Snowplow
1/2-ton four- snowplow design. The quickest and easiest mounting wheel-drive trucks, as well as full-size sport-utility system available, the Minute Mount 2 is twice the vehicles. This snowplow is ideal for homeowners, mount because it takes half the time. The Minute small businesses, and light commercial plowing. -
Page 10: Common Attachment Kit
The headgear also automatically switch back to the vehicle headlamps. provides the mounting framework for the FISHER ® Insta-Act Hydraulic Power Unit and the lift arm. The lift ®... -
Page 11: Insta-Act Hydraulic Power Unit
GETTING TO KNOW YOUR SNOWPLOW INSTA-ACT HYDRAULIC POWER UNIT CONTROLS ® The Insta-Act Hydraulic Power Unit delivers a fast and WARNING uniform speed for lifting and angling. It raises the blade in approximately 3 seconds and angles side to side in To prevent accidental movement of the blade, approximately 6 seconds. -
Page 12: Accessories And Options
Along with these parts the kit contains a knit cap to keep your ears warm while out in the cold and also a quart of FISHER High Performance Hydraulic Fluid. August 1, 2001... -
Page 13: Attaching Snowplow To Vehicle
ATTACHING SNOWPLOW TO VEHICLE ATTACHING SNOWPLOW WARNING WARNING Inspect snowplow components and bolts for Keep 8' clear of the blade drop zone when it is wear or damage whenever mounting or being raised, lowered or angled. Do not stand removing the snowplow. Worn or damaged between the vehicle and blade or directly in components could allow the snowplow to drop front of blade. -
Page 14: Operating Your Snowplow
OPERATING YOUR SNOWPLOW DRIVING AND PLOWING ON SNOW Here are some tips for driving in these conditions: AND ICE Drive defensively. Do not drink, then drive or plow snow. CAUTION Plow or drive only when you have good visibility for Drinking then driving or plowing is very operating a vehicle. - Page 15 The control indicator light will turn off. LOWER FLOAT CAUTION FISHER ENGINEERING Rockland, Maine 04841 DO NOT hold control lever in RAISE, ANGLE LEFT or ANGLE RIGHT position after blade has reached desired position. To do so will use U.S.
- Page 16 OPERATING YOUR SNOWPLOW FISH-STIK HAND-HELD CONTROL ® Emergency Stop ON/OFF WARNING POWER FLOAT To prevent accidental movement of the blade, RAISE always turn the ON/OFF switch to OFF whenever the snowplow is not in use. The control indicator light will turn off. CAUTION DO NOT hold control lever in RAISE, ANGLE LEFT or ANGLE RIGHT position after blade has...
- Page 17 1. Completely raise the blade. For proper headlamp adjustment, see your local 2. Place the blade halfway between the fully angled FISHER outlet. ® and straight positions. This configuration allows:...
-
Page 18: Plowing Snow
PLOWING SNOW GENERAL INSTRUCTIONS SPECIAL SNOW CONDITIONS Hard-packed Snow CAUTION 1. On blades equipped with a shoe kit, raise the disc Plowing speed should not exceed 10 mph. shoes so that the cutting edge comes into direct contact with the pavement. Do not stack spare CAUTION spacers on top of shoe holder. - Page 19 PLOWING SNOW CLEARING DRIVEWAYS CLEARING PARKING LOTS 1. Head into the driveway with the blade angled and 1. Clear areas in front of buildings first. Drive up to plow the snow away from any buildings. Widen the building with the blade raised. Drop the blade driveway by rolling snow away from any buildings.
-
Page 20: Detaching Snowplow And Storage
DETACHING SNOWPLOW & STORAGE DETACHING SNOWPLOW WARNING CAUTION Never use a finger to check an alignment. If Inspect snowplow components and bolts for the snowplow moves, your finger could be wear or damage whenever mounting or crushed. removing the snowplow. Worn or damaged components could allow the snowplow to drop unexpectedly. - Page 21 DETACHING SNOWPLOW & STORAGE ELECTRICAL CABLE ROUTING Cable Ties Cable Boot Cable Ties Black/Orange ground wire Connect to negative motor terminal Snowplow Lighting Harness, shrouded plug Snowplow Cable Assembly, shrouded plug (plug into cable boot for storage) Snowplow Control Harness (plug into Snowplow Lighting Harness for storage) Snowplow Lighting Harness,...
-
Page 22: Maintenance
POSTSEASON MAINTENANCE CAUTION Servicing the trip springs without special tools and knowledge could result in personal injury. See your authorized FISHER outlet ® for service. Apply grease here Coat all electrical plugs with dielectric grease. - Page 23 1. Remove drain plug located in the bottom of the hydraulic reservoir. 2. Completely drain the reservoir. 3. Refill through fill hole with FISHER High ® Performance Hydraulic Fluid. 4. Recycle used oil according to national and local regulations.
- Page 24 Balance of parts made of plastic shall be disposed in customary manner. Flashlight 1/8" Allen Wrench 1/4" rachet, 6" extension, 5/16" socket electrical tape 1 - Quart FISHER ® High Performance Hydraulic Fluid August 1, 2001 Lit. No. 26982...
-
Page 25: Troubleshooting Guide
TROUBLESHOOTING GUIDE Some of the following guide corrections listed here are complicated. Unless you are very experienced in electrical and hydraulic repair, let you trained FISHER outlet service personnel do the repairs. ® Condition Possible Cause Correction Control power indicator not on Control not turned on. - Page 26 Blown fuse in FISHER vehicle Replace blown fuse. control harness. Control or hydraulic system See FISHER outlet for repair malfunction or fault in wiring. information. Snowplow lowers by itself or Hydraulic fittings or hoses loose or Tighten or replace components or see won’t stay in raised position...
- Page 27 Power or DRL circuit has been Turn on light and/or ignition interrupted. switch to cycle the DRL circuitry. Plow park/turn lamps not Blown fuse. Part of the FISHER vehicle Replace fuse. operating. control harness. Lit. No. 26982 August 1, 2001...
- Page 28 Fisher Engineering outlets is granted. Fisher Engineering reserves the right under its product improvement policy to change construction or design details and furnish equipment when so altered without reference to illustrations or specifications used herein. Fisher Engineering and the vehicle manufacturer may require and/or recommend optional equipment for snow removal.
Need help?
Do you have a question about the Minute Mount 2 and is the answer not in the manual?
Questions and answers
I have about 4 leaking hydraulic couplings on my hoses. How can I repair them without replacing them ($).
To repair leaking hydraulic couplings on Fisher Minute Mount 2 hoses without replacing them, tighten any loose fittings or components. If the leak persists, inspect the fittings, hoses, plugs, and hardware for damage. If tightening does not stop the leak, see a FISHER outlet for further repair information.
This answer is automatically generated