
Related Manuals for SATO WS208


Summary of Contents for SATO WS208
- Page 1 WS2 Series Printer Operator Manual WS208 / WS212 WS2-r01-15-06-18OM © 2018 SATO Corporation. All rights reserved.
- Page 2 SATO Corporation takes steps to assure that the company’s published engineering specifications and manuals are correct; however, errors do occur. SATO reserves the right to correct any such errors and disclaims any resulting liability. In no event shall SATO or anyone else involved in the...
-
Page 3: Table Of Contents
Contents Introduction ......................1 Features ....................... 1 Unpacking ....................2 Understand your printer ................3 1.3.1 Perspective view ................3 1.3.2 Back view ..................4 1.3.3 Interior view ................... 5 Printer lights ....................6 1.4.1 Status lights ..................6 1.4.2 System mode .................. - Page 4 Troubleshooting ....................37 Printer issues ..................... 37 Media issues ....................38 Other issues ....................39 Specifications ....................... 40 Printer......................40 Media ......................42 Electrical and operating environment ............42 Physical dimension ..................42 Fonts, Barcodes, and Graphics Specification ..........43 Ethernet ....................
-
Page 5: Introduction
1 Introduction Features 1 Introduction Thank you for purchasing an SATO WS2 Series industrial barcode printer. This manual provides information about how to set up and operate your printer, load media and solve common problems. Illustrations are provided to help you quickly become familiar with the printer. -
Page 6: Unpacking
When you receive the printer, open the package immediately and inspect for shipping damage. If you discover any damage, contact the shipping company and file a claim. SATO is not responsible for any damage incurred during shipping. Save all package materials for the shipping company to inspect. -
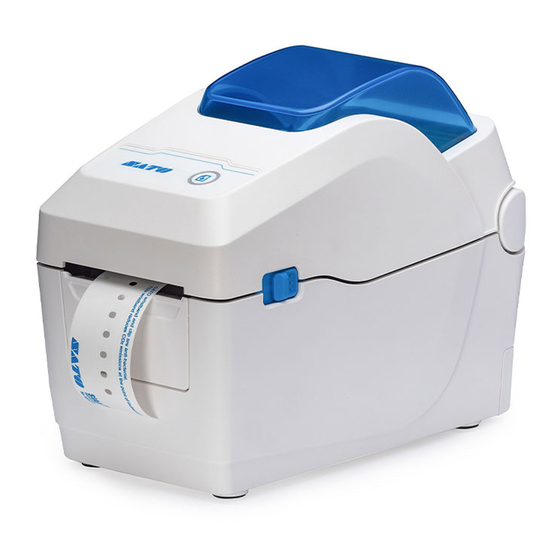
Page 7: Understand Your Printer
1 Introduction Understand your printer 1.3 Understand your printer 1.3.1 Perspective view Top Cover Feed Button LED Indicator LED 2 LED 1 Cover Latch... -
Page 8: Back View
1 Introduction Understand your printer 1.3.2 Back view Ethernet USB A USB B Power Switch Power Jack Caution To avoid injury, be careful not to trap your fingers in the Paper Slot while opening or closing the Top Cover. -
Page 9: Interior View
1 Introduction Understand your printer 1.3.3 Interior view Printhead See-through Sensor Media Roll Holders Media Guides Reflective Sensor Platen Roller... -
Page 10: Printer Lights
1 Introduction Printer lights 1.4 Printer lights There are two LED lights that show the status of WS2 Series printer. The Upside light is defined in LED2. LED1 is below LED2 and Feed symbol. 1.4.1 Status lights Status lights help you check printer’s condition. The following tables show the blinking speed of status lights and the conditions they indicate. - Page 11 1 Introduction Printer lights Paper end. ** Orange Orange ** Ribbon end or ribbon error (for thermal transfer models) Orange The printhead is broken. **Orange Cutter error (with optional cutter). Cover (Thermal Head) open error during printing. An EEPROM for backup cannot be read or written properly. A command has been fetched from an odd address.
-
Page 12: System Mode
1 Introduction Printer lights 1.4.2 System mode The system mode consists of status light color combinations. It contains a list of commands for you to select and run. To enter the system mode and run the command, do the following: 1. -
Page 13: Get Started
2 Get started Attach the power cord 2 Get started This chapter describes how to set up your printer. Caution Do not use your printer in areas exposed to splashing water or any other liquid. Caution Do not drop your printer, or place it in an area subject to humidity, vibration or shock. -
Page 14: Turn On/Off Your Printer
2 Get started Turn on/off your printer 2.2 Turn on/off your printer When your printer is connected to a host (a computer), it is good to turn on the printer before turning on the host, and turn off the host before turning off the printer. -
Page 15: Load Media
2 Get started Load media 2.3 Load media There are various types and sizes for the media roll. Load the applicable media to satisfy your need. 2.3.1 Prepare media The inside wound and outside wound media roll can be loaded into the printer the same way. -
Page 16: Place A Media Roll
2 Get started Load media 2.3.2 Place a media roll 1. Pull the head latch to open the top cover of the printer. 2. Pull the Media Roll Holders to slide them outward, and place the media roll between the holders. Make sure the print side is up, and the media roll is clamped tightly by the holders. - Page 17 2 Get started Load media 3. Pull the media until it reaches out of the printer. Thread the media under the media guides. 4. Close the top cover on both sides.
- Page 18 2 Get started Load media Flexibility If you usually use the same width media or fanfold media, scroll the “Media Roll Holder Wheel” to adjust width to the same media guide. Media Holder Stop Adjustment...
-
Page 19: Test Media Feed
2 Get started Load media 2.3.3 Test media feed 1. Turn on the printer, and press the FEED button to feed a label. 2. Flip the media and tear it along the edge of the front cover. -
Page 20: Media Types
2 Get started Media types 2.4 Media types Your printer supports various media types, including non-continuous media, continuous media, and fanfold media. The following table provides details about them. Media Type Looks Like Description Non-Continuous Non-continuous media is the typical media for Media bar code printing. - Page 21 2 Get started Media types Media Type Looks Like Description Continuous Continuous media does not have gaps, holes, Media notches or black marks. It allows you to print data anywhere on the media. A cutter may be used for splitting labels. Fanfold Media Fanfold media is in continuous form, but it can be used as non-continuous media, because its...
-
Page 22: Media Sensing
2 Get started Media sensing 2.5 Media sensing WS2 printer offers reflective sensor. It used for detecting specific media types. 2.5.1 Transmissive sensor The transmissive sensor is fixed and placed near the center line with 6.27 mm offset of the printhead. It is used for detecting gaps across the entire width of the label. -
Page 23: Reflective Sensor
2 Get started Media sensing 2.5.2 Reflective sensor The reflective sensor is movable within the entire width of the media. It detects gaps, notches and black marks not located at the center of the media. Multi Columns Notch Black Mark Flip the media so the black-mark side is facing down to align with the sensor. -
Page 24: Printer Operation
3 Printer operation Printing Media Calibration & Configuration 3 Printer operation This chapter provides information about printer operation. 3.1 Printing Media Calibration & Configuration You need to calibrate the media sensor to print properly. WS printers provide transmissive and reflective sensor calibration. Take the following steps to use them. -
Page 25: Self Test
3 Printer operation Self test 3.2 Self test The printer can run a self test to print a configuration label, which helps you understand current settings of the printer. 1. Turn off the printer. 2. Press and hold the FEED button, and turn on the printer. 3. - Page 26 3 Printer operation Self test SZPL...
- Page 27 3 Printer operation Self test 1. Version Information The firmware version and its build date. 2. Standard RAM Display SDRAM size. 3. Available RAM RAM is able to be used. 4. Flash Type The flash memory type and size. 5. Available Flash Flash is able to be used.
- Page 28 3 Printer operation Self test Printing speed unit is inch per second (ips). 17. ABS. Darkness Display the current darkness. You can use the SZPL command ~SD to define 18. Trim. Darkness Display the adjustment of the current darkness. You can use the SZPL command ^MD to define it.
- Page 29 3 Printer operation Self test Enable or disable backfeed during the printing process. When it is enabled, the printer moves the paper forward in a predefined length 1 second after printing, and pulls the paper back in a predefined length once the printing begins again.
- Page 30 3 Printer operation Self test 42. Socket Port Display printer port number. 43. IPv6 Mode It determines how you get the IPv6 address of your printer. There are three modes: MANUAL, DHCPv6 or AUTO. 44. IPv6 Type It is the IPv6 address type of your printer. There are four types: NONE, NORMAL, EUI and ANY.
- Page 31 3 Printer operation Self test This is for developers to debug. 58. See-Through Sensor Automatic Gain Control This is for developers to debug. 59. SW Display status of the dip switch. 60-68. Font Image You can use them as the reference to check your label font. 69-74.
-
Page 32: Option Parts
3 Printer operation Self test Option Parts If your printer has a Wi-Fi module, your SZPL configuration label will contain the following entries: FW Version Display WLAN board firmware version. Date Display WLAN board firmware version date. IP Address Display the IP address of your printer. When DHCP is enabled, it shows the automatically assigned IP address;... - Page 33 3 Printer operation Self test Display the country or region in Wi-Fi module. Channel Display the Wi-Fi channel. Network Authentication There are six modes. Refer to Printer Tool Network authentication description from Technical manual. Display the printer WEP encryption is on or off.
- Page 34 3 Printer operation Self test SDPL...
- Page 35 3 Printer operation Self test SEPL...
-
Page 36: Reset Your Printer
3 Printer operation Reset your printer 3.3 Reset your printer By resetting your printer, you can return your printer to the state it was in when you receive it. This can help you solve some problems caused by settings changed during the printing. Do the following to reset your printer: 1. -
Page 37: Communications
3 Printer operation Communications 3.4 Communications 3.4.1 Interfaces and Requirements This printer comes with USB type A and type B interface, an ethernet. USB Interface Requirements The Universal Serial Bus (USB) interface is compatible with your existing PC hardware. The USB’s “plug and play”... -
Page 38: Maintenance
4 Maintenance Cleaning 4 Maintenance This chapter describes routine cleaning procedure. 4.1 Cleaning To maintain print quality and prolong the printer’s life, you need to perform some routine maintenance. Daily maintenance should be done for high volume printing, and weekly for low volume printing. Caution Always turn off the printer before cleaning. -
Page 39: Media Housing
4 Maintenance Cleaning Note Printhead warranty becomes void if printhead serial number is removed, altered, defected, or made illegible, under every circumstance. 4.1.2 Media housing Use a soft cloth to clean the dust, dirt or debris built up on the Media Roll Holders, Media Guides and media path. -
Page 40: Platen Roller
4 Maintenance Cleaning 4.1.4 Platen roller The platen roller is also important for print quality. Dirty platen roller may damage the printhead. Clean the platen roller right away if the adhesive, dirt or dust accumulates on it. 1. Moisten a soft cloth with absolute ethyl alcohol. 2. -
Page 41: Troubleshooting
5 Troubleshooting Printer issues 5 Troubleshooting This chapter provides the information about printer problems and solutions. 5.1 Printer issues The printer is not turned on Did you attach the AC power cord? Make sure the power supply’s connector is inserted into the printer power jack. ... -
Page 42: Media Issues
5 Troubleshooting Media issues 5.2 Media issues The media is out Load a new media roll. The paper is jammed Open the printer and clear the jammed paper. Make sure the paper is held properly by the Media Guides. The printing position is not correct ... -
Page 43: Other Issues
5 Troubleshooting Other issues 5.3 Other issues There are broken lines in the printed label The printhead is dirty. Clean the printhead. An error occurred when writing data to the USB memory Did you insert the USB drive? ... -
Page 44: Specifications
6 Specifications Printer 6 Specifications This chapter provides specifications for the printer. Specifications are subject to change without notice. 6.1 Printer Model WS208 WS212 Print method Direct Thermal Resolution 203 dpi (8 dots/mm) 300 dpi (12 dots/mm) Media Alignment Centered... - Page 45 6 Specifications CPU Type 32 bit RISC microprocessor Software---Label Windows Driver (Windows Vista/ Win 7/ Win 8/ Win 10), editing BarTender® from Seagull Scientific, Nice Label Software--- Utility Printer Tool Agency Listing CB, CE...
-
Page 46: Media
6 Specifications Media 6.2 Media Properties Description Media Size Max. width: 60mm, Min. width: 12mm Max length 100" (2540 mm), Min length 0.4" (10mm) Thickness: 0.00236”~0.00787” (0.06mm~0.2mm) 5”(127mm) OD on a 1”/1.5” (25.4/38 mm) ID core 4.5”(115mm) OD on a 0.5” (12.7mm) ID core Min. -
Page 47: Fonts, Barcodes, And Graphics Specification
6 Specifications Fonts, Barcodes, and Graphics Specification Fonts, Barcodes, and Graphics Specification The specifications of fonts, bar codes and graphics depends on the printer emulation. The emulations SDPL, SEPL, and SZPL are printer programming languages, through which the host can communicate with your printer. Printer Programming Language SDPL Programming Language SDPL... - Page 48 6 Specifications Fonts, Barcodes, and Graphics Specification Printer Programming Language SEPL Programming Language SEPL Internal fonts 5 fonts with different point size 8 bits code page : 437, 850, 852, 860, 863, 865, 857, 861, 862, 855, 866, 737, 851, 869, 1252, 1250, 1251, 1253, 1254, 1255 Symbol sets 7 bits code page: USA, BRITISH, GERMAN,...
- Page 49 6 Specifications Fonts, Barcodes, and Graphics Specification Printer Programming Language SZPL Programming Language SZPL 8 (A~H) fonts with different point size. 8 AGFA fonts: 7 (P~V) fonts with fixed different point size Internal fonts (not scalable). 1 (0) font with scaling point size. CG Triumvirate Bold Internal TTF font.
-
Page 50: Ethernet
6 Specifications Ethernet 6.6 Ethernet Properties Description Port RJ-45 Speed 10Base-T/100Base-T (Auto Detecting) Protocol ARP, IP, ICMP, UDP, TCP, HTTP, DHCP, Socket, LPR, IPv4, IPV6, SNMPv2 Mode TCP Server/Client, UDP Client Technology HP Auto-MDIX, Auto-Negotiation 6.7 Wireless LAN (Option) Properties Wireless LAN I/F Hardware Protocol... - Page 51 6 Specifications Wireless LAN (Option) Properties Wireless LAN I/F IEEE Transmission Conforming to 802.11n Method IEEE802.11n OFDM method Channel (US)1-11ch (JP/DE)1-13ch Data Transmission 20MHz : 6.5M / 7.2M / Speed/Modulation 13M / 14.4M / 19.5M / 21.7M / 26M /28.9M / 39M / 43.3M / 52M / 57.8M / 58.5M / 65M / 72.2M(Auto-sensing)
-
Page 52: Ports
6 Specifications Ports 6.8 Ports This section provides information about IO port specifications for the printer. 6.8.1 USB There are two common USB connectors. Typically, type A is found on hosts and hubs; type B is found on devices and hubs. The figure below shows their pinouts. -
Page 53: Ethernet
6 Specifications Ports 6.8.2 Ethernet The Ethernet uses RJ-45 cable, which is 8P8C (8-Position 8-Contact). The figure below shows its pinout. 1 2 3 4 5 6 7 8 Signal Transmit+ Transmit- Receive+ Reserved Reserved Receive- Reserved Reserved...
Need help?
Do you have a question about the WS208 and is the answer not in the manual?
Questions and answers