Table of Contents
Advertisement
Quick Links
Advertisement
Table of Contents

Related Manuals for Bernina 435


Summary of Contents for Bernina 435
- Page 1 BERNINA 435...
- Page 2 Enjoy the creative sewing on your new BERNINA 435 and keep informed about the various accessories at www.bernina.com. On our homepage you will also find a lot of inspiring sewing instructions, to be downloaded for free.
- Page 3 2018/02 en 1031745.0.04 1. Edition Copyright 2018 BERNINA International AG All rights reserved: For technical reasons and for the purpose of product improvements, changes concerning the features of the machine can be made at any time and without advance notice. The supplied...
-
Page 4: Table Of Contents
Contents Contents IMPORTANT SAFETY INSTRUCTIONS....................10 1 My BERNINA............................. 14 Introduction .......................... 14 Welcome to the world of BERNINA ..................14 Key to signs .......................... 15 Overview Machine ........................ 16 Overview front controls ..................... 16 Overview front ........................17 Overview sideways ......................18 Overview back........................ - Page 5 Contents Presser foot........................... 35 Adjusting the presser foot position via the knee lifter of the Free Hand System ....35 Changing the presser foot sole ..................36 Changing the presser foot ....................36 Having the presser foot displayed in the User Interface ............37 Adjusting the presser foot pressure..................
- Page 6 Contents 5 Creative sewing ..........................60 Overview selection menu sewing................... 60 Selecting a stitch pattern ....................60 Regulating the speed ......................60 Adjusting the upper thread tension ..................60 Editing stitch patterns ......................61 Changing the stitch width ....................61 Changing the stitch length ....................
- Page 7 Contents 6.11 Finishing edges ........................81 6.12 Sewing Double overlock......................81 6.13 Narrow edgestitching......................82 6.14 Wide edgestitching ....................... 82 6.15 Sewing hem edges........................ 82 6.16 Sewing blind hems........................ 83 6.17 Sewing visible hems ......................84 6.18 Sewing flat joining seams...................... 85 6.19 Sewing basting stitches ......................
- Page 8 Contents 10.2 Quilting, Securing Program ....................105 10.3 Sewing handlook quilt stitches ....................106 10.4 Guiding the quilt work freely....................106 11 Attachment ............................108 11.1 Maintenance and cleaning ....................108 Cleaning the display ......................108 Cleaning the feed dog....................... 108 Cleaning the hook......................
-
Page 9: Important Safety Instructions
Important safety instructions IMPORTANT SAFETY INSTRUCTIONS Please be aware of the following basic safety instructions when using your machine. Before using this machine, read instruction manual carefully. DANGER! To reduce the risk of electrical shock: • Never leave the machine unattended as long as it is plugged in. •... - Page 10 Never operate this machine if it has a damaged cord or plug, if it is not working properly, if it has been dropped or damaged, or dropped into water. Contact the nearest authorized BERNINA dealer to arrange further details. •...
- Page 11 - turn the power switch to «0». • Do not use bent needles. • Always use the original BERNINA stitch plate. The wrong stitch plate can cause needle breakage. • To disconnect, turn power switch to «0» and then remove the plug from the outlet.
- Page 12 The symbol may also be marked on the product. KEEP THE INSTRUCTION MANUAL SAVE Appropriate use Your BERNINA machine is conceived and designed for private household use. It answers the purpose to quilt fabrics as it is decribed in this instruction manual. Any other use is not considered appropriate.
-
Page 13: My Bernina
My BERNINA 1.1 Introduction With your BERNINA 435 you can sew delicate silk or satin fabrics as well as heavy-weight linen, fleece and denim without any problems. Numerous practical, decorative stitches and buttonholes are at your disposal. Additional to this instruction manual, subsequently listed help programs are provided which will give you useful advice and support at any time how to operate your BERNINA 435. -
Page 14: Key To Signs
Fancy instructions, free sewing patterns and embroidery motifs as well as many new ideas: all this you can find in the weekly blog by BERNINA. Our experts give valuable tips and explain step by step how you can achieve the desired result. In the community you can upload your own projects and exchange experiences and ideas with other sewing and embroidering enthusiasts. -
Page 15: Overview Machine
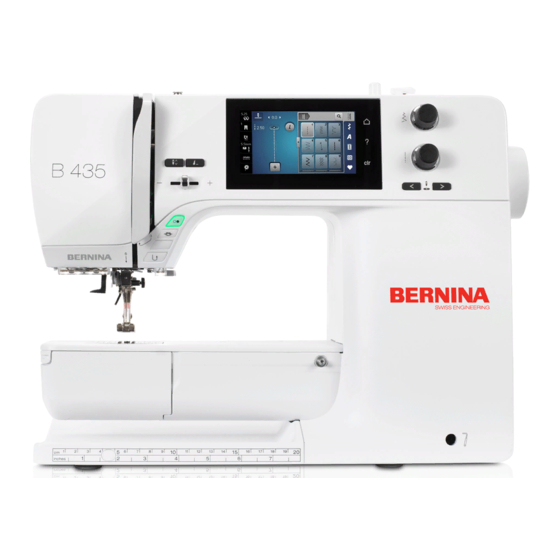
My BERNINA 1.4 Overview Machine Overview front controls Quick reverse Presser foot pressure Securing Upper Multifunction knob Start/Stop Lower Multifunction knob Pattern end Needle left/right Needle up/down... -
Page 16: Overview Front
My BERNINA Overview front Bobbin cover Thread take-up lever cover Presser foot Thread take-up lever Needle threader Thread cutter Sewing light Needle fixing screw Thread cutter Connection for slide-on table Slide speed control Connection for Free Hand System... -
Page 17: Overview Sideways
My BERNINA Overview sideways Connection for foot control Retractable spool pin Feed dog up/down Air vents PC-connection Handwheel USB port Power switch Spool pin Connection for power cable Bobbin winding unit Magnet holder for touchscreen pen (optional accessory) -
Page 18: Overview Back
My BERNINA Overview back Air vents Bobbin winding unit Connection for slide-on table Thread pretension Connection for darning hoop Thread take-up lever Presser foot lifter Thread guide Handle Thread cutter Spool pin Feed dog Thread guide Stitch plate Retractable spool pin... -
Page 19: Supplied Accessories
All rights reserved: For technical reasons and for the purpose of product improvements, changes concerning the features of the machine can be made at any time and without advance notice. The supplied accessory can vary depending on the country of delivery. Please visit www.bernina.com for more accessory information. Illustration Name... -
Page 20: Use Of The Power Cable (Only Usa/Canada)
My BERNINA Illustration Name Purpose Height compensation tool The height compensation tool levels an angled position of the presser foot sole when sliding over thick seams. Selection of needles The needle assortment contains different versions and sizes of needles for all the common applications. - Page 21 My BERNINA Illustration Number Name Purpose Example Snap-on shaft The exchangeable snap-on soles can be attached to the snap-on shaft due to a simple clamping mechanism. Reverse pattern sole With the Reverse pattern foot you will succeed in sewing various practical and decorative stitches as well as sewing hems on heavy-weight fabrics such as cord, jeans or wool.
- Page 22 My BERNINA Illustration Number Name Purpose Example Reverse pattern foot With the Reverse pattern foot, you will succeed sewing various practical and decorative stitches as well as sewing hems on heavy-weight fabrics such as cord, jeans or wool. The notch both in...
-
Page 23: Overview User Interface
My BERNINA 1.6 Overview User Interface Overview functions/visual information Upper thread tension Stitch plate/Needle selection Presser foot indicator Feed dog up/down Presser foot pressure Instruction how to thread the bobbin thread Overview System settings Sewing mode eco mode Setup Program... -
Page 24: Overview Selection Menu Sewing
My BERNINA Overview selection menu sewing Practical stitches Buttonholes Decorative stitches Quilt stitches Alphabets Personal Memory Overview Icons Icon Name Purpose i-Dialog Touching the icon «i»-Dialog provides various functions to edit motifs. Close The display is closed and the previously made adjustments are saved. -
Page 25: Needle, Thread, Fabric
My BERNINA Icon Name Purpose Switch Activates or deactivates functions. Process navigation With the process navigation scrolling back in the display is possible. Swipe function By swiping the display using the touchscreen pen or the finger upwards or downwards, further functions can be displayed. - Page 26 My BERNINA Illustration Needle name Needle description Purpose Embroidery needle Small ball point, Embroidery on all especially large needle natural and synthetic 130/705 H-E 75, 90 eye and wide thread fabrics. groove Fine material needle Fine ball point Fine knitware,...
-
Page 27: Example For Needle Description
My BERNINA Example for needle description The 130/705 system, which is the most common for household machines, is explained by the following picture of a Jersey/Stretch needle. 130/705 H-S/70 130 = Shank length (1) 705 = Flat shank (2) H = Needle scarf (3) S = Needle point (here medium ball point) (4) 70 = Needle size 0.7 mm (5) -
Page 28: Needle/Thread Combination
My BERNINA Needle/thread combination The needle/thread combination is correct, when the thread fits perfectly into the long groove and goes easily through the needle eye. The thread can be optimally sewn. The thread can break and skipped stitches can occur when there is too much clearance in the long groove and the needle eye. -
Page 29: Sewing Preparation
Attaching the knee lifter of the Free Hand System (optional accessory) The lateral position of the knee lifter can be adjusted by your local BERNINA Dealer if required. > Insert the knee lifter into the opening at the front side of the machine. -
Page 30: Attaching The Touchscreen Pen (Optional Accessory)
Sewing preparation > Adjust the sitting height so that the knee lifter can be operated with the knee. Attaching the touchscreen pen (optional accessory) > Store the touchscreen pen at the magnet holder. Switching the machine on > Switch on the machine at the main switch to «I». 2.2 Foot control Regulating the speed via the foot control Via the foot control the speed is infinitely variable. -
Page 31: Spool Pin
Sewing preparation > Release the foot control to stop the machine. 2.3 Spool pin Retractable spool pin Lift the spool pin The retractable spool pin is necessary when several threads are sewn and it can also be used for bobbin winding while sewing. -
Page 32: Horizontal Spool Pin
The spool net keeps the thread on the thread spool and prevents the thread from knotting and breaking. > Pull the spool net over the thread spool. 2.4 Free arm The BERNINA 435 provides a solidly designed free arm which offers a lot of space for large project on the right of the needle. 2.5 Feed dog... -
Page 33: Instruction For Adjusting The Feed Dog
Sewing preparation With a short stitch length, the steps are very short. For example when sewing buttonholes and satin stitches. The fabric is fed slowly under the presser foot, even when sewing at maximal speed. Let the fabric be fed evenly; this results in a more perfect stitch formation. -
Page 34: Slide-On Table
Sewing preparation 2.6 Slide-on table Using the slide-on table When attached to the free arm, it expands the already existing sewing area. > Raise the needle. > Raise the presser foot. > Switch the machine off and disconnect it from the power supply system. >... -
Page 35: Changing The Presser Foot Sole
Sewing preparation Changing the presser foot sole Removing the presser foot sole > Raise the needle. > Raise the presser foot. > Switch the machine off and disconnect it from the power supply system. > Push the button at the snap-on shaft. –... -
Page 36: Having The Presser Foot Displayed In The User Interface
Sewing preparation > Remove the presser foot (2). > Guide the new presser foot upwards over the cone. > Press the clamping lever down. Having the presser foot displayed in the User Interface The recommended presser foot for the selected stitch is displayed. In addition to that, optional presser feet can be displayed. -
Page 37: Needle And Stitch Plate
Sewing preparation > Turn the knob to the left to increase the pressure foot pressure. 2.8 Needle and stitch plate Changing the needle > Raise the needle. > Switch the machine off and disconnect it from the power supply system. >... -
Page 38: Selecting The Needle In The User Interface
Sewing preparation Selecting the needle in the User Interface After having changed the needle, it can be checked whether or not it can be used in combination with the selected stitch plate. > Touch the icon «Stitch plate/Needle selection». > Select the inserted needle. Selecting the needle type and the needle size Convenient memory function: To prevent a loss of information, the needle type and the needle size can be saved additionally on the machine. -
Page 39: Needle Stop Up/Down (Permanent)
Sewing preparation > Push the button «Needle right» (2) to move the needle to the right. Needle stop up/down (permanent) > Touch the icon «Needle stop up/down (permanent)» to fix the needle position permanently. – The machine stops with needle position down as soon as the foot control is released or the button «Start/Stop»... -
Page 40: Selecting The Stitch Plate In The User Interface
Sewing preparation Selecting the stitch plate in the User Interface After having changed the stitch plate, it can be checked whether or not it is suitable to be used in combination with the selected needle. > Touch the icon «Stitch plate/Needle selection». >... - Page 41 Sewing preparation > Guide the thread upwards and insert into the thread take-up lever (4). > Guide the thread downwards again (5). > Guide the thread through the guides (6/7) above the foot. > Switch the machine on. > Press the semi-automatic threader lever (8) slightly down, keep pressed and pull the thread to the left beneath the gray threader hook (9).
- Page 42 Sewing preparation > Guide the thread around the gray threader hook from the left to the right (11). > Press the threader lever down as far as it will go (10) and then pull the thread from the left to the right (11) through the threader slot (12) until it hooks into the small wire hook.
-
Page 43: Threading The Double Needle
Sewing preparation Threading the double needle Prerequisite: • The double needle is inserted. > Guide the first thread in direction of the arrow on the right side of the tension disc (1). > Guide the second thread in direction of the arrow on the left side of the tension disc (1). >... -
Page 44: Winding The Bobbin Thread
Sewing preparation > Thread the first thread into the left needle manually. > Thread the second thread into the center needle manually. > Thread the third thread into the right needle manually. Winding the bobbin thread The bobbin thread can be wound while sewing when the retractable spool pin is used for winding. Prerequisite: •... -
Page 45: Threading The Bobbin Thread
Sewing preparation Threading the bobbin thread Prerequisite: • The needle is raised. • The machine is switched off and the bobbin cover is opened. > Press the bobbin case release at the bobbin case (1). > Remove the boobin case. >... - Page 46 Sewing preparation > Pull the thread into the slot (2) from the left. > Pull the thread to the right under the spring (3), then lead the thread under the two thread guides (4) and pull upwards. > When inserting into the machine, hold the bobbin case so the the thread guide (5) points upwards. >...
-
Page 47: Instruction How To Thread The Bobbin Thread
Sewing preparation > Pull the thread through the thread cutter (6) and cut. > Close the bobbin cover. Instruction how to thread the bobbin thread > Touch the icon «Filling level bobbin thread». > Thread the bobbin thread according to the animation. -
Page 48: Setup Program
Setup Program Setup Program 3.1 Sewing settings Adjusting the upper thread tension Adjustments to the upper thread tension in the Setup Program affect all stitch patterns. Individual alterations of the upper thread tension can also be made for currently selected stitches. The setting in the Setup remains active after switching off. -
Page 49: Activating The Audio Signals
Setup Program > Touch the icon «Personal settings». > Select the desired color of the display and the background. > Touch the text box above the color settings. > Enter the welcome text. > Touch the icon «ABC» (standard setting), to use upper-case letters. >... -
Page 50: Machine Settings
Selecting a language The User Interface can be programmed in different languages according to the customer's wish because BERNINA provides a wide range of international languages for the customers. Via firmware updates new languages are provided for the User Interface as appropriate. -
Page 51: Checking The Firmware Version
> Touch the icon «Information». > Touch the icon «Firmware and Hardware Information». Registering details of the dealer The contact details of your specialized BERNINA dealer can be registered. > Touch the icon «Home». > Touch the icon «Setup Program». -
Page 52: Saving Service Data
BERNINA dealer. Saving Service data Service data concerning the status quo of the machine can be saved on a BERNINA USB stick (optional accessory) and then given to the BERNINA dealer. > Insert a BERNINA USB stick (Optional accessory) which provides enough free memory space into the USB port. -
Page 53: Back To Default Setting
Setup Program Back to default setting ATTENTION: Using this function will delete all individually made settings. > Touch the icon «Home». > Touch the icon «Setup Program». > Touch the icon «Machine settings». > Touch the icon «Default settings». > Touch the icon «Default setting sewing». >... -
Page 54: Updating The Machine Firmware
For reasons of safety, it is also recommended to save data and settings on a BERNINA USB stick (optional accessory) before the firmware update is started. If personal data and settings should get lost during a firmware update, they can be transferred to the machine again afterwards. -
Page 55: Recovering Saved Data
If personal data and settings after a software update are not available anymore, they can be transfered to the machine again afterwards. > Insert the BERNINA USB stick (Optional accessory) providing the saved data and settings into the USB port of the machine. - Page 56 Setup Program The Setup Program provides animations how the machine has to be oiled. In chapter «Maintenance and cleaning» there are more illustrated step by step instructions. Always use BERNINA oil to lubricate. > Touch the icon «Home». > Touch the icon «Setup Program».
-
Page 57: System Settings
System settings System settings 4.1 Calling up the Tutorial The Tutorial provides information and explanations on different sections concerning sewing and the various stitches. > Touch the icon «Home». > Touch the icon «Tutorial». > Select the desired topic to get information. 4.2 Calling up the Creative Consultant The Creative Consultant provides information about decision support concerning sewing projects. -
Page 58: Cancelling Any Alterations With «Clr
System settings 4.5 Cancelling any alterations with «clr» Any alterations to motifs can be reset to default setting. Exceptions are saved motifs which have been filed in the personal memory and monitoring functions. > Touch the icon «clr». -
Page 59: Creative Sewing
The default setting of the upper thread tension is made automatically as soon as a stitch pattern is selected. The upper thread tension is set optimally at the BERNINA factory and the machine has been tested. Metrosene-/Seralon thread size 100/2 (Company Mettler, Switzerland) is used for upper and bobbin thread. -
Page 60: Editing Stitch Patterns
Creative sewing When of using other types of sewing threads, the optimal upper thread tension may vary. Therefore it may be necessary to adjust the upper thread tension individually according to the sewing project as well as the desired stitch pattern. The higher the upper thread tension, the tighter the upper thread which means that the bobbin thread is pulled up to the top of the fabric. -
Page 61: Changing The Stitch Length
Creative sewing Changing the stitch length > Turn the «Lower Multifunction knob» to the left to shorten the stitch length. > Turn the «Lower Multifunction knob» to the right to elongate the stitch length. > Touch the icon «Stitch length» (1). >... -
Page 62: Mirror Image Of Stitch Patterns
Creative sewing > Touch the icon «Pattern repeat» once to repeat the stitch pattern. > Touch the icon «Pattern repeat» again to repeat the stitch pattern up to 9 times. > Keep the icon «Pattern repeat» pressed to deactivate the stitch pattern repeat. Mirror image of stitch patterns >... -
Page 63: Combining Stitch Patterns
Creating Stitch pattern combinations In the Combi mode stitch patterns and alphabets can be combined according to your wish. By combining any alphabet letters, the logo BERNINA can be created. > Touch the icon «Single/Combi mode». > Select the desired stitch patterns. -
Page 64: Overwriting A Stitch Pattern Combination
Creative sewing Loading a stitch pattern combination > Touch the icon «Single/Combi mode». > Touch the icon «Personal memory». > Touch the icon «Selection of stitch pattern combination». > Select a stitch pattern combination. Overwriting a stitch pattern combination > Create a stitch pattern combination. >... -
Page 65: Deleting A Single Stitch Pattern
Creative sewing > Touch the icon «i»-Dialog to edit the single stitch pattern. Deleting a single stitch pattern > Create a stitch pattern combination. > With the touchscreen pen/finger touch the desired position (1) within the stitch pattern combination to select a single stitch pattern. -
Page 66: Mirroring A Stitch Pattern Combination
Creative sewing > With the touchscreen pen/finger touch the desired position (1) within the stitch pattern combination to select a single stitch pattern. > Select a new stitch pattern. Mirroring a stitch pattern combination > Create a stitch pattern combination. >... -
Page 67: Administering Stitch Patterns
Creative sewing > Touch the icon «Edit the whole combination». > Touch the icon «Pattern repeat» once to repeat the stitch pattern combination. > Touch the icon «Pattern repeat» again to repeat the stitch pattern combination up to 9 times. >... -
Page 68: Securing
Creative sewing Deleting stitch patterns from the personal memory Prerequisite: • The stitch pattern is saved in the personal memory. > Touch the icon «Personal memory». > Touch the icon «Delete». > Select the file where the stitch pattern has been saved. >... -
Page 69: Sewing Corners
Creative sewing > Sew until the complete presser foot has passed the thick seam. > Remove the plates of the height compensation. 5.9 Sewing Corners When sewing corners, only a small section of the fabric is actually on the feed dog. Therefore it cannot grip the fabric well. -
Page 70: Practical Stitches
Practical stitches Practical stitches 6.1 Overview Practical stitches Stitch Stitch Name Description pattern number Straight stitch Seams and topstitching. Zig zag Reinforcing seams, finishing edges, sewing elastic seams and attaching lace. Vari overlock Sewing and finishing in one step of elastic fabrics. - Page 71 Practical stitches Stitch Stitch Name Description pattern number Gathering stitch Most types of fabric; gathering with shirring elastic, butted seams = butting two pressed edges and sewing together, decorative stitches. Stretch overlock Sewing and finishing elastic fabrics in one step. Tricot stitch Visible hems, visible seams in lingerie, sweaters, mending jersey.
-
Page 72: Sewing Straight Stitch
Practical stitches Stitch Stitch Name Description pattern number Single Straight stitch Used as a connecting stitch in a combination. Three Single Straight As connecting stitches in a combination. stitches 6.2 Sewing straight stitch Match the stitch length with the sewing project, which means for denim fabrics long stitches (ca. 3 – 4 mm), for fine fabrics short stitches (ca. -
Page 73: Securing With The Automatic Securing Program
Practical stitches 6.3 Securing with the automatic Securing Program Due to a defined number of sewn stitches, 5 stitches forward and 5 stitches in reverse, securing is done evenly. Prerequisite: • The Reverse pattern foot No. 1 is attached. > Touch the icon «Practical stitches». >... -
Page 74: Sewing Both Sides Of The Zipper From Bottom To Top
Practical stitches > Attach the Reverse pattern foot No. 1. > Touch the icon «Practical stitches». – The Straight stitch No. 1 is selected automatically. > Sew the seam up to where the zipper starts. > Sew the securing stitches. >... -
Page 75: Sewing Triple Straight Stitch
Practical stitches > Use the Free Hand System to raise the presser foot and to position the sewing project. > Start sewing in the center of the seam at the end of the zipper. > Sew diagonally along the edge of the zipper coils. >... -
Page 76: Sewing Triple Zig Zag
Practical stitches 6.7 Sewing Triple zig zag For firm fabrics, especially for denim, deckchair covers, awnings. Hems on items that need frequent washing. Finish the hem edges first. > Attach the Reverse pattern foot No. 1. > Touch the icon «Practical stitches». >... - Page 77 Practical stitches > Sew from the left to the right, guide the fabric evenly by hand without using pressure. > Move in curves when changing the direction to avoid holes and thread breakage. > Work the rows in irregular lengths so that the thread is better spread over the fabric. >...
-
Page 78: Automatic Darning
Practical stitches > Sew another loose row. 6.9 Automatic darning The simple Darning Program No. 22 is especially suitable for quick darning of worn or damaged areas or snags. It is recommended to use fine material as a backing for the worn and damaged areas or to stick an adhesive interlining. -
Page 79: Reinforced Darning, Automatic
NOTICE! This program can only be used with the Buttonholefoot No. 3A which is only available as optional accessory at the specialized BERNINA retailers in some markets. The reinforced Darning Program No. 23 is especially suitable for quick darning of worn or damaged areas. -
Page 80: Finishing Edges
Practical stitches 6.11 Finishing edges The Zig zag No. 2 is suitable for all materials. It can also be used for elastic seams as well as for decorative sewing. Use darning thread for fine materials. When sewing satin stitch, it is recommended to select a dense, short the zig zag with a stitch length of 0.5 –... -
Page 81: Narrow Edgestitching
Practical stitches > Attach the Reverse pattern foot No. 1 or the Overlock foot No. 2. > Touch the icon «Practical stitches». > Select the Double overlock No. 10. 6.13 Narrow edgestitching > Attach the Blindstitch foot No. 5 or the Reverse pattern foot No. 1 or the Edge stitch foot No. 10 (optional accessory). -
Page 82: Sewing Blind Hems
Practical stitches > Attach the Blindstitch foot No. 5 or the Reverse pattern foot No. 1 or the Edge stitch foot No. 10 (optional accessory). > Touch the icon «Practical stitches». – The Straight stitch No. 1 is selected automatically. >... -
Page 83: Sewing Visible Hems
Practical stitches > After sewing about 10 cm (ca. 3.93 inch) check both sides of the fabric and adjust the width again if necessary. 6.17 Sewing visible hems The visible hem is especially suitable for elastic hems in jersey, cotton, wool, synthetic and blended materials. >... -
Page 84: Sewing Flat Joining Seams
Practical stitches 6.18 Sewing flat joining seams The flat joining seam is especially suitable for long-pile or thick materials such as terry cloth, felt or leather. > Attach the Reverse pattern foot No. 1. > Touch the icon «Practical stitches». >... - Page 85 Practical stitches > Select the Basting stitch No. 30. > Pin the fabric layers at a right angle to basting direction to prevent the layers from slipping. > Hold the threads and sew 3 – 4 securing stitches at the beginning. >...
-
Page 86: Decorative Stitches
Decorative stitches Decorative stitches 7.1 Overview Decorative Stitches Depending on the type of material, simple or more complex decorative stitches should be selected to best suit the material. • Decorative stitches which are programmed with simple straight stitches are particularly appropriate for light-weight materials, e.g. -
Page 87: Sewing Cross Stitches
Decorative stitches 7.2 Sewing cross stitches Cross stitch embroidery is a traditional technique and a charming addition to the other decorative stitches. If the cross stitches are sewn on a fabric with a linen texture, they look like hand-stitched cross stitching. When cross stitches are sewn with embroidery yarn, the stitch pattern appears fuller. -
Page 88: Overview Pintucks
Decorative stitches Overview pintucks Pintuck foot Number Description 30 (optional accessory) 4 mm double needle: for heavy fabrics. 3 grooves 31 (optional accessory) 3 mm double needle: for heavy to medium-weight fabrics. 5 grooves 32 (optional accessory) 2 mm double needle: for light to medium-weight fabrics. -
Page 89: Sewing Pintucks
Decorative stitches > Place the cord spool on the knee lifter. > Check that the cord runs smoothly. > If the thread doesn't glide smoothly at the bobbin cover, leave the bobbin cover open. Sewing Pintucks The cord lies on the wrong side of the material and is held/sewn over by the bobbin thread. >... -
Page 90: Alphabets
Alphabets Alphabets 8.1 Overview Alphabet Block, Double block and Script alphabets can be sewn in lower case letters. For a perfect stitch formation, use the same thread color for upper and bobbin threads. The fabric can be reinforced with embroidery stabilizer on the wrong side. When working with pile or napped fabrics, e.g. toweling, use an additional, water-soluble stabilizer on the right side of the fabric. - Page 91 Alphabets > Select the letters. > Touch the icon (2) (standard setting) to use upper case letters. > Touch the icon (3) to use lower case letters. > Touch the icon (4) to use figures. > Touch the icon (5) to use special characters and mathematical symbols. >...
-
Page 92: Buttonholes
Buttonholes 9.1 Overview Buttonholes To create the correct buttonhole for every button, every purpose and for every garment, your BERNINA 435 is equipped with a considerable collection of buttonholes. The corresponding button can be sewn on automatically. Eyelets can also be sewn. -
Page 93: Making Use Of The Height Compensation Tool
Buttonholes Buttonhole Buttonhole Name Description number Straight-stitch eyelet Openings for cords and narrow ribbons, for decorative work. 9.2 Making use of the height compensation tool When a buttonhole is to be sewn at right angles to the project edge, it is recommend to use the height compensation plates (optional accessory). -
Page 94: Marking Buttonholes
Buttonholes 9.4 Marking buttonholes > For the buttonholes to be sewn manually, mark the position and the length on the fabric using chalk or a water-soluble pen. > For the buttonholes to be sewn automatically, mark the complete length of 1 buttonhole on the fabric using chalk or a water-soluble pen. -
Page 95: Cord
Buttonholes 9.5 Cord Using cord with the Buttonhole foot No. 3 Prerequisite: • The Buttonhole foot No. 3 is attached and raised. > Insert the needle at the beginning of the buttonhole. > Hook the cord over the pin at the front of the buttonhole foot. >... -
Page 96: Using Cord With The Buttonhole Foot No. 3A (Optional Accessory)
Buttonholes > Pull the ends of the cord through to the wrong side of the fabric (using a hand stitching-needle), knot or secure with stitches. Using cord with the Buttonhole foot No. 3A (optional accessory) The cord reinforces and enhences the buttonhole and is particularly suitable for the Buttonhole No. 51. Optimal cord is Perle cotton No. -
Page 97: Sewing A Test Sample
Buttonholes > Lower the buttonhole foot with slide. > Sew the buttonhole in the usual manner. > Pull the cord through the buttonhole until the loop disappears in the bartack. > Pull the ends of the cord through to the wrong side of the fabric (using a hand stitching-needle), knot or secure with stitches. -
Page 98: Determining The Buttonhole Length With The Buttonhole Foot With Slide No. 3A
Buttonholes > Touch the icon «Buttonholes». > Select the buttonhole. > Touch the icon «i»-Dialog. > Touch the icon «Program the length with the stitch counter». > Sew the desired buttonhole length. > Stop the machine. > Push the button «Quick reverse» so that the machine sews the lower bartack and the second bead in reverse. -
Page 99: Sewing The Manual 5-Step Buttonhole With The Buttonhole Foot No. 3
Buttonholes > Touch the icon «Buttonholes». > Select the Buttonhole No. 51. > Touch the icon «i»-Dialog. > Touch the icon «Adjust the length manually». – Step 1 in the display is activated for the buttonhole start. > Sew the desired buttonhole length. –... - Page 100 Buttonholes > Touch the icon «i»-Dialog. > Touch the icon «Adjust the length manually». – Step 1 the display is activated for the buttonhole start. > Sew the desired buttonhole length. – Step 2 is activated. > Stop sewing at the desired length of the bead or at the marking. >...
-
Page 101: Sewing A Buttonhole Automatically With The Buttonhole Foot With Slide No. 3A
When the Buttonhole foot with slide No. 3A is not included in the standard accessory, it can be purchased as optional accessory at the specialized BERNINA retailers. When the Buttonhole foot with slide No. 3A is used, the length of the buttonhole is measured automatically by the lens on the presser foot. -
Page 102: Cutting The Buttonhole Open With The Seam Ripper
Buttonholes > Push the button «Start/Stop» or press the foot control. – The machine finishes the buttonhole automatically. All subsequent buttonholes are sewn at the same length. 9.12 Cutting the buttonhole open with the seam ripper > Place a pin in each end of the buttonhole to avoid accidental cutting into ends of buttonhole. >... -
Page 103: Sewing On Buttons
Buttonholes 9.14 Sewing on buttons With the Button sew-on Program buttons with 2 or 4 holes can be sewn on. To reinforce the stability the Button sew-on Program can be sewn twice. When sewing on a button with 4 holes, the front holes should be sewn first. -
Page 104: Quilting
Quilting 10 Quilting 10.1 Overview Quilt Stitches Stitch Stitch Name Description patterns number 1301 Quilting, Securing To secure at the sewing start and sewing end Program with short stitches forward. 1302 Quilting straight stitch Straight stitch at 3 mm stitch length. 1303 Piecing stitch/Straight Straight stitch at 2 mm stitch length. -
Page 105: Sewing Handlook Quilt Stitches
Quilting 10.3 Sewing handlook quilt stitches Handlook quilt stitches are suitable for all fabrics and sewing projects which should look hand sewn. It is recommended to use a monofilament thread as upper thread and an embroidery thread as bobbin thread. The sewing speed should be moderate to prevent the monofilament from breaking. - Page 106 Quilting It is recommended to use the slide-on table and the Free Hand System. With free-motion quilting, it is of advantage to quilt from the center outwards and to guide the fabric using smooth, round movements to form the design of your choice. Free-motion quilting and darning are based on the same free-motion principles.
-
Page 107: Attachment
Attachment 11 Attachment 11.1 Maintenance and cleaning Cleaning the display > Clean the display when it is switched off with a soft slightly damp microfiber cloth. Cleaning the feed dog CAUTION Electronically driven components Risk of injury near the needle and the hook. >... -
Page 108: Lubricating The Hook
Attachment > Remove the hook. > Clean the hook race with a brush; do not use any pointed objects. > Hold the hook at the pin in the center with two fingers. > Lead the hook, lower edge ahead, angular top-down behind the hook race cover. >... - Page 109 > Remove the hook. > Give one drop of BERNINA oil down in the hook race. > Give one drop of oil in each of the two oil depots so that the felts are damp and make sure that the red- marked surface of the hook sleeve remains free of oil.
-
Page 110: Troubleshooting
Upper thread too tight or too > Adjust the upper thread tension. loose. Needle blunt or bent. > Replace the needle, make sure that a new BERNINA quality needle is used. Poor quality needle. > Use a new BERNINA quality needle. - Page 111 > Rethread. Poor quality thread. > Use quality thread. The stitch plate or the hook tip is > Contact the nearest specialized BERNINA dealer to have damaged. the damages repaired. > Replace the stitch plate. The thread is caught in the area >...
- Page 112 > Place the machine in a warm room one hour before use. > Connect the machine and switch it on. The machine is damaged. > Contact the specialized BERNINA dealer. Error during software update USB stick is not recognized. > Use a BERNINA USB stick.
-
Page 113: Error Messages
Too less free capacity on the Not enough free capacity on the > Make sure that the BERNINA USB stick (optional BERNINA USB stick (optional BERNINA USB stick (optional accessory) is used. - Page 114 Message on the display Cause Repair No BERNINA USB stick is inserted. The BERNINA USB stick (optional > Use a BERNINA USB stick (optional accessory) providing Make sure that during the accessory) is not inserted. enough free capacity. complete automatic update always the same BERNINA USB stick remains inserted.
-
Page 115: Storage And Disposal
> Protect the machine against climatic influences. Dispose of the machine BERNINA International AG is committed to the protection of the environment. We strive to minimize the environmental impact of our products by continuously improving product design and our technology of manufacturing. -
Page 116: Technical Data
Attachment 11.5 Technical data Term Value Measurement unit Maximum fabric thickness 10.5 (0,41) mm (inch) Sewing light Maximum speed spm/rpm Measurements without the spool pin 465/330/200 (18.30/12.99/7.87) mm (inch) Weight 10.0 Energy consumption Watt Input voltage 100-240 Volt Protection class (Electrical engineering) Production date: Can be seen on the type plate under «Code». -
Page 117: Overview Stitch Patterns
Overview stitch patterns 12 Overview stitch patterns 12.1 Overview Stitch patterns Practical stitches Buttonholes Decorative stitches Natural stitches Cross stitches... - Page 118 Overview stitch patterns Satin stitches Ornamental stitches Heirloom stitches Children stitches...
- Page 119 Overview stitch patterns Quilt stitches 1301 1302 1303 1304 1305 1306 1307 1308 1309 1310 1311 1313 1314...
-
Page 120: Index
Index Activating the audio signals 50 Maintenance and Cleaning 108 Adjusting pressure foot position via knee lifter 35 Adjusting the brightness of the display 51 Needle stop up/down (permanent) 40 Adjusting the maximum sewing speed 49 Needle, Thread, Fabric 26 Adjusting the upper thread tension 49 Needle/thread combination... - Page 121 Index Updating the machine Firmware 55 Using a spool net 33 Using eco mode 58 Welcome to the world of BERNINA 14...