Table of Contents
Advertisement
Operating and
Maintenance Manual
CR 1
CR 2
Robin-Subaru EX 17
Item no. 000115502
Item no. 000115505
Item no. 000115602
CR 1_CR 2R
Weber Maschinentechnik GmbH
Im Boden 5 - 8, 10
57334 Bad Laasphe-Rückershausen / Germany
Telephone +49 (0) 27 54 / 398-0
Fax +49 (0) 27 54 / 398-101
E-Mail: info@webermt.de
Web: www.webermt.de
1
Advertisement
Table of Contents

Subscribe to Our Youtube Channel
Related Manuals for Weber mt CR 1


Summary of Contents for Weber mt CR 1
- Page 1 Operating and Maintenance Manual CR 1 CR 2 Robin-Subaru EX 17 Item no. 000115502 Item no. 000115505 Item no. 000115602 Weber Maschinentechnik GmbH Im Boden 5 - 8, 10 57334 Bad Laasphe-Rückershausen / Germany Telephone +49 (0) 27 54 / 398-0 Fax +49 (0) 27 54 / 398-101 E-Mail: info@webermt.de...
- Page 2 CR 1_CR 2R...
-
Page 3: Table Of Contents
Table of contents Introduction Safety guidelines Graphic presentation Device description Technical data Activities prior to starting work Starting Compacting Shutting down Maintenance overview Maintenance work Operating fluids and fill levels Troubleshooting Storage Contact addresses CR 1_CR 2R... -
Page 4: Introduction
Introduction This operating and maintenance manual is designed to facilitate familiarization with your soil compactor, and to enable you to maintain the compactor and use it for its intended purpose. When complying with the instructions in the operating and maintenance manual you help avoid hazards, reduce repair and downtime costs, and increase the reliability and service life of your compactor. -
Page 5: Safety Guidelines
The soil compactor should only be used if it is in a technically faultless condition, as intended, in a safety-conscious and hazard-conscious manner, in compliance with the instructions in the operating manual. Malfunctions that impair safety must be eliminated without delay. The CR 1/CR 2 soil compactor is designed exclusively for compacting – sand – gravel –... - Page 6 Operation Prior to starting work the owner of the compactor must be familiar with the work environment. The work environment includes obstacles in the work and traffic area, the bearing capacity of the ground, as well as the necessary safeguarding of the construction site in the area adjacent to public traffic; and it includes compliance with traffic regulations.
- Page 7 Maintenance and repair work Only use original Weber spare parts to ensure reliable and safe operation for maintenance or repair work. Hydraulic hose lines must be checked at regular intervals in accordance with standard engineering practice, or they must be replaced at appropriate intervals, even if no signs of safety-relevant defects are present.
- Page 8 Inspection Compactors must be inspected in accordance with the corresponding implementation conditions and operating conditions, as needed; however an inspection to ensure operationally safe status must be performed by an expert at least once a year. The results of the inspection must be recorded in writing and must be stored at least until the next inspection.
-
Page 9: Graphic Presentation
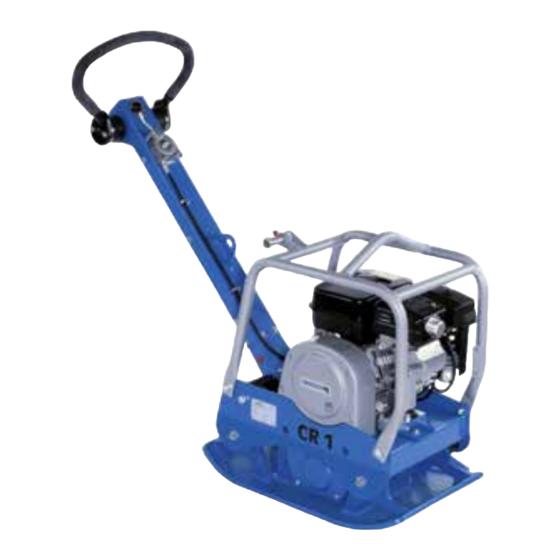
Graphic presentation Overall view CR 1 1 Engine 2 Drive lever 3 Manual guidance rod 4 Lifting ring 5 Base plate 6 Protective frame 7 Exciter 8 Gas lever 9 Hearing protection (sticker) CR 1_CR 2R... -
Page 10: Device Description
Device description The CR 1/CR2 compactor is used for road building and landscaping compaction tasks. Drive The machine is propelled by an air-cooled Robin-Subaru gasoline engine. Force is transferred to the exciter mechanically via a V-belt. Operation The Robin-Subaru gasoline engine is started by means of a manual starting device. -
Page 11: Technical Data
Technical data CR 1 R CR 2 R Weight Operating weight CECE in kg (basic device) Dimensions 1044 1079 Overall length (in mm) Overall width (in mm) Height with folded manual guidance rod (in mm) 1006 1061 Base plate length (base in mm) - Page 12 1 Description 2 TYPE ..........................3 Serial number 4 Year of construction ..........................5 Mass 6 Rated power kW ..........................CR 1_CR 2R...
-
Page 13: Activities Prior To Starting Work
Activities prior to starting work Transport When transporting the soil compactor on a vehicle, secure it with suitable restraints. Arrest the manual guidance rod (1) with the spring bolt (2). Fit the crane hook into the protective frame (1) and lift the machine onto the means of transport selected. - Page 14 Installing the protective mat Fasten the protective mat with holder, screws, spring-lock washers and nuts on the base plate front and rear Ensure that the protective mat rests under the base plate. Transport with hand truck Arrest the manual guidance rod (1) with the spring bolt (2). Mount the retaining pin (1).
-
Page 15: Starting
Mounting the water sprinkling system Use the screws (2) on both sides and the star-knob screw (3) to fasten the water tank (1). Starting Turn the short-circuit button (1) to the “ON” position. Bring the gas lever (1) into full-throttle position. Slide the choke lever (1) to the left (close). -
Page 16: Compacting
Slowly tighten the handle (1) of the reversing starter (2) until resistance is noticeable. Allow the handle (1) to glide back into the initial position, and then forcefully and completely pull it through with both hands. After the engine has warmed up, slide the choke lever to the right (open). -
Page 17: Maintenance Overview
Maintenance overview Maintenance interval Maintenance point Maintenance activity After the first Engine – Change the engine oil 10 operating hours – Re-tighten all accessible threaded connections Every 8 operating Air filter – Clean air filter insert, hours / daily check for damage, replace if necessary Every 50 operating Engine... -
Page 18: Maintenance Work
Maintenance work Change the engine oil Remove the water tank (1). Unscrew dip stick (1). Remove the oil drain screw (2) and drain oil completely. Only drain engine oil when at operating temperature. Screw the oil drain screw back in and fill the engine with oil as specified. - Page 19 Changing the oil in the exciter Remove the oil drain screw (1) and drain oil. To fill – tilt the machine slightly and fill with fresh oil through the drain opening in accordance with the fill level table. Select a collection vessel that is large enough to prevent oil from spilling on the ground.
-
Page 20: Operating Fluids And Fill Levels
Operating fluids and fill levels Assembly Operating material Quantity Quantity Summer Winter CR 1 R CR 2 R Quality Engine SAE 10 W 40 0.6 l 0.6 l Engine oil (–10 ~ +50 °C) API – CD CE-CF-CG or SHPD or CCMC –... -
Page 21: Storage
Actions to be taken before long-term storage (longer than a month) Entire soil compactor – Clean thoroughly – Check for leaks – If there are leaks, correct defects Fuel tank – Empty fuel and fill with clean fuel up to the lower edge of filler neck Engine –... - Page 22 CR 1_CR 2R...
-
Page 23: Contact Addresses
+ 48 (0) 22 - 739 70 – 82 05-830 Stara Wies E-Mail info@webermt.com.pl In Tschechien WEBER MT s.r.o. Telefon + 42 (0) 776 222 216 V Piskovne 2054 + 42 (0) 776 222 261 278 01 Kralupy nad Vitavou E-Mail info@webermt.cz... - Page 24 > Vibration plates > Vibrating tampers > Vibration rollers > Joint cutters > Internal vibrators and converters > Rollers Weber MASCHINENTECHNIK GmbH Im Boden 57334 Bad Laasphe-Rückershausen Telephone +49 (0) 27 54 / 398-0 – Fax +49 (0) 27 54 / 398-101 CR 1_CR 2R...
Need help?
Do you have a question about the CR 1 and is the answer not in the manual?
Questions and answers