Table of Contents
Advertisement
Quick Links
Advertisement
Table of Contents

Summary of Contents for Pyramid Time Systems TIMETRAX Sync 5300
- Page 1 Bell Ringer Installation Instructions pyramidtimesystems.com...
- Page 2 TIMETRAX™ SYNC 5300 BELL RINGER Installation Instructions OVERVIEW Thank you for choosing a TimeTrax Sync™ 5300 Bell Ringer. The TimeTrax Sync™ 5300 directs bells and horns (sold separately) to promote accountability, productivity and punctuality with standardized class changes, shift changes, production schedules, arrival time, breaks and departure time.
-
Page 3: Table Of Contents
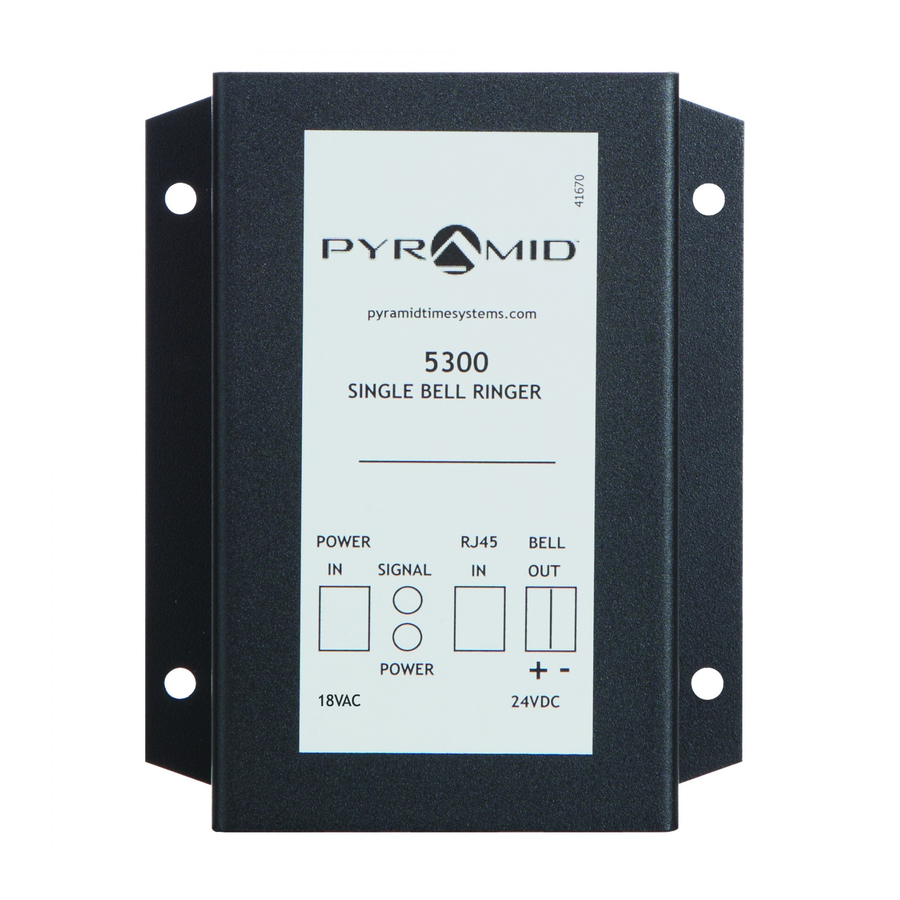
TIMETRAX™ SYNC 5300 BELL RINGER Installation Instructions CONTENTS Bell Ringer Installation Instructions pyramidtimesystems.com 5300 SINGLE BELL RINGER POWER RJ45 BELL SIGNAL POWER 24VDC Power Adapter pyramidtimesystems.com TimeTrax Sync™ 5300 5300 Bell Ringer User Guide Mounting Screws (4) RJ45 Cable RJ45 Splitter Cable Wall Anchors (4) pyramidtimesystems.com CONTENTS... -
Page 4: Pyramidtimesystems.com
TIMETRAX™ SYNC 5300 BELL RINGER Installation Instructions WALL MOUNTING pyramidtimesystems.com 5300 SINGLE BELL RINGER POWER RJ45 BELL SIGNAL POWER 24VDC Select a location for mounting. Power outlet should be within 5 feet of mounting location. Hold the case in desired location and mark holes for drilling. Drill holes for mounting. For sheet rock walls, use plastic anchors. -
Page 5: Pyramidtimesystems.com
TIMETRAX™ SYNC 5300 BELL RINGER Installation Instructions INSTALLATION The 5300 Bell Ringer requires one of the following Pyramid interface products for operation; 4000, 4000HD, 5000HD, PSDLAUBKK, TTPROXEK, TTELITEEK, 9T1WI, S9DWXSLAUB. Prior to installation, make sure the time is set on the time clock or transmitter from which bell/horn signal will be sent. - Page 6 TIMETRAX™ SYNC 5300 BELL RINGER Installation Instructions INSTALLATION (Cont.) Insert RJ45 cable into the BCD port located on the bottom of the 5300 case. Insert other end RJ45 cable into BCD port on the side or back of time clock. The top light will turn green, signaling connection (this can take up to 2 minutes).
- Page 7 TIMETRAX™ SYNC 5300 BELL RINGER Installation Instructions BELL/HORN CONNECTION Connect 24Volt DC bell or horn to the 5300 bell ringer by pushing the bell wire into the connector located on the far right of the bottom of the 5300. Positive (red) is on the left, and negative (black) is on the right.
-
Page 8: User Guide
IMPORTANT: Duplicate card numbers must NOT be used within the same pay period AMOUNT pyramidtimesystems.com Form 44100-10 Rev. K © 2001 PYRAMID TIME SYSTEMS, LLC EARNINGS DEDUCTIONS IMPORTANT: Duplicate card numbers must NOT BALANCE be used within the same pay period pyramidtimesystems.com... -
Page 9: Power Adapter
TIMETRAX™ SYNC 5300 BELL RINGER Installation Instructions SPECIFICATIONS SPECIFICATIONS Zones Single Signal Devices 41361 6” 24V DC bell, 41392 8” 24V DC bell 41362 24V DC horn Max Load 1 amp Compatible Signal 4000, 4000HD, 4000Pro, 5000, 5000HD Auto Devices Totaling Time Clocks, PSDLAUBKK, TTPROXEK, TTELITEEK Elite Time Clock Systems, 9T1WI, S9DWXSLAUB RF Wireless Transmitters... - Page 10 TIMETRAX™ SYNC 5300 BELL RINGER Installation Instructions WARRANTY 1-YEAR LIMITED WARRANTY Pyramid warranties its Synchronized Clock Systems to the original user against defective material or workmanship for a period of 1 year from date of purchase. The manufacturer’s responsibility under this Warranty is limited to repair or replacement of defective part or parts. Pyramid re- serves the right to determine whether parts failed because of defective material, workmanship, or other causes.
- Page 11 THIS PAGE DOES NOT PRINT this page not needed...
- Page 12 CONTACT US: For more information, visit pyramidtimesystems.com or call our technical support team at 888.479.7264 during regular business hours: 8am-5pm EST, Monday-Friday. Copyright © 2017 Pyramid Time Systems, LLC. All rights reserved. I2037 Rev. F...
Need help?
Do you have a question about the TIMETRAX Sync 5300 and is the answer not in the manual?
Questions and answers