Advertisement
Quick Links
Figure 3: Optimum Positioning
CAN PUSHER INSERT ONLY FITS ONE WAY, WITH THE
2 PUSHERS ON THE SAME SIDE AS THE 2 LEDs
BOW
STERN
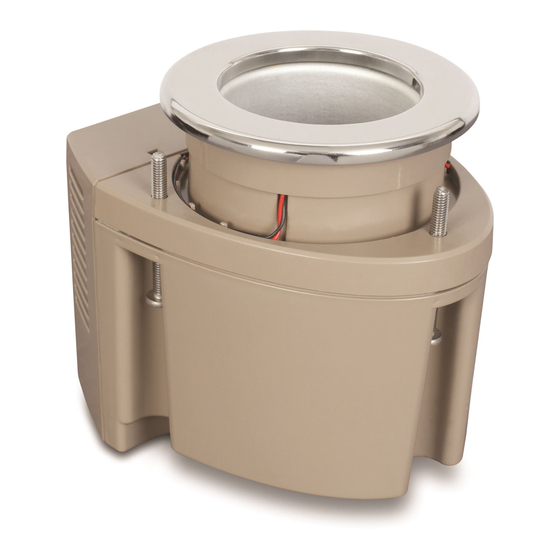
Figure 4: Upper Trim Ring Installation Procedure
S
PECIFICATIONS
Amps
Power
Dimensions
H x W x D
3.1
12V DC
6.23 x 5.36 x 6.85 in
159 x 137 x 174 mm
P
N
ART
UMBERS
Eskimo Cup
250140101
Spare Part, Trim Ring
250140250
Spare Part, LED
250140201
COPYRIGHT © 2014-2015 Dometic Corporation. All Rights Reserved.
No part of this publication may be reproduced, translated, stored in a retrieval system, or transmitted in any
form or by any means electronic, mechanical, photocopying, recording or otherwise without prior written con-
sent by Dometic Corporation. Every precaution has been taken in the preparation of this manual to ensure its
accuracy. However, Dometic Corporation assumes no responsibility for errors and omission. Neither is any lia-
bility assumed for damages resulting from the use of this product and information contained herein.
4
CAN PUSHER INSERT
FOR OPTIMUM COOLING HAVE BEVERAGE
CONTACT THIS SIDE OF COOLER
U
SAGE
This appliance can be used by
children aged from 8 years and
above and persons with reduced
physical, sensory or mental
capabilities or lack of experience
and knowledge if they have been
given supervision or instruction
concerning use of the appliance
in a safe way and understand the
hazards involved.
Children shall not play with the
appliance. Cleaning and user
maintenance shall not be made
by children without supervision.
Interior
Cutout
Power Cord
Diameter
Diameter
Length
2.95 in
4.0 in
16 in
75 mm
102 mm
407 mm
Spare Part, Fan
250140202
Spare Part, Can Pusher Insert
250140203
Eskimo Cup
Installation & Operation
Manual
O
VERVIEW
The Dometic Eskimo Cup is a thermoelectric
refrigerated cup holder. It is designed to
accommodate mounting into surfaces of various
thicknesses.
A polished marine-quality 316 stainless-steel trim
ring finishes the surface installation and is
accented with two blue LED interior lights.
S
P
AFETY
RECAUTIONS
CAUTION
Do not over tighten mounting screws. Do not use a power driver. Tighten by hand
ONLY!
To mount the unit, tighten the 3 mounting screws evenly until they contact the
underside of the mounting surface. For hard surfaces, tighten the unit down evenly
by tightening each of the 3 screws 1 additional full revolution after surface contact.
For soft surfaces, tighten each of the 3 screws 2 additional full revolutions after
surface contact.
CAUTION
•
Do not use an abrasive cleaner to clean the stainless-steel trim ring. It will
scratch the surface.
•
Do not use an abrasive cleaner to clean the cooler bore. It has an anti-stick
coating and it will be damaged.
CAUTION
Eskimo Cup may freeze beverages in cold ambient temperatures.
CAUTION
Weight
Ventilation is required to dissipate heat, otherwise poor performance and
overheating may occur..
33.75 oz
I
P
0.96 kg
NSTALLATION
(For a quick video overview, see "How to Install the Dometic Eskimo Cup" on YouTube.com)
Choosing the Location
Choose an installation location that does not interfere with existing below-deck objects and
has enough ventilation below the surface to help dissipate the heat of 150 BTUs generated
by the thermoelectric process. Allow 6 in (15 cm) of space on all sides of the unit. See
Figures 1 and 2. Note: If space underneath does not have proper ventilation, an
optional vent or power vent might have to be installed to remove the built-up heat or
unit will not cool your beverage properly.
Do NOT locate in area where under-mounted portion of unit will receive frequent seawater
exposure or deck wash down.
See Figure 2 for detailed dimensions. For optimum performance, mount the Eskimo Cup
with the LED lights (rounded end) toward the bow or uphill to allow gravity to pull the
beverage toward the coldest side of the cooler bore. See Figure 3.
L-3423 - Rev 20150515 - P/N 337817
ROCEDURE
1
Advertisement

Subscribe to Our Youtube Channel
Related Manuals for Dometic Eskimo Cup


Summary of Contents for Dometic Eskimo Cup
- Page 1 See Figure 2 for detailed dimensions. For optimum performance, mount the Eskimo Cup sent by Dometic Corporation. Every precaution has been taken in the preparation of this manual to ensure its with the LED lights (rounded end) toward the bow or uphill to allow gravity to pull the accuracy.
- Page 2 With the power off, attach the wires of the Eskimo Cup to the wiring of that switch; the red wire is positive and the black wire is negative. Each unit has a 5 amp fuse built into its wiring which should be positioned in an accessible location.
Need help?
Do you have a question about the Eskimo Cup and is the answer not in the manual?
Questions and answers