Keithley 2280 Series Quick Start Manual
Precision measurement dc power supplies
Hide thumbs
Also See for 2280 Series:
- Reference manual (399 pages) ,
- Reference manual (457 pages) ,
- Quick start manual (23 pages)
Table of Contents
Advertisement
Quick Links
Download this manual
See also:
Reference Manual
Advertisement
Table of Contents

Subscribe to Our Youtube Channel
Related Manuals for Keithley 2280 Series


Summary of Contents for Keithley 2280 Series
- Page 1 Series 2280 Precision Measurement DC Power Supplies Quick Start Guide...
-
Page 2: Safety Precautions
Keithley Instruments products are designed for use with electrical signals that are This product is intended for use by qualified personnel who recognize shock hazards measurement, control, and data I/O connections, with low transient overvoltages and and are familiar with the safety precautions required to avoid possible injury. - Page 3 Do not connect switching cards directly to unlimited power circuits. They are intended Do not exceed the maximum signal levels of the instruments and accessories, as to be used with impedance-limited sources. NEVER connect switching cards directly defined in the specifications and operating information, and as shown on the to AC mains.
-
Page 4: Power And Environmental Specifications
(note that selected parts should be purchased Pollution degree only through Keithley Instruments to maintain accuracy and functionality of the product). If you are unsure about the applicability of a replacement component, call a Keithley Instruments office for information. -
Page 5: Cd-Rom Contents
Introduction Model Description number Thank you for choosing a Keithley Instruments product. The Series 2280S-32-6 Precision Measurement Programmable DC Power Supply. 32 V, 6 A 2280 Precision Measurement DC Power Supplies are high-sensitivity, 2280S-60-3 Precision Measurement Programmable DC Power Supply. 60 V, 3.2 A... -
Page 6: Unpack And Inspect The Instrument
Unpack and inspect the instrument To unpack and inspect the instrument: Inspect the box for damage. Open the top of the box. Remove the bag that contains the documentation, standard accessories, CD-ROM, and cable housing. Remove the packaging insert. Remove the Series 2280 from the box. Do not lift the Series 2280 from the front bezel. - Page 7 Y ou should have received the Series 2280 with the following accessories, shown in the photograph: 1 Power line cord 2 KKS-903-01C KickStart Quick Start Guide 3 Series 2280 Quick Start Guide (this document) 4 Series 2280 Precision Measurement DC Power Supplies Product Information CD-ROM 5 Model CA-180-3A CAT5 Crossover Cable for Ethernet 6 PA-853D User's Guide Safety Standards Conformance...
-
Page 8: Connect The Instrument
42.4 V peak, or 60 V DC Use high-reliability fail- safe interlock switches to disconnect for equipment rated for dry locations. Keithley Instruments power sources when a test fixture cover is opened. products are only rated for dry locations. -
Page 9: Install The Instrument
Install the instrument Provide training to all users of the system so they understand all potential hazards and know how to protect themselves from injury. Y ou can use the Series 2280 on a bench or in a rack. Please see the ... -
Page 10: To Connect Line Power
The power cord supplied with the Series 2280 contains a separate protective earth (safety ground) wire for use with grounded outlets. When proper connections are made, the instrument chassis is connected to power-line ground through the ground wire in the power cord. -
Page 11: Connections For Testing
Connections for testing Two-wire connection The two-wire connections are used for basic operation when Before making the connections, prepare the wires as described in the maximum accuracy is not required. Keep the wire as short as possible following table. to reduce lead inductance and noise pickup. If you want to compensate for the voltage drop in the load leads, use a four-wire Usage Specifications... - Page 12 Two-wire (local sensing) DUT connection to rear panel After making the connections, slide the cable housing over the output mating connector and wires. When making two-wire connections with the Series 2280, you must short both Output Hi and Sense Hi and Output Lo and Sense Lo with Failure to install the cable housing may result in personal injury or the shorting jumpers.
-
Page 13: Four-Wire Remote Sense Connection
Four-wire remote sense connection After making the connections, slide the cable housing over the output mating connector and wires. Using four-wire remote sensing connections ensures that the programmed voltage is applied to the load and compensates for the voltage drop in the leads between the power supply and the load. As shipped, the sense terminals are connected to the output terminals by shorting jumpers. -
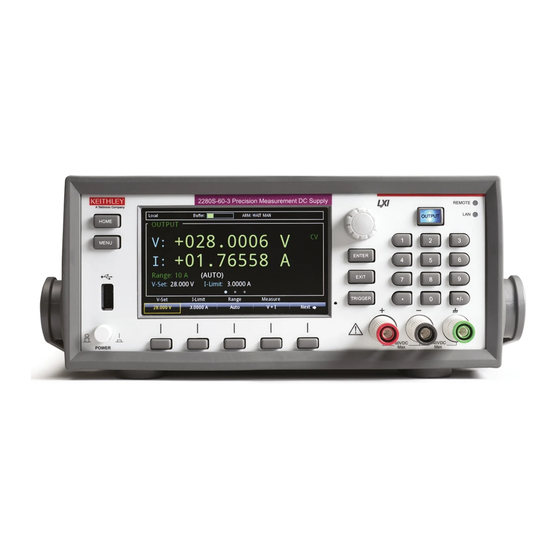
Page 14: Overview Of The Front-Panel Options
Overview of the front-panel options ENTER and EXIT keys The E N TE R key selects a highlighted option. In most cases, it opens the menu or dialog box that allows you to change settings for that option. The E XIT key returns to the previous menu or closes a dialog box. For example, if you are in the Menu screen, pressing E XIT returns you to the Home screen. -
Page 15: Home Screen Overview
Home screen overview The soft-key area is located on the bottom of the Home screen. It shows the present setting values. Y ou can change these values by The Home screen is the first screen that opens on power up. Y ou can pressing the buttons below the screen. -
Page 16: Simple Voltage Output And Current Measurement
Simple voltage output and current From this screen, you can select source, measure, graph, trigger, and system setup menus. These menus allow you to choose options to set measurement up your instrument for your applications. Select a setup item by either scrolling the navigation control or using the arrow keys to highlight an icon. - Page 17 Select a measure function The Series 2280 allows you to perform the following measure When the output is turned on, changing the value with the functions. navigation control can source voltage and current instantly. Measure functions What the instrument measures Make sure the output does not damage your device under test (DUT).
-
Page 18: Specify A Measurement Range
Specify a measurement range Select the range. Y ou are returned to the MEASURE SETTINGS screen. Y ou can set ranges for the measurement values. Y ou can set specific Voltage Current measurement ranges or allow the instrument to choose the ranges automatically. Model number measurement range... -
Page 19: Configure And Execute A 10-Step Linear List Sweep
Configure and execute a 10-step linear list sweep The following example demonstrates the steps to set up the power supply to output a linear list sweep from 1 V to 10 V in 1 V steps (default settings). Each step in the list sweep will dwell for 3 seconds. The list will be stored in list location 1. - Page 20 To execute a list sweep on the front panel: Press the ME N U key. Under Trigger, highlight the Configure icon using either the navigation control or the soft keys. Press E N TE R. Select the button next to Sample Count and press the E N TE R key.
-
Page 21: Next Steps
For more information, refer to the Product Information CD-ROM, which includes the Series 2280 Reference Manual. It provides detailed information about all features of the instrument. Also see the Keithley Instruments website, www.keithley.com support and additional information about the instrument.
Need help?
Do you have a question about the 2280 Series and is the answer not in the manual?
Questions and answers