
Related Manuals for Ocean Digital WR-60


Summary of Contents for Ocean Digital WR-60
- Page 1 User Manual Internet Radio WR-60 Please read this user manual carefully before using the receiver.
-
Page 2: Location Of Controls
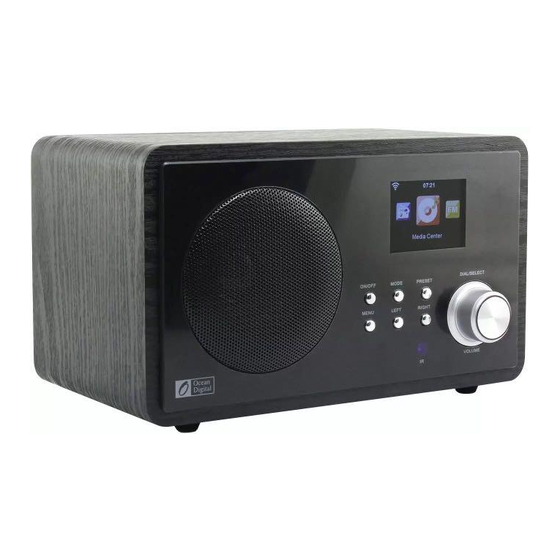
Location of Controls 1. Speaker 2. ON/OFF 3. Mode 4. Preset 5. 2.4” TFT color display 6. Menu 7. Left 8. Remote sensor 9. Right 10. Dial/Select/Volume 11. Wire FM antenna 12. DC jack 13. Earphone jack 14. Aux-In jack... -
Page 3: Remoter Controller
Remoter controller : Standby button : Mute 3. 0-9: Favorite station key / input letters and numbers for WiFi Encryption code : Dim the display : Favorite button, adding station to your favorite list 6. : Cursor up 7. : Cursor down : Cursor left / back to previous menu : Cursor right 10. -
Page 4: Switching On The Radio
Switching on the radio Plug the connector plug of the mains adaptor into the DC jack on the unit. Connect the other end of the adaptor to the wall socket. Caution: Use only the main adaptor supplied with the radio. Connecting a power supply with a different rating will cause permanent damage to the radio and may be hazardous. -
Page 5: Internet Radio
Please refer to the “Remote control character list” for you to enter the passwords. Press the “ ” button to go to the next word, press “ ” button to delete the wrong word you have entered. If you want to enter the passwords on the radio main unit, you can use the Volume Dial rotary knob. - Page 6 To recall a preset station: Press the button briefly and choose your desire station. Remark: Please note Preset 1-5 is reserved for future use and cannot be preset for radio stations. Radio Station / Music Select this option, then you can select your desired radio station by Category, Genere or Location.
-
Page 7: Media Center
The radio will appear as “AirMusic” when you try to search it on other devices. If you want to change other name from AirMusic, go to Configuration and DLNA setup to make the change. Please note: The WR-60 DLNA feature is compatible and works with corresponding Android APPs. Apple devices are not supported. -
Page 8: Information Center
to complete its scan and before the scan has completed, the radio will display ‘[Empty]’. The radio will continue to display ‘[Empty]’ if no UPnP servers and found. c. After a successful scan. Select your UPnP server, by rotating the dial if there is more than one UPnP server, and then press SELECT (note, your radio will display’... - Page 9 previous/next day weather forecast. Remark: The weather is just for reference only. It may have deviation to the actual weather. Financial Information You can get the information of Stock Market all over the world System Information You can view the information of the radio such as the Version of the software / Wlan Mac / IP address..etc.
- Page 10 Manual Configuration You can set the DHCP on or off, and enter the SSID as you known, or delete the connected WiFi. Check network when power on This is set to enable or disable “Check network when power on”. Date & Time Currently Date &...
-
Page 11: Troubleshooting
You can set up the playback as Off, Repeat one, Repeat all, Shuffle DLNA Setup When the WR-60 radio is connected by other DLNA devices, the name of the radio will appear as “AirMusic”. This is the name in default. You can change other name here as you desire. - Page 12 connect to the Wi-Fi network, and the Internet Radio display will show Bad ESSID or key. To overcome this problem you will need to add the Internet Radio’s MAC address to the list of allowed equipment in your access point. The Internet Radio’s MAC address can be found using the menu <Information Center ->System Information ->...
-
Page 13: Technical Specification
Internet congestion while transferring it may stop/interfere with the quality of play. If this happens, check your internet connection speed- it must be faster than the speed of the streams. Technical Specification Model: WR-60 Power input: 9V 1.5A Power voltage: 100-240V~50/60Hz Wireless Network: IEEE802.11b/g/n... - Page 14 (1) l'appareil ne doit pas produire de brouillage, et (2)l'utilisateur de l'appareil doit acceptertout brouillage radioélectrique subi,même si le brouillage est susceptible d'en compromettrele fonctionnement. Ocean Digital Technology Ltd. Flat B, 12/F., Yeung Yiu Chung (No.8) Ind. Bldg., 20 Wang Hoi Road, Kowloon Bay, Hong Kong Email: support@oceandigital.com.hk...
Need help?
Do you have a question about the WR-60 and is the answer not in the manual?
Questions and answers