
Related Manuals for Icop VDX-6318


Summary of Contents for Icop VDX-6318
- Page 1 VDX-6318 Windows Embedded Compact 7 Getting Started Guide Samuel Phung Windows Embedded MVP ICOP Technology Inc. Screen captured with Snagit...
-
Page 2: Table Of Contents
VDX-6318 Windows Embedded Compact 7 - Getting Started Guide Table of Contents Introduction ..............................6 Part 1 – Development Environment Overview ..................... 7 Windows Embedded Compact 7 ......................7 Windows Embedded Compact 7 – Platform Builder ................7 Windows Embedded Compact 7 Remote Tools ..................7 Visual Studio 2008 Integrated Development Environment .............. - Page 3 Create Connectivity Profile for a Target Device ..................38 Associate VDX-6318 to MyTargetDevice Connectivity Profile ............... 39 Download Compact 7 OS Run-time Image to VDX-6318 ................ 42 Deploy Compact 7 OS Run-time Image to Target Device ............... 43 Part 8 – Software Development Kit (SDK) ....................45 Create and Configure Compact 7 SDK ....................
- Page 4 VDX-6318 Windows Embedded Compact 7 - Getting Started Guide Download Application to Target Device ....................57 Part 10 – Develop Managed Code App with VS2008 .................. 58 Create a New Managed Code Application Project ................. 58 Add Codes and Build the Application Project ..................60 Preparing Target Device to Connect to VS2008 IDE ................
- Page 5 VDX-6318 Windows Embedded Compact 7 - Getting Started Guide Appendix H – Deploy OS Run-time with DiskPrep ..................97 Appendix I – CoreCon Connectivity ......................100 Appendix J – Recover Jump Start Kit’s Original Files ................102 VDX-6318-MSJK Preconfigured Files ....................102 Recover Files with DiskPrep ........................
-
Page 6: Introduction
While it’s possible to use a Virtual PC as the target device and work through similar exercises, using a real hardware provides a practical environment, and helps improve the learning process. The VDX-6318 Single-Board-Computer (SBC), configured with the necessary software components, is used as the target device for the exercises in this guide. -
Page 7: Part 1 - Development Environment Overview
VDX-6318 Windows Embedded Compact 7 - Getting Started Guide Part 1 – Development Environment Overview The Windows Embedded Compact 7 Platform Builder (Platform Builder) development tool is a plug-in to the Visual Studio 2008 integrated development environment (VS2008 IDE). All Compact 7 development tasks are supported within the VS2008 IDE, a developer friendly, efficient and intuitive development environment with templates and wizard to help simplify complicate development tasks. -
Page 8: Visual Studio 2008 Integrated Development Environment
VDX-6318 Windows Embedded Compact 7 - Getting Started Guide Process Viewer Profiler Registry Editor Resource Consumer Resource Leak Detector System Information Timeline Viewer Zoom Visual Studio 2008 Integrated Development Environment Visual Studio 2008 is a popular developer friendly development tool to develop broad range of applications for different version of the Windows operating system. -
Page 9: Develop Compact 7 Applications With Vs2008
The Target Device The term target device is referring to the hardware platform used in a Compact 7 development project. For the exercises in this guide, the VDX-6318 single-board-computer (SBC) is used as the target device. Windows Embedded Compact 7 Getting Started Rev 2.00... - Page 10 OS design project, as shown in Figure 1. Note: We will refer to the VDX-6318 SBC as “SBC” or “Target Device” within this getting started guide. Fig. 1 – ICOP_VDX6318_70B BSP for Compact 7 In addition to the device drivers, the following DLLs are included as part of the BSP to help developers access the SBC’s GPIOs and Watchdog timers:...
-
Page 11: Common Terminology
Target Device device. Virtual PC can also be a target device for the Compact 7 development environment. For the exercise in this guide, the VDX-6318 SBC is the target device. The binary file generated from the OS design project to deploy to the OS Run-time Image target device. -
Page 12: Compact 7 Environment And Directory Variables
VDX-6318 Windows Embedded Compact 7 - Getting Started Guide Compact 7 Environment and Directory Variables Within the Compact 7 development environment, environment variables are used to configure the OS design to include, exclude associated components and control certain system behaviors. -
Page 13: Part 2 - Development Environment Connectivity
VDX-6318 Windows Embedded Compact 7 - Getting Started Guide Part 2 – Development Environment Connectivity It’s important to establish a proper development environment and understand different options available to establish connectivity between the development station and the target device, to download OS run-time image, and deploy application to the target device for testing and debug. -
Page 14: Development Environment Setup With Dhcp
VDX-6318 Windows Embedded Compact 7 - Getting Started Guide Development Environment Setup with DHCP One of the common development environments to support Compact 7 development is to attach both the development station and target device to the same LAN with DHCP service to provide IP addresses dynamically with a null RS-232 serial modem cable connected between one of the serial port on the target device and an available serial port on the development station. -
Page 15: Development Environment Setup With Static Ip
VDX-6318 Windows Embedded Compact 7 - Getting Started Guide Development Environment Setup with Static IP It’s possible to establish a Compact 7 development environment with Static IP addresses. Here are two scenarios for setting up the development environment using static IP addresses:... -
Page 16: Part 3 - Required Software & Installation
VDX-6318 Windows Embedded Compact 7 - Getting Started Guide Part 3 – Required Software & Installation The following software components are needed to work through the exercises in this getting started guide: Visual Studio 2008 Visual Studio 2008 service pack 1 ... -
Page 17: Board-Support-Package Installation
VDX-6318 Windows Embedded Compact 7 - Getting Started Guide Fig. 5 Installation Options (Custom install) During the supported processor selection step, include support for the x86 Architecture, as shown in Figure 6. Fig. 6 Supported processor architecture Note: It’s strongly recommended to install all software to the default installation directory. Some of the 3 party components used for the exercises in this guide assume all software components are installed to the default directory. -
Page 18: Sdk Installation
VDX-6318 Windows Embedded Compact 7 - Getting Started Guide SDK Installation VS2008 and Compact 7 must be installed prior to installing the SDK. The Compact 7 SDK is needed to support application development exercises in this guide, Vortex86DX_SDK_Compact7.msi, is provided on the jump start CD, in the \WinCE700 folder. -
Page 19: Part 4 - Os Design (Platform Builder Project)
VDX-6318 Windows Embedded Compact 7 - Getting Started Guide Part 4 – OS Design (Platform Builder Project) In this section, with help from the OS Design wizard, you will work through the steps to create a new OS design project. -
Page 20: Os Design Wizard - Board Support Package (Bsp)
VDX-6318 Windows Embedded Compact 7 - Getting Started Guide Fig. 8 OS Design Wizard Click Next to continue and bring up the Create an OS Design - Board Support Packages selection screen. OS Design Wizard – Board Support Package (BSP) In the BSP selection step, the OS Design Wizard provides the options to select one or more BSP for the new project from the list of available BSPs. -
Page 21: Os Design Wizard - Design Templates
VDX-6318 Windows Embedded Compact 7 - Getting Started Guide OS Design Wizard – Design Templates In the design template selection step, the OS Design Wizard provides multiple design templates to choose from, as shown in Figure 10. Fig. 10 - OS design Wizard –... -
Page 22: Os Design Wizard - Networking & Communications
VDX-6318 Windows Embedded Compact 7 - Getting Started Guide In addition to the .NET Compact Framework 3.5 component, select and include the following components to the OS design: Console Window Internet Explorer 7.0 Network User Interface ... -
Page 23: Security Warning - Catalog Item Notification
VDX-6318 Windows Embedded Compact 7 - Getting Started Guide Fig. 13 - OS Design Wizard – Completed Click Finish to complete the OS Design Wizard step. Security Warning - Catalog Item Notification At the completion of OS Design Wizard step, the Catalog Item Notification screen is raised, with security warning, to warn one or more of the components included in the OS design may pose security risk, as shown in Figure 14. -
Page 24: Part 5 - Configure And Customize Compact 7 Os Design
VDX-6318 Windows Embedded Compact 7 - Getting Started Guide Part 5 – Configure and Customize Compact 7 OS Design At this point, with help from the OS Design Wizard, the initial workspace for the OS design is created using the Industrial Controller design template along with the ICOP_VDX6318_70B BSP and components selected during the OS Design Wizard steps. - Page 25 VDX-6318 Windows Embedded Compact 7 - Getting Started Guide Add application and library as subproject to the OS design. Modify system configuration and registry files to customize system behavior. With the VDX6318 OS design project active, from the VS2008 menu, select View → Other Windows →...
- Page 26 VDX-6318 Windows Embedded Compact 7 - Getting Started Guide Fig. 17 - Catalog Items View (Component Catalog) Check to ensure the following BSP components are selected and included to the OS design: ATAPI (IDE) Storage driver Note: The ATAPI (IDE) Storage component set the SYSGEN_ATAPI variable to include the ATAPI storage driver, and the SYSGEN_FATFS variable to include FAT file system support.
- Page 27 256MB RAM Note: The VDX-6318 SBC that comes with the jump start kit is built with 256MB. This component set the IMGRAM256 environment variable and configure the OS run-time image to use the 256MB of available system memory. Improper system memory configuration can cause the Compact 7 OS run-time image not able to complete the boot up process and reset the device.
- Page 28 VDX-6318 Windows Embedded Compact 7 - Getting Started Guide Expand the \Core OS\Windows Embedded Compact\Applications – End User node, locate and include the following components to the OS design to support CAB file installation and application deployment from the Visual Studio 2008 IDE: ...
-
Page 29: Customize The Os Design - Locate Component By Search
VDX-6318 Windows Embedded Compact 7 - Getting Started Guide AutoLaunch_v300_Compact 7\Autolaunch CoreCon Note: When this sub-component is added, it includes the command script to copy the necessary CoreCon connectivity files to the OS design’s build release directory, and include the following registries to... -
Page 30: Customize The Os Design - Configuration Manager
VDX-6318 Windows Embedded Compact 7 - Getting Started Guide Fig. 19 - Locate component using the search feature Select and include the Tenet Server component in the OS design. Note: The Telnet Server component provides a convenience mechanism to access and the compact 7 device remotely. -
Page 31: Customize The Os Design - Build Options
VDX-6318 Windows Embedded Compact 7 - Getting Started Guide Fig. 20 - Configuration Manager From the Active solution configuration selection options, select ICOP_VDX6318_70B x86 Release and click Close to configure the OS design to generate a release mode image. -
Page 32: Customize The Os Design - The Registry
VDX-6318 Windows Embedded Compact 7 - Getting Started Guide Click Apply and OK to close the VDX6318 Property Pages screen. Customize the OS Design – The Registry The registry plays a key role in controlling how the Compact 7 OS run-time behave, loads driver, application and more. -
Page 33: Adding Registry Entries To Os Design
VDX-6318 Windows Embedded Compact 7 - Getting Started Guide [HKEY_LOCAL_MACHINE\Startup] "Process2"="App_01.exe" "Process2Delay"=dword:3A98 "Process3"="App_02.exe" "Process3Delay"=dword:4E20 Note: The process delay entries above are randomly selected. You can configure the delay based on your need. 3A98 in HEX equal to 15000 in decimal, which represent 15000 ms or 15 seconds You can configure the delay to control startup sequence between multiple applications. -
Page 34: Other Compact 7 Components
VDX-6318 Windows Embedded Compact 7 - Getting Started Guide [HKEY_LOCAL_MACHINE\Comm\VMINI1\Parms\TcpIp] "EnableDHCP"=dword:0 "IpAddress"=multi_sz:"192.168.2.233" "Subnetmask"=multi_sz:"255.255.255.0" Note: When the KITL build option is enabled, the Compact 7 OS run-time image is generated with the VMINI driver to support debugging, which is different from the driver for the R6040 Ethernet controller. -
Page 35: Part 6 - Build And Generate Compact 7 Os Run-Time Image
VDX-6318 Windows Embedded Compact 7 - Getting Started Guide Part 6 – Build and Generate Compact 7 OS Run-time Image In the previous sections, you created an OS design project, configured and customized the OS design. In this section, you will work through the steps to build and generate a custom Compact 7 OS run-time image from the OS design. - Page 36 VDX-6318 Windows Embedded Compact 7 - Getting Started Guide Fig. 23 - VS2008 IDE – Build completed The Output tab on the VS2008 IDE shows the result of the build process, with “0” failed task. Note: When the build process ended with 1 or more error, the build process failed and will not generate a Compact 7 OS run-time image file.
-
Page 37: Part 7 - Download Compact 7 Os Run-Time To Target Device
VDX-6318 Windows Embedded Compact 7 - Getting Started Guide Part 7 – Download Compact 7 OS Run-time to Target Device To download the run-time image to the target device, you need to establish connectivity between the VS2008 development station and target device. -
Page 38: Create Connectivity Profile For A Target Device
VDX-6318 Windows Embedded Compact 7 - Getting Started Guide While the splash screen is showing, you can press “1” or “2” before the 10 seconds delay timed-out to perform the following: Press “1” to launch EBOOT.BIN to establish connectivity to the Platform Builder development station and download OS run-time image from an active OS design. -
Page 39: Associate Vdx-6318 To Mytargetdevice Connectivity Profile
Click Apply to continue and save the settings. Associate VDX-6318 to MyTargetDevice Connectivity Profile In this section, you will work through the steps to associate the VDX-6318 SBC to the MyTargetDevice connectivity profile, created in the previous section. Windows Embedded Compact 7 Getting Started Rev 2.00... - Page 40 VDX-6318 Windows Embedded Compact 7 - Getting Started Guide From the Target Device Connectivity Options screen (continuing from previous section), clicks on the top most Settings button, to bring up the Ethernet Download Settings screen, as shown in Figure 27.
- Page 41 VDX-6318 Windows Embedded Compact 7 - Getting Started Guide Fig. 28 - Ethernet Download Settings Click and highlight the device ID listed in the Active target devices windows to associate the device ID to the profile. Click Apply to continue.
-
Page 42: Download Compact 7 Os Run-Time Image To Vdx-6318
VDX-6318 Windows Embedded Compact 7 - Getting Started Guide Download Compact 7 OS Run-time Image to VDX-6318 With the MyTargetDevice connectivity profile created and the SBC target device associated with this profile, you are ready to download the Compact 7 OS run-time image from the Development station to the target device. -
Page 43: Deploy Compact 7 Os Run-Time Image To Target Device
VDX-6318 Windows Embedded Compact 7 - Getting Started Guide Fig. 32 - Downloading OS run-time image to the target device After the image download process is completed, the Compact 7 OS run-time image downloaded to the target device will launch. Be patient… It takes a few moments for the image to boot up. - Page 44 VDX-6318 Windows Embedded Compact 7 - Getting Started Guide Note: Release mode image built with KITL enabled and debug image is not intended for deployment to the target device’s local storage. When deploying a release mode OS run-time image, generated with KITL enabled, to the target device’s local storage, the image attempt to establish connectivity to an unavailable KITL connection...
-
Page 45: Part 8 - Software Development Kit (Sdk)
VDX-6318 Windows Embedded Compact 7 - Getting Started Guide Part 8 – Software Development Kit (SDK) In this section, you will work through the steps to create and configure an SDK from the OS design project. An SDK is needed to support Compact 7 application development for the target device. - Page 46 VDX-6318 Windows Embedded Compact 7 - Getting Started Guide On the left pane, click on the Development Languages node to bring up the development languages configuration, and enable support for both the Native and Managed development, as shown in Figure 36.
-
Page 47: Build And Generate Compact 7 Sdk
VDX-6318 Windows Embedded Compact 7 - Getting Started Guide Build and Generate Compact 7 SDK With the Vortex86DX_SDK_Compact7 SDK created, you can build and generate the SDK. Note: The OS design project must be built prior to launching the SDK build step. The SDK build process requires library files generated during the OS design build process. -
Page 48: Part 9 - Develop Native Code App With Vs2008
VDX-6318 Windows Embedded Compact 7 - Getting Started Guide Part 9 – Develop Native Code App with VS2008 In this section, you will work through the steps to develop a native code application for Compact 7 using Visual C++ 2008. The following are needed to work through the exercise: ... - Page 49 VDX-6318 Windows Embedded Compact 7 - Getting Started Guide Fig. 39 - Win32 smart device project wizard Click Next to continue and bring up the Platforms selection step, as shown in Figure 40. Fig. 40 - Win32 smart device project wizard | SDK selection ...
- Page 50 VDX-6318 Windows Embedded Compact 7 - Getting Started Guide Click on the right pointing arrow, located to the right of the Installed SDKs pane, to add the Vortex86DX_SDK_Compact7 SDK to the selected SDKs pane, as shown in Figure 41.
-
Page 51: Add Codes And Build The Application Project
VDX-6318 Windows Embedded Compact 7 - Getting Started Guide After the new project wizard step is completed, the initial VS2008_Win32_HelloWorld project workspace is created in the following folder: C:\Lab\VS2008_Win32_HelloWorld Add Codes and Build the Application Project With the VS2008_Win32_HelloWorld project active, the VS2008 IDE should look similar to the IDE as shown in Figure 43. -
Page 52: Preparing Target Device To Connect To Vs2008 Ide
VDX-6318 Windows Embedded Compact 7 - Getting Started Guide Fig. 44 - VS2008 IDE with VS2008_Win32_HelloWorld project active From the VS2008 menu, select Build → Build Solution to build the VS2008_Win32_HelloWorld project. Preparing Target Device to Connect to VS2008 IDE To download the VS2008_Win32_HelloWorld application to the Compact 7 target device, you need to establish connectivity between the target device and VS2008 IDE using CoreCon. - Page 53 VDX-6318 Windows Embedded Compact 7 - Getting Started Guide Since the Compact 7 OS run-time image launched on the target device is built with the AutoLaunch and Autolaunch CoreCon components, the target device is configured with CoreCon launched and is ready to establish connectivity to the VS2008 IDE.
-
Page 54: Configure Vs2008 Device Connectivity Settings
VDX-6318 Windows Embedded Compact 7 - Getting Started Guide Fig. 47 - Network controller information The target device’s IP address is needed in the next step. Record the IP address. Configure VS2008 Device Connectivity Settings To establish connectivity to the Compact 7 target device, you need to configure the device connectivity settings for the VS2008 development station with the target device’s IP address. - Page 55 VDX-6318 Windows Embedded Compact 7 - Getting Started Guide Fig. 49 - VS2008 Options Click Properties to bring up the Vortex86DX_SDK_Compact7 x86 Device Properties screen, as shown in Figure 50. Fig. 50 - Vortex86DX_SDK_Compact7 x86 Device Properties From the Vortex86DX_SDK_Compact7 x86 Device Properties screen, click Configure to bring up the Configure TCP/IP Transport screen, as shown in Figure 51.
-
Page 56: Establish Connectivity To Compact 7 Target Device
VDX-6318 Windows Embedded Compact 7 - Getting Started Guide From the Configure TCP/IP Transport screen, select the Use specific IP address option, and enter the target device’s IP address from the earlier step. Click OK to continue and close the Configure TCP/IP Transport screen. -
Page 57: Download Application To Target Device
VDX-6318 Windows Embedded Compact 7 - Getting Started Guide Download Application to Target Device With CoreCon connectivity established between the VS2008 IDE and the target device, you can download the VS2008_Win32_HelloWorld application to the target device. From the VS2008 menu, select Debug → Start Debugging to initiate the process to download the application to the device. -
Page 58: Part 10 - Develop Managed Code App With Vs2008
VDX-6318 Windows Embedded Compact 7 - Getting Started Guide Part 10 – Develop Managed Code App with VS2008 In this section, you will work through the steps to develop a managed code application for Compact 7 using Visual C#, from the VS2008 IDE. - Page 59 VDX-6318 Windows Embedded Compact 7 - Getting Started Guide Fig. 56 - Add New Smart Device Project Click OK to complete the step to create a new smart device project. After the new project wizard step is completed, the initial VS2008_CSharp_HelloWorld project...
-
Page 60: Add Codes And Build The Application Project
VDX-6318 Windows Embedded Compact 7 - Getting Started Guide Add Codes and Build the Application Project In the following steps, you will make changes and add codes to the project: Resize Form1 to a smaller size or to fit the target device’s display resolution. For this exercise, resize Form1 to 320 x 240. -
Page 61: Preparing Target Device To Connect To Vs2008 Ide
VDX-6318 Windows Embedded Compact 7 - Getting Started Guide Preparing Target Device to Connect to VS2008 IDE The VS2008 Managed code development environment uses CoreCon to establish connectivity between the VS2008 IDE and the target device, similar to the CoreCon used for the Native code application exercise in Part-9 of this guide. -
Page 62: Download Application To Target Device
VDX-6318 Windows Embedded Compact 7 - Getting Started Guide Download Application to Target Device With CoreCon connectivity established between the VS2008 IDE and the target device, work through the following steps to download the VS2008_CSharp_HelloWorld application to the device: ... - Page 63 VDX-6318 Windows Embedded Compact 7 - Getting Started Guide Fig. 63 - VS2008_CSharp_HelloWorld managed code application running on target device In the earlier step, there was an error message during the process to download the application to the target device, as shown in Figure 62. Work through the following steps to change the VS2008_CSharp_HelloWorld project’s configuration to eliminate this error message:...
-
Page 64: Debug Application Running On Target Device
VDX-6318 Windows Embedded Compact 7 - Getting Started Guide Select the Devices tab from the VS2008_CSharp_HelloWorld properties screen’s left pane and uncheck the Deploy the latest version of .NET Compact Framework option on the right. With the above configuration, you will not encounter any more error message when downloading the VS2008_CSharp_HelloWorld application to the target device. - Page 65 VDX-6318 Windows Embedded Compact 7 - Getting Started Guide Note: The above breakpoint is set while the application is running on the target device. With the breakpoint in place, work through the following steps to execute the VS2008_CSharp_HelloWorld application, and cause the application to halt when the execution reaches the breakpoint: ...
- Page 66 VDX-6318 Windows Embedded Compact 7 - Getting Started Guide Fig. 67 - Compact 7 application halt at the breakpoint From the VS2008 IDE, press the F11 key to step through one line of code. As the F11 key is pressed, the application executes one line of code. The next line of code becomes highlighted with yellow, indicates the program is halt on this line of code.
-
Page 67: Part 11 - Debug And Remote Tools
VDX-6318 Windows Embedded Compact 7 - Getting Started Guide Part 11 – Debug and Remote Tools While it’s not within the scope of this guide to cover in depth development and debug issues, it’s good to know about the debug and remote tools available for the Compact 7 development environment. -
Page 68: Download Kitl Enabled Compact 7 Os Image To Target Device
VDX-6318 Windows Embedded Compact 7 - Getting Started Guide Download KITL Enabled Compact 7 OS Image to Target Device After the build process in the previous step is completed and successfully generated an OS run-time image with KITL enabled. Follow the procedure in the earlier section (Part-7) to download the Image to the target device. - Page 69 VDX-6318 Windows Embedded Compact 7 - Getting Started Guide Fig. 71 - Select a Windows CE device to connect to the remote tool From the Select a Windows CE Device screen, select MyTargetDevice under the Windows CE node and click OK to establish connectivity to the target device.
-
Page 70: Remote Tool: Registry Editor
VDX-6318 Windows Embedded Compact 7 - Getting Started Guide The Windows CE Process Viewer Warning screen is raised. As you click Yes to continue and terminate the process, the control panel running on the target device is terminated. -
Page 71: Remote Tool: System Information
VDX-6318 Windows Embedded Compact 7 - Getting Started Guide To view which device drivers are loaded, take a look at registry entries under the following registry key: [HKEY_LOCAL_MACHINE\Drivers\Active] To terminate the Remote Registry Editor, select File → Exit from the Remote Tools Shell menu. - Page 72 VDX-6318 Windows Embedded Compact 7 - Getting Started Guide Fig. 76 - System Information remote tool You can use similar process to check out the other remote tools. Windows Embedded Compact 7 Getting Started Rev 2.00 Page 72...
-
Page 73: Part 12 - Silverlight For Windows Embedded
VDX-6318 Windows Embedded Compact 7 - Getting Started Guide Part 12 – Silverlight for Windows Embedded Silverlight is a user interface (UI) development framework designed to separate the graphical presentation from the programming logic. Different from the Silverlight for the desktop environment, where the code behind is based on managed code, SWE code behind uses native code. -
Page 74: Congratulations! - You've Completed All The Steps
For additional information resources relate to Windows Embedded, visit the following Microsoft Website: http://www.microsoft.com/windowsembedded/en-us/develop/windows-embedded-products-for-developers.aspx Additional Windows Embedded Compact information resources are provided in appendix C. To learn more about the VDX-6318 and other Single-Board-Computer from ICOP, visit the following Web sites. http://www.icoptech.com http://www.embeddedpc.net/VDX6318MSJK/ Windows Embedded Compact 7 Getting Started Rev 2.00... -
Page 75: Appendix A - Development Station Setup With Dhcp
VDX-6318 Windows Embedded Compact 7 - Getting Started Guide Appendix A – Development station Setup with DHCP One of the common setup is to attach both the development station and Target Device to the same LAN with DHCP service to provide IP addresses dynamically, as shown in Figure A1. -
Page 76: Capturing Serial Debug Messages
VDX-6318 Windows Embedded Compact 7 - Getting Started Guide Capturing Serial Debug Messages To capture serial debug messages from the target device, a null RS-232 serial modem cable is connected between the target device’s COM1 and an available serial port on the development station. -
Page 77: Appendix B - Development Station Setup With Static Ip
VDX-6318 Windows Embedded Compact 7 - Getting Started Guide Appendix B – Development station Setup with Static IP Following are two scenarios where the development environment is setup without DHCP and require proper static IP addresses configuration to function. Connecting to Ethernet Hub or Switch without DHCP In this scenario, both the development station and target device are connected to the same LAN without DHCP service, and require proper static IP addresses configuration to establish connectivity. -
Page 78: Capturing Serial Debug Messages
VDX-6318 Windows Embedded Compact 7 - Getting Started Guide For the target device: IP address: 192.168.2.232 Subnet mask: 255.255.255.0 For the development station: IP address: 192.168.2.132 Subnet mask: 255.255.255.0 The prebuilt Compact 7 OS run-time images provided as part of the preconfigured software on the target device’s flash storage is built with DHCP enabled, and will attempt to send request to acquire... -
Page 79: Appendix C - Windows Embedded Compact Resources
VDX-6318 Windows Embedded Compact 7 - Getting Started Guide Appendix C – Windows Embedded Compact Resources Windows CE Reference Windows Embedded Compact product documentation http://msdn.microsoft.com/en-us/library/ee504813.aspx This is the URL to the Windows Embedded Compact documentation on MSDN. If you are new to Windows Embedded Compact, this site provides valuable information and links to technical information resources. - Page 80 VDX-6318 Windows Embedded Compact 7 - Getting Started Guide Phidgets USB I/O driver shared source projects http://phidgetswincedriver.codeplex.com Phidgets is a family of I/O, sensors and microcontroller modules which can easily be added to a Windows Embedded CE system through the USB interface. This community project provides the Windows Embedded CE device driver needed to support Phidgets devices.
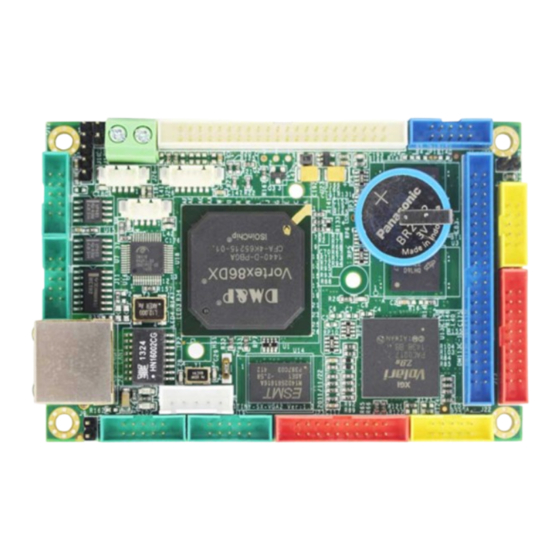
- Page 81 Hardware Reference Information http://www.embeddedpc.net/VDX6318MSJK The VDX-6318 SBC is designed with an 800 MHz Vortex86DX System-On-Chip, built with 256MB DDR2 system memory and other common computer interfaces. http://www.vortex86dx.com Vortex86DX System-On-Chip information site. http://www.icoptech.com Other embedded hardware from ICOP.
-
Page 82: Appendix D - Vdx-6318-Msjk Technical Information
Designed with the matured x86 CPU architecture with rich set of integrated I/O and able to operate in harsh environment, the VDX-6318 SBC is the suitable for broad range of application, such as industrial- automation, process-control, robotics, instrumentation, human-machine-interface, medical device, automotive, utility metering, network appliance, security access control, thin client, intelligent RFID reader, home-building automation, point-of-sales, information kiosk and other embedded devices. - Page 83 VDX-6318 Windows Embedded Compact 7 - Getting Started Guide VDX-6318 Dimension VDX-6318 SBC I/O connectors Windows Embedded Compact 7 Getting Started Rev 2.00 Page 83...
- Page 84 VDX-6318 Windows Embedded Compact 7 - Getting Started Guide VDX-6318-MSJK Specification System 800 MHz Vortex86DX System-On-Chip BIOS AMI BIOS System Chipset Integrated in Vortex86DX I/O Chip Integrated in Vortex86DX System Memory Soldered on 256MB DDR2 RAM (RAM) Storage Enhanced IDE (UltraDMA-100/66/33) 1 x PS/2 K/B &...
- Page 85 VDX-6318 Windows Embedded Compact 7 - Getting Started Guide VDX-6318 I/O Connectors Connectors summary for VDX-6318 single-board-computer Connector Description Type of Connections Pin Count IDE Connector 22 x 2 Box Header, 2.0mm pitch 44 pins USB 2 & 3 5 x 2 Box Header, 2.0mm pitch...
- Page 86 VDX-6318 Windows Embedded Compact 7 - Getting Started Guide I/O Connectors Pin Assignment IDE (44 Pins) Pin # Signal Name Pin # Signal Name J10: PS/2 Mouse IDERST Pin # Signal Name Pin # Signal Name IDED7 IDED8 MSCLK MSDATA...
- Page 87 J18: COM3 J24: LCD Connector Pin # Signal Name Pin # Signal Name Pin # Signal Name Pin # Signal Name DCD3 RXD3 +3.3V +3.3V TXD3 DTR3 DSR3 RTS3 CTS3 J19: COM4 Pin # Signal Name Pin # Signal Name DCD4 RXD4 TXD4...
- Page 88 VDX-6318 Windows Embedded Compact 7 - Getting Started Guide VDX-6318 System BIOS The VDX-6318 SBC uses AMI BIOS. To reconfigure the SBC’s BIOS settings, go through the following steps to enter BIOS configuration: Immediately after power on, depress the <Del> key multiple times to enter the system BIOS configuration mode.
- Page 89 VDX-6318 Windows Embedded Compact 7 - Getting Started Guide 002Eh – 002Fh Forward to LPC Bus 0030h – 003Fh Not use 0040h – 0043h Timer Counter 8254 ** 0044h – 0047h Not use 0048h – 004Bh PWM counter 8254 ** 004Ch –...
- Page 90 VDX-6318 Windows Embedded Compact 7 - Getting Started Guide Parallel port (IRQ-7, DMA 0) ** 0278h – 027Fh 02E8h – 02EFh Serial Port 4 (IRQ-11) ** 02F8h – 02FFh Serial Port 2 (IRQ-3) 0338h – 033Fh Serial Port 5 Forward to LPC Bus **...
-
Page 91: Appendix E - Startup Options
VDX-6318 Windows Embedded Compact 7 - Getting Started Guide Appendix E – Startup Options By changing the BIOS settings, the SBC can be configured to boot from the following sources: IDE storage (Including 2.5” IDE hard disk and IDE flash storage) ... -
Page 92: Appendix F - Biosloader
VDX-6318 Windows Embedded Compact 7 - Getting Started Guide Appendix F – BIOSLoader The IDE Flash provided as part of the VDX-6318-MSJK Compact 7 jump start kit is preconfigured with BIOSLoader. BIOSLoader is a bootloader designed to support x86 target device and can be used on device intended for distribution to the end-user. -
Page 93: Biosloader Configuration File For Vdx-6318
- Enable eboot space in memory BIOSLoader Configuration File for VDX-6318 As part of this jump start kit, the VDX-6318 SBC is preconfigured to launch the preloaded Compact 7 OS run-time image (NK.BIN) using BIOSLoader with 10 seconds delay during boot up. Before the 10 seconds delay expire (while the startup Compact 7 splash is still showing), you can press “1”... - Page 94 VDX-6318 Windows Embedded Compact 7 - Getting Started Guide # Device name root string: DeviceNameRoot=VDX # Boot delay (in seconds) in which to select the alternative image Delay=10 # Alternative image # While booting hit the key corresponding to the suffix char (e.g. "1" for # BinFile1) to boot the alternative image BinFile1=eboot.bin...
-
Page 95: Appendix G - Using Static Ip Address
VDX-6318 Windows Embedded Compact 7 - Getting Started Guide Appendix G – Using Static IP Address When configuring the development environment to use static IP address, the IP addresses for both the target device and development station must be configured to be in the same subnet The evaluation Compact 7 OS run-time image provides as part of the jump start kit is built with DHCP enabled, and will request IP address from an available DHCP service dynamically at boot time. -
Page 96: Configure Os Design With Static Ip Address
VDX-6318 Windows Embedded Compact 7 - Getting Started Guide Configure OS Design with Static IP Address The OS design project can be configured to generate Compact 7 OS run-time image with preconfigured static IP address, by adding the necessary registry entries to the OSDesign.reg file. -
Page 97: Appendix H - Deploy Os Run-Time With Diskprep
VDX-6318 Windows Embedded Compact 7 - Getting Started Guide Appendix H – Deploy OS Run-time with DiskPrep DiskPrep is a Windows Embedded Compact power toy developed from Microsoft, available for download freely from the following URL: http://code.msdn.microsoft.com/DiskPrep The DiskPrep utility can be used to configure different type of storage device with BIOSLoader to launch Compact 7 OS run-time image and Ethernet bootloader with customizable splash screen. - Page 98 VDX-6318 Windows Embedded Compact 7 - Getting Started Guide Download the DiskPrep utility (DiskPrep.exe), from , and http://code.msdn.microsoft.com/DiskPrep place the DiskPrep.exe executable to the C:\MyOSImage directory. Copy the NK.BIN OS run-time image file to the C:\MyOSImage directory. ...
- Page 99 VDX-6318 Windows Embedded Compact 7 - Getting Started Guide Select “640 x 480” for the “Physical Video Mode” and 16bpp for “Bit Depth”. Use the default “CEPC” as the device prefix or select “Use custom device name prefix” and enter a customized device prefix.
-
Page 100: Appendix I - Corecon Connectivity
VDX-6318 Windows Embedded Compact 7 - Getting Started Guide Appendix I – CoreCon Connectivity CoreCon connectivity is needed to establish link between the Compact 7 target device and the Visual Studio 2008 IDE to support application development for the target device. - Page 101 VDX-6318 Windows Embedded Compact 7 - Getting Started Guide The CMaccept.exe executable temporary disable Compact 7 security to enable CoreCon connection to CMaccept.exe take place. After launching the executable, CoreCon connection must be established within 3 minutes. Otherwise, the CMaccept.exe executable needs to be launched again.
-
Page 102: Appendix J - Recover Jump Start Kit's Original Files
Appendix J – Recover Jump Start Kit’s Original Files The VDX-6318 SBC is preconfigured with BIOSLoader to launch a prebuilt Compact 7 OS run-time image with options to launch an Ethernet bootloader to download OS run-time image from the development station. - Page 103 VDX-6318 Windows Embedded Compact 7 - Getting Started Guide From the “Select File to Execute on Boot” screen, navigate to the “C:\MSJK” directory and select the “NK.BIN” file, and click on the Open button. From the DiskPrep utility program screen, click on the OK button to format and configured the Compact Flash.
-
Page 104: Appendix K - Vdx-6318 System Bios
VDX-6318 Windows Embedded Compact 7 - Getting Started Guide Appendix K – VDX-6318 System BIOS The VDX-6318 SBC uses AMI BIOS To access the SBC’s BIOS configuration, immediately after power on, or power reset, press the Del key repeatedly. After successful gaining access to the system’s BIOS configuration, the main BIOS configuration screen will show, similar to Figure K1 Fig. - Page 105 VDX-6318 Windows Embedded Compact 7 - Getting Started Guide From the Exit Options menu, use the Up/Down Arrow key to select the Load FailSafe Defaults option and press Enter When the “Load Failsafe Defaults?” screen pop up, select OK and press Enter ...
-
Page 106: Appendix L - Using Watchdog Timer
VDX-6318 Windows Embedded Compact 7 - Getting Started Guide Appendix L – Using Watchdog Timer There are 2 watchdog timers accessible on the VDX-6318 SBC, WDT0 and WDT1. The codes used to set, reset and disable WDT0 are different from WDT1. Using WDT0 To access WDT0 registers, use index port 22H and data port 23H. - Page 107 VDX-6318 Windows Embedded Compact 7 - Getting Started Guide Sample codes to configure and use WDT0: void main(void) unsigned char c; unsigned int lTime; outp(0x22,0x13); // Lock register outp(0x23,0xc5); // Unlock config. register // Configure WDT0 to trigger in 5 seconds lTime = 0x20L * 5000L;...
-
Page 108: Using Wdt1
VDX-6318 Windows Embedded Compact 7 - Getting Started Guide Using WDT1 WDT1 does not use index and data port to access the watchdog timer registers. It uses I/O port 68H ~ 6DH. WDT1 can be configured to trigger system reset, NMI or IRQ. -
Page 109: Watchdog Timer Dll: Wdt.dll
VDX-6318 Windows Embedded Compact 7 - Getting Started Guide Sample codes to configure and use WDT1: void main(void) unsigned char c; unsigned long lTime; // Configure WDT1 to trigger in 5 seconds lTime = 0x20L * 5000L; outp(0x6c, (lTime >> 16) & 0xff);... -
Page 110: Appendix M - Using Gpio
Note: Improper use of the GPIO interface can damage the hardware platform. There are 32 GPIOs accessible on the VDX-6318 SBC, on J13 and J23 headers. The 32 GPIOs are extended from the Vortex86DX SoC’s GPIO Port-0, Port-1, Port-2 and Port-3 with 8-bits link to each port. -
Page 111: Configure Gpio To Output Mode
VDX-6318 Windows Embedded Compact 7 - Getting Started Guide Configure GPIO to Output Mode The GPIO can be used to light up or blink LEDs to function as visual status indicator, to trigger relay or send reset signal to another controller. -
Page 112: Configure Gpio To Input Mode
VDX-6318 Windows Embedded Compact 7 - Getting Started Guide Outportb(0x78, 0x05); To set only bit-0 and bit-3 on Port-1 to high: Outportb(0x79, 0x05); To set all 8 GPIO bits on Port-0 to low: Outportb(0x78, 0x00); To set all 8 GPIO bits on Port-1 to low: Outportb(0x79, 0x00);... -
Page 113: Gpio.dll
VDX-6318 Windows Embedded Compact 7 - Getting Started Guide GPIO.DLL The GPIO.DLL is provided to help managed code developer to access and use the GPIO. The GPIO.DLL is provided as part of the BSP and include in resulting CE 6.0 OS run-time image when this BSP is in used to develop the OS design. - Page 114 VDX-6318 Windows Embedded Compact 7 - Getting Started Guide Function to write to the data register for GPIO Port-2 WritePort3(byte dbValue) Function to write to the data register for GPIO Port-3 Sample codes showing how to use the GPIO.DLL is provided on the jump start CD, under the \SampleCodes\GPIO\ folder.
Need help?
Do you have a question about the VDX-6318 and is the answer not in the manual?
Questions and answers