Table of Contents
Advertisement
Quick Links
Download this manual
See also:
User Manual
Advertisement
Table of Contents

Related Manuals for R82 Toucan


Summary of Contents for R82 Toucan
- Page 1 English user manual © 2010 R82 A/S. All rights reserved. The R82 logo and the Toucan are registered trademarks of R82 A/S. 07.2011 - rev. 003...
-
Page 2: Table Of Contents
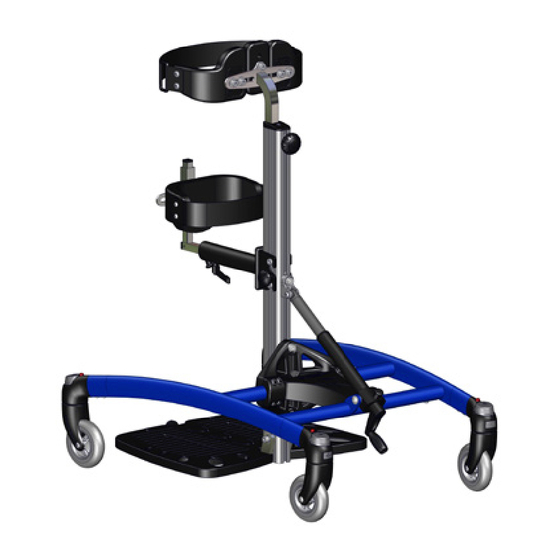
CONTENTS Safety ................4 Warranty ................4 Tools .................. 4 Maintenance ..............4 Ready for use ..............5 Angling of the centre bar ........... 6 Wheel locks ............... 6 t-tool................... 6 Mounting and adjustment of the foot plate ......7 Mounting and adjustment of individual foot supports .. - Page 3 TOUCAN The Toucan is a modern standing frame providing users the possibility of standing and having weight bearing through their feet. It is important to have the possibility to stand at an early age. Further it is not about standing for a long time but about standing often.
-
Page 4: Safety
R82 or, subsequently, an R82 dealer. TOOLS Tools are delivered with the Toucan: 5 & 6 mm allenkey and 2 pcs. T-tools. Theese tools are used to perform some of the adjustments described in this manual. -
Page 5: Ready For Use
The Toucan is now ready to receive any acces- sories ordered. Do not place a user in the Toucan if it has been standing in/exposed to the sun. For the safety and comfort of the user the Toucan must be moved away from the sun... -
Page 6: Angling Of The Centre Bar
/ standing frame. Turn the handle (B) to desired angle. Let go of the se- curity lock to maintain the desired position. The Toucan size 4+5 is equipped with a small ring (C). This ring allows a maximum angle adjustment of 20°. -
Page 7: Mounting And Adjustment Of The Foot Plate
MOUNTING AND ADJUSTMENT OF THE FOOT PLATE Follow the description below to mount the foot plate correctly. We recommend dismounting the square plates (A) from the foot plate before mounting. Tip! In general we recommend that you mount all accessories from the top of the centre bar which is why the lower accessories must be mounted first. -
Page 8: Mounting And Adjustment Of Individual Foot Supports
MOUNTING AND ADJUSTMENT OF INDIVIDUAL FOOT SUPPORTS Follow the description below to mount the foot supports correctly. The foot supports are mounted seperately and can be adjusted indi- vidually. * The square plates mounted on the foot sup- port, should be mounted in the slot on the centre bar as for the foot plate. -
Page 9: Mounting Of Flip-Up Sandals / Heel Supports
MOUNTING OF FLIP- UP SANDALS / HEEL SUPPORTS Follow the description below to mount the flip-up sandals / heel supports correctly. * Place the enclosed bolt (A) in the slot from the top of the footplate/heel support and fasten with the fingerscrew (B). * The flip-up sandal / heel support can be adju- sted forward or/and backward depending on the desired placement (C). -
Page 10: Hinged Knee Supports
HINGED KNEE SUPPORTS Follow the description below to mount the hin- ged knee supports correctly. The knee supports are mounted seperately and can be adjusted individually. * The square plates on the knee support should be mounted in the slot on the centre bar. * Adjust the knee support to the desired height and fasten (A) using the enclosed 6 mm allen key. -
Page 11: Hip Support, Rear
HIP SUPPORT, REAR Follow the description below to mount the hip support correctly: * Mount two square plates in the slots on both sides of the centre bar. * Mount bolts (A) in the upper square plates and fasten at the desired height using the enclosed 6 mm allen key. -
Page 12: Head Support
Either back support or hip supports (rear) must be mounted to be able to mount a head support on the Toucan * Mount the head support bar on the fitting from the back support/hip supports (rear) and fasten with the enclosed 4 mm Allen key (A). -
Page 13: Hip Support, Front
HIP SUPPORT, FRONT Follow the description below to mount the hip support correctly. * Mount the two square plates in the slots on both sides of the centre bar. * Mount bolts (A) in the upper square plates and fasten lightly. Do not fasten completly before the four bolts have been placed correctly. -
Page 14: Tray With Bowl
TRAY WITH BOWL Follow the description below to mount the tray correctly. * Loosen the screws (A) to separate the fit- ting. * Place the lower part of the fitting (A) below the frame and make sure the screws already mounted on the frame fit into the fitting*. -
Page 15: Chest Support
CHEST SUPPORT We recommend to mount the chest support as the final equipment. Follow the description below to mount the chest support correctly: * Mount the top part (A) in the top of the centre bar and fasten with the enclosed 5 mm allen key. -
Page 16: B Sliding Extension For Centre Bar
SLIDING EXTENSION FOR CENTRE BAR Follow the description below to mount a sliding extension on the centre bar. * To be able to mount the extension part and the centre bar all together, the plast covers need to be removed. Use the 5 mm Allen key to dismount the hubs. -
Page 17: Product Identification
PRODUCT IDENTIFICATION A) Serial number The label is placed on the underside of the frame to the left. B) Manufacturer The label is placed on the innerside by the left rear wheel. Dato: 31-01-02 Belast: kg 0840-01-111878-001 Varenr: 880003 5707292 134158 Parallelvej 3 DK-8751 Gedved... -
Page 18: Measurements
MEASUREMENTS Size 1 Size 2 Size 3 Size 4 Size 5 cm (inch) cm (inch) cm (inch) cm (inch) cm (inch) Width (G) 56 (21¾”) 63 (24½”) 63 (24½”) 70 (27¼") 70 (27¼") Length (H) 75 (29¼”) 88 (34¼”) 88 (34¼”) 111 (43¼") 111 (43¼") Total height (I1) -
Page 19: Technical Data
Upholstery: PUR (Polyurethane) DISTRIBUTOR PRODUCER R82 A/S Parallelvej 3 8751 Gedved Denmark Please find your distributor on www.R82.com TROUBLESHOOTING Problem* Solution The standing frame is hard - Check that all brakes have been released. to move/push/turn - Check if all front forks are turnable - If not, contact your dealer The angle winding mecha- - Check if the security lock has been released. -
Page 20: Care And Maintenance
R82 parts may be used. Accessories or available spare parts which are broken can be forwarded to R82 for repair. If there is a problem with any basic parts, the whole frame must be returned to R82 for repair. R82 will not be held responsible for damage or injury caused by...
Need help?
Do you have a question about the Toucan and is the answer not in the manual?
Questions and answers