
Related Manuals for Abtus ABT4640


Summary of Contents for Abtus ABT4640
- Page 1 ABT4640 Laser Height and Stagger Gauge ‘IMPERIAL’ Instruction Manual 4640-1 IMP Issue 03...
-
Page 2: Table Of Contents
1.0 Index Index Item List Specification Getting Started Overview Assembly Operating the Laser Measuring Height and Stagger Measuring Super Elevation Measuring REFOS Maintenance Before Each Use Every 3 Months Annual Trouble Shooter Super-Elevation is not showing or is incorrect Incorrect icon is displayed on the laser unit 4640-1 IMP Issue 03... -
Page 3: Item List
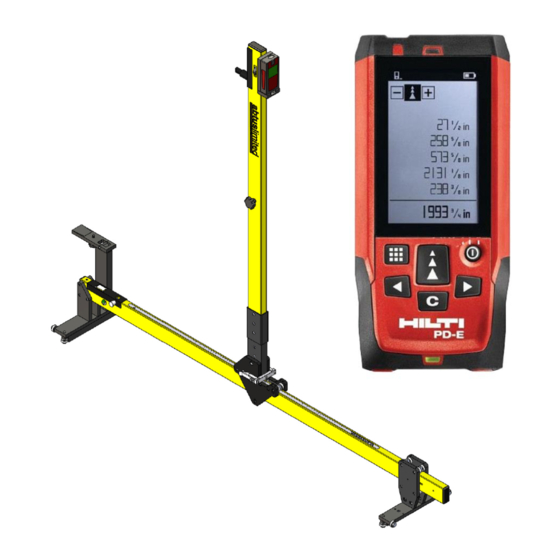
2.0 Item List Height and Stagger Gauge REFOS Bracket Hilti PD-E Laser Instruction Manual Hilti Documentation 3.0 Specification Weight 13.5lb Length: 57.08” Dimensions Height: 58.85” Width: 17.71” Range: -17.13” +20.47” Measures Accuracy: ±0.4” @ 16ft Cable Stagger Resolution: 0.004” Measures Range: 6ft to 650ft Cable Height Accuracy: ±0.12”... -
Page 4: Getting Started
Getting Started Overview The ABT 4640 is a light-weight gauge that allows the user to safely take Height and Stagger measurements of the OHL (Over Head Line) using laser technology. Super-Elevation (SE) and Rail Edge to Face of Structure (REFOS) can also be measured The laser unit is positioned at eye-level and features a 90º... -
Page 5: Operating The Laser
Place the laser unit into the holder at the top of the vertical beam and fix in place using the screw provided. Screw the REFOS bracket to the rail foot of the gauge. The REFOS bracket may be fitted to either side of the gauge as required (see Figure 3). - Page 6 b. If the laser unit is mounted on the REFOS bracket appears the default screen. 2. Press the button to go to the next screen if the laser is mounted on the top holder. 3. One of two icons (shown in Figure 4) will be displayed in the top left of the screen which represents the point from which the laser measurements will be taken.
-
Page 7: Measuring Height And Stagger
4. Press the button to reveal the laser location marker (visible red laser beam). 5. Press the same button to take the measurement, which will appear in the bottom right corner of the screen. Measuring Height and Stagger Ensure vertical beam is in the operating position and that the laser is secured (as described in section 4.2). - Page 8 Figure 5 The vertical beam can be moved from side to side by turning the stagger adjustment wheel located in the centre of the vertical beam (shown in figure 6). When the Over head cable is in line with the laser the amount of cable stagger can be read from the scale on the upper side of the horizontal beam.
-
Page 9: Measuring Super Elevation
Measuring Super Elevation To measure super elevation press the white button at the left end of the gauge, a measurement will appear on the screen above the white button (see Figure ) Figure 7 After pressing the white button, the sensor requires approximately 10 seconds to stabilise. -
Page 10: Maintenance
Ensure that there are no flat spots on the bearing surfaces in contact with the rail Annual To ensure that the accuracy of your ABT4640 remains within specified limits, it should be returned to your local distributor for annual re-calibration. 4640-1 IMP Issue 03... -
Page 11: Trouble Shooter
Trouble Shooter Super-Elevation is not showing or is incorrect Try replacing the battery (9V PP3). Remove the battery cover on the underside of the horizontal beam and carefully unplug the existing battery. Incorrect icon is displayed on the laser unit The laser unit senses a magnetic field to select the correct icon –...
Need help?
Do you have a question about the ABT4640 and is the answer not in the manual?
Questions and answers