Table of Contents
Advertisement
Quick Links
Advertisement
Table of Contents

Related Manuals for Measurement Computing CIO-DAC08


Summary of Contents for Measurement Computing CIO-DAC08
- Page 2 CIO-DAC08 Analog Output Board User’s Guide Document Revision 2A, January, 2007 © Copyright 2007, Measurement Computing Corporation...
- Page 3 Other product and company names mentioned herein are trademarks or trade names of their respective companies. © 2007 Measurement Computing Corporation. All rights reserved. No part of this publication may be reproduced, stored in a retrieval system, or transmitted, in any form by any means, electronic, mechanical, by photocopying, recording, or otherwise without the prior written permission of Measurement Computing Corporation.
-
Page 5: Table Of Contents
Chapter 1 Introducing the CIO-DAC08 .........................7 Overview: CIO-DAC08 features ........................7 Software features ..............................7 Chapter 2 Installing the CIO-DAC08 ........................8 What comes with your CIO-DAC08 shipment?....................8 Hardware ..................................8 Additional documentation ..........................8 Optional components............................8 Unpacking the CIO-DAC08 ..........................9 Installing the software ............................9 Configuring the CIO-DAC08 ..........................9... -
Page 6: About This User's Guide
What you will learn from this user's guide This user's guide explains how to install, configure, and use the CIO-DAC08 board so that you get the most out of its analog output features. This user's guide also refers you to related documents available on our web site, and to technical support resources. -
Page 7: Introducing The Cio-Dac08
The board also features a wait state generator that you enable with an on-board jumper. Software features For information on the features of InstaCal and the other software included with your CIO-DAC08, refer to the Quick Start Guide that shipped with your device. The Quick Start Guide is also available in PDF at www.mccdaq.com/PDFmanuals/DAQ-Software-Quick-Start.pdf... -
Page 8: Installing The Cio-Dac08
In addition to this hardware user's guide, you should also receive the Quick Start Guide (available in PDF at www.mccdaq.com/PDFmanuals/DAQ-Software-Quick-Start.pdf). This booklet supplies a brief description of the software you received with your CIO-DAC08 and information regarding installation of that software. Please read this booklet completely before installing any software or hardware. -
Page 9: Unpacking The Cio-Dac08
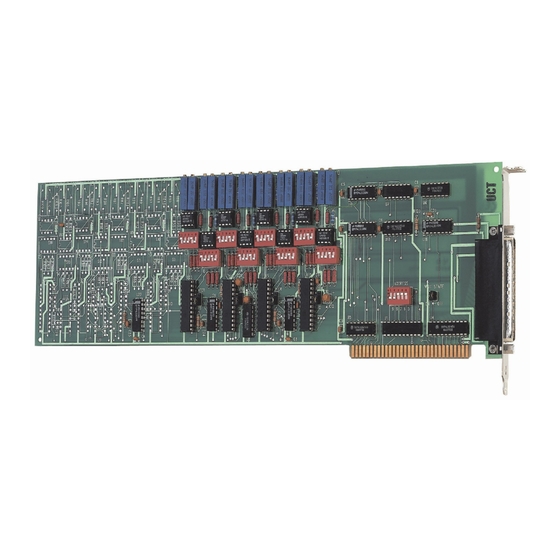
Quick-Start.pdf. Configuring the CIO-DAC08 The CIO-DAC08 has one base address switch, one bank of gain switches for each analog output channel, a simultaneous update jumper for each DAC pair, a "power-up state" selection jumper, and one wait state jumper which you must set before installing the board in your computer. The InstaCal calibration and test program included with the CIO-DAC08 will show you how to set the switches. - Page 10 Serial port The CIO-DAC08 Base switch can be set for an address in the range of 000-3E0, so it should not be hard to find a free address area for your CIO-DAC08. If you are not using IBM prototyping cards, or some other board which occupies these addresses, then 300-31F HEX are free to use.
-
Page 11: Wait State Jumper
Wait state jumper The CIO-DAC08 board has a wait state jumper which you can set to enable an on-board wait state generator. A wait state is an extra delay injected into the processor's clock via the bus. This delay slows down the processor when the processor addresses the CIO-DAC08 board so that signals from slow devices (chips) will be valid. -
Page 12: Power Up And Reset Jumper
±5V range (switch settings UP>DN>DN>UP>DN). Installing the CIO-DAC08 After you configure the board's switches and jumpers, you can install the CIO-DAC08 into your computer. To install your board, follow the steps below. Install the MCC DAQ software before you install your board The driver needed to run your board is installed with the MCC DAQ software. -
Page 13: Connecting The Board For I/O Operations
General information regarding signal connection and configuration is available in the Guide to Signal Connections (available at www.mccdaq.com/signals/signals.pdf). Pinout – main I/O connectors The CIO-DAC08 I/O connector is a standard 37-pin male D connector that is accessible through the PC/AT expansion bracket. -12V... -
Page 14: Cabling
CIO-DAC08 User's Guide Installing the CIO-DAC08 The analog outputs of the CIO-DAC08 are two-wire hook-ups. Always use low-level ground (LLGND) as the ground reference for all analog hook-ups. Cabling The red stripe identifies pin # 1 Figure 7. C37FF-x cable Figure 8. -
Page 15: Programming And Developing Applications
You should use the Universal Library or one of the packaged application programs mentioned above to control your board. Only experienced programmers should try register-level programming. If you need to program at the register level in your application, refer to the Register Map for the CIO-DAC08 and CIO-DAC16. This document is available on our website at www.mccdaq.com/registermaps/RegMapCIO-... -
Page 16: Functional Details
As the load resistance decreases, the output load increases. The OP07 responds by producing a lower output voltage. If your CIO-DAC08 will not produce the output voltage specified by the code & range combination, it is a good idea to check the load with an ohm meter. -
Page 17: Specifications
Chapter 5 Specifications Typical for 25 °C unless otherwise specified. Specifications in italic text are guaranteed by design. Analog output Table 1. Analog input specifications Parameter Conditions Specification D/A converter AD7237 Resolution 12-bits Number of channels 8 voltage outputs Output ranges ±10 V, ±5 V, ±2.5 V, 0 to 10 V, 0 to 5 V, 0 to 2.5 V. -
Page 18: Environmental
CIO-DAC08 User's Guide Specifications Environmental Table 3. Environmental specifications Operating temperature range 0 to 70 °C Storage temperature range -40 to 100 °C Humidity 0 to 90% non-condensing Main connector and pin out Table 4. Connector specifications Connector type 37-pin male "D" connector... - Page 19 Norton, MA 02766 Category: Electrical equipment for measurement, control and laboratory use. Measurement Computing Corporation declares under sole responsibility that the product CIO-DAC08 to which this declaration relates is in conformity with the relevant provisions of the following standards or...
- Page 20 Measurement Computing Corporation 10 Commerce Way Suite 1008 Norton, Massachusetts 02766 (508) 946-5100 Fax: (508) 946-9500 E-mail: info@mccdaq.com www.mccdaq.com...
Need help?
Do you have a question about the CIO-DAC08 and is the answer not in the manual?
Questions and answers