Table of Contents
Advertisement
Quick Links
See also:
Setup Manual
Advertisement
Table of Contents

Subscribe to Our Youtube Channel
Related Manuals for Time2 HSIP2


Summary of Contents for Time2 HSIP2
- Page 1 HSIP2 User Manual iOS Application Android Application PC Setup Please read all instructions carefully before use to get the most out of your HSIP2 Wireless Surveillance Camera. The design and features are subject to change without notice.
-
Page 2: General Description
General Description Thank you for purchasing the time2 HSIP2 Rotating Surveillance Camera – this device is a great way to monitor any part of your office, home or warehouse making sure all your valuables are safe and secure. Please keep this manual for future reference and ensure all safety instructions have been read carefully before using. -
Page 3: What Comes In The Box
What comes in the box? HSIP2 HD IP Camera WiFi Antenna Ethernet (internet) Cable DC Supply (power supply) Wall Mounting Brackets User Manual... -
Page 4: Camera Features
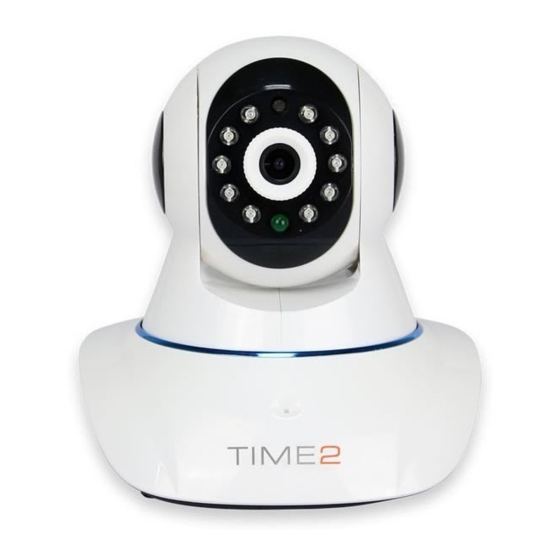
Camera Features 1. Wireless Antenna 2. Motion Detector 3. Infrared LED 4. Camera Lens 5. Network Indicator LED 6. Microphone 7. Loud Speaker... - Page 5 1. Headphone Slot 2. Ethernet / RJ45 Port 3. WiFi Antenna 4. Micro SD Card Slot 5. Power Port...
-
Page 6: Connecting The Camera
Support section, product downloads select HSIP2 Wireless Surveillance Camera. Connecting the Camera 1. Screw the WiFi Antenna into the gold screw at the back of the camera. 2. Plug the power adapter into the port at the back of the camera. -
Page 7: Ios Application
In order to download the iOS application, go to the Apple App Store on your iPhone/iPad. Search time2 Surveillance Pro then download and install the App. Once the App has been installed onto your iPhone/iPad, a shortcut icon will appear on your App list. Simply click to open. -
Page 8: Camera Setup
Camera Setup In Order to setup your camera onto your iPhone/iPad, click “Add device” on the App interface. The following screen will be displayed: You can set the camera up by either scanning the QR Code or Via the LAN Search. -
Page 9: Scan The Qr Code
LAN Search Click on this which will allow the iPhone/iPad to search the WiFi network that it is connected to and detect any Cameras that are also connected the same Wifi network. The following screen will appear: Simply click onto the camera you would like to connect to, the camera details will automatically complete. - Page 10 Once you have successfully added the camera to your software it will appear online with an additional message “Empty Password”. For extra security you will be required to change the Username and Password before you can access the camera. Click on the camera and the following will appear:...
- Page 11 Click “OK” and the application will take you through the User Setting section where you can change your Username and Password. Once you have changed the details for the “Administrator” click “Done” in the top right corner. The camera will reboot and will re-establish a connection after a couple of minutes.
- Page 12 Please note: You may find that once you have changed the Username and Password you see the following: This is because the changes you have made for the security need to be improved further. We recommend using a selection of Uppercase and Lowercase Letters and Numbers to ensure you set a secure Username and Password.
-
Page 13: Camera Controls
Camera Controls Simply swipe in any direction to move the camera. Other actions available are below:... - Page 14 Settings To view the Settings, simply click on the settings icon on the device homepage. The following screen will appear: Please note when you apply any settings to the camera ensure it is only online on one device. Having the camera online on multiple devices whilst changing settings may cause complications.
- Page 15 Wi-Fi Setting Using this setting you can set the camera to function over your wireless network. Please note: When setting the camera up for the first time, it will need to be wired into the internet router first. Click “Manage Wi-Fi network” to search for networks your camera can connect to.
-
Page 16: Alarm Settings
Alarm Settings Using this setting you can set the camera to send you notifications once the motion and audio has been detected. - Page 17 Motion Detection – Ensure this is turned on to activate the motion detection. Whilst the camera is turned on if any movement is detected, the built in motion detector will trigger an alarm. An alert will be sent to your phone.
-
Page 18: Email Settings
Email Settings Using this setting you can setup your mailbox to receive email notifications when motion has been detected. Sender – Enter your email address. SMTP Server – Select the appropriate SMTP server according to your email address. SMTP Port – This will automatically fill in once the server has been selected. - Page 19 SMTP User – Please enter the SMTP user (in most cases it is the first part of your email address) SMTP Password – Enter the password to your email address. Receiver 1 – Enter the email address you would like the email notification to go to.
-
Page 20: Sd Card Settings
SD Card Settings When first inserting an SD card, you will be required to format the SD card (simply click the format button). Once formatted, you will be able to select conditions such as “Record audio” or “Timer recording” etc. The PC software allows you to specify the times you would like the camera to start recording (see below). -
Page 21: Preset Positions
Preset Positions You can preset up to 16 positions for the camera to rotate to using the application. Once set all you have to do is select the number and the camera will rotate to that position. Click on the camera to bring up the live feed. Rotate the camera to the position you would like for a preset to be created. -
Page 22: User Setting
User Setting The username and password for the Operator and Administrator can be set and changed by clicking on this tab. Device Time Setting Set the date and time according to your time zone or simply synchronise to your Mobile phone time. -
Page 23: Downloading The App
Android Application Downloading the App In order to download the Android application, go to the Google Playstore on your Android device. Search time surveillance pro then download and install the App. Once the App has been installed onto your Android device, a shortcut icon will appear on your App list. -
Page 24: Camera Setup
Camera Setup In order to setup your camera onto your Android device, click “Add device” on the App interface. The following screen will be displayed: You can set the camera up by either scanning the QR Code or Via LAN Search. - Page 25 LAN Search Click on this which will allow the Android device to search the WiFi network that it is connected to and detect any cameras that are also connected to the same WiFi network. Simply click onto the camera you would like to connect to, the camera detail will automatically complete.
- Page 26 Once you have successfully added the camera to your software it will appear online with an additional message “Empty Password”. For extra security you will be required to change the Username and Password before you can access the camera. Click on the camera and the following will appear:...
- Page 27 Click “OK” and the application will take you through the User Setting section where you can change your Username and Password. Once you have changed the details for the “Administrator” click “Done” in the top right corner. The camera will reboot and will re-establish a connection after a couple of minutes.
- Page 28 Please note: You may find that once you have changed the Username and Password you see the following: This is because the changes you have made for the security need to be improved further. We recommend using a selection of Uppercase and Lowercase Letters and Numbers to ensure you set a secure Username and Password.
- Page 29 Camera Controls Simply swipe in any direction to move the camera. Other actions available are below:...
- Page 30 Settings To view the Settings, simply click on the settings icon on the Device. The following screen will appear: Please note when you apply any settings to the camera ensure it is only online on one device. Having the camera online on multiple devices whilst changing settings may cause complications.
- Page 31 Wi-Fi Setting Using this setting you can set the camera to function over your wireless network. Please note: When setting the camera up for the first time, it will need to be wired into the internet router first. Click “WiFi Manager” to search for networks your camera can connect to.
-
Page 32: Alarm Setting
Alarm Setting Using this setting you can set the camera to send you notifications once the motion and audio has been detected. - Page 33 Motion Detect Armed – Ensure this is turned on to activate the motion detection. Whilst the camera is turned on if any movement is detected, the built-in motion detector will trigger an alarm. An alert will be sent to your phone.
-
Page 34: Email Setting
Email Setting Using this setting you can setup your mailbox to receive email notifications when motion has been detected. Sender – Enter your email address. SMTP Server – Select the appropriate SMTP server according to your email address. - Page 35 SMTP Port – This will automatically fill in once the server has been selected. Need Check – Please ensure this is always ticked as some mail servers require authentication to receive emails. SMTP User – Please enter the SMTP user (in most cases it is the first part of your email address).
-
Page 36: Sd Card Settings
SD Card Settings When first inserting an SD card, you will be required to format the SD card (simply click the format button). Once formatted, you will be able to select conditions such as “Record audio” or “Timer recording” etc. The PC software allows you to specify the times you would like the camera to start recording (see below). -
Page 37: Preset Positions
Preset Positions You can preset up to 16 positions for the camera to rotate to using the application. Once set all you have to do is select the number and the camera will rotate to that position. Click on the camera to bring up the live feed. Rotate the camera to the position you would like for a preset to be created. -
Page 38: Time Setting
User Setting The username and password for the Operator and Administrator can be set and changed by clicking on this tab. Time Setting Set the date and time according to your time zone or simply synchronise to your Mobile phone time. -
Page 39: Installing The Pc Software
PC Setup Installing the PC Software Visit the following webpage – https://www.time2technology.com/product-downloads/Time2-HSIP2- Wireless-Surveillance-Camera.html To download the “IP Camera for PC” software. (Click to download) During download, your Anti-Virus software may bring up an alert, please ignore it and continue to download the software. Once the software has downloaded, double click on the software icon to open. - Page 40 Follow the onscreen instructions to finish the installation of the software (See below):...
- Page 41 Please ensure the “Create a desktop icon” option is ticked (see below) so an icon can be created on your desktop for easy access to the software. Once the software has been successfully installed, double click the icon to launch.
- Page 42 Camera Setup Open the application as the administrator and the following screen will appear: By default, there is no password allocated to the camera. To log in, simply enter the username (found at the bottom of the camera) then click Login.
- Page 43 In order to set up the software, firstly, ensure the camera and computer are connected to the same Internet Router. Click the “Plus” icon on the top right – hand corner of the screen. This will bring up another window, then click “Search”. This will bring up any cameras connected to that Internet Network.
- Page 44 This will bring up another window (see below). Check the settings then click OK to add the camera to the device list. Please note the initial log in details can be located at the bottom of the camera. In order to view the camera, simply put your mouse over the camera name and click and drag into one of the 4 black windows for the image to appear.
-
Page 45: Main Features
Main Features Click on the live feed to bring up the control bar for the camera. - Page 47 To view the Settings, simply click on the settings icon next to the camera name.
-
Page 48: Wifi Settings
WiFi Settings The wireless settings can be set and changed by clicking on this tab. Please note: When setting the camera up for the first time, it will need to be wired into the internet router first, before the wireless function is activated. -
Page 49: Device Information
Device Information This gives you all the information about the device, e.g. Firmware version, serial number, Alarm status etc. Date & Time Set the date and time according to your Time Zone or simply synchronise to your PC time. User Settings The username and password for the visitor, operator and administrator can be set and changed by clicking on this tab. - Page 50 Alarm Settings The motion detection settings can be changed by clicking on this tab. Motion Detect Armed – Whilst the camera is on, if any movement is detected the built-in motion detector will trigger an alarm. Tick this option to activate this feature. The dropdown box next to this option is for the sensitivity of the motion detection.
- Page 51 Alarm preset linkage – Click the dropdown box and choose a preset position you would like the camera to move too once the motion is detected. Please note you will need to set a preset position for this setting to work. See preset position for more information. Alarm video record –...
- Page 52 Email Settings This setting will set your email to receive email notifications when motion has been detected. Sender – Enter your email address. SMTP server – Select the appropriate SMTP server according to your email address. SMTP Port – This will be automatically filled in once the server has been selected.
- Page 53 Receiver – Finally enter the email addresses you would like the email notification to go to. Please note The camera needs to be connected to the internet at all times for this feature to work. If your email address provider is not available in the SMTP server settings you can still use your email address as long as you have the SMTP settings available.
- Page 54 Preset Positions You can preset up to 16 positions for the camera to rotate to using the application. Once set all you have to do is select the number and the camera will rotate to that position. Click on the camera to bring up the live feed. Rotate the camera to the position you would like for a preset to be created.
- Page 55 Support For further support with setup and if you require any help to make the most of your camera please contact our customer services support team. https://www.time2technology.com/en/support/ Connect With Us: http://m.me/time2HQ www.facebook.com/time2HQ www.twitter.com/time2HQ...
Need help?
Do you have a question about the HSIP2 and is the answer not in the manual?
Questions and answers