Advertisement
Owner's Manual and Assembly Instructions
Model #: ZW455AC-R-F
Read and understand the entire manual before assembly and operation. The vehicle must be
assembled by an adult who has read and understands the instructions.
Made in China.
Styles and colours may vary. Do not return to store. Visit us online at www.ariachild.com for
assistance and replacement parts.
Save this manual with your sales receipt.
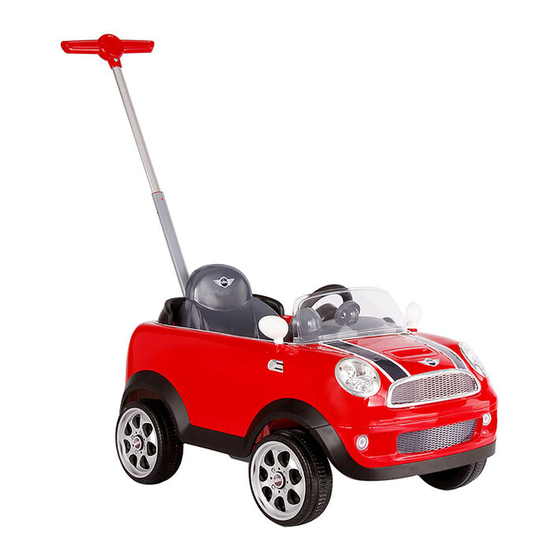
Mini Cooper Push Car
MINI Cooper S Push Car is manufactured by Paragon Child Products Co. Ltd, (Goodbaby
Group). The MINI trademarks are used under license from BMW AG. MINI name and
associated logos are trademarks of BMW AG.
Advertisement
Table of Contents

Related Manuals for Rollplay ZW455AC-R-F


Summary of Contents for Rollplay ZW455AC-R-F
- Page 1 Mini Cooper Push Car Owner’s Manual and Assembly Instructions Model #: ZW455AC-R-F Read and understand the entire manual before assembly and operation. The vehicle must be assembled by an adult who has read and understands the instructions. Made in China.
- Page 2 Introduction Thank you for purchasing the MINI Cooper S Push Car. We hope the rider enjoys it for miles to come. Please read this instruction guide carefully before assembling and operating the vehicle. Please contact Aria Child Customer Service with any questions. Hours: 9 AM - 5 PM (CST), Monday - Friday Web: www.ariachild.com Email: customerservice@ariachild.com...
- Page 3 IMPORTANT! DO NOT RETURN THIS ITEM TO THE STORE! Email or call Customer Service if you need assistance or replacement parts. customerservice@ariachild.com 1-888-982-9309 Read this entire manual to ensure proper assembly and safe operation of the vehicle.
- Page 4 This page is intentionally left blank.
-
Page 5: Table Of Contents
Table of Contents Safety ............6 Parts List ............8 Assemble the Wheels ........9 Steering Wheel/Windshield Assembly ...10 Mirror/ Seat/Push Bar Assembly ...11 Batteries and Operating Instructions ..12 General Care ..........13 Service and Repairs .......14 Warranty ...........15 Product Registration .......16... -
Page 6: Safety
Safety WARNING: SAFETY RIDING RULES The user must follow all safety rules and guidelines, or serious injury or death may occur to the user. • Always use common sense and safe practices when using the vehicle. The user must be at least 18 months old and weigh no more than 20 kg. - Page 7 Safety (Continued) WARNING: BATTERY SAFETY • explosion. It could permanently damage the system. Keep the charger housing closed to prevent exposed wiring, which may cause electric shock. • When replacing AAA batteries, always replace both batteries at the same time. Do not mix old batteries with new batteries or batteries of different types.
-
Page 8: Parts List
Parts List 1. Manual 10. Side Mirror (right) 2. Car Body 11. Snap Pin (4) 3. Steering Wheel Screw 12. Rim (4) 4. Steering Wheel Nut 13. Push Bar 5. Wheel (4) 14. Seat 6. Windshield 15. Steering Wheel 7. Rear Orientation Sleeve (2) 16. -
Page 9: Assemble The Wheels
Assemble the Wheels Front Wheels 1. To assemble the front wheels, place a washer on the front axle. 2. Slide the wheel onto the axle, ensuring that the holes for the rim are facing out. 3. Slide another washer onto the axle, then insert the snap-pin into the hole on the axle to secure the wheel in place. -
Page 10: Steering Wheel/Windshield Assembly
Steering Wheel/Windshield Assembly Assemble the Steering Wheel 1. Remove the steering wheel screw and steering wheel nut from the steering wheel. 2. Slide the steering wheel onto the steering rod. 3. Align the holes of the steering wheel with the holes on the rod. 4. -
Page 11: Mirror/ Seat/Push Bar Assembly
Mirror/ Seat/Push Bar Assembly Side Mirror Assembly 1. Insert the mirror into the slot on the side of the body. 2. Push it into the slot until you hear a click to complete the assembly. Repeat on the other side. Assemble the Seat 1. -
Page 12: Batteries And Operating Instructions
Batteries and Operating Instructions Insert Batteries 1. Open the battery cover using a Phillips screwdriver (not included). Insert 2 AAA batteries with the correct polarity, then resecure the cover using a screwdriver. To Operate: 1. Press buttons on steering wheel to hear horn and engine sounds. -
Page 13: General Care
General Care • Regularly inspect all vehicle parts to ensure they are in good working condition. • Remove any damaged parts and immediately contact Customer Service for replacement parts. See Service and Repairs on Page 24 for more information. • DO NOT operate the vehicle if there are any damaged parts. •... -
Page 14: Service And Repairs
Service and Repairs Do not return this vehicle to the store. If your product requires service, repairs or replacement parts, please visit us online at www.ariachild.com Or contact us at: 888-982-9309 Phone: 1- Email: customerservice@ariachild.com Web: www.ariachild.com Hours: 9 AM - 5 PM (CST), Monday - Friday For a list of available replacement parts, please visit www.ariachild.com. -
Page 15: Warranty
Warranty • One-year limited warranty from the date of purchase with proof of purchase from an Aria Child certified retailer. • This one-year limited warranty covers the push car vehicle against defects in materials and workmanship to the original purchaser. Proof of purchase receipt from an Aria Child certified reseller is required. -
Page 16: Product Registration
Product Registration Fill out the form below and mail it to: Aria Child, Inc. 1131 W Blackhawk St. Second Floor Chicago, IL 60642 OR fill out the form online at www.ariachild.com We will use the information provided only for your warranty. We will not sell, rent or share your personal information.
Need help?
Do you have a question about the ZW455AC-R-F and is the answer not in the manual?
Questions and answers
How do you assemble the push bar turning cable assembly?