SWELLPRO Splash Drone Quick Manual
Hide thumbs
Also See for Splash Drone:
- User manual (42 pages) ,
- Quick manual (2 pages) ,
- Quick manual (2 pages)
Table of Contents
Advertisement
Quick Links
Download this manual
See also:
User Manual
Splash Drone Quick Guide
V5.6
www.swellpro.com
SWELLPRO TECHNOLOGY Co., LTD
Splash Drone
Quick Guide
1. Radio
1.1. Using the Radio controller
Open the battery compartment cover, insert the battery JST cable into power
socket of the Radio controller. Please observe the correct polarity. (The Radio
controller won't burn out even when connected with a reverse polarity. If the
battery is incorrectly connected, the controller will not power up.)
1.2 Flight Mode
1.2.1 Flight Mode Introduction
Return-Home Switch
Normal
SWB1
SWB1
SWB2
Return-Home
SWB2
Attention: When returning and descending, the drone nose & aileron
joystick are controllable, to allow for a better landing location.
Note: Throttle is not controllable whilst the drone is in Auto Return-Home
mode.
Flight Mode switch ( SWC1, SWC2, SWC3)
SWC1
GPS Mode
SWC2
Circle Flight
SWC1 SWC2 SWC3
SWC3
ATTI Mode
Splash Drone
Caution: Please make sure the GPS arrow on the removable vent cover
is pointing towards the nose direction.
Nose Direction
01
02
03
04
05
06
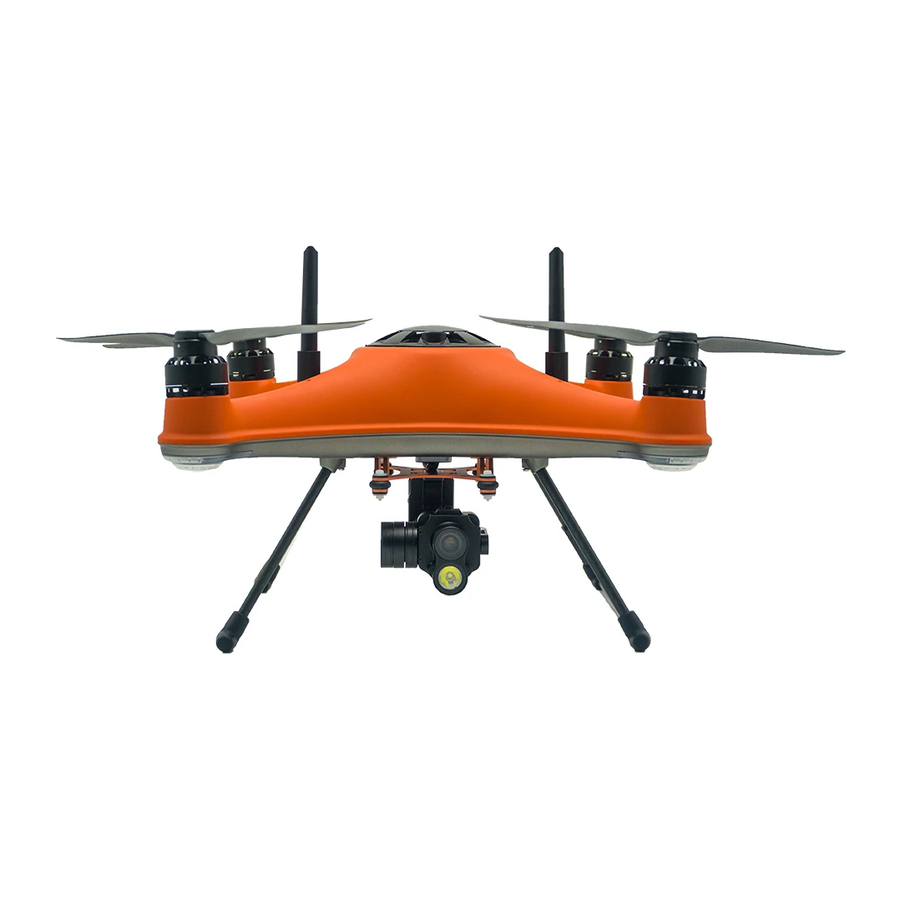
1. Hatch Screws
2. Propeller
3. Drone Nose
4. Navigation Lights
5. Anti-vibration damper ball
6. 2-Axis Waterproof Gimbal
7. Landing Gear
8. Watertight sealing connector
9. Rubber cushion foot
10. Watertight Motor
11. Propeller securing nut
12. NANO Vent cover
Splash Drone
1.2.2 Flight Operation Guide
a. Left Joystick is for Throttle and Nose direction
b. Right Joystick is for aileron control, pitch to forward/backward,
roll to left/right.
Left Stick
Right Stick
2. Self-tightening Propeller
2.2.1. Installation
Propeller
Propellor with silver cap
Propellor with black cap
Graphic
Assembly
Motor with silkprinting 'CCW'
Motor with silkprinting 'CW'
Location
Installation
Graphic
01
Remote Controller
20
19
01
18
02
17
03
16
04
05
15
06
14
07
13
08
12
12
09
11
10
Front view
11
1. Antenna
10
2. SWB-Normal/ Return Home
3. SWA-Airdrop
4. Power switch
09
5. Left Joystick
08
6. Throttle Sub-trim button
7. Yaw Sub-trim button
07
8. Mode/Menu button
9. End/Back button
10. Display
11. Enter button
12. Scrolling wheel
13. Left/Right Sub-trim button
14. Front/Rear Sub-trim button
Remarks: Items 18,19,20,21,25 and 26 are spare buttons for extra usage if
required. The default throttle control configuration is set to American Mode on
the left joystick. However, the Japanese Mode (right joystick ) is also available
basing on requirement.
Splash Drone
Quick Guide
2.2.2. Uninstall Propeller
NEVER try to un-fasten the propellers until the motors have stopped
spinning and are locked.
3. Flight
3.1. Calibration
Attention: All calibrations MUST be done with the motors LOCKED
and WITHOUT propellers.
3.1.1 Accelerometer Calibration
Calibration is necessary in below cases:
a. Use the drone for the first time.
b. After following excessive flight in ATTI Mode.
c. When pushing up the THROTTLE joystick without moving the right AILERON
joystick, the drone drifts with certain angle under ATTI Mode.
d. If the drone incurred or was subjected to a heavy shaking during
transportation.
e. After a completed compass calibration as well as the motors successfully
unlock, but the red LED stays solid red when trying to start up the motors.
Calibration Steps:
Accelerometer Calibration
1. Turn on the Radio controller, then power on the drone, wait until the
self-checking sequence is completed, then flip SWB to SWB2 (Return-Home)
position.
02
Safety Guide
1. Please obey the relevant regulations of the International Civil Aviation
23
21
Organization and local laws regarding the control of airspace & UAV
management regulations. Please do not fly in any no-fly zones.
22
24
25
2. When flying the Splash Drone, always fly in an open area, away from buildings,
trees and obstacles.
26
3. Keep a minimum distance of 3-5 meters between you and others. Do not
operate the drone close to crowds.
27
4. Before flight, you need to calibrate the aircraft according to procedures in the
manual.
5. If any abnormal operation is detected while using the Splash Drone, please
land immediately and stop operating the drone.
28
6. Before flying, ensure the propellers are installed in the correct direction and
tightened securely to each of the motors.
Back view
7. Do not attempt to touch the motors, until the motors have stopped rotating .
15. Right Joystick
8. When using the WiFi Sport camera with the Splash Drone, please disable the
16. SWD-Camera Control
WiFi function before flying. Wifi should not be used in the area where you are
17. SWC-Flight Mode
flying.
18. SWG (NO Function)
9. If the aircraft battery is low, land immediately to avoid damage.
19. VRB (NO Function)
10. Wait for 6-10 seconds after powering on aircraft before taking off or moving
20. VRA (NO Function)
the Splash Drone, the system is in self-checking and satellite collecting.
21. SWH (NO Function)
11. If a loss of radio signal occurs, the aircraft will enter into Auto Return Home
22. VRD-Gimbal Pitch control
mode automatically. If radio contact is re-established, please flip SWC once and
23. Handle Shaft
then switch to GPS mode to take control of the aircraft.
24. VRC-Gimbal Roll control
25. SWF (NO Function)
Forbidden ight conditions:
26. SWE (NO Function)
a. Never fly nearby strong radio interference activity areas.
27. Trainer Socket
b. Never fly nearby any crowds.
28. Battery cover
c. Never fly around strong magnetic fields.
d. Never fly when you are tired or affected by alcohol.
e. Never fly when the remote controller can not control aircraft due to any other
reasons.
Splash Drone
Quick Guide
2. Pull the left joystick to right-lowest at a 45° angle, push the right joystick to
right-upper at a 45° angle as shown in the picture below:
3. Maintain the above gesture for 2s until the light changes to flashing RED,
the drone then enters into its calibration process. Wait till the light stops
flashing, and goes to a slower RED blink, then release the joysticks. The
accelerometer calibration is now completed.
3.1.2. Compass Calibration
Please Note: It is recommended to calibrate the compass in the proposed flying
area before flying. Flying anywhere close to any magnetic interference is HIGHLY
DISCOURAGED. (Please make sure to keep far away from the following:
High-Voltage transmission power lines, Emitting base stations, metal objects,
etc.)
Calibration is necessary in below cases:
a. Before flying drone for the first time.
b. If 100KM or more away from the last compass calibration location.
c. The drone has been crashed/dropped by accident.
d. The drone keeps swaying / drifting during flight.
e. If the drone incurred or was subjected to a heavy shaking during
transportation.
f . If the RED Light stays on, and the motors can't be unlocked.
03
Quick Guide
04
Advertisement
Table of Contents

Related Manuals for SWELLPRO Splash Drone


Summary of Contents for SWELLPRO Splash Drone
- Page 1 Caution: Please make sure the GPS arrow on the removable vent cover management regulations. Please do not fly in any no-fly zones. is pointing towards the nose direction. 2. When flying the Splash Drone, always fly in an open area, away from buildings, Splash Drone Quick Guide trees and obstacles.
- Page 2 3. Wait 2s until the RED light is ON SOLID, the drone is now ready for compass right pictures. calibration. 2. Run the " Swellpro " APP, click " GPS coordinate " to find the current location 4. Pick up drone HORIZONTALLY, to commence full COUNTER CLOCKWISE and to select a suitable flying area.
Need help?
Do you have a question about the Splash Drone and is the answer not in the manual?
Questions and answers