
Related Manuals for SWELLPRO SWIFT 2


Summary of Contents for SWELLPRO SWIFT 2
- Page 1 SWIFT 2 Racing drone User Manual V 1.0 Do not blink, because it’s fast! www.swellpro.com...
-
Page 2: Table Of Contents
INDEX 1. Get to know your aircraft............ 3 2. Get to know your remote controller ......4 3. Specification ................6 4. Attention before flight ............8 5. Charge the battery..............8 6. Prepare the drone ..............9 7. Ready for flight ................ 11 8. - Page 3 Swift User Manuzal SWIFT 2 Racing drone A professional, ready to fly, compact but aggressive andyet elegant racing drone! 1. Do not blink, because it’s fast! 2. Unprecedented modular design and highly integrated design. 3. Championship level racing power system.
-
Page 4: Get To Know Your Aircraft
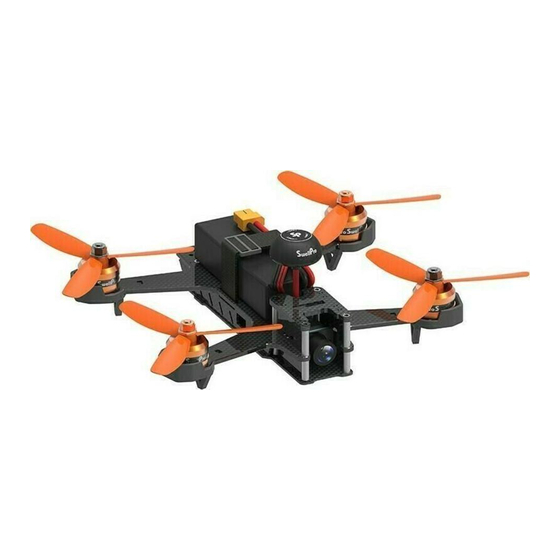
Swift User Manual 1. Get to know your aircraft 1. Camera 8. Mushroom antenna 2. Propeller(CW) 9. Reciever antennas 3. Propeller(CCW) 10. Tail light 4. Clockwise motor 11. Transmitter monitor 5. Counterclockwise motor 12. Transmitter control switch 6. Li-Po Battery 13. -
Page 5: Get To Know Your Remote Controller
Swift User Manual 2. Get to know your Remote Controller Light ON / Light OFF Stablize / Intermediate / Advanced Wave wheel switch (No function) Wave wheel switch (No function) Lock Motor / Unlock Motor OSD ON / OSD OFF Left Joystick Right Joystick Power... - Page 6 Swift User Manual The Swift 2 features 3 useful flight modes, STABILIZE/INTERMEDIATE / ADVANCED(RATE) Flight modes are selected by SWC. (Select the appropiate mode according to your flight skills) Stablize Intermediate Advanced STABILIZE Flight mode: the main flight controller system comes with stabilization function,its operation is relatively stable, it can not roll, it is suitable for beginners.
-
Page 7: Specification
Swift User Manual 3. Specification Main carbon frame: 3.5mm 3K altra strong carbon fiber frame Aircraft Propeller: #5045 3blades Brushless ESC: 25A Axis Diameter:220mm Battery: 3S 2600 mAh LiPo (Weight: 214g) Overall (L x W x H):183 x 216 x 85mm Transmitter:... -
Page 8: Remote Controller
Swift User Manual Remote Controller Net Weight: 435g (Battery Excluded) Frequency Channel: 2405 ~ 2475HMZ Remote Control Distance: 1.0 KM Receiver Sensitivity(1%PER):-105dbm Working Current: 120 mA Battery: 7.4V-11.1V Channel: 10 Camera Horizontal Resolution: 800TVL System Commitee: PAL/NTSC Power input: 5V FOV: 120 Degree Aperture: F2.5 Transmitter... -
Page 9: Attention Before Flight
Swift User Manual 4. Attention before flight The Swift is recomended for pilots, 15 years or older, with RC hobby experience. Only fly the Swift in dry weather, with low wind, please do not fly in rain or heavy foggy conditions. Always choose large open fields for flying. -
Page 10: Prepare The Drone
Swift User Manual 6. Prepare the drone First, install the mushroom to the mounting brackets as show.Next, push into the Video Transmitter, Finally tighten the rotating collar with the included wrench. Install propellers Fix the clockwise propeller onto the clockwise motor according to the direction of blue arrow,and fix the counter clockwise propeller onto the counterclockwise motor according to the direction of orange arrow. -
Page 11: Battery Installation
Swift User Manual Battery installation First put the battery anti-slip mat into the battery compartment.Put the battery on top and move it forward-backwards as required for perfect balance, then firmly secure the battery with the velcro strap. Airplane Head Gravity center adjustment Grab the Swift by the COG line (center of gravity).See the illustration for the COG.Adjust the battery forward-backwards until the quad balances. -
Page 12: Ready For Flight
Swift User Manual 7. Ready for flight Attention: 1. Place the aircraft in a wide open space, with the rear facing you. 2. Put the motor switch to the lock mode position, move the throttle to the lowest position. 3. A video receiving equipment is needed to display an image and OSD informa- tion 4. - Page 13 Swift User Manual 7.2 Motor unlock Put the throttle joystick at the lowest position,put the SWA at the lowest position to unlock the motor. -12-...
-
Page 14: Operation Instruction
Swift User Manual 8. Operation instruction Aircraft instruction Remote Controller control instruction -the direction of the head) ( Throttle up/down (The rear toward operator) Pitch forward/backward (Indicator light instruction ) ROLL (lean) left/right (Indicator light instruction ) -13-... - Page 15 Swift User Manual Aircraft instruction Remote Controller control instruction -the direction of the head) ( YAW(turn) left/right (Indicator light instruction ) The aircraft roll forward Intermediate Advanced Make sure fly in the Intermediate&Advanced flight mode. The rear toward operator The aircraft roll backward Attention: Always select large open spaces with soft ground for flying, Rolls...
- Page 16 Swift User Manual The aircraft roll left Intermediate Advanced Make sure fly in the Intermediate&Advanced flight mode. The aircraft roll right Attention: Always select large open spaces with soft ground for flying, Rolls and flips are best suited for experi- enced pilots.Match throttle power to the flight to manage altitude.
-
Page 17: End Flight
Swift User Manual 9. End flight Land the aircraft Motor lock First Power off the aircraft , then turn off the radio Finally, remove the battery from the aircraft -16-... -
Page 18: Additional Instruction
Swift User Manual 10. Additional Instruction 10.1 Remote controller setting Attention: We strongly recommand not to change the default setting of remote control- ler. This is only for senior pilot. Boot screen(Main interface) T1 \T2:Timer and setting menu FLY MODE: Current flight mode and setting menu TX/RX: Status and voltage settings menu Display actuator Sliding up and down to check and long press the screen to... - Page 19 Swift User Manual Main interface display make operation more easy and simple Sliding screen to the right to check the channel status,Sliding to the left to check the sensor list. Click the ( wrench) to enter the main menu, Slide the screen down to view the settings menu.
- Page 20 Swift User Manual End points The end points function changes the range of movement available to a channel. This can be used to limit the tilt of the model, so that it is easier to control.The left box is the low end points, the right box is the high end points, marked below as low being blue and red being high.
- Page 21 Swift User Manual output mode This function can choose two output modes of the receiver, PWM mode and PPM mode. Select the output mode according to the demand, the black dot icon indicates the currently selected mode. Select [back] to save and back to the superior menu 10.2 OSD information A video receiver is needed to display the OSD information.
- Page 22 Swift User Manual 10.3 Video transmitter channel selection There are 40 channels available,chose the best video quality based on your screen. channel selection method Channel selection: press for 3 seconds to enter into the ABCDE loop mode,Short press to enter the selection of 1-8 loop mode for adjust the specific channel ,and hold for 2 seconds to confirm Power selection Long press for 5 seconds to enter the power switching mode;Short press to switch 1...
- Page 23 Swift User Manual 10.4 Main board connection receiver connection ESC4 ESC3 SBUS ESC2 ESC1 camera connection holder display window video transmission modular Adjustment button Brushless ESC and brushless motor connection diagram Counterclockwise motor ESC4 ESC3 ESC2 ESC1 Counterclockwise motor Clockwise motor -22-...
- Page 24 Attention: ESC and flight controller can both be adjusted via USB , please download and install the Cleanflight in Google apps for adjust the flight controller, and download the application and documents at swellpro.com for adjust the ESC, The power should be on when adjust the ESC.
-
Page 25: Instruction For Balance Changer
Swift User Manual 11. Instruction for balance changer General specification of the balance changer Input voltage: AC100-240V Charging power :35W Support battery: LiPo 2-4S Balance current:400mA Charging current:3A±10% Operation instruction: 1. Insert the AC power cord into changer and 100-240V AC socket 2. - Page 26 Swift User Manual Notice Do not leave the battery and charger unattended when charging. Place the charger in a dry and ventilated place during charging. Do not charge the waste battery,damaged battery and wet battery.. Do not charge the different types of battery pack. Do not allow children under 15 years to use the changer to avoid accidents.
- Page 27 SWELLPRO TECHNOLOGY Co., LTD TEL:0755-82266175 Email: info@swellpro.com Address: D15.shengang Flower Center , Shohe West Road, ShenZhen, China 51800 This manual is subject to renewal without prior notice.Please refer to the Swellpro official website for the latest version.
Need help?
Do you have a question about the SWIFT 2 and is the answer not in the manual?
Questions and answers