Table of Contents
Advertisement
Advertisement
Table of Contents

Related Manuals for Intel NUC Kit DE3815TYKHE


Summary of Contents for Intel NUC Kit DE3815TYKHE
-
Page 1: User Guide
Intel NUC Kit DE3815TYKHE User Guide Intel® NUC Kit DE3815TYKHE User Guide... -
Page 2: Before You Begin
If such a station is not available, you can provide some ESD protection by wearing an antistatic wrist strap and attaching it to a metal part of the computer chassis. Installation Precautions When you install and test the Intel NUC, observe all warnings and cautions in the installation instructions. To avoid injury, be careful of: ... -
Page 3: Installing And Removing Memory
To open the Intel NUC chassis, follow these steps: 1. Unscrew the two screws (A) on the front panel of the chassis and lift the cover (B). Installing and Removing Memory Intel NUC Kit DE3815TYKHE has one 204-pin DDR3L SO-DIMM socket. Memory requirements: 1.35V low voltage memory ... - Page 4 Intel® Wireless-N 7260 + Bluetooth The operation of any other wireless adapter with Intel® NUC Kit DE3815TYKHE, other than those listed above, may violate regulatory compliance requirements for your region. For more information on wireless adapters, go to: http://www.intel.com/support/wireless/wlan.
- Page 5 Intel NUC Kit DE3815TYKHE User Guide CAUTION When installing a Mini-PCIe wireless adapter on the Intel NUC, ensure that the adapter is fully seated in the connector before you power on the system. If the adapter is not fully seated in the connector, an electrical short may result across the connector pins.
- Page 6 Intel NUC Kit DE3815TYKHE User Guide 5. Secure the wireless card to the standoff with the small silver screw (C). 6. Remove the black tape holding the two wireless antennas. 7. Slide the clear plastic protective sleeve down onto the antenna wires, away from the connectors at the ends of the antennas (D).
- Page 7 Intel NUC Kit DE3815TYKHE User Guide Install a 2.5” SSD or Hard Drive For a list of tested 2.5” hard drives, go to the Tested Peripherals page on the Support site. Follow these instructions to install a 2.5” Solid State Drive (SSD) or Hard Disk Drive (HDD): 1.
-
Page 8: Close The Chassis
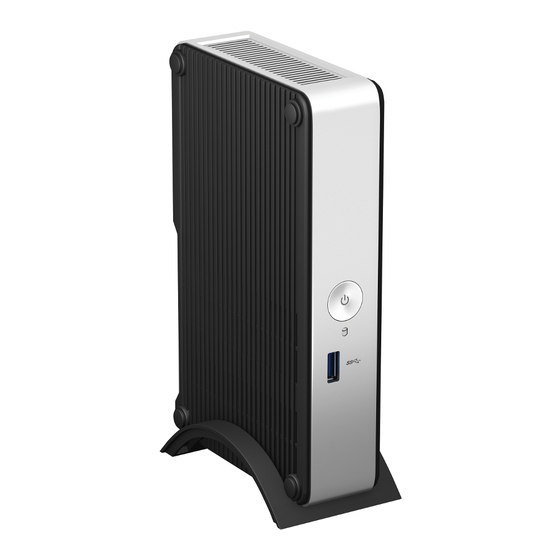
4. Set the drive bay bracket down inside the chassis, taking care not to pinch the SATA cables along the edge. Secure the drive bay with the screws. Close the Chassis After all components have been installed, close the Intel NUC chassis. - Page 9 Intel NUC Kit DE3815TYKHE User Guide Attach the Chassis Stand (Optional) The chassis stand allows for the Intel NUC to be positioned vertically. Follow these instructions to attach the chassis stand: Attach and Use the VESA Bracket (Optional) Follow these instructions to attach and use the VESA mount bracket: 1.
-
Page 10: Install An Operating System
Intel NUC Kit DE3815TYKHE User Guide 2. Attach the two slightly larger black screws to the bottom chassis cover of the Intel NUC. 3. Slide the Intel NUC onto the VESA mount bracket. Install an Operating System Refer to Supported Operating Systems for a list of Intel-validated Windows* operating systems, as well as versions of Linux that have been reported as compatible by Intel NUC owners. - Page 11 Intel NUC Kit DE3815TYKHE User Guide Install Intel NUC Drivers To download the latest Microsoft* Windows* drivers and BIOS updates for the Intel NUC Kit DE3815TYKHE, go to Download Center. Drivers are available for the following features: Audio ...
Need help?
Do you have a question about the NUC Kit DE3815TYKHE and is the answer not in the manual?
Questions and answers