
Related Manuals for BeachTek DXA-MICRO PRO+


Summary of Contents for BeachTek DXA-MICRO PRO+
- Page 1 Operating Manual DXA-MICRO PRO+ Compact XLR Adapter for DSLR Cameras and Camcorders This operating manual explains the adapter function settings and how to use the adapter to record audio into the camera. ©Beachtek Inc. 2018...
- Page 2 Please contact us if you have any problems or questions. Description he BeachTek DXA-MICRO PRO+ allows you to capture pro audio from external microphones and other audio gear to any DSLR camera or camcorder that has a built-in mic jack. Its small size makes it ideal for today’s compact cameras.
- Page 3 Warnings Ensure that the VOLUME control is set low to avoid excessively loud audio from damaging your hearing. Always do a test recording and play back the audio to ensure it is acceptable. DO NOT activate phantom power for dynamic microphones, condenser microphones that do not operate on phantom power, wireless receivers, mixing boards or any unbalanced device as it may cause damage to both the adapter and connecting device.
-
Page 4: Table Of Contents
Contents Supplied Accessories…………………………………………………... 1 Quick Setup Guide…………………………………………………..2 Adapter Controls and Connectors…………………………………….. 3 Power and Charging Status…………………………………………… 6 Setup Guide……………………………………………………………... 7 Basic Operation……………………………………………………..9 Playback Monitoring……………………………………………………. 10 Advanced Operation……………………………………………………. 11 Features………………………………………………………………….. 13 Specifications……………………………………………………………. 14 Warranty Information…………………………………………………… 15... -
Page 5: Supplied Accessories
Supplied Accessories Removeable cheese plate Two 3.5mm to 3.5mm SC35 cables Micro USB cable Brass mounting foot with knurled wheel and attachment bolt Allen key... -
Page 6: Quick Setup Guide
Quick Setup Guide Ensure the POWER switch is set to OFF before you begin. Fully charge the battery for 4 hours or use external power. Mount the DXA-MICRO PRO+ adapter to the camera. Connect the supplied SC35 cable from the OUT jack on the adapter to the MIC input jack on the camera. -
Page 7: Adapter Connectors And Controls
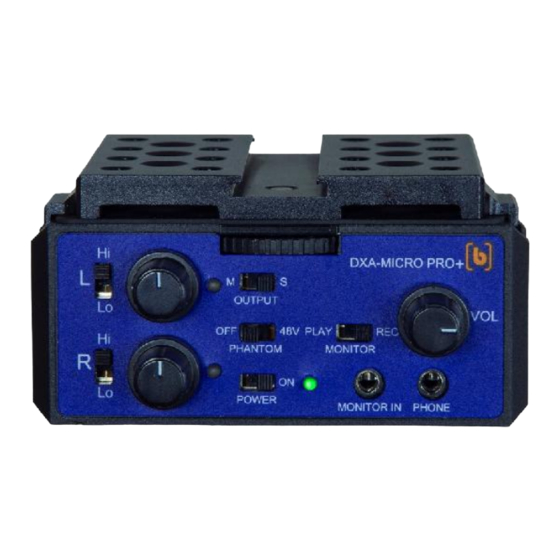
Adapter Connectors and Controls Front Panel POWER Switch Main power switch for adapter POWER LED Green indicates power on and good battery condition Yellow indicates low battery level indicates critical low battery level MONITOR Switch REC selects headphone monitoring from either the microphones during recording, or PLAY for playback audio from the camera PHONE Headphone jack to monitor the audio from microphones or camera... - Page 8 Front Control Panel Rear Panel MICRO USB Port Charging and External power port Rear Panel...
- Page 9 Side XLR Panel XLR Input Balanced XLR input to attach professional microphones or wireless systems. This sends the signal to the Right channel Side Mini-Jack Panel Stereo output jack for connection to the camera Left unbalanced 3.5mm mic input. Provides 3.5 volt plug-in power Right unbalanced 3.5mm mic input.
-
Page 10: Power And Charging Status
Power and Charging Status Charging Use the supplied Micro USB Cable connected to a USB power source to charge the LiPo battery in the adapter. The Adapter should be fully charged before use to ensure maximum run times. The Power LED indicates power status as follows: Charging: Flashing Charged: Solid GREEN... -
Page 11: Setup Guide
Setup Guide Mounting and Connecting the Adapter to the Camera 1) Ensure that the camera and adapter are both switched off. 2) To mount the adapter under the camera, line up the mounting bolt on top of the adapter to the tripod hole on the underside of the camera. - Page 12 Initial Setup 1) Connect your microphones or other audio gear to the adapter. 2) Set the PHANTOM switch to OFF if phantom power is not needed. Set to 48V only for condenser microphones that require phantom power to operate. 3) Set the MONITOR Switch to REC to monitor the audio from the microphones during recording.
-
Page 13: Basic Operation
Basic Operation After following the above Initial Setup, you should be ready to start recording. The following setup is for cameras that only have Auto Gain Control (AGC) with no manual settings. 1) Turn the adapter POWER switch ON. The POWER LED should light green indicating good battery voltage. -
Page 14: Playback Monitoring
Notes on Getting the Best Audio Performance The most common problem in recording professional audio on today’s DSLR cameras is the hiss generated by the camera preamplifiers. You will never completely eliminate all hiss, which is normal, but you can reduce it so that it is no longer a problem. -
Page 15: Advanced Operation
Advanced Operation Using Cameras that have Manual Audio Controls If your camera allows you to disable the AGC feature we recommend that you do so to get the best performance. Set the camera to manual mode and the camera gain as follows: Canon DSLR cameras 1 click above off Nikon DSLR cameras... - Page 16 How to Setup Audio Bracketing Audio Bracketing is a simply a technique of setting a secondary channel at a lower level to use as a backup in case the primary channel gets blown out from an overly hot signal. This can be used anytime a single mono mic is being used with the adapter.
-
Page 17: Features
Features Inputs One balanced XLR connector Two unbalanced 3.5mm jacks with plug-in power One stereo unbalanced 3.5mm jack with plug-in power MONITOR IN for playback monitoring Output Unbalanced stereo mini-jack for connection to the camera Headphone Monitor ... -
Page 18: Specifications
Specifications Maximum Input Levels LO gain -14dBu HI gain -29dBu Output Level -26dBu when level indicators change to red Frequency Response 20Hz to 20kHz (+/- 0.5dB) THD+N Less than 0.03% @ 1kHz, -30dBu input S/N Ratio 85dB @ 1Khz, -30dBu input Gain +15dB +30dB... -
Page 19: Warranty Information
Warranty Information Limited Two Year Warranty This warranty covers any defects or malfunction in your new BeachTek adapter for two years from date of purchase. BeachTek will replace or repair any defective or malfunctioning adapter, within the warranty period, at no charge. The warranty does not cover damage resulting from accident, alteration, misuse or abuse. - Page 20 Contact Information Address Beachtek Inc. 480 Osprey Avenue Kelowna, British Columbia Canada V1Y 5A5 Phone 778-478-9872 Email info@beachtek.com Website www.beachtek.com...
Need help?
Do you have a question about the DXA-MICRO PRO+ and is the answer not in the manual?
Questions and answers