Table of Contents

Related Manuals for BeachTek DXA-CONNECT


Summary of Contents for BeachTek DXA-CONNECT
- Page 1 Operating Manual DXA-CONNECT Professional XLR Adapter for DSLR Cameras and Camcorders This operating manual explains the adapter function settings and how to use the adapter to record audio into the camera. ©Beachtek Inc. 2013...
- Page 3 Direct audio recording eliminates the need to have a separate audio recording device and syncing the audio in post editing. The DXA-CONNECT is very easy to set up and use. It allows you to connect a wide variety of audio devices including wireless systems, mixers, sound boards and professional condenser microphones that require phantom power to operate.
- Page 4 Warnings Ensure that the VOLUME control is set low to avoid excessively loud audio damaging your hearing. Always do a test recording and play back the audio to ensure it is acceptable. DO NOT activate phantom power for dynamic microphones, condenser microphones that do not operate on phantom power, wireless receivers, mixing boards or any unbalanced device as it may cause damage to both the adapter and connecting device.
-
Page 5: Table Of Contents
Contents Before You Begin……………………………………………………….. 1 Supplied Accessories…………………………………………………... 1 Quick Setup Guide……………………………………………………… 2 Adapter Connectors and Controls…………………………………….. 4 Setup Guide……………………………………………………………... 6 Basic Operation…………………………………………………………. 9 Features…………………………………………………………………. Specifications…………………………………………………………… Warranty Information…………………………………………………… 12... -
Page 6: Before You Begin
Before You Begin 1) This product is primarily designed for cameras that have manual audio controls to get the best performance and a headphone jack to monitor the sound. This includes the Canon 5D MKIII and Nikon D800. 2) Panasonic Lumix GH1 and GH2 DSLR cameras require a special 2.5mm mic cable which is available from our Online Store. -
Page 7: Quick Setup Guide
Ensure the POWER switch is set to OFF before you begin. Install a fresh alkaline or lithium battery in the adapter. Mount the DXA-CONNECT adapter to the camera hot shoe. Connect the supplied output cable from the OUT jack on the adapter to the MIC input jack on the camera. - Page 8 Turn the adapter PWR switch ON. The power LED should indicate green. Adjust the LEFT and RIGHT level controls for each channel to get an average reading of -12dB on the VU Meter in the camera. Plug your headphones into the phone jack on the camera and adjust the volume control to a comfortable level.
-
Page 9: Adapter Connectors And Controls
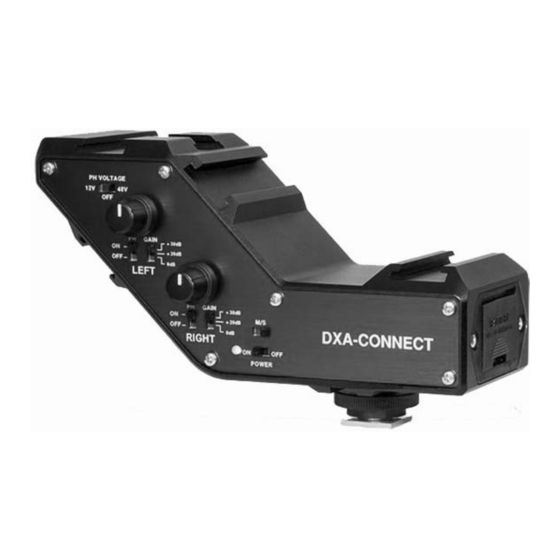
Adapter Connectors and Controls Control Panel PWR Switch Main power switch for adapter PWR LED Green indicates power on and good battery condition Red indicates low battery voltage M/S Switch Selects mono (mixed) or stereo (separated) output mode LEFT and RIGHT Controls Individual adjustment controls to adjust output levels on each channel Gain Switch... - Page 10 Connector Panel LEFT and RIGHT XLR Inputs Two balanced XLR inputs attach to professional microphones or other audio gear such as wireless systems or mixers and sound boards Output jack for connection to the camera Connector Panel...
-
Page 11: Setup Guide
Setup Guide Battery Installation 1) The DXA-CONNECT operates on one 9 volt battery. We recommend that you use either an alkaline or lithium type battery for the longest operating time. 2) To install the battery, unlatch the drawer by pushing in and over on the drawer front, releasing and sliding the drawer out. -
Page 12: Initial Setup
Initial Setup Connect your microphones or other audio gear to the adapter via the XLR inputs. Set the PH switches to on only for condenser type mics that require phantom power to operate. DO NOT activate phantom power when attaching wireless microphones! ... - Page 13 Camera setup The Auto Gain Control (AGC) in the camera will vary the amount of gain depending upon the input signal level. During quiet moments, the AGC will increase the gain, which will also increase the amount of hiss from the camera preamplifiers.
-
Page 14: Basic Operation
Basic Operation After following the above Initial Setup, you should be ready to start recording. 1) Turn the adapter PWR switch ON. The power LED should light green, indicating good battery voltage. Red indicates low battery warning. 2) Turn on the camera and set to record standby. 3) Adjust the LEFT and RIGHT level controls to give you an average reading of about -12dB on the VU Meter in the camera. -
Page 15: Features
Features Inputs Two balanced XLR connectors Outputs Unbalanced stereo mini-plug jack for connection to the camera Phantom Power Switchable 12V/48V phantom power for both channels Gain Switch 0dB, +20dB, and +30dB gain setting for each channel Level Controls ... -
Page 16: Specifications
Specifications Maximum Input Levels +13 dBu at 0dB gain setting -7 dBu at 20dB gain setting -17 dBu at +30dB gain setting Output Level Nominal MIC levels Frequency Response 20 Hz to 20 kHz (+/- 0.5 dB) Less than 0.01% @ 1 kHz, -30 dBu input S/N Ratio 85 dB @ 1 KHz, -30 dBu input Gain... -
Page 17: Warranty Information
Warranty Information Limited Two Year Warranty This warranty covers any defects or malfunction in your new Beachtek adapter for two years from date of purchase. Beachtek will replace or repair any defective or malfunctioning adapter, within the warranty period, at no charge. The warranty does not cover damage resulting from accident, alteration, misuse or abuse. -
Page 20: Contact Information
Contact Information Address Beachtek Inc. 480 Osprey Avenue Kelowna, British Columbia Canada V1Y 5A5 Phone 778-478-9872 Email info@beachtek.com Website www.beachtek.com...
Need help?
Do you have a question about the DXA-CONNECT and is the answer not in the manual?
Questions and answers