PureLink UX-8800 Owner's Manual
Ux series hdmi 2.0 integrated matrix switcher
Hide thumbs
Also See for UX-8800:
- Troubleshooting manual (20 pages) ,
- Technical support manual (12 pages)

Related Manuals for PureLink UX-8800


Summary of Contents for PureLink UX-8800
- Page 1 Owner's Manual UX Series HDMI 2.0 Integrated Matrix Switcher PureLink For technical support, please contact us at info@solidsignal.com or 877.312.4547...
-
Page 2: Table Of Contents
1.1 Safety Precautions --------------------------------------------------------------- 1.2 Declaration of Conformity --------------------------------------------------------------- 1.3 What’s in the Box --------------------------------------------------------------- 1.4 Product Introduction --------------------------------------------------------------- 1.5 Front View of UX-8800 --------------------------------------------------------------- 1.6 Rear View of UX-8800 --------------------------------------------------------------- 1.7 Front View of UX-4400 --------------------------------------------------------------- 1.8 Rear View of UX-4400 --------------------------------------------------------------- 1.9 Installation Guidelines... -
Page 3: Safety Precautions
PureLink by Dtrovision Chapter 1. Introduction 1.1 Safety Precautions All safety instructions should be read and understood before the unit is operated. The owner’s manual and safety instructions should be retained for future reference. Unplug this unit from the wall outlet before cleaning. Do not use liquid or aerosol cleaners. Use a damp cloth only. -
Page 4: Declaration Of Conformity
Council Directive Low Voltage Equipment Safety. Each product marketed is identical to the representative unit tested and found to be compliant with the standards. 1.3 What’s in the Box Main Frame: UX-4400 / UX-8800 Power Adapter – DC12V, 7.5A, 60W ... -
Page 5: Product Introduction
4x4 or 8x8 HDMI 2.0b Matrix Switching PureLink’s UX Series Matrix Switchers are available in the 4x4 (UX-4400) and 8x8 (UX-8800) configurations Supported Resolutions... -
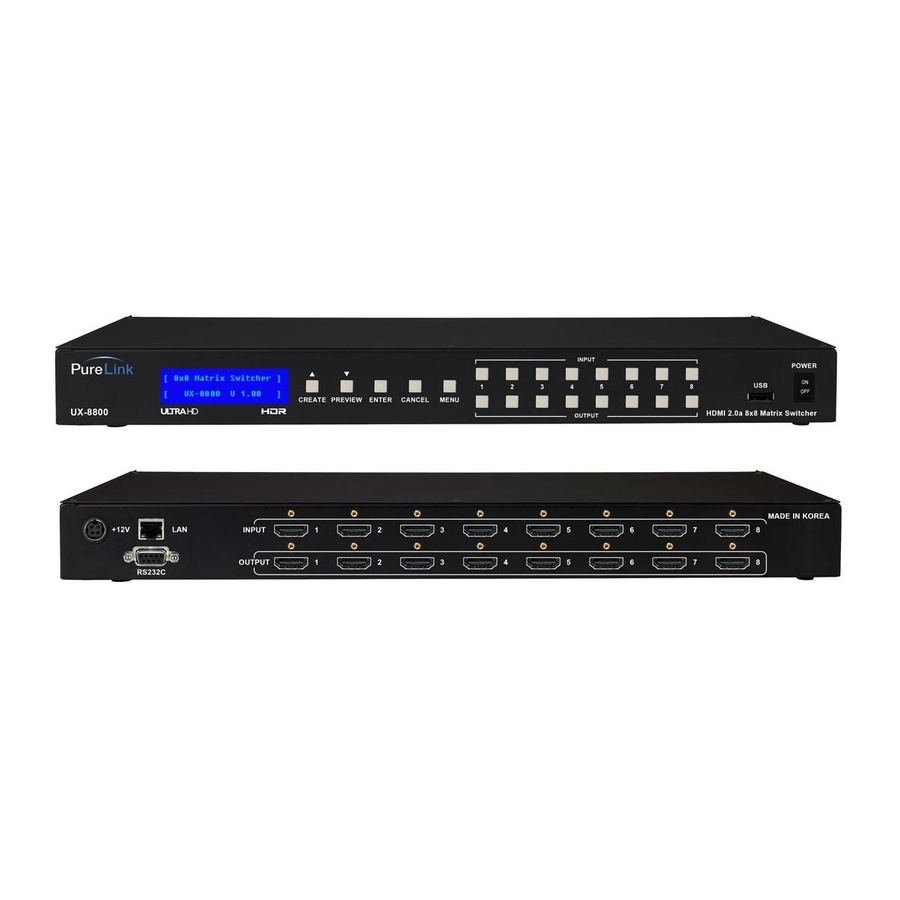
Page 6: Front View Of Ux-8800
PureLink by Dtrovision 1.5 Front View of UX-8800 The UX-8800 features a 19” rack mountable chassis with function keys, push button controls, and a status display as shown in Figure 1-1. <Front Panel> (Figure 1-1) POWER: Main power switch ON / OFF... -
Page 7: Front View Of Ux-4400
PureLink by Dtrovision 1.7 Front View of UX-4400 The UX-4400 features a 19” rack mountable chassiswith function keys, push button controls, and a status display as shown in Figure 2-1. <Front Panel> (Figure 2-1) POWER: Main power switch ON / OFF... -
Page 8: Installation Guidelines
PureLink by Dtrovision 1.9 Installation Guidelines The following installation settings are recommended for optimal performance. Operational temperature should be 30° C or below Operational humidity should be 60% or below Operational environment should be dust-free and well ventilated ... -
Page 9: Chapter 2. Product Features
PureLink by Dtrovision Chapter 2. Product Features 2.1 Features Full HDMI v2.0b support and HDCP 2.2 compliance 19” standard rack mount enclosure External EDID read functionsupports HDMI or DVI displays. Bi-directional RS232/LAN control Locking HDMI ports ... -
Page 10: Chapter 3. Operational Guidelines
PureLink by Dtrovision Chapter 3. Operational guidelines 3.1 Main Menu User Guide Turn the power switch on Once all channel indicator lights are on, the first step is completed. Channel View and Input Selection IN / OUT indicates connection status ... - Page 11 PureLink by Dtrovision EDID Set Internal EDID Write On this menu, select an EDID from the library and save it on to the Input EEPROM. UX series Matrix Switcher has 13 selectable most widely used EDID data pre-programmed.
- Page 12 PureLink by Dtrovision and supported settings are: Supported Baud Rate: 4800 Bps, 9600 Bps, 14400 Bps, 19200 Bps, 38400 Bps, 57600Bps, 76800 Bps, 115200 Bps Supported Data bit: 5 bit, 6 bit, 7 bit, 8 bit Supported Parity: Non, Even, Odd...
- Page 13 PureLink by Dtrovision 7. Now you have the IP Address shown on the screen 8. The cursor will be located on the first set of numbers of the default IP Address 9. Use the ‘Create’ and ‘Preview’ button to change numbers 10.
- Page 14 PureLink by Dtrovision Firmware Version - Matrix Switcher’s/Web UI firmware version can be checked UX-4400-CT-V1.1.0 - Controller(Matrix) firmware is 1.1.0 UX-4400-UI-V1.1.0 - Web UI Firmware is 1.1.0...
-
Page 15: Chapter 4. Communication Code Configuration
This section is designed for programmers who wish to create their own control programs using the command code. All PureLink digital matrix switchers provide a simple character stream control used by external control devices attached to a PureLink device. Command codes are used primarily for control, during system installation and setup, and for diagnostic purposes. -
Page 16: General Rules Forcommand Codes
PureLink by Dtrovision 4.4 General Rules forCommand Codes The commands are coded in ASCII and HEXA. Please refer to Table 3.1 on pg. 16 for detailed descriptions of keys and functions. A basic command code setup is shown below; Ex) *255CI01O01! ... - Page 17 PureLink by Dtrovision Table 3.1 Command Codes Characters Table The table below shows command code characters (keys), which are used to generate control commands, their functions, and short function descriptions. Function Description and Example Byte ASCII 0x2A Start the command...
-
Page 18: Command Ack Value Response
PureLink by Dtrovision 4.5 Command Ack (Acknowledge) Value Response When command codes are entered into a terminal emulation program (such as HyperTerminal) and are accepted by the system, they respond back to the terminal screen one at a time, as noted below in the table. -
Page 19: Disconnecting Switches
*255CI01O01,I01O02,I02O03,I04O04! Connect both input 1 to output 1 and input 1 to output 2 , input 2 to output 3 , input 4 to output 4 ☞ response *255sCI01O01,I01O02,I02O03,I04O04! •Create settings command (UX-8800) *255CI01O01,I01O02,I02O03,I04O04,I05O05,I06O06,I07O07,I08O08! ☞ response *255sCI01O01,I01O02,I02O03,I04O04,I05O05,I06O06,I07O07,I08O08! Examples (Connect Video):... - Page 20 PureLink by Dtrovision character “!” is found at the end of the Command code, which tells the system to execute the command. For example, the command code *255DI01O00! It can be interpreted as follows: (*) Starting the command code (255) Switcher ID is 255 (D) Disconnect on (I01) Input 01 to (O00) Output 00 (!) take the command.
- Page 21 PureLink by Dtrovision Internal/External EDID Setting L01 : 1080p , DVI L02 : 1080p , 2ch L03 : 1080p , Bitstream L04 : 1080p , PCM Multichannel L05 : 1080p , 2ch , 3D support L06 : 1080p , Bitstream , 3D support...
-
Page 22: Connection Status Check
1. Enter the Connection status check command below. Replace the “#”s with the input and output number(s). *255?I#! or *255?O#! •Channel connecting information (UX-4400) *255?C! ☞ response *255s?CI01O01,I01O02,I02O03,I04O04! • Channel connecting information (UX-8800) *255?C! ☞ response *255s?CI01O01,I01O02,I02O03,I04O04,I08O05,I08O06,I08O07,I08O08! Firmware Version Check: User can confirm switcher’s current firmware version •Web UI version *255?VERSIONUI!... - Page 23 PureLink by Dtrovision *255?NCS! ☞response *255s?NCS00! or *255s?NCS01! • Current IP address information *255?NIP! ☞ response *255s?NIP192.168.000.002! • Current gateway address information *255?NGW! ☞ response *255s?NGW192.168.000.001! • Current subnetmask information *255?NSM! ☞ response *255s?NSM255.255.255.000! • Current Mac address information *255?NMA!...
- Page 24 PureLink by Dtrovision •RS232 databits settings command *999?RD! ☞ response *999s?RD01! •RS232 parity settings command *999?RP! ☞ response *999s?RP01! Preset Command: User can call / check saved preset. •Preset call command *999PC01! ☞ response *255sCI01O01,I01O02,I02O03,I04O04! •Preset status command *999?PC01! ☞ response...
-
Page 25: Lan Code Configuration
PureLink by Dtrovision 4.9 LAN CODE CONFIGURATION Using TELNET protocol with LAN(TCP/IP) The UX series Matrix Switcher can be controlled from remote locations through the LAN port using WINDOWS XP DOS prompts, hyper-terminal, or TELNET program (the control code is fully compliant with RS-232C). -
Page 26: Web Ui Guide
PureLink by Dtrovision Chapter 5. Web UIGuide 5.1 UX Web UI Guide *Google Chrome is recommended for web UI* *Default log in ID and password is 1* *We recommend using Google Chrome -5 Menus for the Web UI- 1) CREATE... - Page 27 PureLink by Dtrovision -Example for output. - Completion of labelingboth inputs and outputs. CREATE - Switching Inputs and Outputs 2. Switching can be made by pressing each buttons. For example...
- Page 28 PureLink by Dtrovision Input 1 is routed to output1, Input 2 is routed to output 2. (The color will change once the buttons are clicked) Input 3 is routed to output 3 and input 4 is routed to output 4.
- Page 29 PureLink by Dtrovision 2) PRESET Preset Edit - Multiple(up to 20) preset switching commands can be pre-programmed and saved in the memory. It can be recalled in the future for east time-saving switching. 1. Select the preset from the preset select option 2.
- Page 30 PureLink by Dtrovision 3. You can label each inputs to the output as seen above. 4. Press Save button to save the Preset...
- Page 31 PureLink by Dtrovision Preset Call - Calling the saved preset. 1. You can select saved presets by selecting from the preset select option under PRESET CALL. 2. Once the preset is selected, press Call button to complete the switching that was saved on to the preset.
- Page 32 PureLink by Dtrovision 3) EDID EDID - Configuring EDID setting (Internal and external) . 1. There are 13 preloaded EDID selection on the EDID Edit list 2. Once the selection is made, pressing Load button to the selected input will save the EDID to the input.
- Page 33 PureLink by Dtrovision 3. External EDID can be selected from the EDID list. (Outputs 1-4 for UX-4400, Outputs 1-8 for UX-8800) 4. Select the Output port and press LOAD to bring and save the EDID from the display to the selected input.(EDID from output port 1 was saved to IN1:Roku on example picture above)
- Page 34 PureLink by Dtrovision IP Address 1. Selecting On in DHCP will assign the IP address by the network.(Dynamic IP Address) 2. The IP settings can be manually set with DHCP Off.(Static IP Address) RS232 3. RS232C Setting can be changed by selecting each option. Press save button to save the changes made.
-
Page 35: Firmware Upload Web Ui
PureLink by Dtrovision 5.2Firmware Upload (Web UI) *Google Chrome is recommended* 1. There are 2 types of firmware that may be required to be upload. UX-4400-UI-V1.1.0 - Web UI Firmware is version 1.1.0 UX-4400-CT-V1.1.0 - Controller(Matrix) firmware is version 1.1.0 *Confirm the proper firmware type is selected 2. - Page 36 PureLink by Dtrovision 3. Select and open the firmware to load the firmware. 4. Once the firmware upload is completed, check the front of the LCD panel of the matrix.
- Page 37 PureLink by Dtrovision 5.The screen above will appear on the front LCD panel. 6. It will return to the original state once the firmware upload is fully completed. 7. Power cycle the matrix. *Procedures of uploading firmware for both controller and Web UI are identical.
-
Page 38: Firmware Upload Usb
PureLink by Dtrovision 5.3 Firmware Upload (USB) 1. Confirm the USB file system is FAT32. *USB Disk is not included in the package... - Page 39 PureLink by Dtrovision 2. Confirm only the firmware is in the USB disk. 3. Insert the USB disk in to the USB port in the front. 4. Power cycle the Matrix while the USB is inserted. 5. Once the upload start, you will see the Flash writing on the front LCD panel.
- Page 40 PureLink by Dtrovision 6. Once the upload is completed, UX will return to its original state. 7. Remove the USB disk and power cycle the matrix once the firmware upload is completed.
-
Page 41: Chapter 6. Additional Information
90-day warranty or the remainder of the warranty period. PureLink shall not be responsible for any software, firmware, information, or memory data loss of contained in, stored on, or integrated with any products returned to PureLink for repair under warranty.
Need help?
Do you have a question about the UX-8800 and is the answer not in the manual?
Questions and answers