Tektronix TCPA300 SERIES Instruction Manual
Amplifiers & ac/dc current probes
Hide thumbs
Also See for TCPA300 SERIES:
- User manual (82 pages) ,
- Safety instructions (32 pages) ,
- User manual (80 pages)
Table of Contents
Advertisement
Instruction Manual
TCPA300/400 Amplifiers &
TCP300/400 Series AC/DC Current Probes
071-1183-03
This document applies for firmware version 1.0
and above.
Warning
The servicing instructions are for use by qualified
personnel only. To avoid personal injury, do not
perform any servicing unless you are qualified to
do so. Refer to all safety summaries prior to
performing service.
www.tektronix.com
Advertisement
Chapters
Table of Contents

Related Manuals for Tektronix TCPA300 SERIES


Summary of Contents for Tektronix TCPA300 SERIES
- Page 1 This document applies for firmware version 1.0 and above. Warning The servicing instructions are for use by qualified personnel only. To avoid personal injury, do not perform any servicing unless you are qualified to do so. Refer to all safety summaries prior to performing service. www.tektronix.com...
- Page 2 Copyright © Tektronix. All rights reserved. Licensed software products are owned by Tektronix or its subsidiaries or suppliers, and are protected by national copyright laws and international treaty provisions. Tektronix products are covered by U.S. and foreign patents, issued and pending. Information in this publication supercedes that in all previously published material.
- Page 3 Warranty 2 Tektronix warrants that this product will be free from defects in materials and workmanship for a period of one (1) year from the date of shipment. If any such product proves defective during this warranty period, Tektronix, at its option, either will repair the defective product without charge for parts and labor, or will provide a replacement in exchange for the defective product.
-
Page 5: Table Of Contents
Table of Contents Preface ............Getting Started System Configuration . - Page 6 Table of Contents Inductance Measurements ......... 3- - 13 Continuity Test of Multiple-Conductor Cable .
- Page 7 Table of Contents Adjustment Procedures Adjustment Procedures Overview ......6- -1 TCPA300 and TCPA400 Amplifier Adjustments .
- Page 8 Table of Contents TCPA300/400 Amplifiers and TCP300/400 Series Current Probes Instruction Manual...
- Page 9 Table of Contents List of Figures Figure 1- -1: Typical TCPA300/400 current measurement system . . . 1- -1 Figure 1- -2: Using the probe holders ......1- -6 Figure 1- -3: Equipment locations in the travel case .
- Page 10 Table of Contents Figure 4- -8: Measuring 750A noncontinuous at 50 °C ambient temperature ........4- -12 Figure 4- -9: Measuring 600A noncontinuous at 50 °C ambient temperature...
- Page 11 Table of Contents Figure 7- -10: Removing the strain relief boot ....7- -14 Figure 7- -11: Removing the top half of the probe .
- Page 12 Table of Contents viii TCPA300/400 Amplifiers and TCP300/400 Series Current Probes Instruction Manual...
- Page 13 Table of Contents List of Tables Table 1- -1: Amplifier options ....... . 1- -3 Table 1- -2: Service options .
- Page 14 Table of Contents Table 5- -19: DC gain accuracy test worksheet for the TCP303 and TCP404XL ......... . . 5- -35 Table 5- -20: Equipment settings for rise time .
- Page 15 General Safety Summary Review the following safety precautions to avoid injury and prevent damage to this product or any products connected to it. To avoid potential hazards, use this product only as specified. Only qualified personnel should perform service procedures. While using this product, you may need to access other parts of the system.
- Page 16 General Safety Summary Provide Proper Ventilation. Refer to the manual’s installation instructions for details on installing the product so it has proper ventilation. Symbols and Terms Terms in this Manual. These terms may appear in this manual: WARNING. Warning statements identify conditions or practices that could result in injury or loss of life.
- Page 17 Service Safety Summary Only qualified personnel should perform service procedures. Read this Service Safety Summary and the General Safety Summary before performing any service procedures. Do Not Service Alone. Do not perform internal service or adjustments of this product unless another person capable of rendering first aid and resuscitation is present.
- Page 18 Service Safety Summary TCPA300/400 Amplifiers and TCP300/400 Series Current Probes Instruction Manual...
-
Page 19: Preface
Preface This Instruction Manual supports the operation and basic maintenance of the TCPA300 and TCPA400 Current Probe Amplifiers, and the TCP300/400 Series AC/DC current probes that mate with the amplifiers. The current probes covered in this manual are listed below: H TCP312 (30 amps, 100 MHz, compatible with TCPA300) H TCP305 (50 amps, 50 MHz, compatible with TCPA300) H TCP303 (150 amps, 15 MHz, compatible with TCPA300) - Page 20 Preface TCPA300/400 Amplifiers and TCP300/400 Series Current Probes Instruction Manual...
-
Page 21: Getting Started
Getting Started... -
Page 23: System Configuration
Getting Started The TCPA300 and TCPA400 current probe amplifiers let you use one probe to simultaneously measure AC and DC current. The amplifiers convert the sensed current into a proportional voltage signal that you can measure directly with an oscilloscope. The TCPA300 and TCPA400 current probe amplifiers provide better linearity than other current measurement systems because of a current feedback process used with the probe. - Page 24 Current Probes The following Tektronix current probes are compatible with the TCPA300 Amplifier: H TCP312 (30 amps, 100 MHz) H TCP305 (50 amps, 50 MHz)
-
Page 25: Options
No power cord Japanese Instruction Manual Table 1- -2 lists the Tektronix service options you can order for your amplifiers and probes. Designed to support tracking of calibration to requirements of ISO9000 and to provide for extended repair coverage, these options help fix your long-term maintenance costs and eliminate unplanned expenditures. -
Page 26: Standard Accessories
Getting Started Standard Accessories The following accessories are shipped with the amplifiers and probes. Refer to the Replaceable Parts List beginning on page 8- -1 for Tektronix part numbers to use in ordering accessories. Amplifiers The following accessories are shipped with the TCPA300 and TCPA400 amplifiers. -
Page 27: Optional Accessories
Optional Accessories You can order the following optional accessories for the amplifiers and probes. Refer to the Replaceable Parts List beginning on page 8- -1 for Tektronix part numbers to use in ordering accessories. H One-turn 50 Ω current loop. The current loop is used in the performance verification procedure for checking the performance of the TCPA300 Amplifier and the compatible probes. -
Page 28: Probe Covers
Getting Started Probe Covers The TCP300/400 Series Current Probes come with a probe cover that stores the probe when not in use. Use the probe cover to hold your probe in a convenient place at your bench or workstation when you are not using it. You can attach the probe cover to the side of the bench to keep the probe off of your work surface. -
Page 29: Travel Case
Getting Started Travel Case The travel case is a recommended accessory for the TCPA300/400 Amplifiers. The travel case includes room to store one amplifier and two TCP300/400 Series Current Probes, one of each size. (For example, you can store a TCP305 and a TCP303 probe.) A compartment is included to store associated cables and terminations. -
Page 30: Connecting The Amplifier To An Oscilloscope
Getting Started Connecting the Amplifier to an Oscilloscope You will need an oscilloscope to display the TCPA300 and TCPA400 measure- ment output. To use the full dynamic range of the probe/amplifier combination, the oscilloscope must be capable of displaying a vertical scale factor of 1 mV/div to 1V/div. -
Page 31: Connecting A Current Probe To The Amplifier
Each current probe is calibrated before it is shipped, and should not require further adjustment. If a probe requires adjustment, refer to the Adjustment Procedure Overview on page 6- -1 or contact your nearest Tektronix Service Center. The adjustment procedure must be performed only by qualified service personnel. -
Page 32: Operating The Current Probe Slide
Getting Started Operating the Current Probe Slide The current probes each have a slide mechanism that opens and closes the probe jaw. This allows you to clamp the probe around a conductor under test. The slide must be locked closed to accurately measure current or to degauss the probe. If a probe is unlocked, the PROBE OPEN indicator on the amplifier will light. -
Page 33: Degaussing And Autobalancing The Current Probe
Getting Started (2) Lock the probe (1) Unlock the probe (1) Release the handle (2) Squeeze the handle (a) Opening the probe (b) Closing and locking the probe Figure 1- 6: TCP303 and TCP404XL slide operation Degaussing and Autobalancing the Current Probe Degaussing the probe removes any residual magnetization from the probe core. -
Page 34: Dc Measurements
Getting Started To degauss and autobalance a current probe, perform these steps: 1. Verify that the current probe is connected to the amplifier. 2. Remove the current probe from the conductor under test. 3. Lock the probe slide closed (see Figures 1- -5 and 1- -6). 4. -
Page 35: Figure 1- 7: Current Probe Polarity
Getting Started WARNING. Do not clamp the TCP305 or TCP312 current probes around uninsulated wires. Damage to the probe or personal injury may result. Only use the TCP305 or TCP312 current probes on INSULATED wires. The TCP303 and TCP404XL current probes can be used to measure current on uninsulated wires. -
Page 36: Ac Measurements
Getting Started AC Measurements To measure AC current only, and remove the DC component of the current being measured, follow the instructions below. These are identical to the instructions for DC current measurements except that the amplifier coupling in step 2 is set to 1. -
Page 37: Operating Basics
Operating Basics... -
Page 39: Control Summary
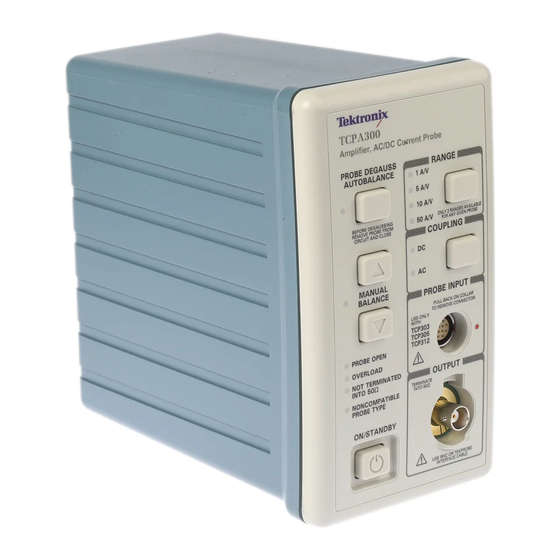
Control Summary This section describes the function of each TCPA300 and TCPA400 front panel control and connector. The overview in Figure 2- -1 is followed by a detailed description. Some seldom-used functions do not appear in Figure 2- -1. These functions are completely discussed in the detailed descriptions that follow Figure 2- -1. -
Page 40: Tcpa300 And Tcpa400 Controls
Control Summary TCPA300 and TCPA400 Controls These front panel controls and indicators are common to both the TCPA300 and TCPA400 current probe amplifiers, unless otherwise indicated. PROBE DEGAUSS When pressed, this button performs two functions that maximize measurement AUTOBALANCE Button accuracy. -
Page 41: Manual Balance Buttons And Indicator
Control Summary Displaying Error Codes with the Probe Degauss Autobalance Button on page 3- -22. NOTE. The NOT TERMINATED INTO 50 Ω LED is on when the amplifier output is not properly terminated into a 50 Ω load. Make sure your amplifier OUTPUT is connected to an oscilloscope input using a 50 Ω... -
Page 42: Probe Open Indicator
Control Summary NOT TERMINATED When lit, this indicator informs you that the TEKPROBE interface cable or BNC INTO 50 Ω Indicator cable from the OUTPUT of the amplifier is not connected to a 50 ohm input on the oscilloscope. You need to switch the termination setting on the oscilloscope to 50 Ω, or use a 50 Ω... -
Page 43: Probe Input Connector
BNC cable to this connector and the other end to a 50 Ω vertical input of your oscilloscope. The output impedance of the amplifier is 50 Ω. To get a direct readout of current on your Tektronix oscilloscope, use the TEKPROBE interface cable to connect the amplifier to your oscilloscope. -
Page 44: Gpib Operation
Control Summary GPIB Operation The TCPA300 and TCPA400 Current Probe Amplifiers do not have direct GPIB connections. However, you can use a computer to control the oscilloscope that the amplifier is connected to, enabling you to change the time and scale factors of your current measurements over the oscilloscope GPIB bus. -
Page 45: Reference
Reference... -
Page 47: Reference Notes
Reference Notes These notes are provided to help you utilize the full potential of the TCPA300 and TCPA400 current probe systems. Degaussing a Probe with an Unpowered Conductor in the Jaws Under almost all conditions, you can degauss your current probe while a conductor of an unpowered circuit is clamped in the jaws. -
Page 48: Measuring Differential Current
Reference Notes Measuring Differential Current You can place two conductors in a current probe to provide differential or null current measurement. This avoids the necessity of using two current measure- ment systems with a differential oscilloscope. WARNING. Do not put more than one uninsulated conductor at a time in the TCP303 or TCP404XL probes. -
Page 49: Ac And Dc Coupling
Reference Notes Conductor #2 Conductor #1 Current Current Current probe Figure 3- 1: Measuring differential current and nulls AC and DC Coupling You can couple the signal input to the TCPA300 and TCPA400 with either DC or AC coupling. DC coupling shows the DC and AC measurement components while AC coupling removes the DC component from the displayed signal. -
Page 50: Maximum Current Limits
Reference Notes 1. Select the range setting that will display the maximum detail without exceeding the dynamic range of the signal. 2. Adjust the oscilloscope V/div sensitivity (A/div if using the TEKPROBE interface), to display maximum signal detail. Maximum Current Limits Current probes have three maximum current ratings: continuous, pulsed, and Ampere-second product. -
Page 51: Figure 3- 3: Applying The Amp-Second Product Rule
Reference Notes Maximum Do Not Exceed pulsed current Pulse width at 50% Pulse width at 50% Maximum continuous current (a) Maximum allowable pulse width (b) Maximum allowable pulse amplitude Figure 3- 3: Applying the amp-second product rule Procedure B To determine the maximum allowable pulse amplitude, measure the pulse width at the 50% points (see Figure 3- -3b). -
Page 52: Measuring Noncontinuous Current With The Tcp404Xl Probe
Reference Notes Measuring Noncontinuous Current with the TCP404XL Probe When you measure a noncontinuous current with the TCP404XL probe, you need to take into consideration several factors to ensure that you make accurate measurements and do not trip the thermal overload circuit. The amplitude and duty cycle of the continuous and noncontinuous current, and the ambient temperature, all affect the maximum amount of time allowed for the measure- ment, which defines the safe operating area of the probe. - Page 53 Reference Notes varying duty cycles and levels of continuous current. The ambient temperature in these two examples is kept constant at 50 °C. WARNING. When using the probe near the upper current limit and maximum ambient temperature for extended lengths of time, the probe head surface can become hot to the touch.
-
Page 54: Extending Current Range
Reference Notes Extending Current Range You may encounter situations where your measurement exceeds the maximum current rating of the connected probe. This section discusses methods for extending AC and DC current ranges without exceeding specified limits. WARNING. To avoid personal injury or equipment damage, do not exceed the specified electrical limits of the TCPA300 and TCPA400 or any applicable accessories. -
Page 55: Figure 3- 5: Increasing The Dc Measurement Range
Figure 3- 5: Increasing the DC measurement range Extending AC Range You can extend the AC amplitude limit of the TCPA300 by using the Tektronix CT-4 High-Current Transformer. The CT-4, designed for use with the TCP305 and TCP312 current probes, extends the current probe range by a factor of 20:1 or 1000:1. -
Page 56: Increasing Sensitivity
Reference Notes Increasing Sensitivity If you are measuring DC or low-frequency AC signals of very small amplitudes, you can increase measurement sensitivity of your Current Probe by winding several turns of the conductor under test around the probe as shown in Figure 3- -6. -
Page 57: Application Notes
Application Notes This section describes some of the typical measurement applications of the TCPA300 and TCPA400 Current Probe Amplifiers: H Automobile Charging Systems H Inductance Measurements H Continuity Test of Multiple-Conductor Cable H Measuring Inductor Turns Count H Power Measurement and Analysis Software Applications Automobile Charging Systems Most automotive charging systems are three-phase alternators with a diode rectifier network. -
Page 58: Figure 3- 7: Setup For Measuring Charging Current
Application Notes TCP303/404XL Battery Alternator ground To ground To current probe amplifier Figure 3- 7: Setup for measuring charging current The waveform in Figure 3- -8(a) shows the three-phase ripple frequency. The average charge current is approximately 27 A with a minimum peak of approxi- mately 23 A and a maximum peak of approximately 31 A. -
Page 59: Inductance Measurements
Application Notes Inductance Measurements You can use the TCPA300 and TCPA400 to measure inductance of coils. Two different methods can be used: one for low-impedance pulse sources and another for high-impedance pulse sources of known value. Low-Impedance Pulse Figure 3- -9 shows a measurement setup using a constant-voltage pulse generator Sources of extremely low output impedance. -
Page 60: Figure 3- 10: Linear Current Vs. Time Ramp
Application Notes Current flow (i) Time (t) Figure 3- 10: Linear current vs. time ramp High-Impedance Pulse If the pulse source has a higher impedance of known resistance, such that the Sources output voltage drops as the current increases, the inductance of a coil can be calculated by the time constant of the charge curve. -
Page 61: Continuity Test Of Multiple-Conductor Cable
Application Notes Resistance Current flow (i) Pulse Inductance generator Current probe Figure 3- 11: Measuring inductance with a high-impedance source Current flow (i) 100% 63.2% 36.8% Time (t) τ τ Figure 3- 12: High-impedance source current ramp Continuity Test of Multiple-Conductor Cable Single conductors in a multiconductor cable can be tested with the TCPA300 and TCPA400. -
Page 62: Measuring Inductor Turns Count
Application Notes Measuring Inductor Turns Count To obtain an approximate turns count of an inductor, connect the inductor to a current limited source, as shown in Figure 3- -13. Measure the input current on one of the inductor leads, then clamp the current probe around the inductor and note the current value. -
Page 63: Power Measurement And Analysis Software
H Modulation analysis After making the measurements, the software generates detailed test reports in customizable formats. When the software is used with a Tektronix TDS5000 Series or TDS7054/TDS7104 digital phosphor oscilloscope and differential voltage and current probes, it forms a complete measurement system for power supply design and test. - Page 64 Application Notes 3- 18 TCPA300/400 Amplifiers and TCP300/400 Series Current Probes Instruction Manual...
-
Page 65: Troubleshooting And Error Codes
Troubleshooting and Error Codes Table 3- -3 lists possible problems that you may encounter when measuring current with the TCPA300 and TCPA400. Use this as a quick troubleshooting reference. Table 3- 3: Troubleshooting Problem Remedy Amplifier will not power on Check that the amplifier is plugged into a working AC outlet. - Page 66 Troubleshooting and Error Codes Table 3- 3: Troubleshooting (Cont.) Problem Remedy Degauss takes longer than 10 seconds Probe is attached to an energized circuit. Disconnect probe from circuit and retry. Probe is faulty - - Probe transformer (defective Hall device with excessive noise or drift) may cause this symptom.
- Page 67 Troubleshooting and Error Codes Table 3- 3: Troubleshooting (Cont.) Problem Remedy Measurements exhibit excessive noise Current Probe is not locked. Lock the current probe. Current Probe is improperly connected to the amplifier input. Amplifier output is not terminated into 50 Ω load. Set input impedance of oscilloscope to 50 Ω...
-
Page 68: Displaying Error Codes With The Probe Degauss Autobalance Button
Troubleshooting and Error Codes Displaying Error Codes with the Probe Degauss Autobalance Button This section describes the error codes that the amplifiers display using the function indicator LEDs. When an internal error condition exists, the amplifiers may generate error codes when you press the PROBE DEGAUSS AUTOBALANCE button. -
Page 69: Figure 3- 16: Interpreting The Error Code Display
Troubleshooting and Error Codes Four- - bit error code is displayed here = binary 0010 = code 2 = a null error in the DC offset occurred Figure 3- 16: Interpreting the error code display Table 3- -4 shows the complete list of error codes for the amplifier. Table 3- 4: Amplifier error codes Code Description of error... -
Page 70: Correcting The Cause Of An Error Code
If the measurement you were taking was within the probe and amplifier specifications, degauss the probe and take the measurement again. If the shutdown error persists, contact your Tektronix Service Center. 3- 24 TCPA300/400 Amplifiers and TCP300/400 Series Current Probes Instruction Manual... -
Page 71: Specifications
Specifications... -
Page 73: Warranted Specifications
Specifications These specifications are valid only under the following conditions: H The probe and amplifier have been calibrated at an ambient temperature of 23 _±5 _C. H The probe and amplifier are operating within the environmental limits described in Table 4- -6 on page 4- -5 (the operating temperature limits are 0 _C to +50 _C, unless otherwise stated). -
Page 74: Nominal And Typical Characteristics
Specifications Nominal and Typical Characteristics Nominal and typical characteristics, listed in Table 4- -2, are not guaranteed. They are provided to characterize the configuration, performance, or operation of typical probe/amplifier combinations. Table 4- 2: Nominal and typical amplifier characteristics Installed probe TCP312 TCP305 TCP303... -
Page 75: Mechanical Characteristics
Specifications Table 4- 2: Nominal and typical amplifier characteristics (Cont.) Installed probe TCP312 TCP305 TCP303 TCP404XL Parameter Parameter Low Current Sensitivity Range 1 A/V Range 5 A/V Range 5 A/V Range 25 A 25 A - - - - - - . -
Page 76: Figure 4- 1: Probe Jaw Dimensions (Nominal)
Specifications Mechanical characteristics of the probes are listed in Table 4- -4. Table 4- 4: Probe mechanical characteristics TCP305 and TCP312 TCP303 and TCP404XL Probe dimensions ....Length: 20 cm (7.77 inches) 268 cm (10.55 inches) -
Page 77: Environmental Characteristics
Specifications Environmental Characteristics The environmental characteristics in Table 4- -6 are warranted performance specifications. Unlike the warranted characteristics in Table 4- -1, the environ- mental characteristics are type tested; therefore there are no performance verification procedures provided to test these characteristics. Unless otherwise noted, these characteristics apply to all probes and amplifiers. -
Page 78: Table 4- 7: Certifications And Compliances
Specifications Table 4- -7 lists the certifications and compliances for the amplifiers and probes. Table 4- 7: Certifications and compliances Category Standards or description EC Declaration of Conformity - - Meets intent of Directive 89/336/EEC for Electromagnetic Compatibility. Compliance was demonstrated to the following specifications as listed in the Official Journal of the European Communities: EN 61326... - Page 79 Specifications Table 4- 7: Certifications and compliances (cont.) Category Standards or description Additional Compliance UL 61010B-1 Safety requirements for electrical equipment for measuring, controlling and laboratory use. IEC61010-1/A2:1995 Safety requirements for electrical equipment for measurement, control, and laboratory use. IEC 61010-2-032:1995 Particular requirements for hand-held current clamps for electrical measurement and test.
-
Page 80: Figure 4- 2: Frequency Derating- Tcp312
Specifications TCP312 derating curve 50_C ambient 25_C ambient 100k 100M Frequency (Hz) Figure 4- 2: Frequency derating- TCP312 TCP305 derating curve 50_C ambient 25_C ambient 100k 100M Frequency (Hz) Figure 4- 3: Frequency derating- TCP305 4- 8 TCPA300/400 Amplifiers and TCP300/400 Series Current Probes Instruction Manual... -
Page 81: Figure 4- 4: Frequency Derating- Tcp303
Specifications TCP303 derating curve 50_C ambient 25_C ambient 100k 10 M 100M Frequency (Hz) Figure 4- 4: Frequency derating- TCP303 TCP404XL derating curve 50_C ambient 25_C ambient 100k Frequency (Hz) Figure 4- 5: Frequency derating- TCP404XL 4- 9 TCPA300/400 Amplifiers and TCP300/400 Series Current Probes Instruction Manual... -
Page 82: Figure 4- 6: Insertion Impedance Graphs For The Current Probes
Specifications TCP312 .001 100k 100M Frequency (Hz) TCP305 .001 100k 100M Frequency (Hz) TCP303 .001 100k 100M Frequency (Hz) 100m TCP404XL 100µ 10µ 100k Frequency (Hz) Figure 4- 6: Insertion impedance graphs for the current probes 4- 10 TCPA300/400 Amplifiers and TCP300/400 Series Current Probes Instruction Manual... -
Page 83: Figure 4- 7: Specified Operating Area Of The Probes
Specifications TCP312 Max peak pulse vs PW Maximum peak pulse ≤50A Range setting 1 A/V 10 A/V 500 A*μs ≤30 A continuous Any width µs 50 A* ≤5 A continuous Allowable pulse width (µseconds) TCP305 Max peak pulse vs PW Maximum peak pulse ≤50A µ... -
Page 84: Tcp404Xl Maximum Measurement Times
Specifications TCP404XL Maximum Measurement Times Figures 4- -8 through 4- -10 show the maximum measurement time for the TCP404XL probe, with varying duty cycles and temperatures. For more detail on the relationship between measurement factors, refer to Measuring Noncontin- uous Current with the TCP404XL Probe on page 3- -6. Measuring 750A at 50 _C ambient 0A Continuous 100A Continuous... - Page 85 Specifications Measuring 750A at 23 _C ambient 0A Continuous 200A Continuous 300A Continuous 400A Continuous 500A Continuous Duty cycle (%) Figure 4- 10: Measuring 750A noncontinuous at 23 °C ambient temperature At 23 degrees ambient temperature, 600 A can be measured continuously with the TCP404XL probe.
- Page 86 Specifications 4- 14 TCPA300/400 Amplifiers and TCP300/400 Series Current Probes Instruction Manual...
- Page 87 WARNING The following servicing instructions are for use only by qualified personnel. To avoid injury, do not perform any servicing other than that stated in the operating instructions unless you are qualified to do so. Refer to all safety summaries before performing any service.
-
Page 89: Performance Verification
Performance Verification... -
Page 91: Performance Verification Overview
Performance Verification Overview The Performance Verification tests allow you to demonstrate that the Current Probe Amplifier and Current Probes meet their specified levels of performance. Since the TCPA300 and TCPA400 cannot operate without a current probe, a calibration adapter is used to verify the amplifier(s) separately. The TCPA Calibration Adapter is an optional accessory- -see Replaceable Parts for part numbers. -
Page 92: Test Procedure Conditions
Performance Verification Overview Table 5- 2: Probe performance verification checks (Cont.) Probe DC gain accuracy Bandwidth Risetime TCP303 TCP404XL Test Procedure Conditions These procedures are valid only under the following conditions: H The system has been calibrated at an ambient temperature of 23_ ±5 _C. H The system is operating in an environment whose limits are described in Table 4- -6 on page 4- -5. -
Page 93: Tcpa300 And Tcpa400 Performance Verification
Refer to page 5- - 4 Calibration Adapter TCPA Calibration Adapter Tektronix part number 174-4765-00 Current Probe TCPA300/400-compatible probe Tektronix TCP303, 305, or 312 (TCPA300) or TCP404XL (TCPA400) Required for functional test only. 5- 3 TCPA300/400 Amplifiers and TCP300/400 Series Current Probes Instruction Manual... -
Page 94: Making Dc Current Loops
TCPA300 and TCPA400 Performance Verification Making DC Current Loops You need to construct simple current loops to complete some tests for the amplifiers. The current loops are also used in the DC gain accuracy tests for the probes. 5-Turn DC Current Loop Construct the loop using a cylindrical form approximately 3 inches in diameter: 1. -
Page 95: Front-Panel Display
TCPA300 and TCPA400 Performance Verification Front-Panel Display The status and error LEDs on the front panel are illuminated briefly during the amplifier power-on sequence. Verify that all LEDs are functional by doing the following procedure: 1. Power-cycle the amplifier and check that the LEDs shown in Figure 5- -1 light briefly. -
Page 96: Dc Gain Accuracy
TCPA300 and TCPA400 Performance Verification DC Gain Accuracy Use the following procedure to verify the DC gain accuracy of the amplifier. Test Equipment Setup Refer to Figure 5- -2 and set up the test equipment as follows: 1. Connect the output of the amplifier to the DMM: a. -
Page 97: Table 5- 4: Equipment Settings
TCPA300 and TCPA400 Performance Verification 3. Make or verify the equipment settings in Table 5- -4: Table 5- 4: Equipment settings Digital multimeter Measurement Type DC volts Range Autoranging Current source Voltage Current 100 mA Output TCPA300 and TCPA400 amplifier Coupling Procedure After the equipment is set up, proceed as follows:... - Page 98 TCPA300 and TCPA400 Performance Verification d. Calculate the %Error between the measured output, M , and the expected output (V ) %Error as follows: %Error For example, using an expected output V of 2.5000 V and a measured output M of 2.510, the %Error would be: 2.5100 2.5000...
-
Page 99: Bandwidth
BNC connector on the rear of the instrument. Figure 5- 3: Bandwidth test setup 1. If you are using a Tektronix oscilloscope that supports the TekProbe Level 2 Interface, use the TekProbe interface cable to connect the amplifier OUT- PUT to the oscilloscope input. If you are not using a Tektronix oscilloscope that supports the TekProbe Level 2 Interface, use a 50 Ω... - Page 100 TCPA300 and TCPA400 Performance Verification Table 5- 6: Equipment settings for bandwidth check (Cont.) Oscilloscope Record length Coupling Offset 0 V (mid-scale) Trigger type Edge Trigger mode Auto Trigger position Acquisition mode Average Number of waveforms to average Measurement type Peak-to-Peak Leveled sine wave generator Frequency...
-
Page 101: Table 5- 7: Tcpa300 Bandwidth Measurements
TCPA300 and TCPA400 Performance Verification c. Using the peak-peak measurement capability of the oscilloscope, measure and record the peak-peak reading as M in Table 5- -7 or Table 5- -8 on page 5- -11. 9. The system meets the bandwidth specification if the ratio of the signal amplitude at the warranted bandwidth is at least 70% of the signal amplitude at 3 MHz. -
Page 102: Ac Coupling
TCPA300 and TCPA400 Performance Verification AC Coupling The following test checks that the AC coupling circuit of the amplifier functions properly. First, you measure a square-wave signal in DC coupling mode and record the value, and then switch to AC coupling and measure the signal amplitude. -
Page 103: Degauss
TCPA300 and TCPA400 Performance Verification Table 5- 9: TCPA300 and TCPA400 AC coupling measurements TEKPROBE Interface cable BNC coaxial cable Minimum Maximum Minimum Maximum Square wave coupled coupled Vertical coupled coupled Vertical coupled coupled generator amplifier amplifier gain amplifier amplifier gain amplifier amplifier... -
Page 104: Current Overload Test
TCPA300 and TCPA400 Performance Verification Current Overload Test (TCPA300 Only) This test checks the functionality of the TCPA300 current overload detection circuit using the setup shown in Figure 5- -6. You set the current source to output the maximum rated current for the probe/amplifier you are testing, and then increase the current source to a level that engages the overload circuit (the OVERLOAD LED is on). -
Page 105: Table 5- 10: Maximum Current Ratings For Tcpa300-Compatible Probes
TCPA300 and TCPA400 Performance Verification Table 5- 10: Maximum current ratings for TCPA300-compatible probes Maximum current rating, Current loop Current source Amps Probe model Range used for test output, Amps ±30 ±6 TCP312 10 A/V ±50 ±10 TCP305 10 A/V ±212 ±4.24 TCP303... -
Page 106: Tcpa300 Amplifier Test Record
TCPA300 and TCPA400 Performance Verification TCPA300 Amplifier Test Record Photocopy this form and use it to record the performance test results. TCPA300 amplifier test record Instrument Serial Number: Certificate Number: Temperature: Relative Humidity %: Date of Calibration: Technician: Performance test Range, A/V Minimum Measured/calculated... -
Page 107: Tcpa400 Amplifier Test Record
TCPA300 and TCPA400 Performance Verification TCPA400 Test Record Photocopy this form and use it to record the performance test results. TCPA400 amplifier test record Instrument Serial Number: Certificate Number: Temperature: Relative Humidity %: Date of Calibration: Technician: Performance test Minimum Measured/calculated Maximum Front-Panel Display... - Page 108 TCPA300 and TCPA400 Performance Verification 5- 18 TCPA300/400 Amplifiers and TCP300/400 Series Current Probes Instruction Manual...
-
Page 109: Tcp305 And Tcp312 Performance Verification
TCP305 and TCP312 Performance Verification The test procedures in this section verify warranted specifications and proper performance of the TCP305 and TCP312 current probes, using the TCPA300 Amplifier. Tolerances that are specified in these procedures apply to the amplifier and current probe and do not include test equipment error. Before starting these procedures, photocopy the appropriate test record beginning on page 5- -29 to record the performance test results. -
Page 110: Required Test Equipment
DCA: 0.1% accuracy, 0 to ±10 A Current Source Wavetek 9100 50 Ω, BNC Connector HF Current Loop Tektronix part number 015-0601-50 DC Current Loop 5 turns 18 AWG coated wire Refer to page 5- - 4 50 Ω, ±0.1%, 0.5 W... -
Page 111: Dc Gain Accuracy
TCP305 and TCP312 Performance Verification DC Gain Accuracy This procedure tests the DC gain accuracy of the TCP305 and TCP312 Current Probes. In this test you compare the voltage output of the amplifier to a reference input. This test uses current loops that you make using wire and 3-inch forms. Refer to page 5- -4 for instructions on making the current loops. - Page 112 TCP305 and TCP312 Performance Verification Table 5- 12: Equipment settings for DC gain accuracy (Cont.) Current source Output TCPA300 Coupling Procedure 1. Do not clamp the current probe around any conductor, but make sure the jaws are locked shut. 2. Press the amplifier PROBE DEGAUSS AUTOBALANCE button. Wait for the degauss/autobalance routine to complete before proceeding.
-
Page 113: Table 5- 13: Dc Gain Accuracy Test For The Tcp305 And Tcp312
TCP305 and TCP312 Performance Verification Table 5- 13: DC gain accuracy test for the TCP305 and TCP312 Expected output, Current source % Error, (VAC) Probe Range output (ADC) M1 (VDC) M2 (VDC) M1- M2 (VDC) calculated ±1.00 A ±1.00 V TCP305 5 A/V ±3.00 A ±3.00 V... -
Page 114: Rise Time
Figure 5- 8: Rise time test setup for the TCP305 and TCP312 Equipment Connections 1. If you are using a Tektronix oscilloscope that supports the TekProbe Level 2 Interface, use the TekProbe Interface Cable to connect the amplifier OUTPUT to the oscilloscope input. If you are not using a Tektronix oscilloscope that supports the TekProbe Level 2 Interface, use a 50 Ω... -
Page 115: Table 5- 14: Equipment Settings For Rise Time
TCP305 and TCP312 Performance Verification Table 5- 14: Equipment settings for rise time Oscilloscope 50 Ω Vertical input impedance Vertical scale 200 mA/division Time base 2 ns/division Record length Coupling Offset 0 V (mid-scale) Trigger type Edge Trigger mode Auto Trigger position Acquisition mode Average... -
Page 116: Bandwidth
Figure 5- 9: Bandwidth test setup for TCP305 and TCP312 Equipment Connections 1. If you are using a Tektronix oscilloscope that supports the TekProbe Level 2 Interface, use the TekProbe Interface Cable to connect the amplifier OUTPUT to the oscilloscope input. If you are not using a Tektronix oscilloscope that supports the TekProbe Level 2 Interface, use a 50 Ω... -
Page 117: Table 5- 15: Equipment Settings For Bandwidth
TCP305 and TCP312 Performance Verification Equipment Settings Make or verify the equipment settings in Table 5- -15. Table 5- 15: Equipment settings for bandwidth Oscilloscope 50 Ω Vertical input impedance Time base 200 ns/division Record length Coupling Offset 0 V (mid-scale) Trigger type Edge Trigger mode... -
Page 118: Table 5- 16: Bandwidth Test For The Tcp305 And Tcp312
TCP305 and TCP312 Performance Verification Table 5- 16: Bandwidth test for the TCP305 and TCP312 Oscilloscope vertical gain TCPA300 output w/TEK- w/TEK- M2 @ PROBE PROBE warranted w/BNC w/BNC M1 @3 MHz Calcula- cable cable BW freq Probe Range cable cable ref freq BW freq... -
Page 119: Tcp305 Current Probe Test Record
TCP305 and TCP312 Performance Verification TCP305 Current Probe Test Record Photocopy this form and use it to record the performance test results. TCP305 test record Instrument Serial Number: Certificate Number: Temperature: Relative Humidity %: Date of Calibration: Technician: Test Performance test Range, A/V current, A Minimum... -
Page 120: Tcp312 Current Probe Test Record
TCP305 and TCP312 Performance Verification TCP312 Current Probe Test Record Photocopy this form and use it to record the performance test results. TCP312 test record Instrument Serial Number: Certificate Number: Temperature: Relative Humidity %: Date of Calibration: Technician: Test Performance test Range, A/V current, A Minimum... -
Page 121: Tcp303 And Tcp404Xl Performance Verification
TCP303 and TCP404XL Performance Verification The test procedures in this section verify warranted specifications and proper performance of the TCP303 and TCP404XL Current Probes, using the appropri- ate amplifier. Tolerances that are specified in these procedures apply to the amplifier and current probe and do not include test equipment error. Before starting these procedures, photocopy the appropriate test record beginning on page 5- -42 to record the performance test results. -
Page 122: Equipment Required
Digital Multimeter DCV: 0.1% accuracy 5 digit Keithley 2700 resolution Current Probe Amplifier Use appropriate amplifier Tektronix TCPA300 or TCPA400 50 Ω, 0.76 m (30 in) long BNC Cable Tektronix part number 012-0117-00 Cable TEKPROBE Interface Tektronix part number 012-1605-00... -
Page 123: Dc Gain Accuracy
TCP303 and TCP404XL Performance Verification DC Gain Accuracy This procedure tests the DC gain accuracy of the TCP303 and TCP404XL. In this test you compare the voltage output of the amplifier to a reference input. This test uses a 50-turn current loop that you make using wire and a 3-inch form. Refer to page 5- -4 for instructions on making the current loop. - Page 124 TCP303 and TCP404XL Performance Verification Procedure 1. Do not clamp the current probe around any conductor, but make sure the jaws are locked shut. 2. Press the amplifier PROBE DEGAUSS AUTOBALANCE button. Wait for the degauss/autobalance routine to complete before proceeding. The routine is complete when the indicator light turns green.
- Page 125 TCP303 and TCP404XL Performance Verification 5. Record the results on the test record. Table 5- 19: DC gain accuracy test worksheet for the TCP303 and TCP404XL Current source Expected output output, V % Error, calcu- (ADC) (VAC) lated Probe Range M1 (VDC) M2 (VDC) M1- M2 (VDC)
-
Page 126: Rise Time
Figure 5- 11: Rise time test setup for the TCP303 and TCP404XL Equipment Connections 1. If you are using a Tektronix oscilloscope that supports the TekProbe Level 2 Interface, use the TekProbe Interface Cable to connect the amplifier OUTPUT to the oscilloscope input. If you are not using a Tektronix oscilloscope that supports the TekProbe Level 2 Interface, use a 50 Ω... - Page 127 TCP303 and TCP404XL Performance Verification Equipment Settings Make or verify the equipment settings in Table 5- -20: Table 5- 20: Equipment settings for rise time Oscilloscope Vertical scale: TCP303 200 mA/division TCP404XL 1 A/division 50 Ω Vertical input impedance Time base: TCP303 10 ns/division TCP404XL...
- Page 128 TCP303 and TCP404XL Performance Verification a. If you are testing a TCP303, clamp the current probe around the HF current loop. Verify that the arrow-shaped indicator on the probe points away from the pulse generator. b. If you are testing a TCP404XL, clamp the current probe around the built- -in current loop on the pulse generator.
-
Page 129: Bandwidth (Tcp303)
Figure 5- 12: Bandwidth test setup for TCP303 Equipment Connections 1. If you are using a Tektronix oscilloscope that supports the TekProbe Level 2 Interface, use the TekProbe Interface Cable to connect the amplifier OUTPUT to the oscilloscope input. If you are not using a Tektronix oscilloscope that supports the TekProbe Level 2 Interface, use a 50 Ω... - Page 130 TCP303 and TCP404XL Performance Verification Equipment Settings Make or verify the equipment settings in Table 5- -21. Table 5- 21: Equipment settings for bandwidth Oscilloscope 50 Ω Vertical input impedance Time base 200 ns/division Record length Coupling Offset 0 V (mid-scale) Trigger type Edge Trigger mode...
-
Page 131: Bandwidth (Tcp404Xl)
TCP303 and TCP404XL Performance Verification Table 5- 22: Bandwidth test for the TCP303 TEKPROBE cable BNC cable M1 @ M2 @ 3 MHz ref warranted BW Oscilloscope TCPA300 Oscilloscope TCPA300 Calcula- freq freq (15 MHz) Probe Range vertical Gain output vertical gain output tion... -
Page 132: Tcp303 Current Probe Test Record
TCP303 and TCP404XL Performance Verification TCP303 Current Probe Test Record Photocopy this form and use it to record the performance test results. TCP303 test record Instrument Serial Number: Certificate Number: Temperature: Relative Humidity %: Date of Calibration: Technician: Test Performance test Range, A/V current, A Minimum... -
Page 133: Tcp404Xl Current Probe Test Record
TCP303 and TCP404XL Performance Verification TCP404XL Current Probe Test Record Photocopy this form and use it to record the performance test results. TCP404XL test record Instrument Serial Number: Certificate Number: Temperature: Relative Humidity %: Date of Calibration: Technician: Test Performance test Range current Minimum... - Page 134 TCP303 and TCP404XL Performance Verification 5- 44 TCPA300/400 Amplifiers and TCP300/400 Series Current Probes Instruction Manual...
-
Page 135: Adjustment Procedures
Adjustment Procedures... -
Page 137: Adjustment Procedures Overview
Adjustment Procedures Overview The following procedures describe adjustments to the current probes and amplifiers. Before performing the adjustment procedures, do the following: 1. If you are adjusting an amplifier, remove the outer case to gain access to the adjustments. Refer to Disassembly on page 7- -3. Next, attach the calibration adapter to the amplifier. - Page 138 Adjustment Procedures Overview 6- 2 TCPA300/400 Amplifiers and TCP300/400 Series Current Probes Instruction Manual...
-
Page 139: Tcpa300 And Tcpa400 Amplifier Adjustments
Keithley 2700 0.1%, 0 to ±100 mA Current Source Fluke 5100A or HP 6612C 50 Ω, ±0.1%, 0.5 W Termination Tektronix part number 011-0129-00 50 Ω, 1.05 m (42 in) long BNC Cables Tektronix part number 012-0117-00 Cables TEKPROBE Interface... -
Page 140: Tcpa300 Amplifier
TCPA300 and TCPA400 Amplifier Adjustments TCPA300 Amplifier The TCPA300 has four internal adjustments that affect the gain of the amplifier. (The TCPA400 has one adjustment.) Each range has an individual control, except the 1A/V range, which does not have an adjustment. To make adjustments to the amplifier, do the following: 1. -
Page 141: Tcpa400 Amplifier
TCPA300 and TCPA400 Amplifier Adjustments TCPA400 only; 25 Ω Ω Ω Comp(5 A/V) Comp (10A/V and 50 A/V) Ω Ω 12.5 (10 A/V) (50 A/V) TCPA300 Adjustments Figure 6- 2: Gain adjustment locations TCPA400 Amplifier The TCPA400 has one internal gain adjustment in the amplifier. To make adjustments to the amplifier, do the following: 1. - Page 142 TCPA300 and TCPA400 Amplifier Adjustments 6- 6 TCPA300/400 Amplifiers and TCP300/400 Series Current Probes Instruction Manual...
-
Page 143: Tcp305 And Tcp312 Adjustments
Digital Multimeter ACV: <0.1% accuracy 5 digit resolution Keithley 2700 50 Ω, 0.1% precision, BNC connector, feedthrough Termination Tektronix part number 011-0129-00 50 Ω, 0.76 m (30 in) long BNC Cable Tektronix part number 012-0117-00 Adapter BNC to Dual Banana... -
Page 144: Tcp305 And Tcp312 Dc Gain Adjustment
TCP305 and TCP312 Adjustments TCP305 and TCP312 DC Gain Adjustment Use the following procedure to adjust the DC Gain of the TCP305 and TCP312 Probes. Equipment Connections 1. Connect the amplifier OUTPUT to the DMM input using a BNC-to-Dual Banana connector, 50 Ω BNC cable, and a 50 Ω precision feedthrough termination. - Page 145 TCP305 and TCP312 Adjustments Current source Output + -- 5 Turns BNC-to-dual banana adapter 50 Ω Precision Current termination probe Current flow 50 Ω Coaxial cable Figure 6- 4: DC gain adjustment setup for TCP305 and TCP312 Procedure 1. Press the amplifier PROBE DEGAUSS AUTOBALANCE button. Wait for the degauss/autobalance routine to complete before proceeding.
- Page 146 TCP305 and TCP312 Adjustments 6- 10 TCPA300/400 Amplifiers and TCP300/400 Series Current Probes Instruction Manual...
-
Page 147: Tcp303 And Tcp404Xl Adjustments
High Amplitude Pulse Genera- AVTECH AVR-3-PW-C-P-TEK2 into 50 Ω tor (TCP404XL only) Current Probe Amplifier Tektronix TCPA300 (TCP303) or TCPA400 (TCP404XL) AC A: 0.25% accuracy, 0 to ±5 A, square AC Current Source Wavetek 9100 wave output, 40 Hz- - 1 kHz, t <10 s... -
Page 148: Adjustment Locations
TCP303 and TCP404XL Adjustments Adjustment Locations Refer to Figure 6- -5 for the location of the probe adjustments. DC Gain 10 s (TCP303) DC Gain (TCP404XL) 10 s Figure 6- 5: TCP303 and TCP404XL adjustment locations 6- 12 TCPA300/400 Amplifiers and TCP300/400 Series Current Probes Instruction Manual... -
Page 149: Tcp303 And Tcp404Xl Transient Response And Coarse Gain Adjustment
Figure 6- -6 when making equipment connections. Equipment Connections 1. If you are using a Tektronix oscilloscope that supports the TEKPROBE Level 2 Interface, use the TEKPROBE Interface Cable to connect the amplifier OUTPUT to the oscilloscope input. If you are not using a Tektronix oscilloscope that supports the TEKPROBE Level 2 Interface, use a 50 Ω... - Page 150 TCP303 and TCP404XL Adjustments AC current source TCP303 probe TCPA300/400 1 Turn Test oscilloscope amplifier High amplitude pulse generator Current probe 50 Ω oscilloscope input - - use the TEKPROBE Interface Cable or use a 50 Ω cable. (Add 50 Ω termination here if oscilloscope has only high-impedance input).
- Page 151 TCP303 and TCP404XL Adjustments Table 6- 9: Settings for transient response and preliminary gain adjustments (Cont.) Oscilloscope Time Base 100 s/division, Auto triggered 50 Ω Vertical Input Record Length Coupling Offset Trigger Type Edge Mode Auto Position Acquisition Mode Average Number of Wave- forms Measurement Type...
- Page 152 TCP303 and TCP404XL Adjustments TCP303 Procedure 1. Remove the access plugs that cover the DC gain, 10 s, and 1 s adjust- ments on the probe. 2. Preset the probe adjustments: Refer to Figure 6- -5 on page 6- -12 for adjustment locations.
- Page 153 TCP303 and TCP404XL Adjustments TCP404XL Procedure 1. Move the oscilloscope trace to one graticule line from the bottom of the screen. 2. Do not clamp the current probe around any conductor, but make sure the jaws are locked shut. 3. Remove the probe access plugs for 1 s, 10 s, and DC Gain. 4.
-
Page 154: Dc Gain Adjustment
TCP303 and TCP404XL Adjustments DC Gain Adjustment This procedure adjusts the DC gain accuracy of the TCP303 and TCP404XL probes. Equipment Connections 1. Connect the amplifier OUTPUT to the DMM input using a BNC-to-Dual Banana connector, 50 Ω BNC cable, and a 50 Ω precision feedthrough termination. - Page 155 TCP303 and TCP404XL Adjustments Equipment Settings Make or check the equipment settings in Table 6- -10: Table 6- 10: Equipment settings for DC gain accuracy Digital multimeter Measurement Type AC volts, autorange Current source Output waveshape/frequency Squarewave, 40 Hz Output TCPA300 and TCPA400 Coupling Range:...
- Page 156 TCP303 and TCP404XL Adjustments 6. If the DC gain adjustment was adjusted, verify the pulse response by repeating the TCP303 and TCP404XL Transient Response and Coarse Adjustment procedure beginning on page 6- -13. 7. When the probe adjustments are done, reinstall the probe access plugs for the 1 s, 10 s, and DC Gain adjustments.
-
Page 157: Maintenance
Maintenance... -
Page 159: Customer Maintenance
Customer Maintenance This manual supports maintenance of the amplifiers and probes. Service Strategy The amplifiers have some mechanical and electrical parts that may be replaced by the customer. This section describes the preventive maintenance and repair procedures. The probes can be repaired to component level. Information on troubleshooting and repair begin on page 7- -13. - Page 160 Customer Maintenance 7- 2 TCPA300/400 Amplifiers and TCP300/400 Series Current Probes Instruction Manual...
-
Page 161: Disassembly
Disassembly To access the internal adjustments or to replace internal components of the amplifiers, you need to remove the instrument case and internal covers. This section covers the disassembly of the amplifiers. Current probe procedures are described later in this section. Amplifiers Use these procedures when making adjustments or replacing components in the amplifiers. -
Page 162: Removing The Outer Case And Internal Covers
Disassembly Removing the Outer Case and Internal Covers To replace internal components, you need to remove the outer case and internal covers. You may also want to remove the case and covers to access the internal adjustments. The following procedures describe the removal process: 1. - Page 163 Disassembly 3. Remove the 6 screws that secure the right-side inner panel to the chassis. See Figure 7- -2. Screws (6) Torque screws to 8 in-lbs Amplifier when reassembling Right- - side panel Adjustment access ports Figure 7- 2: Removing the right-side inner panel 7- 5 TCPA300/400 Amplifiers and TCP300/400 Series Current Probes Instruction Manual...
- Page 164 Disassembly 4. Remove the 4 screws that secure the left-side inner panel to the chassis. See Figure 7- -3. Amplifier Left- - side panel Screws (4) Torque screws to 8 in-lbs when reassembling Figure 7- 3: Removing the left-side inner panel You now have exposed access to the amplifier adjustments.
-
Page 165: Replacing The Front Panel Assembly
Disassembly Replacing the Front Panel Assembly If you need to replace the Front Panel Assembly, do the following: 1. Wear an antistatic wriststrap when handling the circuit assemblies. 2. Using pliers, remove the heat sink clip from U9. See Figure 7- -4. U9 heat sink clip Lift up the tab to remove the... -
Page 166: Replacing The Amplifier Board
Disassembly Replacing the Amplifier Board If you need to replace the amplifier board, you must detach the rear- and front- panel assemblies of the amplifier from the chassis. 1. Wear an antistatic wriststrap when handling the circuit assemblies. 2. Remove the 2 Phillips screws that attach the AC power connector to the rear panel. - Page 167 Disassembly 8. Remove the screw that attaches the probe input connector to the front panel amplifier board to the chassis. Pull the front panel assembly away from the amplifier and set it aside. See Figure 7- -6. 9. Remove the three screws that attach the amplifier board to the chassis. 10.
-
Page 168: Replacing The Power Supply
Disassembly Replacing the Power Supply To replace the power supply, refer to Figure 7- -7 and do the following: 1. Disconnect the AC and DC power connectors from the power supply. 2. Remove the four screws from the power supply. 3. -
Page 169: Replacing The Fan
Disassembly Replacing the Fan If you need to replace the fan, you must first detach the rear panel of the amplifier from the chassis to gain access to the fan: 1. Remove the 2 Phillips screws that attach the AC power connector to the rear panel. -
Page 170: Probes 7
Disassembly 2. Disconnect the DC power supply connector from J2 on the amplifier board. See Figure 7- -9. 3. Disconnect the fan connector from J3 on the amplifier board. 4. Gently pull back the rear panel enough to allow access to the four nuts that secure the fan to the rear panel. -
Page 171: Probes
Disassembly Probes Use these procedures when repairing or replacing defective components in the current probes. WARNING. Probe disassembly must be performed by qualified service personnel. The probes that mate with the TCPA300 and TCPA400 Current Probe Amplifiers have two physical styles. The TCP305 and TCP312 use a slender form factor that contain three replaceable assemblies - - the connector/cable, the circuit board, and the current transformer. -
Page 172: Tcp305 And Tcp312
Disassembly TCP305 and TCP312 Disassemble the TCP305 or TCP312 probe body as follows: 1. Remove the two screws from the bottom of the probe and pull the strain relief boot back as shown in Figure 7- -10. Note: When reassembling the probe, insert and tighten the two screws. - Page 173 Disassembly Be careful to keep this tiny metal ball from falling out (2) Grasp the top half of the probe body here (1) Hold the bottom with your other hand, half of the probe body then in one hand (a) pivot the back end up, and (b) slide the top forward off the end of the bottom...
- Page 174 Disassembly Replacing the Current Replace the current transformer of the probe as follows: Transformer 1. Gently lift the front edge of the circuit board and transformer enough to clear the probe body. Refer to Figure 7- -13. 2. Pull the transformer socket straight off the circuit board pins. Circuit board Current transformer...
- Page 175 Disassembly Replacing the Circuit Replace the circuit board or cable assembly of the probe as follows: Board or Cable Assembly 1. Remove the current transformer using the procedure on page 7- -16. 2. Lift the plastic cable housing from the probe body half. See Figure 7- -14. 3.
-
Page 176: Tcp303 And Tcp404Xl
Disassembly TCP303 and TCP404XL The following procedures explain how to disassemble the probe body and replace the current transformer, the circuit board, and the cable assembly. WARNING. Probe disassembly must be performed by qualified service personnel. 1. Unlock the probe slide. 2. - Page 177 Disassembly Removing the Current Remove the current transformer of the probe as follows: Transformer 8. To remove the current transformer, lift the assembly out of the probe as shown in Figure 7- -16 and unplug it from the circuit board. TCP404XL TCP303 Current transformer...
- Page 178 Disassembly 10. To remove the cable, do step 9 and then unsolder the two switch wires. Cut cable tie. (Before tightening new cable tie, check for enough cable lead length when seated in case) Disconnect cable Unsolder switch wires Unsolder switch wires TCP303 TCP404XL...
-
Page 179: Isolating Hardware Faults
Isolating Hardware Faults Use the following procedures to help locate a hardware malfunction. You can isolate the symptoms to the amplifier or probe by substituting a known good probe or amplifier. If you suspect that you have a defective probe and you don’t have another compatible probe, you can use the calibration adapter in place of the probe to verify some of the amplifier functions. -
Page 180: Determining The Amplifier Firmware Version Number
Isolating Hardware Faults Table 7- 4: ardware faults Probe h Symptom Possible Cause Repair Action Probe Open LED stays continuously lit, Open coil in probe. Substitute probe with another probe or even with the probe slider closed. the Calibration Adapter - - if the Probe Open LED goes out , coil is open - - repair bad connection or replace coil Determining the Amplifier Firmware Version Number... -
Page 181: Replaceable Parts
Replaceable Parts... -
Page 183: Parts Ordering Information
TCPA300 and TCPA400. As described below, use these lists to identify and order replacement parts. Parts Ordering Information Replacement parts are available from or through your local Tektronix, Inc., service center or representative. Changes to Tektronix instruments are sometimes made to accommodate improved components as they become available and to give you the benefit of the latest circuit improvements. - Page 184 Replaceable Parts Indentation System This parts list is indented to show the relationship between items. The following example is of the indentation system used in the Description column: Name & Description Assembly and/or Component Attaching parts for Assembly and/or Component (END ATTACHING PARTS) Detail Part of Assembly and/or Component Attaching parts for Detail Part...
-
Page 185: Amplifier Replaceable Parts
Amplifier Replaceable Parts Figure 8- 1: TCPA300 and TCPA400 replaceable parts 8- 3 TCPA300/400 Amplifiers and TCP300/400 Series Current Probes Instruction Manual... - Page 186 Amplifier Replaceable Parts Replaceable parts list Fig. & index Tektronix Serial no. Serial no. number part number effective discont’d Name & description Mfr. code Mfr. part number 8- - 1- - 1 174- - 4676- - 00 CABLE ASSEMBLY,DC, POWER SUPPLY...
- Page 187 Amplifier Replaceable Parts Table 8- 1: Power cord identification Option number/ Plug configuration Normal usage part number North America Standard 120 V 161-0066-00 Universal Euro 161-0066-09 United Kingdom 161-0066-10 Australia 161-0066-11 Switzerland 161-0154-00 Japan 161-A005-00 China 161-0306-00 No power cord supplied. 8- 5 TCPA300/400 Amplifiers and TCP300/400 Series Current Probes Instruction Manual...
- Page 188 Amplifier Replaceable Parts Figure 8- 2: TCPA300 and TCPA400 standard accessories TCPA300 and TCPA400 standard accessories Fig. & index Tektronix Serial no. Serial no. number part number effective discont’d Name & description Mfr. code Mfr. part number 8- - 2- - 1...
- Page 189 Amplifier Replaceable Parts Figure 8- 3: TCPA300 and TCPA400 optional accessories TCPA300 and TCPA400 optional accessories Fig. & index Tektronix Serial no. Serial no. number part number effective discont’d Name & description Mfr. code Mfr. part number 8- - 3- - 1...
- Page 190 Amplifier Replaceable Parts 8- 8 TCPA300/400 Amplifiers and TCP300/400 Series Current Probes Instruction Manual...
-
Page 191: Current Probes Replaceable Parts
Current Probes Replaceable Parts Figure 8- 4: TCP305 and TCP312 replaceable parts 8- 9 TCPA300/400 Amplifiers and TCP300/400 Series Current Probes Instruction Manual... - Page 192 Current Probes Replaceable Parts TCP305 and TCP312 Replaceable parts list Fig. & Index Tektronix Serial No. Serial No. Number Part Number Effective Discont’d Name & Description Mfr. Code Mfr. Part Number 8- - 4- - 1 204- - 0288- - 03...
- Page 193 Current Probes Replaceable Parts Figure 8- 5: TCP303 replaceable parts 8- 11 TCPA300/400 Amplifiers and TCP300/400 Series Current Probes Instruction Manual...
- Page 194 Current Probes Replaceable Parts TCP303 Replaceable Parts List Fig. & Index Tektronix Serial No. Serial No. Number Part Number Effective Discont’d Name & Description Mfr. Code Mfr. Part Number 8- - 5- - 1 204- - 0713- - 02 BODY HALF,PROBE:LEFT W/CONTACTS...
- Page 195 Current Probes Replaceable Parts Figure 8- 6: TCP404XL replaceable parts 8- 13 TCPA300/400 Amplifiers and TCP300/400 Series Current Probes Instruction Manual...
- Page 196 Current Probes Replaceable Parts TCP404XL Replaceable Parts List Fig. & Index Tektronix Serial No. Serial No. Number Part Number Effective Discont’d Name & Description Mfr. Code Mfr. Part Number 8- - 6- - 1 204- - 0713- - 02 BODY HALF,PROBE:LEFT W/CONTACTS...
- Page 197 PORTLAND, OR 97214- - 4657 0KB05 NORTH STAR NAMEPLATE INC 5750 NE MOORE COURT HILLSBORO, OR 97124- - 6474 80009 TEKTRONIX INC 14150 SW KARL BRAUN DR BEAVERTON, OR 97077- - 0001 PO BOX 500 8X345 NORTHWEST SPRING MFG CO...
- Page 198 Current Probes Replaceable Parts 8- 16 TCPA300/400 Amplifiers and TCP300/400 Series Current Probes Instruction Manual...
- Page 199 Glossary and Index...
- Page 201 Glossary amp-second product The unit of measure defining the maximum amount of pulsed current that can be measured before the probe core becomes saturated. The amp-second rating applies only to measurement values between the maximum continuous and maximum pulse current ratings of the probe. The amp-second rating is equal to the peak current multiplied by the pulse width at the 50% point.
- Page 202 Glossary Hall device A thin, rectangular piece of semiconductor material located in the core of the current probe. The Hall device uses the Hall effect for DC and low-frequency AC measurements. Hall effect The effect that produces a voltage potential in the Hall device when magnetic lines of force pass through the device.
- Page 203 Index Degauss function, 1- - 11, 2- - 2, 3- - 1 functional check, 5- - 13 AC coupling, 1- - 14, 2- - 4, 3- - 3 Differential current, 3- - 2 Adjustments overview, 6- - 1 TCP303 & TCP404XL, 6- - 11 TCP305 &...
- Page 204 Index Maximum measurement times, 3- - 6 extending the current range, 3- - 8 Maximum pulsed current rating, 3- - 4 increasing the current limit, 3- - 8 Measuring continuity, 3- - 15 maintenance, 7- - 1 Measuring current maximum current limits, 3- - 4 AC, 1- - 14 operating the probe slide, 1- - 10 current nulls, 3- - 2...
- Page 205 Index disassembly, 7- - 3 TCP312, 5- - 30 front panel display check, 5- - 5 TCP404XL, 5- - 43 TEKPROBE- - to- - TEKPROBE interface cable, 1- - 8 TCPA300, 5- - 16 Termination, 50- - ohm feedthrough, 1- - 8 TCPA400, 5- - 17 Test Record, Performance Verification Travel Case, 1- - 7...
Need help?
Do you have a question about the TCPA300 SERIES and is the answer not in the manual?
Questions and answers