AJA FS-HDR Quick Start Manual
Hide thumbs
Also See for FS-HDR:
- Installation and operation manual (129 pages) ,
- Quick start manual (18 pages)
Advertisement
Quick Links
Overview
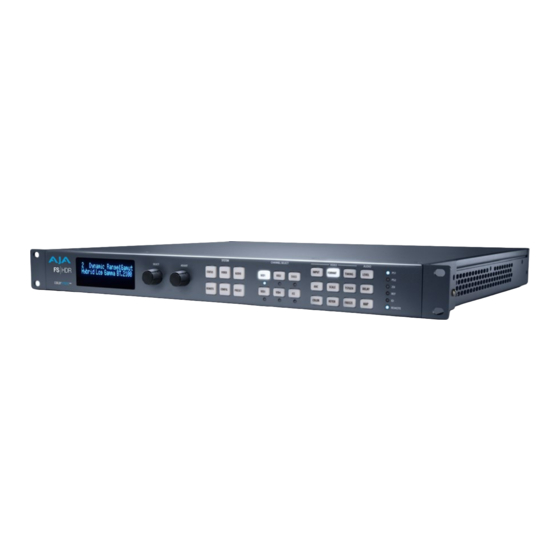
FS-HDR, a 1RU, rack-mount, universal converter/frame synchronizer, is designed
specifically to meet the HDR (High Dynamic Range) and WCG (Wide Color Gamut)
needs of broadcast, OTT, post and live event AV environments, where real time,
low-latency processing and color fidelity is required for 4K/UltraHD and 2K/HD
workflows. Developed in partnership with Colorfront, the FS-HDR's HDR/WCG
functionality is powered by Colorfront Engine™ proprietary video processing
algorithms. FS-HDR also serves as a full, 1-channel up, down, cross-converter for
4K/UltraHD/2K/HD conversion and frame sync needs and in 4-Channel mode,
offers 4 independent channels of 2K/HD conversion.
Quick Start Guide Objectives
The FS-HDR can be extremely simple to use, because of its ability to detect
incoming signal formats and automatically apply the correct video processing for
the selected output format. However, the FS-HDR is also extremely powerful and
can be flexibly configured to perform a wide variety of tasks.
This Quick Start Guide is designed to help you get your FS-HDR up and running
for the first time, and confirm it is operating properly. It also provides step-by-
step instructions that demonstrate a few FS-HDR signal processing examples.
•
"First Power Up" on page 4
•
"Internal Test Signals" on page 5
Computer Setup
•
"FS-HDR Network Setup" on page 6
Processing Examples
•
•
"4K HDR to HD HDR Down and Cross-Conversion" on page 11
•
•
"Multiple Simultaneous HDR and SDR Distribution" on page 15
For additional information, please see the FS-HDR Installation and Operation Guide
available on the AJA website.
Published September 6, 2017
FS-HDR Quick Start Guide v1.0
FS-HDR
Quick Start Guide
1
www.aja.com
Advertisement

Subscribe to Our Youtube Channel
Related Manuals for AJA FS-HDR


Summary of Contents for AJA FS-HDR
-
Page 1: Table Of Contents
This Quick Start Guide is designed to help you get your FS-HDR up and running for the first time, and confirm it is operating properly. It also provides step-by- step instructions that demonstrate a few FS-HDR signal processing examples. - Page 2 FS-HDR Colorfront Engine Settings FS-HDR settings involved in Colorfront Engine transforms for HDR include: Input Video Dynamic Range & Gamut • SDR BT.709 100 Nits (default) •...
- Page 3 RJ45 Ethernet LAN Connector 5. Connect one or two power cords to the FS-HDR and mains AC (100-240 VAC, 50/60 Hz, 55 Watts). For redundancy, use both cords and connect them to separate branch circuits. The FS-HDR power supply is autosensing and adjusts to the available power.
-
Page 4: Stand Alone Tests
The stand alone tests can be performed without a computer, using the FS-HDR front panel controls and rear connections. The following procedures assume the FS-HDR is at factory defaults (taken from a newly opened box). If not set to defaults, the FS-HDR may behave differently. -
Page 5: Internal Test Signals
NOTE: In the following procedures, where the terms select and adjust are used, turn the front panel SELECT and ADJUST knobs. Setup • Connect the FS-HDR SDI 1 output BNC connector to an SDI video display with a BNC cable. • Connect the FS-HDR AES/EBU output DB25 connector to an AES audio monitor using a standard TASCAM pinout cable (customer supplied). -
Page 6: Fs-Hdr Network Setup
Networking Using DHCP or Default Static IP The FS-HDR factory default configuration automatically looks for a DHCP server to issue an IP address. If your network includes a DHCP server, plug the FS-HDR into the network and connect with the unit as follows: 1. - Page 7 Most parameters available on the browser are selected from a drop-down list. The currently active parameter is displayed. Click on the down arrow symbol next to the parameter to display the list and select an alternative value. The FS-HDR will immediately operate with the new setting.
- Page 8 FS-HDR Processing Examples General FS-HDR Setup For any FS-HDR operation the following general menu items will need to be set correctly for your workflow. Some default FS-HDR settings may be applicable. The following items assume front panel control. Web browser control may require additional network configuration steps.
-
Page 9: Hd Video Camera To Ultrahd Hdr Live Production
HDR and SDR modes on that monitor (which may go black during the change- over). The FS-HDR default setting is No Clamp, and this generally should be used during production. When set to 100 Nits, the HDR signal is cleanly compressed to SDR, allowing quick A/B comparison on an HDR display in HDR mode. - Page 10 • View the FS-HDR SDI output signal on a compatible HDR display. Procedure System Configuration 1. If the FS-HDR is not already in Single Channel Mode, press the CONFIG System button: • Select 2 FS-HDR Mode, select 4K/UHD and press the ADJUST knob. Wait for the FS-HDR to reboot (not longer than 90 seconds).
-
Page 11: 4K Hdr To Hd Hdr Down And Cross-Conversion
1920 x1080p 59.94 HLG SDI Out 7 SFP Down Convert to (w Embedded Audio) 1920 x1080p 59.94 HLG SDI Out 8 SFP Down Convert to (w Embedded Audio) 1920 x1080p 59.94 HLG FS-HDR Quick Start Guide v1.0 www.aja.com... - Page 12 HD tri-level sync signal to one of the Ref Loop BNC connectors, and terminate the other Ref Loop BNC connector. • Connect a Quad Link 4K 59.94 signal to the FS-HDR SDI 1, 2, 3, and 4 video input BNC connectors.
-
Page 13: Multiple Legacy Device Sdr To Hdr Live Conversion
Standard (default), Soft 1-3, Bright VID2 FORMAT 1 Output Format 1080p5994 VID2 FORMAT 2.1 Dynamic Range&Gamut Hybrid Log Gamma BT.2100 VID2 FORMAT 3.0 Link Cfg SDI2 Sngl Link LvlA VID2 FORMAT 4.0 Link Cfg SDI6 Sngl Link LvlA FS-HDR Quick Start Guide v1.0 www.aja.com... - Page 14 • Configure the source devices to the desired settings and connect them to SDI1 through SDI 4 BNC inputs on the rear of the FS-HDR. Once connected the LED below the VID1 button on the FS-HDR front panel will light.
-
Page 15: Multiple Simultaneous Hdr And Sdr Distribution
Multiple Simultaneous HDR and SDR Distribution The following workflow demonstrates simultaneously distributing HDR and SDR content. In this example, the FS-HDR converts one HDR input to a different HDR format output and also converts it to an SDR output. Simultaneously the FS-HDR also converts two other signals, one from a BNC input, and the other from an SFP module input. - Page 16 HD tri-level sync signal to one of the Ref Loop BNC connectors, and terminate the other Ref Loop BNC connector. • Connect sources A and B to the FS-HDR SDI 1 and SDI 3 Input BNCs. • Install an optional SFP module into the FS-HDR SDI 5 Input cage and connect the source cable.
- Page 17 Procedure System Configuration 1. If the FS-HDR is not already in Four Channel Mode, press the CONFIG System button: • Select 2 FS-HDR Mode, select HD/SD and press the ADJUST knob. Wait for the FS-HDR to reboot (not longer than 90 seconds).
- Page 18 Soft 1-3, or Bright. 20. If you have optional SFP output modules installed, you can select FORMAT 3.0 Link Cfg SDI8 and adjust to Sngl Lnk LvlA for an additional copy of that converted signal. FS-HDR Quick Start Guide v1.0 www.aja.com...
Need help?
Do you have a question about the FS-HDR and is the answer not in the manual?
Questions and answers