
Subscribe to Our Youtube Channel
Related Manuals for GSE 355 I.S.


Summary of Contents for GSE 355 I.S.
- Page 1 GSE Model 350/355 I.S. NTRINSICALLY NDICATOR Technical Reference Manual Version 3.0...
- Page 3 GSE Model 350/355 I.S. Technical Reference Manual Version 3.0...
- Page 4 Information in this Operation Manual is subject to change without notice due to correction or enhancement. The information described in this manual is solely the property of GSE. No part of this manual may be reproduced or transmitted in any form or by any means, electronic or mechanical, including photocopying and recording and sold for any monetary figure without the express written permission of GSE.
-
Page 7: Table Of Contents
Table of Contents Chapter 1: Introduction...........................1 Hazardous Area Guidelines ........................2 Hazard Grouping..........................2 Duration of Hazard..........................2 Temperature Codes ..........................2 Definitions ............................4 Entity Evaluation Concept .........................4 Entity Rating Definitions ........................5 Entity Ratings.............................5 Factory Mutual Approval ........................6 NEMKO Approval (ATEX) ........................7 CSA Approval ............................8 Standard Functions ..........................9 Standard Features..........................9 Specifications ............................9... - Page 8 Safe Area Options ..........................21 Safe Area Hub Kit..........................21 Safe Area Analog Option Installation....................26 Chapter 3: Configuration ........................31 Entering the Setup Mode (Model 350 I.S.) ..................32 Entering the Setup Mode (Model 355 I.S.) ..................33 Selecting a Parameter........................33 Changing a Parameter Value ......................34 Selection Parameters ........................34 Key-In Parameters..........................35 Saving Parameters ..........................36...
- Page 9 Changing Targets From The Weigh Mode (Fill) ................65 Example (Fill) ..........................65 Batch..............................65 Activation Method (Batch) ......................66 Pre-Acts (Batch) ..........................66 Learn Feature (Batch) ........................66 Pause Feature (Batch) ........................66 Changing Targets From The Weigh Mode (Batch) .................66 Example (Batch) ..........................67 Discharge.............................67 Activation Method (Discharge) .......................68 Pre-Acts (Discharge)........................68 Learn Feature (Discharge) .......................68 Pause Feature (Discharge) .......................68...
- Page 10 Remote Display Configuration ......................84 Master To Remote (Slave) Configuration..................84 Setup Master Indicator........................85 Setup Remote Indicator........................85 Control (Hazardous Area) to Hub (Safe Area) Configuration............89 300 Series Command Codes......................90 Display Capture Utility........................91 Chapter 4: Calibration...........................93 Setup Mode Calibration ........................94 Fast Calibration ..........................94 Performing Calibration........................94 Establishing Zero ..........................94 First Zero............................95...
- Page 11 Viewing Setup...........................116 Information Mode Parameters .......................116 A/D Calibration Procedure ......................118 Appendix A: Maintenance........................121 Main Board Replacement ........................122 Main Board Removal........................122 Main Board Installation .........................122 Keypad Replacement ........................122 Model 350 I.S. Keypad Removal....................122 Model 355 I.S Keypad Removal....................122 Model 350 I.S. Keypad Installation....................123 Model 355 I.S.
-
Page 13: Chapter 1: Introduction
Chapter 1: Introduction Thank you for selecting the GSE Model 350/355 Intrinsically Safe Indicator. The Model 350 I.S. and Model 355 I.S. continue the GSE tradition of Excellence in Weighing. A properly installed and maintained Model 350 I.S. or Model 355 I.S. will provide many years of reliable, accurate performance. -
Page 14: Hazardous Area Guidelines
Hazardous Area Guidelines The GSE Models 350 I.S. and 355 I.S. instruments are approved by FM Approvals as intrinsically safe for use in hazardous areas. An intrinsically safe device has been proven through calculation and testing that it cannot produce enough electric or thermal energy under normal or fault conditions to cause ignition of flammable material present in the atmosphere. - Page 15 Class I, Division 1, Groups A, B, C & D Class I, Division 1 locations are those in which hazardous concentrations of flammable gases or vapors exist continuously, intermittently or periodically under normal operating conditions. Electrical equipment for use in such locations may be ‘‘explosion proof,’’...
-
Page 16: Definitions
abnormal operation of the equipment with which the liquids or gases are handled, processed or used; or (3) in which ignitable concentrations of flammable gases or vapors normally are prevented by positive mechanical ventilation, but which may become hazardous as the result of failure or abnormal operation of the ventilation equipment;... -
Page 17: Entity Rating Definitions
This means that not only can the instrument be used with GSE FM Approved loadcells and peripherals, but they can also be used with any manufacturer’s FM Approved loadcells and peripherals provided that they have matching entity ratings and are approved for the appropriate hazardous area. -
Page 18: Factory Mutual Approval
Factory Mutual Approval The Model 350 I.S. and 355 I.S. indicators and options have been approved for the following hazardous areas: Factory Mutual Project Identifier: 3018357 Indicator/Option Approval M350 I.S./M355 I.S. I.S. for CL I-III, DIV 1, GP A-G (5V Excitation) 20H350-00010 I.S. -
Page 19: Nemko Approval (Atex)
NEMKO Approval (ATEX) Recapitulation of certification NEMKO approval number 04ATEX1356X II1GD T117°C II2(1)GD T64°C II2(1)GD T193°C ITEM Intrinsic Safety APPROVAL Description GS E part number 350IS 355IS 20H350-XXXX0 50° Standard Indicators 20H355-XXXX0 117°C 350IS 355IS 20H350-XXXX1 50° Indicators with 8V 20H355-XXXX1 Exc. -
Page 20: Csa Approval
Model 3502 or associated apparatus AC-DC power supply, Model 3501, rated 90-250 VAC, 50/60 Hz, 120 mA with dual single I.S. output rated 12.7 volt, 315 mA. Intrinsically Safe when installed per Control Drawing 41533 with the Entity Parameters listed. Temp. Code T4 at Tamb = 50°C. Item GSE Part Approval Number 5 Volt Excitation 20H350-00010 Class I, Div. -
Page 21: Standard Functions
Standard Functions The Model 350 I.S. and 355 I.S. include built-in functions that you can enable through the Indicator Setup. Refer to Chapter 3: Configuration for information on the setup and operation of the following standard functions: • Check-weighing • Parts counting •... -
Page 22: Display
SAFE AREA OPTIONS Battery Charger Charges completely discharged battery option in 3.5 hours Universal AC input 85-265VAC, 50/60 Hz Fiber Optic Hub Model 355, installs in the safe area and connects to a Model 350/355 I.S. Allows setpoint and/or analog output options. Communicates with hazardous area indicator via fiber-optic cable. HAZARDOUS AREA OPTIONS Battery Stainless steel enclosure, mounts to indicator swivel bracket. -
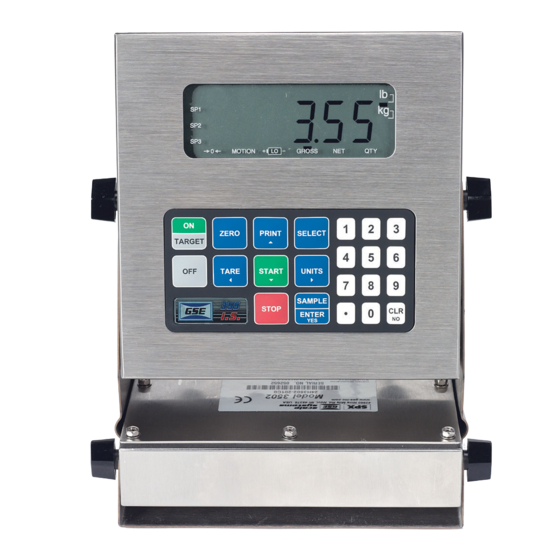
Page 23: 350 I.s. Keypad
Setpoint #1 activated (relay 1 closed). Setpoint #2 activated (relay 2 closed). Setpoint #3 activated (relay 3 closed). Ú0Ù Displayed weight is at center-of-zero (± ¼ display graduation). MOTION Scale is in motion. Motion inhibited transmits and motion inhibited setpoint activation will be delayed until motion ceases. -
Page 24: 355 I.s. Keypad
Weigh Mode Key Press Count Mode Setup Mode Toggles between display Toggles between display modes ü modes and/or restores power and/or restores power to the Advances to the next setup parameter. to the indicator (if auto- indicator (if auto-shutoff shutoff enabled). enabled). - Page 25 Weigh Mode Key Press Count Mode Setup Mode known, key in the value and press selections and/or answers è ‘YES’ to query prompts. Toggles between display modes Toggles between display modes æ Advances to the next setup and/or restores power to the and/or restores power to the indicator (if auto-shutoff indicator (if auto-shutoff...
-
Page 26: Weigh Mode Functions
Weigh Mode Functions The Model 350 I.S. and Model 355 I.S. keypads have five primary Weigh Mode functions: ç Performs a gross zero and selects the gross mode. û Initiates data transmission out the communication port. þ Toggles the units of measure between lb, kg, g, lb oz, oz. è... -
Page 27: Chapter 2: Installation
Chapter 2: Installation This chapter covers installation of the indicator and all options. -
Page 28: System Diagrams
System Diagrams The control drawing details the allowed interconnections between the Model 350 I.S. and Model 355 I.S. indicators, their options, and other possible devices. The drawing also shows the entity ratings of the indicators to allow easy selection of other devices approved under the entity concept. See Appendix C: Control Drawingsfor further details. -
Page 29: Load Cell Connections
Figure 7: Model 350 I.S. with Battery Swivel Bracket Figure 8: Model 355 I.S. with Battery Swivel Bracket Load Cell Connections A high quality braided shield cable with 16 to 24 AWG stranded wire is recommended for load cell or summing box connections. -
Page 30: Communication Port Connections
Figure 9: Model 350 I.S. and Model 355 I.S. Load Cell Connector (J10) Communication Port Connections The 350 I.S. and 355 I.S. come standard with two RS-232 communication ports. Every device connected to a communication port of the Model 350/355 I.S. must be approved for the appropriate hazardous area and entity parameters. -
Page 31: Remote Display Connections
The open circuit voltage across the remote key pins is +5 VDC. A closed switch will conduct about 0.25 mA. Therefore, a low-voltage switch with gold-plated contacts is recommended. A Mercury-wetted switch will also work well. A minimum contact duration of 100 ms is required. Once invoked, the selected remote key operation will not repeat until the contact is released and closed again. -
Page 32: Ac To Dc Power Supply (External)
Battery Charging The battery must be charged in the safe area. Connect the battery to the battery charger. Connect the battery charger to AC power. Charging will take approximately 3.5 hours. Low Battery Indication The low battery annunciator will be lit when the voltage reaches a low threshold and the low battery message (Lo Bat) is shown on the display for 1.5 seconds every 15 seconds. -
Page 33: Safe Area Options
Fiber-Optic Board Installation 1. Remove the rear panel screws of the Model 350/355 I.S. 2. Locate the fiber-optic board connector (J6) on the Model 350/355 I.S. main board. 3. Snap the (4) ½ plastic standoffs provided with the fiber-optic board into the holes surrounding the J6 connector. - Page 34 5. Peel apart conductors of plastic fiber cable approximately 1’. 6. Insert plastic fiber conductors through seal holes in the strain relief. 7. Terminate plastic fiber conductors by using snap-on connectors (GSE p/n 26-20-4531) and polishing kit (GSE p/n 31-80-0225) according to termination instructions (GSE p/n 39-10-42119).
- Page 35 Prefabricated cables in 100 feet increments can be purchased from GSE. The cable comes ready to install with connecting ends and a strain relief for the enclosure.
- Page 36 Figure 17: Fiber-Optic Cable Installation (HCS Cable) Safe Area Setpoint Option Installation (Model 355 Hub Only) Using one of the software setpoint configurations (see General Setpoint Setup on page 56) in conjunction with the setpoint option board gives the Safe Area Hub the ability to directly control external devices such as valves, relays, actuators, etc.
- Page 37 3. Install the nylon stand-off supplied with the option bracket kit into the thru-hole on the option bracket. See Figure 18. The thru-hole on the option bracket is the irregular flanged section (a smaller hole than the others on the bracket). 4.
-
Page 38: Safe Area Analog Option Installation
Test ~ Spt 1 Load Device Active 5. Attach the load and power source in series with Setpoint 2 contacts. í 6. Press to activate only output #2. Test ~ Spt 2 Load Device Active 7. Attach the load and power source in series with Setpoint 3 contacts. í... - Page 39 11. Line-up the three other hex stand-offs into the bracket thru-holes first before securing the nylon stand- off into the main board thru-hole. 12. Secure the bracket into position with the hex nuts supplied with the kit. Do not over tighten. 13.
- Page 40 í 7. Press to increase the output to 75%. 0-10v ~ 75P 7.50 V í 8. Press to increase the output to 100%. 0-10v ~ 100P 10 V To test the 0-20mA output mode: Voltmeter readings are based on the use of a 500 ohm precision resistor. Caution! Do not exceed 500 ohms. 1.
- Page 41 2. Attach the precision resistor to pin 5 and pin 6. 3. Attach the voltmeter + (red) lead to pin 6 (4-20 mA) of the analog output connector. 4. Attach the voltmeter - (black) lead to pin 5 (ISOLATED GND) of the Analog Output connector. 62004 æ...
-
Page 43: Chapter 3: Configuration
Chapter 3: Configuration Instructions on how to enter the setup mode, make changes to parameters and exit the setup mode while saving changes. This chapter includes setup for: • Analog output • Setpoints • Time and date • Custom Transmit •... -
Page 44: Entering The Setup Mode (Model 350 I.s.)
Entering the Setup Mode (Model 350 I.S.) To prevent accidental changes to the Indicator Setup, a sequence of keystrokes is used to gain access to the Setup Mode. If the indicator is set for remote display, refer to page 84 for instructions on accessing the setup mode. -
Page 45: Entering The Setup Mode (Model 355 I.s.)
Entering the Setup Mode (Model 355 I.S.) To prevent accidental changes to the Indicator Setup, a sequence of keystrokes is used to gain access to the Setup Mode. If the indicator is set for remote display, refer to page 84 for instructions on accessing the setup mode. -
Page 46: Changing A Parameter Value
To access the previous parameter (Model 355 I.S.): 1. Press DISPLAY READS u. ü ó 2. Press DISPLAY READS u P111.09 ~ 1Grad ~ 0.01 . ü 3. Repeat to back up one parameter. When accessing a parameter, the parameter number appears briefly. The display then toggles between the parameter name þ... -
Page 47: Key-In Parameters
P 200.00 Indicates Parameter Parameter Number Choice Number For example, parameter 200 is a selection parameter that holds the baud rate for the serial. This is a selection parameter because a choice number between 00 and 06 must be used. Each choice number corresponds to a different baud rate. -
Page 48: Saving Parameters
þ 3. Press to advance to the next digit. DISPLAY READS u 2. û 4. Press six times to select the next digit. DISPLAY READS u 25 þ 5. Press to advance to the next digit. DISPLAY READS u 25. û... - Page 49 í 4. Press to complete exit. DISPLAY READS u 0.00 To exit the Setup Mode from the view-only mode (350 I.S.): ÿ 1. Press to begin exiting Setup Mode. DISPLAY READS u Enter ~ =End ý 2. Press to complete exit. DISPLAY READS u 0.00 To exit the Setup Mode without saving changes (350 I.S.): ÿ...
-
Page 50: Factory Default
Factory Default Parameter 65001 and 65002 are available to return the Model 350/355 I.S. to factory settings. Parameter 65001 will reset parameters including the calibration, while parameter 65002 resets all parameters except the calibration. Return to factory default (350 I.S.): 1. -
Page 51: List Of Parameters
List of Parameters The Model 350 I.S. and Model 355 I.S. have several parameters that can be configured to your specific application. Below is a table of the available parameters. Also refer to page 41 for explanations of each parameter. Table 1: Parameter Map Parameter Display... - Page 52 Parameter Display Default Valid Range/ Choices Parameter Description Page Number Name Value P213.01 Ttyp1 --1-- 1 – 16, Custom Print Transmission (Selection) P220.00 Baud2 9600 150 – 115K Comm 2 Baud Rate (13 Selections) P221.01 Data2 8 Bits 7 – 8 Bits Comm 2 Data Bits (2 Selections) P222.00...
-
Page 53: Parameter Map Details
Parameter Display Default Valid Range/ Choices Parameter Description Page Number Name Value (Toggle) P5003.00 StArt Disable Enable / Disable Start Key (Toggle) P5004.00 Chec Auto Auto / Start 355 Restart Mode (Toggle) P5010.00 SPAnn Enable Enable / Disable Setpoint Annunciators (Toggle) P5011.00 SPBar... - Page 54 Selects the stability (motion) time delay to a resolution of 0.1 seconds. For example, an entry of 25 will be accepted as 2.5 seconds. P116 Filter (Selection) Sets the indic ator response time in terms of seconds. Filtering determines how quickly the indicator will respond to changing input signals.
- Page 55 è When enabled, pressing will wait for a no-motion condition and then bring the scale to a net zero reading. Disabling will prevent keypad tare operations. è Note that if a setpoint activation method is set to , disabling Auto Tare will also disable the activation of that setpoint.
- Page 56 P212 Send Stability (Comm 1) (Toggle) Enabling Send Stability will delay any transmissions until a no-motion condition exists. P213 Transmit Selection (Comm 1) (Selection) Select desired print output (1 – 16 or custom). The transmission will be initiated by the selected print operation (P210) and / or the Remote Key selection (P800).
- Page 57 P290 Echo Display (Toggle) Determines which comm. port will be echoed to another device. Selections are None, port 1, port 2. P291 Start Character (Key-in) Set the start character for the master indicator. Choices are 0 – 255. Default value is 2 (STX).
- Page 58 è Select duration of time for auto shutdown. Choose from selections with the key. Selections are off, 0.5, 1, 2, 3, 4, 5, 10, 15, 20, 25, 30, 35, 40, 45, and 60. Choices are in set in minutes. P440 Legal For Trade Restrictions (Toggle) Enable NTEP legal-for-trade restrictions.
- Page 59 ASCII characters and control codes use one byte. See P60001 for available memory. The custom transmit cannot be viewed or altered from the indicator. A custom transmit must be entered via the serial port. See Custom Transmit Setup on page 50 for details on designing and loading a custom transmit.
-
Page 60: Preset Transmit Selections
Only one format or custom transmit may be enabled at a time. Choice 0 Custom Transmit: User-defined serial data string (see Custom Transmit Setup on page 50). Choice 1 GSE Standard Transmit: MM/DD/YY <CR><LF> HH:MM:SS am XXX.XX kg Gross<CR><LF>... -
Page 61: Id Number Entry And Printing
Choice 12: <STX><Unsigned DATA><sp><lb/kg><sp><Gross/Net/Qty><STAT><CR> Use choice 12 to send to a 450/455/550 remote display that is set to text mode and a <CR> terminator. Choice 13: <STX><Unsigned DATA><sp><lb/kg><sp><Gross/Net/Qty><STAT> <CR><LF> Choice 14 (Simulates NCI 3835): <LF>Signed DATA<CR><LF><STAT><CR><ETX> Data Block Name Description <STX>... -
Page 62: Custom Transmit
number will be displayed. An alphanumeric ID of up to 50 characters can be entered. At this point a new ID number can be entered or the existing number may be cleared. In order for the ID number to be printed, the following criteria must be met. •... -
Page 63: Writing A Custom Transmit Ascii Text File
Writing A Custom Transmit ASCII Text File Any text editor may be used to construct a custom transmit (Notepad, Wordpad, etc.), but you must save the custom transmit as a text (.txt) file. Instructions can also be sent keystroke by keystroke from a communications program. - Page 64 Table 2: ASCII / HEXADECIMAL CONVERSION CHART CHAR “ < > & ‘ ‘ Most printers require a carriage return (.013) and/or a line feed (.010) to print preceding data and avoid leaving data in the printer buffer.
-
Page 65: Parameter Selection Numbers
Parameter Selection Numbers The following sequence enters parameters into a custom transmit: %e , the parameter number, %e%e , a format code, and then %e%e with no intervening spaces. %e 0 %e%e 0 %e%e Initiates Parameter Enters Parameter Format Enters Format Parameter Number and Initiates... -
Page 66: Exiting Setup Mode And Saving Changes
Time/Date Format Codes “10:07:40 am 01/26/01 Includes seconds with time. “10:08 01/26/01” 24 hour time format. “10:11 am Jan 26, 2001” Print date spelled out. “10:12 am Fri 01/26/01” Print day of the week. “10:12 am 26/01/01” International date format. “980503984 Tm/Dt”... -
Page 67: Setpoint Setup
þ 4. Press to toggle sample amounts between 5, 10, 20, 50 and 100. DISPLAY READS u Add ~ 20 è 5. Add the pieces to be sampled and press to sample and display the current quantity. DISPLAY READS u 20 To sample using selectable fixed counts (355 I.S.): í... -
Page 68: Activation Methods (General)
Table 5: Setpoint Operations Setpoint Selection Function Description Page Ref P5100.00 None Setpoints disabled. Percentage check-weighing. Over/Under tolerances are based on a P5100.01 ChecP percentage of the target weight. Single Ingredient Fill (Single or Dual-Speed). Allows the use of pre- P5100.02 Fill acts for dribble feed and compensation for free-fall material. -
Page 69: Pre-Acts (General)
Pre-Acts (General) Pre-Acts are control actions prior to reaching a desired target value. Necessary to prevent over- filling due to product flow rate, relay and valve response time and product suspension, Pre-Acts compensate for other system variables affect how much more product reaches the weighing device after the indicator has deactivated a setpoint. -
Page 70: Changing Targets From The Weigh Mode (General)
Pause Action Result Setting Disabled Pause feature disabled. Current cycle paused – all Keypad Model 350/355 I.S. Key Press setpoints deactivated. Current cycle paused – all Remote Key Remote Key Contact Closure setpoints deactivated. Model 350/355 I.S. Key Press Current cycle paused – all Both OR Remote Key Contact setpoints deactivated. -
Page 71: Bargraph Setup (Lcd)
and pre-act 2 are subsets of Targ 1. The following procedure illustrates how to change a target from 250 lbs to 400 lbs., keep pre-act 1 at 28 lbs. and change pre-act 2 from 1.5 lbs to .5 lbs. To change targets from the Weigh Mode (350 I.S.): ü... - Page 72 (Bar weight = 50 – 40 = 10 ) (10/8 = 1.25 lbs ) NOTE: Right-side bars will have the same scaling (lb per bar) as the left-side bars. They are represented as a mirror image of each other. Bars ON Weight Range (Lower Tolerance Limit) <...
- Page 73 Figure 22: Example #2 Bargraph Segments (Weight Value) Figure 23: Examples of the Bargraph "Below, Within and Above Tolerance" NOTE: (bargraph for filling and emptying modes) For modes other than check-weighing, the bars will be on only while the setpoints are on and during the "Done"...
-
Page 74: Percentage Check-Weighing
Although the setpoint annunciators are not motion-inhibited, the setpoint relay outputs will not activate until a no- motion condition exists. Percentage Check-Weighing This feature is commonly used in check-weigh applications. After a target weight is entered, upper and lower tolerances are entered as a percentage of the target. Over and under tolerance values are automatically calculated according to the percentages entered. -
Page 75: Example (Percentage Check-Weighing)
To change targets from the Weigh Mode (350 I.S.): ü 1. Press DISPLAY READS u0.00 ü 2. Press to view the current fill target. DISPLAY READS uTarg1 ~ 250 ý 3. Press 400 to set a new fill target of 400 lbs. DISPLAY READS uTarg1 ~ 400 ý... -
Page 76: Activation Method (Fill)
Table 7: Setpoint Setup (Fill) Setpoint Selection Function Description P5100.1 Fill Select Fill Setpoint Operation P5101.-- Targ1 Final Fill Target Value P5104.0 Based Select between Net or Quantity P5105.-- PA 1 Pre-Act 1 Value (Fast-to-Slow Value; 0 for Single-Speed) P5107.0 Start 1 Setpoint Activation Method P5109.--... -
Page 77: Pause Feature (Fill)
Pause Feature (Fill) The standard pause feature (keypress, remote key closure or both) is available for the fill operation. See Pause Feature (General) on page 57 for ‘pause’ function details. Changing Targets From The Weigh Mode (Fill) When Fill is configured in the setpoint setup, Targ 1 automatically becomes an available mode æ... -
Page 78: Activation Method (Batch)
Activation Method (Batch) The filling of each ingredient begins when one of three selectable start functions occur. Each ingredient may have its own start function. The deactivation of the setpoint is automatic. The desired targets may be based on net weight or quantity (if counting is enabled). All ingredients must be based on the same parameter. -
Page 79: Example (Batch)
Example (Batch) With a system set up a system to make a 50,000 lb batch with water (30,000 lbs.), corn syrup ý (15,000 lbs.) and caramel color (5,000 lbs.), ingredient 1 should start with and subsequent ingredients should auto-start. Parameter Setting Actual Cutoff Value Comments Target 1 = 30,000... -
Page 80: Activation Method (Discharge)
Setpoint Function Description Selection P5107.0 Start 1 Setpoint activation method. P5109.-- PA 2 Pre-act 2 value (final cutoff). P5110.1 Learn 2 Learn feature for pre-act 2. P5114.1 PrAc 1 Pre-act 1 available as subset in Weigh Mode. P5115.1 PrAc 2 Pre-act 2 available as subset in Weigh Mode. -
Page 81: Changing Targets From The Weigh Mode (Discharge)
Changing Targets From The Weigh Mode (Discharge) When Discharge is configured in the setpoint setup, Targ 1 automatically becomes an available æ ý í ý í mode for the key. An entry followed by changes Targ 1. Pressing alone allows access to the subsets. PA 1 and PA 2 are the subsets for Targ 1. The pre-acts can be deleted as subsets by choosing ‘disabled’... -
Page 82: Activation Method (Both)
Table 10: Setpoint Setup (Both) Setpoint Selection Function Description P5100.5 Both Select both setpoint operation. P5101.-- Targ1 Vessel fill target value. P5104.0 Based Select from Net or Count (Quantity). P5105.-- PA 1 Pre-act 1 value for vessel fill. P5106.1 Learn 1 Learn feature for pre-act 1. -
Page 83: Changing Targets From The Weigh Mode (Both)
Changing Targets From The Weigh Mode (Both) When Both is configured in the setpoint setup, Targ 1 and Targ 2 automatically become available æ ý í modes for the key. An entry followed by changes the currently viewed target. ý íô... -
Page 84: Setpoint Activation (Absolute Check-Weighing)
Setpoint Selection Function Description P5102.-- Low acceptance value. P5103.-- High acceptance value. P5104.0 Based Select from Net, Gross or Count (Quantity). See Key-In Parameters on page 35 for instructions on using front panel keys for entering data. Setpoint Activation (Absolute Check-Weighing) In order for the annunciators or setpoints to activate, the displayed value must be at least five graduations above zero. -
Page 85: Example (Absolute Check-Weighing)
DISPLAY READS uPA 2 ~ .5 ü 7. Press to display the current Gross Weight. DISPLAY READS u15.12 To change targets from the Weigh Mode (355 I.S.): é 1. Press to view the current fill target. DISPLAY READS uTarg1 ~ 250 í... -
Page 86: Setpoint Activation (Independent)
Setpoint Function Description Selection P5142.0 Act 3 Activate setpoint 3 when weight is above or below. P5143.-- Targ 3 Setpoint 3 target for weight to either rise above or fall below. P5144.0 Stbl 3 Setpoint 3 stability setting. P5145.0 Rset 3 Reset selection for setpoint 3. -
Page 87: Example (Independent)
Example (Independent) Setup a continuous-cycle static weighing system that fills a weigh hopper from a storage bin. The weigh hopper should stop the fill at a predetermined target, dump the product into a bag, and then restart the fill. A warning light should come on to give an operator advance notice to change the bag. -
Page 88: Changing Targets From The Weigh Mode (Target Deviation Check-Weighing)
Check-Weigh Annunciator Annunciator Status Status Color (LED) SP 1 OVER Illuminated SP 2 GOOD Green Illuminated SP 3 UNDER Yellow Illuminated The Pre-Acts, Learn Mode, and Pause Feature options are not applicable to check-weigh operation. Changing Targets From The Weigh Mode (Target Deviation Check-Weighing) When Check-Weigh by Deviation is configured in the setpoint setup, the Targ 1 value æ... -
Page 89: Example (Target Deviation Check-Weighing)
To change target to 10 from the Weigh Mode (355 I.S.): é 1. Press to view the current target. DISPLAY READS uTarg1 ~ 15.00 í 10 í Key in the new target value and press . Example DISPLAY READS uTarg1 ~ 10.00 í... - Page 90 æ The time and date can be accessed from the weigh mode with the key if P502 is enabled. Also 11%s can be sent into the comm port to access the time/date entry regardless of P502. The time and date can be entered in the setup mode at P500 and P501. Access P500 to change the time or P501 to change the date.
-
Page 91: Time And Date Setup (Model 355 I.s.)
þ Press twice to move the decimal point over to separate the month from the day. It is not necessary to enter a 0 before a single digit month. If it is a double-digit entry, press þ û once to move the cursor and then to scroll through the digits. -
Page 92: Remote Key Configuration
16.32.41 1. Key in the date in the following format: DISPLAY READS u 16.32.41 í 2. Press to except the time æ 3. Press to move to the date. To enter the date from the Enter~date~01.01.70 prompt EXAMPLE: 08.170.04 (August 17, 2004) 8.17.4 1. -
Page 93: Prepare For Upgrade
(355 I.S.) at the Enter = Flash prompt. ~ Or ~ Unplug the indicator and move Reflash jumper (E2) from NORMAL to RFLASH. 5. The terminal program should show: GSE Scale Systems Division of SPX 300 Series Bootloader Version XX (where XX should be at least 03) Date (where Date should be at least Feb 2004) a. -
Page 94: Analog Output Setup
Analog Output Setup Tabl e 15: Analog Output Parameters Parameter Displayed Type/choices Description Setting Name (*=Default) P171.00 AnAlg Enable analog option. Disbl*, Enabl Parameter that analog signal corresponds to. Displayed Gross*, Net, P172.00 AnPar corresponds to gross while viewing the gross weight and net Displayed otherwise. -
Page 95: Entering Analog Calibration Values
Each analog option board can be identified by its serial number, which is entered in the unit during the calibration process. Entering Analog Calibration Values An example of the printout included with each analog option kit follows below: 100%s23640%e Access Setup Modes, Allowing Changes 60100%s%e P60100. c1998-GSE- 60101%s%e P60101. 0Model 350 350p01009 60102%s%e P60102. 06-30-2000 60200%s%e P60200. -
Page 96: Analog Output Example
Analog Output Example Analog Parameter Parameter Example Value Comments Description Setting P172.01 Net Weight 3.00 lb Current net weight. Analog Full P173.-- Net weight value that would give maximum analog output. Scale P174.-- Zero Offset Net weight value that would give minimum analog output. Max Range P175.-- Maximum analog output allowed (entered in terms of voltage). -
Page 97: Setup Master Indicator
Table 17: Common Settings for the Master and Re mote indicators Master Remote Parameter Description P200 or P220 P200 or P220 Baud rate P201 or P221 P201 or P221 Data bits P202 or P222 P202 or P222 Parity P203 or P223 P203 or P223 Stop bits P204 or P224... - Page 98 The parameters in Table 18 are available only when P260 is set for r-dsp or Hub. Refer to Table 18: Remote Display Setup Parametersfor the available parameters and their descriptions. Table 18: Remote Display Setup Parameters Parameter Displayed Type/choices Description Setting Name (*=Default)
- Page 99 Parameter Displayed Type/choices Description Setting Name (*=Default) þ û Enables or disables the use of the keys on the master indicator (350 I.S.). When this parameter is enabled and the keys are pressed, the Print and Enable* / P283.01 Prtut Units keys will be simulated.
- Page 100 Set P271 for Custom and set all other remote display parameters (refer to Table 18). Configure the parameters in the master indicator (refer to Setup Master Indicator on page 85). Make sure that the wiring connections between the master and remote indicators are correct (refer to Remote Display Connections on page 19.
-
Page 101: Control (Hazardous Area) To Hub (Safe Area) Configuration
Control (Hazardous Area) to Hub (Safe Area) Configuration In order to use setpoints or analog output modules they must be located in the safe area. These modules will be installed in the safe area hub. Refer to Safe Area Setpoint Option Installation (Model 355 Hub Only) or Safe Area Analog Option Installation on page 24 for option installation instructions. -
Page 102: 300 Series Command Codes
Parameter Setting Control / Hub P288 Remote numeric and decimal key – enabled P289 Remote target key – enabled P291 Start character - 2 control P292 End character - 3 control P296 Remote style - 300 control 299 í The parameters of the hub indicator may be overridden by keying in at P260. -
Page 103: Display Capture Utility
Percent Master / Decimal Symbol Action equivalent Remote %[Ctrl-A] Target Key %[Ctrl-E] Start Key %[Ctrl-F] Stop Key %[Ctrl-U] Echo display (all 3 lines) out comm. 1 %[Ctrl-V] Echo display (all 3 lines) out comm. 2 Enters the number before the %9 as the piece weight Pause Send out transmits one and two... - Page 104 Example #1 The scale is in the weigh mode with the gross weight displayed (for example, 15.00). Input: The extended ASCII character represented by decimal 149 (hex: 95h) is received through any comm port. Output: “15.00 lb Gross ” is sent out comm port 1. Example #2 The scale is in setup at P110 Full Scale.
-
Page 105: Chapter 4: Calibration
Chapter 4: Calibration This chapter covers all methods of calibration. -
Page 106: Setup Mode Calibration
Setup Mode Calibration You can enter the Calibration Mode after accessing the Setup Mode to view and/or change parameter settings (see Setup Mode on page 32). To access the Calibration Mode when viewing any setup parameter: ç 1. From the Setup Mode, press DISPLAY READS u Enter ~ =Cal! ý... -
Page 107: First Zero
ÿ ü 1. Press to display the calibration prompt. ÿ û þ ý è è è 2. Press to access the Calibration Mode. ü 3. Press to scroll through the five selections. ý 4. Press to establish zero. To select a calibration method (355 I.S.): 100 æ... -
Page 108: Last Zero
ý 12. Press to exit calibration. DISPLAY READS u 100.00 13. Remove the calibration weight. DISPLAY READS u 0.00 First Zero Calibration Method Example (355 I.S.): 100 æ 1. From the Weigh Mode key in DISPLAY READS u Setup 54321 í 2. - Page 109 Last Zero Calibration With Weight Already Applied Example (350 I.S.): 1. Remove any load on the scale. DISPLAY READS u 10. ÿ 2. Press to zero the scale. DISPLAY READS u 00. 3. Apply a 10000 lb test weight to verify calibration. DISPLAY READS u 9970.
-
Page 110: False Zero
DISPLAY READS u Fast ~ Cal~First ~ Zero? ~ 9930. æ 6. Press DISPLAY READS u Last ~ Zero? ~9930. í 7. Press to use last zero. DISPLAY READS u Enter ~ Load? ~ 9970. 8. Enter 10000. DISPLAY READS u 10000 í... - Page 111 DISPLAY READS u 2500 ý 8. Press to establish span. DISPLAY READS u 2500. 9. Pause for motion delay. DISPLAY READS u Cal ~ Good? ~ 2500. ý 10. Press to accept calibration. DISPLAY READS u Enter ~ =Stor ý 11.
-
Page 112: Only Zero
Only Zero Only Zero is used to establish a new calibration zero without affecting the span. This is useful for correcting changes to the scale’s dead load, for example adding safety rails to a truck scale platform. Only Zero Calibration Example (350): ÿ... -
Page 113: Reset Calibration
í 9. Press to exit calibration. DISPLAY READS u 00. Reset Calibration Cal Reset may be necessary when an over-load or under-load condition exists, preventing the completion of the calibration process. Calibration Reset adjusts the zero and gain factors of the A/D amplifier to factory default values for maximum sensitivity. - Page 114 ý 14. Press to accept calibration. DISPLAY READS u Enter ~ =Stor ý 15. Press to save calibration. DISPLAY READS u Enter ~ =End ý 16. Press to exit calibration. DISPLAY READS u 100.00 17. Remove the calibration weight. DISPLAY READS u 0.00 Reset Calibration Gain Factors Example (355 I.S.): 100 æ...
-
Page 115: Multi-Point Linerization
í 16. Press to exit calibration. DISPLAY READS u 100.00 17. Remove the calibration weight. DISPLAY READS u 0.00 Multi-Point Linerization If the load cell signal input to the indicator has good repeatability and stability, then using multi-point linearization during calibration may significantly improve the ultimate accuracy of the data displayed by the indicator. -
Page 116: Examining Calibration Results
ý í After the last point is established, the indicator will prompt with Cal ~ Good? Press the key to ÿ â accept the calibration or press to backup and redo the last point as described below. ÿ â If you make a mistake at any point in the linearization process, simply press the key. -
Page 117: Exiting Calibration
DISPLAY READS u Enter ~ Load ~ xx.xx 2. Enter 100. DISPLAY READS u 100 ÿ í 3. Press to establish span. DISPLAY READS u 100.00 4. Pause for motion delay. DISPLAY READS u Cal ~ Good? ~ 100.00 When making a significant change to the previous calibration, or when the calibration weight is less than 5% of full scale capacity, ReCal ~ ??? will be displayed instead of Cal ~ Good? In this event it is recommended that ý... -
Page 119: Chapter 5: Legal For Trade
Chapter 5: Legal For Trade The Model 350/355 I.S. default parameter setup does not ensure compliance with legal-for-trade installations as mandated by local weights and measures authorities. This chapter contains information on NTEP and OIML regulations , sealing and audit trails, and other requirements. Since legal-for-trade requirements may vary, you must ensure that the Model 350/355 I.S. -
Page 120: Ntep Requirements
NTEP Requirements The National Type Evaluation Program (NTEP) is a widely accepted weights and measures standard in the United States, with most states abiding by some or all of the NTEP requirements. A complete list of these regulations is available in the “Handbook 44” publication distributed by the National Institute of Standards and Technology (NIST). -
Page 121: Sealing And Audit Trails
Parameter Description Comment P118 Zero Range Verify required selection. P212 Print Stability Verify required selection. Sealing And Audit Trails Most legal-for-trade installations will require the Model 350/355 I.S. to be sealed. A sealed indicator cannot be accessed for setup or calibration changes without breaking a physical seal or incrementing an event counter, thus providing evidence of tampering. -
Page 122: Audit Trails
Audit Trails Three separate incrementing, non-resetable audit trail parameters are used by the Model 350/355 I.S. to indicate changes to various parameters, P60201 – OIML, P60203 – Calibration, P60204 – Setup, and P65001 or P65002 – OIML, Calibration, and Setup. An audit trail counter will increment only once upon reflashing the indicator with new firmware, or exiting the Setup Mode and saving changes regardless of how many settings were changed. - Page 123 60203 í 2. Press DISPLAY READS u 60203 æ 3. Press to view the selected audit trail. DISPLAY READS u Audit ~ Trail~CAL. ~ 00001 æ 4. Press to return to the Weigh Mode. DISPLAY READS u 0.00...
-
Page 125: Chapter 6: Troubleshooting
Chapter 6: Troubleshooting This chapter contains error messages and information parameters, as well as information on setup parameter selections and A/D Calibration. -
Page 126: Error Messages
Error Messages The Model 350/355 I.S. utilizes the following types of error messages: Operational Errors, Setup Mode Errors, Hardware Errors, Calibration Errors, Communication Errors, and Miscellaneous Errors. Operational Errors Code02 Under Load. Input signal is less than negative full scale. Check load cell wiring. Verify correct capacity selection at P110. -
Page 127: Hardware Errors
Hardware Errors Code00 A FRAM problem detected during power-up. A-D ~ Bad! Problem with A/D chip detected. Disconnect any options installed and re-power the unit. Options Or Code17 are connected to the same serial lines as the A/D so they may prevent it from working properly. Deflt ~ A-D Bad A/D calibration values. -
Page 128: Viewing Setup
Viewing Setup While troubleshooting it may be helpful to view the setup parameter selections. This can be done using the procedure below (even with the internal program jumper in the “NO” position). Note that accessing the Setup Mode in this manner will not permit parameter changes. To view the setup parameter selections (350 I.S.): ÿ... - Page 129 355 I.S. to change the value. The value will not take affect until û þ power is cycled. View the current processor speed by pressing 60100 -GSE- ~ c1998 Copyright statement. 60101 350 I.S. ~ 01001 Firmware revision code.
-
Page 130: A/D Calibration Procedure
It should never be necessary to recalibrate the A/D. However, if the values stored at parameters P61110 – P61121 appear to be reset to 0.00000 and/or 1.00000, then A/D recalibration is necessary. Contact GSE Scale Systems or your local authorized GSE distributor for more information on this procedure. -
Page 133: Appendix A: Maintenance
Appendix A: Maintenance The mainboard, keypad and display are the key components that may need to be replaced. All service, component replacement and repairs must be performed by qualified personnel. Before opening the indicator, make sure that all power is removed and the repair is done in a safe area. If it is necessary to replace the keypad or display, you must first remove the main board. -
Page 134: Main Board Replacement
Main Board Replacement It is possible tha t the main board may need to be replaced for a number of various reasons. Please consult with a factory representative before removing the main board. Main Board Removal 1. Remove the (8) Phillips head screws from the back panel. 2. -
Page 135: Model 350 I.s. Keypad Installation
5. Use a 7 mm nut driver to remove the nuts securing the keypad. The three nuts on the bottom of the keypad are not accessible with a nut driver. Use either a 7 mm wrench, small adjustable wrench or 7mm socket on a small ratchet. -
Page 136: Display Installation
Display Installation 1. Install 3 plastic standoffs on the new display by pushing them through the holes on the display. 2. Line up the display header with the holes on the back of the main board. 3. Gently push the header into the holes on the main board and also line up the 3 standoffs with the corresponding holes in the main board. -
Page 137: Appendix B: Label Drawings
Appendix B: Label Drawings Reference for Model 350/355 I.S., battery and AC to DC supply labels drawings. - Page 138 41496 Rev. B: Model 3501 AC to DC Power Supply Label...
- Page 139 41874 Rev. B: ATEX Approval Label (5 Volt Excitation) NEMKO 04ATEX1356X II 1 GD CONTROL DRAWING #41533 CL I, ZN 0, EEx ia IIC T = 117°C T4(Ta=50°C) EEx ia IIC 28-10-41874 MFG YEAR: XXXX...
- Page 140 41875 Rev. B: ATEX Approval Label (8 Volt Excitation) NEMKO 04ATEX1356X II 1 GD CONTROL DRAWING #41533 CL I, ZN 0, EEx ia IIB T = 117°C T4(Ta=50°C) EEx ia IIB 28-10-41875 MFG YEAR: XXXX...
- Page 141 APPROVED 42860 Nine Mile Rd. Novi MI, 48375 USA BARCODE HERE CONTROL DRAWING #41533 www.gse-inc.com IS CL I-III, DIV 1, GP A-G IS CL I, ZN 0, AEx ia IIC NI CL I,DIV 2,GP A-D NI CL I,ZN 2,GP IIC SERIAL NO.
- Page 142 APPROVED 42860 Nine Mile Rd. Novi MI, 48375 USA BARCODE HERE CONTROL DRAWING #41533 www.gse-inc.com IS CL I-III, DIV 1, GP A-G IS CL I, ZN 0, AEx ia IIC NI CL I,DIV 2,GP A-D NI CL I,ZN 2,GP IIC SERIAL NO.
- Page 143 APPROVED 42860 Nine Mile Rd. Novi MI, 48375 USA CONTROL DRAWING #41533 IS CL I-III, DIV 1, GP A-G www.gse-inc.com IS CL I, ZN 0, AEx ia IIC SERIAL NO. XXXXXX NI CL I, DIV 2, GP A-D NI CL I, ZN 2, GP IIC S CL II-III, DIV 2, GP F-G T3 (Ta=40°C)
- Page 144 APPROVED 42860 Nine Mile Rd. Novi MI, 48375 USA BARCODE HERE CONTROL DRAWING #41533 www.gse-inc.com IS CL I, DIV 1, GP C-G IS CL I, ZN 0, AEx ia IIB NI CL I,DIV 2,GP C-D NI CL I,ZN 2,GP IIB SERIAL NO.
- Page 145 APPROVED 42860 Nine Mile Rd. Novi MI, 48375 USA BARCODE HERE CONTROL DRAWING #41533 www.gse-inc.com IS CL I-III, DIV 1, GP C-G IS CL I, ZN 0, AEx ia IIB NI CL I,DIV 2,GP C-D NI CL I,ZN 2,GP IIB SERIAL NO.
- Page 146 41883 Rev. B: Model 3502 CSA and ATEX Approval Label NEMKO 04ATEX1356X CONTROL DRAWING #41533 II 1 GD Ex ia IIC CONTROL DRAWING #41533 Ex nL IIC CL I, ZN 0, EEx ia IIC T = 193°C I.S. For CL I, Gp. A,B,C,D T3 (Ta=40°C) CL II, Gp.
-
Page 147: Appendix C: Control Drawings
Appendix C: Control Drawings Reference of system diagrams for connecting the Model 350/355 I.S. to peripherals in the hazardous and safe areas. - Page 148 41533 Rev. A: System Control Drawing...
- Page 149 41533 Rev. C: System Control Drawing MODEL 350IS OR MODEL 355IS INDICATOR (8V EXCITATION) MODEL 350IS OR MODEL 355IS INDICATOR (8V EXCITATION) SUMMING BOX BATTERY POWER SUPPLY 24H3502-201C0 T3(Ta=40°C) MODEL 3502 24S350-101A0 FIBER-OPTIC/RS232 CONVERTER 24S355-100A0 SAFE AREA HUB KIT AC-DC POWER SUPPLY 24H3501-200C0 MODEL 3501...
- Page 151 Model 350 I.S. and Model 355 I.S. Technical Manual Version 3.0 Part Number 39-10-41432...
Need help?
Do you have a question about the 355 I.S. and is the answer not in the manual?
Questions and answers