Ioline CrystalPress User Manual
Hide thumbs
Also See for CrystalPress:
- Quick start manual (12 pages) ,
- Manual (4 pages) ,
- Quick start manual (6 pages)
Table of Contents
Advertisement
Quick Links
Advertisement
Table of Contents

Related Manuals for Ioline CrystalPress


Summary of Contents for Ioline CrystalPress
- Page 1 Us er G u i de Ioline CrystalPress™...
- Page 2 User Guide. Ioline Corporation is not responsible for injuries that may occur as a result of unsafe use. Ioline Corporation is not responsible for substandard operational performance as a result of failure to maintain the machine as described in this User Guide.
- Page 3 CrystalPress™ U se r G ui d e...
-
Page 4: Table Of Contents
Visual Reference Guide ................Safety & Specifications ................Cautions and Guidelines ..................7 Chapter 1: Overview ................. Getting Started ....................9 How the CrystalPress Works ................10 Coordinates ....................... 10 Chapter 2: Installation ............... Installation Overview ..................11 Unpack the Machine ......................11 Attach the Feet ........................ - Page 5 Consumables ..................... 26 Optional Equipment ..................27 Heat Press Guidelines ..................28 Heat Press Settings ......................28 Process Hints ........................28 Embellished Garment Care ....................29 Embellishing with a Motif ................30 Before You Start ........................30 Additional Operation Hints ................34 Printing More than Two Layers ..................
-
Page 6: Visual Reference Guide
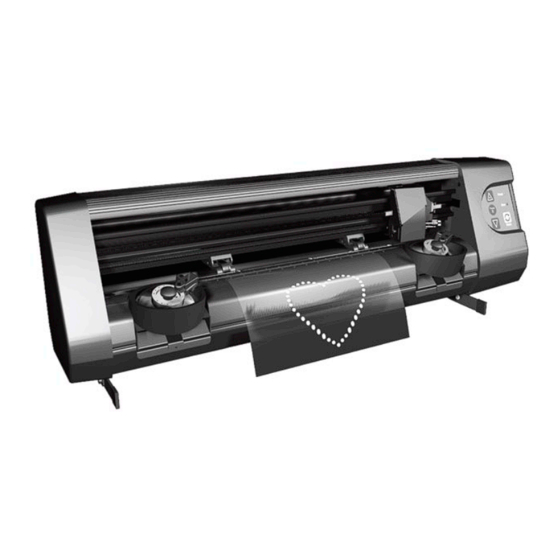
G. Keypad L. Left Sorter Bowl C. Right Pinch Wheel H. Foot (x2) (Sorter #2) D. Carriage Right Sorter Bowl M. Platen E. Pinch Wheel Lever (Sorter #1) N. Traverse (hidden) Drive Shaft (x2) Figure 1. The Ioline CrystalPress front view. -
Page 7: Safety & Specifications
Please read and follow these safety guidelines before begin- ning operation of the machine: The Ioline CrystalPress Motif Maker is designed to use high quality Rhinestones and crystals like those from Preciosa and Swarovski ONLY. Using any other type or make of stones may... -
Page 8: Safety Labels
See the maintenance section for information on proper procedures for keeping safety mechanisms in working order. Specifications and Environment System specifications and environment requirements for the Ioline CrystalPress are listed below: Ioline Part Number 109770 Height 310 mm (12 in.) -
Page 9: Chapter 1: Overview
CrystalStudio User Guide for more information. Press. Crystals or Rhinestones that are certified to work with the Ioline CrystalPress and in sufficient numbers to properly fill the Sorter Bowl as described in the Operation chapter. Note A working installation of the CrystalStudio™ software. -
Page 10: How The Crystalpress Works
Ioline CrystalPress User Guide How the CrystalPress Works The CrystalPress machine creates a motif image through synchro- nized Transfer Sheet and Carriage motion. Design files created in programs like CorelDraw™ are imported into the CrystalStudio software from a local computer or file server. Crystals or Rhinestones are applied to the design in CrystalStudio then motif data are sent to the CrystalPress via a USB or serial connection. -
Page 11: Chapter 2: Installation
See the Do not install the CrystalPress CrystalPress Quick Start Guide for more information. Save all packing where direct sunlight falls on the materials and the box. New boxes are expensive! platen or Sorter Bowls. -
Page 12: Install The Sort Wheel(S)
Keep hands and loose the sort wheels will turn then stop when initialization is complete. clothing away from all The CrystalPress machine is ready to use as soon as the green Status moving parts of the machine. light on the Keypad is visible. -
Page 13: Chapter 3: Operation
Operation The Operation chapter describes all processes and procedures related to use of the CrystalPress equipment for making motifs. A number of hints and suggestions for the motif transfer process are also included to help the user fit the CrystalPress and CrystalStu- dio software into their business. -
Page 14: Arrow Keys
Reset key is pressed. Status The Status light indicates if the CrystalPress ready to print (online) or paused (offline). Press the Print/Pause key to change modes. A red or green blinking Status light might also indicate an error. See the Troubleshooting chapter for more information. -
Page 15: Install The Sorter Wheel
Sorter Wheel that has alignment pits designed to fit the element. In some cases, different brands also require special Sorter Wheels. The customer service specialists at Ioline will assist custom- ers with choosing the correct Sorter Wheels for brands and sizes of supported crystals. -
Page 16: Step 3: Insert Sorter Wheel
Ioline CrystalPress User Guide Step 3: Insert Sorter Wheel Slide the Sorter Wheel onto the shaft in the Sorter Bowl. Turn the Hint wheel until it drops into position. Make sure that all Rhinestones are cleared from the Sorter Bowl before inserting a wheel. -
Page 17: Step 4: Secure The Sorter Wheel
Rotate the Wiper Arm down into operating position. Turn the Wiper Arm Clamp counter-clockwise until it stops to lock the Wiper Arm in place. Note The CrystalPress will not oper- ate unless the Wiper Arm Clamp is fully rotated into position. The Sorter Bowl light will blink... -
Page 18: Assemble And Install The C-Stick
Transfer Sheet with the C-Stick tool. It is important to keep the CP-I C-Stick Tip clean and working properly to ensure the fastest through- put and trouble free operation of the CrystalPress. See the Mainte- nance chapter for more information on proper care of the C-Stick tool. -
Page 19: Step 3: Tighten The Clamp
Operation Step 3: Tighten the Clamp Rotate the Clamp clockwise and tighten the Carriage Thumbscrew until the C-Stick is snug. Excess force is NOT required. Do not overtighten. Clamp Carriage Thumbscrew Figure 20. Tighten the Carriage clamp thumbscrew. Step 4: Insert the Cable Loosen the Socket Nut at the top left hand corner of the Carriage cover by rotating counter-clockwise. -
Page 20: Load A Transfer Sheet
Use the following steps to load a Transfer Sheet in the CrystalPress. Step 1: Find the Pinch Wheel Lever Locate the Pinch Wheel Lever on the back of the CrystalPress. It is behind the machine, close to the right End Cover. The diagram shows the position of the lever when the Pinch Wheels are locked down. -
Page 21: Step 3: Load The Transfer Sheet
Operation Step 3: Load the Transfer Sheet Peel the backing off a Transfer Sheet. With the sticky side up, slide the Transfer Sheet into the machine from the front or rear. Align the right and left wheels with the white strips on each side of the Transfer Sheet. -
Page 22: Fill The Sorter
The following steps and information will help prepare the sorters for use. Turn the CrystalPress OFF by pressing the power switch on the Caution back of the Right End Cover to the ‘O’ position. -
Page 23: Empty The Sorter/Remove Wheel
Sorter Bowl. Once all the stones are off the Sorter Wheel, remove it and set aside. Note If the design requires more colors or sizes than the CrystalPress has Sorter Bowls, you will have to change Sorter Wheels in the middle of printing the motif. Do... -
Page 24: Communication Setup
CrystalPress. Connectors on the back of the USB (Preferred) The preferred method for connecting the CrystalPress to the Crystal- Studio is by Universal Serial Bus (USB). The alternative is making a connection over an RS-232 Serial Port (see next section). -
Page 25: Rs-232 9-Pin Serial Port
CrystalPress. RS-232 9-Pin Serial Port If a USB port is not available, connect the CrystalPress to the Crys- talStudio over a RS-232 9-pin Serial Port. A male-female 9-pin straight-through (non-NULL) cable (not included) is required for this configuration. -
Page 26: Consumables
Motif Transfer Sheets Available in a 26 pack of 13.25” x 12” or 10 pack of 13.25” x 30” Used to transfer the motif from the CrystalPress to the gar- ment for the heat transfer process. Sorter Wiper Available individually Ensures Rhinestones and crystals are properly aligned in the Sorter Wheel before transfer. -
Page 27: Optional Equipment
Operation Optional Equipment A few items are available to extend the utility of the CrystalPress. These items are available directly from Ioline Customer Service or online at http://www.ioline.com. Extra Sorter Wheels Available individually Captures and orients Rhinestones and crystals for transfer by the C-Stick. -
Page 28: Heat Press Guidelines
Ioline CrystalPress User Guide Heat Press Guidelines Ioline has collected and tested heat press processes that improve Hint results when transferring flat-back-hotfix Rhinestones and crystals from motifs to garments and accessories. General guidelines and Always test stones, materials, and advice are included below. There is no ‘right’ answer for all materi- the heat press together before als, brands of stones, or heat press models. -
Page 29: Embellished Garment Care
Operation Proper adhesion depends on adsorption of the adhesive into the substrate when used with textiles. Materials with water- proofing treatments do not work well as they resist absorption. To test for an incompatible coating, lay a sample flat and sprinkle water on it. -
Page 30: Embellishing With A Motif
Embellishing with a Motif This section outlines steps required to make a Rhinestone embel- lished garment or accessory. It also shows how the Ioline Crys- talPress and CrystalStudio fit in the process. Start with the design and end with a finished product ready to sell. Familiarity with the Operation chapter and the CrystalStudio User Guide is required. - Page 31 CrystalStudio are assigned the proper amount. correct stone sizes to match what is loaded in the Sorter Bowls in the CrystalPress. Power On Power on the CrystalPress by pressing the power switch to the ‘O’ position. Stay clear of moving parts during initialization.
-
Page 32: Prepare To Print
The Status light will turn green. Print Motif Press the ‘GO’ button in CrystalStudio. The CrystalPress will make the motif to match what is displayed in CrystalStudio. Transfer the Motif Remove the Motif When the motif is finished, lift the Pinch Wheels then remove the motif from the CrystalPress. -
Page 33: Remove The Material
Operation Transfer the Motif (continued) Press the Motif Close the heat press arm onto the material and lock it down. Leave it locked in place for the time required for your design. Remove the Material Open the heat press arm after enough time. -
Page 34: Additional Operation Hints
Ioline CrystalPress User Guide Additional Operation Hints Printing More than Two Layers The CrystalPress and CrystalStudio are able to print up to 100 layers Note in a single design. The CrystalPress can place two stones during one printing operation so a few extra steps are required to print more Printing more than two layers than two layers. -
Page 35: Chapter 4: Routine Maintenance
Routine Maintenance The Routine Maintenance chapter provides suggestions for keeping the CrystalPress equipment working in top condition for its entire service life. All of these processes are designed for the end user to accomplish with no training. Advanced procedures are only recommended for trained service personnel and not included here. -
Page 36: Clean The C-Stick (Cp-I Only)
Figure 37. C-Stick with tip shown for cleaning. Clean the Sorter Wheels The Sorter Wheels accumulate debris over time. Ioline recommends cleaning them after every 700 gross (100,000) stones are sorted (on the same schedule as the Sorter Bowls). Follow the procedures outlined in the Operation chapter to remove the Sorter Wheels from the Sorter Bowls. -
Page 37: Clean The Sorter Bowl
It is a good idea to occasionally check that all parts of the Crystal- Press are in good working order. The following checklist highlights places to inspect. If ay item is questionable, contact Ioline Customer Service for assistance: Check the Carriage drive belt to confirm that there is no un- usual wear and that the teeth have a rectangular profile. -
Page 38: Updating Firmware
(usually called Firmware). This process requires a spe- cial program and a file from a Customer Service Technician. Check the Ioline CrystalPress support web site for information about firm- ware updates and call for assistance if an update is available. -
Page 39: Chapter 5: Troubleshooting
The type of materials, environmental conditions, and operator habits are only a few of the variables that can affect the finished product. It is important that the CrystalPress is loaded and maintained accord- ing to the guidelines in the Operation and Routine Maintenance chap- ters and that testing is used to find good settings for the job. -
Page 40: Transfer Sheet Issues
Ioline CrystalPress User Guide Transfer Sheet Issues Potential issues with the Transfer Sheet include Tracking and Tangling. Tracking describes how straight the Transfer Sheet moves in the ma- chine while the stones are placed. Tangling occurs when the C-Stick catches the edge of the Transfer Sheet when moving between the Sorter Bowls and the motif image. -
Page 41: Stone Placement Issues
Troubleshooting Stone Placement Issues Consistently moving stones from the Sorter Bowls to the Transfer Sheet depends on a few key factors. Quality of the crystals, C-Stick condi- tion, and issues with the Sorter Bowls can degrade performance. Poor Stone Quality Poor quality or mistreated stones will effect transfer consistency and, ultimately, throughput. - Page 42 Ioline CrystalPress User Guide Blinking Light Error Codes The Ioline CrystalPress has several built-in blinking light error codes that give hints to where a problem has occurred. The tables below give simple solutions to issues related to blinking light errors. If these suggestions do not work, contact Ioline Customer Service for assistance.
- Page 43 Sorter Bowl Light Note Causes Suggestions The CrystalPress will try to pick The C-Stick is not installed or loose or the up a stone 15 times in a row before it stops and displays the Cable is not inserted all the way into the blinking light error.
-
Page 44: Common Issues And Solutions
Ioline CrystalPress User Guide Common Issues and Solutions No power when machine is turned on and the Status light stays dark. Cause: Solution: The power cord is damaged or Check the power connection. disconnected. Contact Ioline Customer Ser- The machine is damaged and vice. -
Page 45: Chapter 6: End Notes
Ioline is dedicated to providing the highest quality service and sup- Technical bulletins, software port to its customers. If you need assistance with an Ioline Crystal- updates and other information is Press or CrystalStudio software, a number of resources are avail-... -
Page 46: Customer Service
The contents are subject to change without notice, and Ioline Corporation assumes no responsibility for any errors that are con- tained herein. No part of the CrystalPress User Guide may be copied, disseminated, or distributed without the express written consent of... - Page 47 End Notes Before Contacting Support… Please gather the following information about your machine be- fore contacting Ioline for support: Name: Company Name: Phone Number: Fax: E-mail: Model: Serial Number *: Date of purchase: Type of stones used: Type of Computer:...
-
Page 48: The Fcc Wants You To Know
Ioline CrystalPress User Guide The FCC Wants You to Know... This equipment was tested and found to comply with the limits for a Class A digital device, pursuant to part 15 of the FCC Rules. These limits are designed to provide reasonable protection against harm- ful interference when the equipment is operated in a commercial environment. -
Page 49: Declaration Of Conformity
Verantwortung, dass das Produkt declare under our sole responsibility that the product déclarons sous notre seule responsabilité que le produit Product Brand: Ioline Product Model: Crystal Press auf das sich diese Erklärung bezieht, mit der/den folgenden Norm(en) oder normativen Dokument(en) übereinstimmt:... - Page 50 Ioline CrystalPress User Guide [This page intentionally left blank]...
-
Page 51: Glossary: Terms And Definitions
C-Stick - A customized pick-and-place tool configured programs, the three letters after the period in a file for the Ioline CrystalPress to move Crystal Elements name. With graphics files the three letters denote a file from Sorter Bowls to the Transfer Sheet. - Page 52 Stone - See Crystal. Motif - A design with a repeating pattern of discrete elements. On the CrystalPress, a Motif is a pattern of Crystal Elements arranged on a collection of Vectors. Throughput – The speed at which a Machine completes a job.
-
Page 53: Index: Guide To Content
Index Guide to Content Numbers Cancel 34 Carriage 6, 7, 10, 12, 18, 19, 35, 36, 42, 51 Carriage Jaw 18 9-pin 24, 52 Carriage Thumbscrew 18 7475 9 CD-ROM 9, 11, 24, 25 Clamp 18 Computer 12 Consumables 31 Acceleration 51 Control Panel 51 Accessories 28, 30... - Page 54 Ioline CrystalPress User Guide Drying 29 DXF 9, 10, 31, 51 Interference 48 I/O 8 Ioline Corporation 2 Ioline Customer Service 26, 44, 45 Earth Ground 8 Ioline Design 30, 31 Element 51 Isopropyl Alcohol 35, 36, 37 Embellish 30, 39...
- Page 55 Index Pinch Wheel Lever 6, 20, 52 Status 12 Pinch Wheels 6, 12, 20, 21, 32, 40, 52 Status Light 13, 14, 21, 25, 32, 34, 42 Platen 6, 32, 35, 52 Stone 32, 39, 52 Power Cord 44 Stop Bits 25 Power Switch 12, 24, 31 Support 2, 38, 46, 47 Preciosa 7...
- Page 56 Ioline CrystalPress User Guide Warranty 46 Washing 29 Waterproofing 29 Weight 8 White Pounce Strip 14, 21, 52 Width 8 Windows XP 9, 11 Wiper Arm 15, 17, 43 Wiper Arm Clamp 15, 17, 23, 43 Wood 29 Wool 28...
Need help?
Do you have a question about the CrystalPress and is the answer not in the manual?
Questions and answers