Advertisement
IN-DASH INSTALLATION KIT
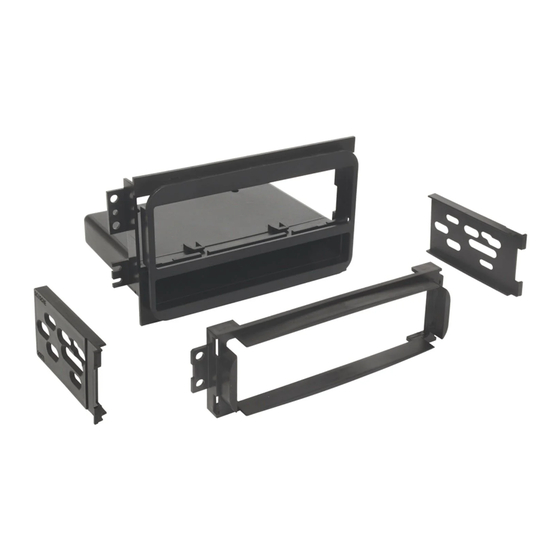
ISO
MOUNTING
BRACKET
ACCENT
MOUNTING
PANEL
This premium installation kit is for 2000-UP Hyundai Accent & Sonata vehicles. Included are all the parts
you need to mount your car stereo/cassette or CD player into your vehicle's dash. Refer to the individual
instruction in this manual to remove your Xvehicle's factory radio and assemble the kit.
CAUTION: Disconnect your vehicle's negative battery terminal before the installation to help prevent
electrical damage. We recommend the use of a volt/ohm meter over a test light to check wiring. A test
light or grounded wire probe can cause damage to the vehicle's computer and/or diagnostic systems.
Avoid all factory air bag wiring - air bags can accidentally deploy causing serious injury or death.
NOTES:
• See your vehicle's instructions for any special tools your installation might require.
• Read all instructions accompanying your car stereo/cassette player for proper wiring and mounting
instructions.
2000-UP HYUNDAI ACCENT
2000-UP HYUNDAI SONATA
SONATA
TRIM RING
INTRODUCTION
HY1602
FOR
POCKET
SONATA
MOUNTING
PANEL
Advertisement
Table of Contents

Related Manuals for Scosche HY1602


Summary of Contents for Scosche HY1602
- Page 1 HY1602 IN-DASH INSTALLATION KIT 2000-UP HYUNDAI ACCENT 2000-UP HYUNDAI SONATA MOUNTING BRACKET POCKET ACCENT MOUNTING PANEL SONATA MOUNTING PANEL SONATA TRIM RING INTRODUCTION This premium installation kit is for 2000-UP Hyundai Accent & Sonata vehicles. Included are all the parts you need to mount your car stereo/cassette or CD player into your vehicle's dash.
- Page 2 POCKET INSTALLATION POCKET INSTALLATION 1. Locate and align bottom guides and top snaps of the pocket to kit panel. 2. Slide pocket on bottom guides while the top snaps are aligned. 3. When aligned properly the top pocket snaps will lock to kit panel.
- Page 3 ISO DIN MOUNT ISO DIN MOUNT: (DIN-E RADIO WITH SIDE MOUNTING HOLES) 1. Snap the ISO DIN side mounting brackets to the back of the mounting panel (1 left and 1 right). Use supplied hardware to bolt them to the back of the kit panel. 2.
Need help?
Do you have a question about the HY1602 and is the answer not in the manual?
Questions and answers