Table of Contents
Advertisement
Quick Links
LaCie Rugged RAID Pro User Manual
© 2018 Seagate Technology LLC. All rights reserved. Seagate, Seagate Technology,
the Spiral logo, and LaCie logo are trademarks or registered trademarks of Seagate
Technology LLC or one of its affiliated companies in the United States and/or other
countries. All other trademarks or registered trademarks are the property of their
respective owners. When referring to drive capacity, one gigabyte, or GB, equals
one billion bytes and one terabyte, or TB, equals one thousand billion bytes. Your
computer's operating system may use a different standard of measurement and
report a lower capacity. In addition, some of the listed capacity is used for
Нажмите, чтобы перейти к актуальной онлайн-версии
formatting and other functions and will not be available for data storage.
этого документа. Особенностью этой версии являются иллюстрации в высоком разрешении,
Quantitative usage examples for various applications are for illustrative purposes.
более удобная навигация и функция поиска.
Actual quantities will vary based on various factors, including file size, file format,
Advertisement
Table of Contents

Related Manuals for LaCie Rugged RAID Pro


Summary of Contents for LaCie Rugged RAID Pro
- Page 1 LaCie Rugged RAID Pro User Manual © 2018 Seagate Technology LLC. All rights reserved. Seagate, Seagate Technology, the Spiral logo, and LaCie logo are trademarks or registered trademarks of Seagate Technology LLC or one of its affiliated companies in the United States and/or other countries.
- Page 2 features, and application software. The export or re-export of hardware or software containing encryption may be regulated by the U.S. Department of Commerce, Bureau of Industry and Security (for more information, visit www.bis.doc.gov) and controlled for import and use outside of the U.S. Actual data rates may vary depending on operating environment and other factors.
-
Page 3: Table Of Contents
......................... . STEP 3 - Set up LaCie Rugged RAID Pro . - Page 4 Windo ws 7 Safely Remove Rugged RAID Pro From Your Computer ...................
-
Page 5: Introduction
Introduc on Thanks to its embedded SD card reader, Rugged RAID Pro will ease the backup of your content in the field. Thinner and lighter than its predecessor and configurable with LaCie RAID Manager, this drive is a versatile travel companion for busy videographers and professional photographers. -
Page 6: Views
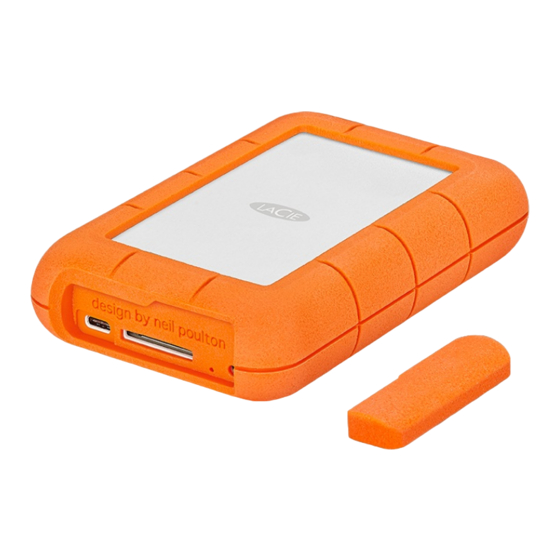
1. Status LED—Indicates Rugged RAID Pro’s status. See LED Status and Power. 2. Power LED—Blinks if Rugged RAID Pro is not receiving enough power from the USB connection to your computer, requiring the use of the included power supply. See LED Status and Power. -
Page 7: Enclosure Weight (With 4Tb Hdd)
0.446 / 0.981 Electrical Power supply: 5.4V 2A Use only the power supply provided with your Rugged RAID Pro. Power supplies from third- party devices and other LaCie products can damage your Rugged RAID Pro. Your device might get warm Your device might feel warm to the touch when copying or moving a large number of files. - Page 8 4: Powerful water jet—Water projected in powerful jets (12.5mm nozzle) against the enclosure from any direction shall have no harmful effects.. LaCie Rugged RAID Pro has also been tested for the following: Drop resistance—Dropped from heights up to 1.2 meters / 4 feet (in non-operating mode).
-
Page 9: Led Status And Power
The status LED continues to blink rapidly. One or both of your hard drives may have failed. Do not swap one or both hard drives onsite or in the field. Doing so will void Rugged RAID Pro’s warranty. Power LED behavior Rugged RAID Pro is designed to operate using power from the connection to your computer. -
Page 10: Power-Saving Mode
If the power LED light is blinking, connect the power cable to Rugged RAID Pro and then connect the power supply to a live power outlet. Power-saving mode Your Rugged RAID Pro can conserve energy by entering power-saving mode. Managed by your computer, power-saving mode can extend the life of the hard drives by sparing them from working during extended periods of inactivity. - Page 11 Note on ejecting the volume and power-saving mode—Rugged RAID Pro enters power-saving mode when its volumes are ejected and the device remains connected to the computer. To access Rugged RAID Pro’s volumes, unplug the interface cable from the computer and reconnect LaCie Rugged RAID Pro User Manual 6/13/18...
-
Page 12: Cables And Connectors
480Mb/s The USB-C port on the LaCie Rugged RAID Pro is USB 3.1 Gen 1. You can connect your Rugged RAID Pro to any USB-C or USB Type A port but transfer rates vary. See below for more details. -
Page 13: Usb-C To Usb Type A Cable
USB-C to USB Type A cable Use the USB-C to USB Type A cable to connect LaCie Rugged RAID Pro to a computer’s Type A port (USB 3.0 or USB 2.0). Transfer rates with USB Type A connections have the potential to reach the following speeds:... -
Page 14: Getting Connected
Confirm the type of USB port on your computer, then choose the appropriate cable to connect your device. Use the USB-C to USB-C cable if your computer has a USB-C port. Use the USB-C to USB Type A cable if your computer does not have a USB-C port. LaCie Rugged RAID Pro User Manual 6/13/18... -
Page 15: Step 2 - Check For Power
USB connection isn’t delivering enough power for Rugged RAID Pro to operate, the power LED blinks. If the LED light is blinking, connect the power cable to Rugged RAID Pro and then connect the power supply to a live power outlet. -
Page 16: Step 3 - Set Up Lacie Rugged Raid Pro
Change RAID levels to optimize Rugged RAID Pro for Manager capacity/speed or protection. Start Here 1. Using a file manager such as File Explorer or Finder, open LaCie Rugged RAID Pro and launch Start Here Mac. 2. Follow the onscreen instructions. -
Page 17: Storage Format
Learn more about LaCie RAID Manager Your LaCie Rugged RAID Pro can be configured as RAID 0, RAID 1, or JBOD. Use LaCie RAID Manager to switch RAID levels. For more information, see the LaCie RAID Manager for 2-Bay Devices user manual. -
Page 18: Manage Raid
The process automatically installs a driver that allows LaCie RAID Manager to detect the device and manage RAID arrays. RAID levels LaCie Rugged RAID Pro can be configured as RAID 0, RAID 1, or JBOD. Each RAID level has its own advantages: RAID level... -
Page 19: Launch Lacie Raid Manager
An administrator should launch the application to prepare the device for a standard user. Changing RAID levels To change RAID levels, confirm that Rugged RAID Pro is connected to your computer and powered. You’ll need a thin, pointed object such as the end of a paperclip to confirm the RAID change. -
Page 20: Optional Formatting And Partitioning
Op onal Forma ng and Par oning LaCie Rugged RAID Pro is delivered formatted in exFAT for compatibility with both Windows and Mac computers. If you use the drive with only one type of computer, you can optimize file copy performance by formatting the drive in the native file system for your operating system—NTFS for Windows or HFS+ for... -
Page 21: Toolkit Optim Ize
LaCie highly recommends that you back up all data on your storage device before performing the steps below. LaCie is not responsible for any data lost due to formatting, partitioning or using a LaCie storage device. 1. Connect LaCie Rugged RAID Pro to your computer. - Page 22 1. Open the Finder and go to Applications | Utilities | Disk Utility. 2. In the sidebar to the left, select the LaCie Rugged RAID Pro drive that shows the capacity. 3. In the Disk Utility window, select the Partition tab.
- Page 23 1. Make sure the storage device is connected to and mounted on the computer. 2. Go to Search and then type diskmgmt.msc. In the search results, double click Disk Management. 3. From the list of storage devices in the middle of the Disk Management window, locate your LaCie device.
-
Page 24: Mac
Safely Remove Rugged RAID Pro From Your Computer Always eject a storage drive from your computer before physically disconnecting it. Your computer must perform filing and housekeeping operations on the drive before it is removed. Therefore, if you unplug the drive without using the operating system’s software, your files can become corrupt or damaged. - Page 25 3. In the list of devices, choose the device you want to eject. Windows displays a notification when it is safe to remove the device. 4. Disconnect the hard drive from the computer. LaCie Rugged RAID Pro User Manual 6/13/18...
-
Page 26: Windows
Frequently Asked Ques ons For help setting up and using your LaCie hard drive, review the frequently asked questions below. For additional support resources, go to LaCie customer support. Hard drive icon Why does the hard drive icon not appear on my desktop (Mac)?
Need help?
Do you have a question about the Rugged RAID Pro and is the answer not in the manual?
Questions and answers