Extech Instruments BR250 User Manual
Video borescope
Hide thumbs
Also See for BR250:
- User manual (15 pages) ,
- User manual (11 pages) ,
- User manual (11 pages)
Table of Contents
Advertisement
Quick Links
Advertisement
Table of Contents

Subscribe to Our Youtube Channel
Related Manuals for Extech Instruments BR250


Summary of Contents for Extech Instruments BR250
- Page 1 User's Guide Video Borescope Models BR200 and BR250...
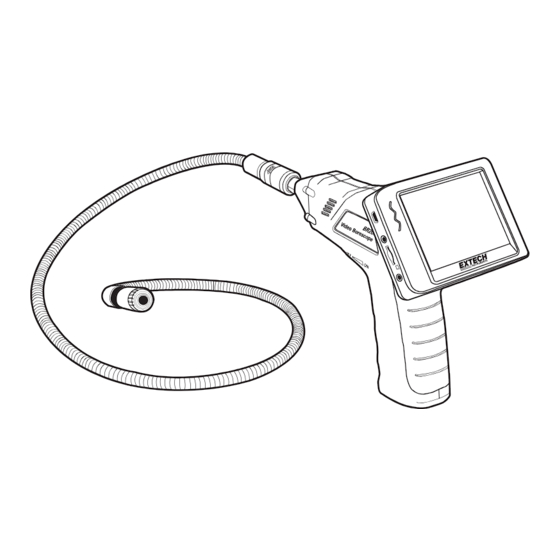
- Page 2 Introduction Congratulations on your purchase of this Extech BR200 (17mm camera head) or BR250 (9mm camera head) Video Borescope. This instrument was designed for use as a remote inspection device. It can be used to peer into tight spots and then supply real-time video and images that can be recorded.
-
Page 3: Warranty
Signal input Warranty EXTECH INSTRUMENTS CORPORATION (A FLIR COMPANY) warrants this instrument to be free of defects in parts and workmanship for one year from date of shipment (a six month limited warranty applies to sensors and cables). If it should become necessary to return the instrument for service during or beyond the warranty period, contact the Customer Service Department at (781) 890-7440 ext. -
Page 4: Installation
Connect the camera and flexible tube Connect the camera tube to the instrument body; ensure that the keyed ends are properly aligned. Once aligned, tighten the knurled knob to hold the connection firmly in place. BR200-BR250 V4.3 8/09... - Page 5 Installing the accessory tools (BR200) The included accessories (mirror, hook and magnet) all attach to the camera in the same manner. Refer to the diagrams below: Attaching the Monitor to the instrument body BR200-BR250 V4.3 8/09...
- Page 6 VIDEO IN jack of a TV or other monitor. The LCD Monitor will output a high quality video image. Installing the Magnetic bracket The magnetic bracket slides onto the rear of the monitor for convenient placement and viewing. BR200-BR250 V4.3 8/09...
-
Page 7: Operation
In Real-Time Monitoring (video) mode, press OK to begin recording; refer to the following diagram for display icon definitions: Battery capacity Function icon (video or photo) CH 4 Recording in progress Channel Date Time Stamp REC Time remaining 2009/07/28 11:12:31 SD card BR200-BR250 V4.3 8/09... - Page 8 Delete all of the files in a folder before deleting the folder. If the user attempts to delete a folder that is not empty, the following message will appear: FOLDER NOT EMPTY BR200-BR250 V4.3 8/09...
-
Page 9: Settings Mode
Use the arrow keys to highlight the DEFAULT icon (red) Press OK and the DEFAULT selection screen will appear (YES, NO) Use the arrow keys to highlight the desired response Press OK to accept the selection and exit BR200-BR250 V4.3 8/09... - Page 10 Press the button to exit Safety • Do not expose instrument to moisture • Shut off the instrument when not in use • Remove the batteries when cleaning the instrument • Replace all batteries at the same time BR200-BR250 V4.3 8/09...
-
Page 11: Specifications
Specifications CAMERA Imaging Sensor CMOS Total Pixels BR200: 704×576(PAL); 712×486(NTSC) BR250: 640×480(PAL ) Horizontal View Angle BR200: 50 degree BR250: 45 degree Transmission Frequency 2468MHz Minimum Illumination 0 Lux Modulation Type Bandwidth 18MHz Power Supply 4 x AA batteries Unobstructed Effective Range... - Page 12 For the latest version of this User Guide, Software updates, and other up-to-the-minute product information, visit our website: www.extech.com Extech Instruments Corporation, 285 Bear Hill Road, Waltham, MA 02451 Copyright © 2009 Extech Instruments Corporation (a FLIR company) All rights reserved including the right of reproduction in whole or in part in any form.
Need help?
Do you have a question about the BR250 and is the answer not in the manual?
Questions and answers