Table of Contents
Advertisement
Quick Links
Advertisement
Table of Contents

Related Manuals for Extech Instruments BR200-2


Summary of Contents for Extech Instruments BR200-2
- Page 1 User Guide Video Borescope Models BR200 and BR250...
-
Page 2: Supplied Equipment
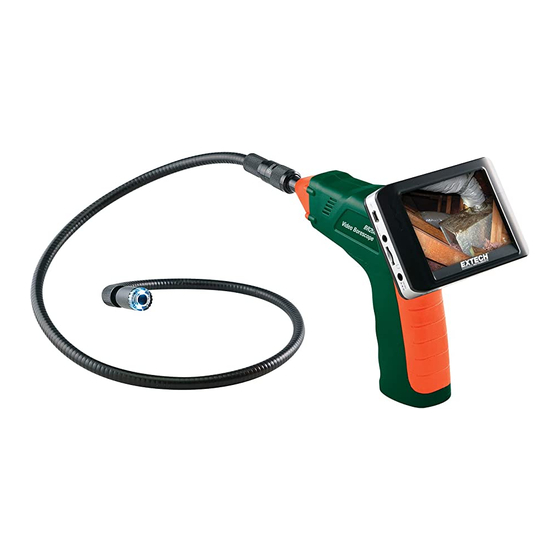
Introduction Congratulations on your purchase of this Extech BR200 (17mm camera head) or BR250 (9mm camera head) Video Borescope. This instrument was designed for use as a remote inspection device. It can be used to peer into tight spots and then supply real-time video and images that can be recorded. - Page 3 Description Signal output Power Indicator Power On/Off, Dimmer Flexible tube Camera head and LED’s Up arrow, video or jpg Menu Down arrow 10 Power On/Off 11 Power Indicator 12 USB Socket 13 Video output 14 SD card socket 15 Power supply socket 16 Reset 17 Signal input BR200-BR250-EU-EN v7.4 2/14...
-
Page 4: Battery Installation
Installation Install the batteries into the instrument body, charge the monitor battery, connect the camera and flexible tube to the body, and insert the micro SD card. Install any accessory as needed. Battery Installation Connect Monitor Power The monitor has a rechargeable battery. Plug in the AC adaptor and connect the cable to the DC5V socket on the monitor. -
Page 5: Video Output
Installing the accessory tools (BR200) The included accessories (mirror, hook and magnet) all attach to the camera in the same manner. Refer to the diagrams below: Installing the accessory tools (BR250) Hook the attachment into the hole in the head and then slide the rubber sleeve over the attachment shaft Attaching the Monitor to the instrument body Connect the USB Cable... -
Page 6: Basic Operation
Operation Basic Operation 1. Turn the ON/OFF dial switch to power the camera. The power indicator will switch on. The switch then acts as a dimmer for the two LEDs on the imager head of the camera. 2. Press and hold the monitor power switch for at least 2 seconds and the power indicator will illuminate green and a Welcome screen will appear. - Page 7 Viewing a Photo or Video In the Real-Time Monitoring mode, press to display a list of dated playback folders Use the ▼▲keys to select the desired folder. Press OK to open the selected folder and view a list of photo or video files.
-
Page 8: Settings Mode
Settings Mode Press and hold for two seconds to enter the Settings Mode. Language Settings In Settings Mode, use the arrow keys to select SYSTEM SETTING (green icon). Press OK to call up the SYSTEM icon list Use the arrow keys to highlight the Language icon (globe) Press OK and the Language icon list will appear (flags) Use the arrow keys to highlight the desired language Press OK to select the highlighted language and exit... -
Page 9: Battery Replacement
Time Stamp ON OFF Setting In Settings Mode, use the arrow keys to select RECORDER SETTING (red icon). Press OK to call up the RECORDER options Use the arrow keys to highlight the Time Stamp icon (purple) Press OK to open the parameter Use the arrows to select ON or OFF Press OK to confirm Date/Time Setting... -
Page 10: Specifications
Specifications CAMERA Imaging Sensor CMOS Total Pixels (NTSC) BR200: 712 x 486; BR250: 640 x 480 Horizontal View Angle BR200: 50 degrees BR250: 45 degrees Transmission Frequency 2468MHz Focus point BR200: 20cm (8”), BR250: 10cm (4”) Minimum Illumination 0 Lux Modulation Type Bandwidth 18MHz...
Need help?
Do you have a question about the BR200-2 and is the answer not in the manual?
Questions and answers