Table of Contents
Advertisement
Quick Links
Advertisement
Table of Contents

Related Manuals for Monoprice Blackbird 31057


Summary of Contents for Monoprice Blackbird 31057
- Page 1 Blackbird™ 4K 4x1 Scaler and Switch P/N 31057 User's Manual...
-
Page 2: Table Of Contents
CONTENTS SAFETY WARNINGS AND GUIDELINES ....................................3 INTRODUCTION ................................................4 FEATURES ..................................................4 CUSTOMER SERVICE .............................................. 4 PACKAGE CONTENTS ............................................. 5 PRODUCT OVERVIEW ............................................5 Front Panel ................................................5 Rear Panel .................................................6 SAMPLE CONNECTION DIAGRAM ......................................7 CONTROLS ..................................................8 Manual Switching ............................................. -
Page 3: Safety Warnings And Guidelines
SAFETY WARNINGS AND GUIDELINES Please read this entire manual before using this device, paying extra attention to these safety warnings and guidelines. Please keep this manual in a safe place for future reference. This device is intended for indoor use only. ... -
Page 4: Introduction
If you have any problem with your order, please give us an opportunity to make it right. You can contact a Monoprice Customer Service representative through the Live Chat link on our website www.monoprice.com during normal business hours (Mon-Fri: 5am-7pm PT, Sat-Sun: 9am-... -
Page 5: Package Contents
PACKAGE CONTENTS Please take an inventory of the package contents to ensure you have all the items listed below. If anything is missing or damaged, please contact Monoprice Customer Service for a replacement. 1x Blackbird™ 4K 4x1 scaler and switch... -
Page 6: Rear Panel
and hold the SOURCE/AUTO-3s button for at least 3 seconds to turn Auto Switching 5. VOLUME DOWN: Press the VOLUME DOWN button to decrease the output volume level. 6. VOLUME UP: Press the VOLUME UP button to increase the output volume level. 7. -
Page 7: Sample Connection Diagram
5. AUDIO IN: 3.5mm stereo analog jack for connecting the audio output of the VGA video source device. 6. IR OUT: 3.5mm jack for connecting an IR transmitter (not included). 7. RS232: 3-pin Euroblock connector for connecting a computer for RS-232 control. 8. -
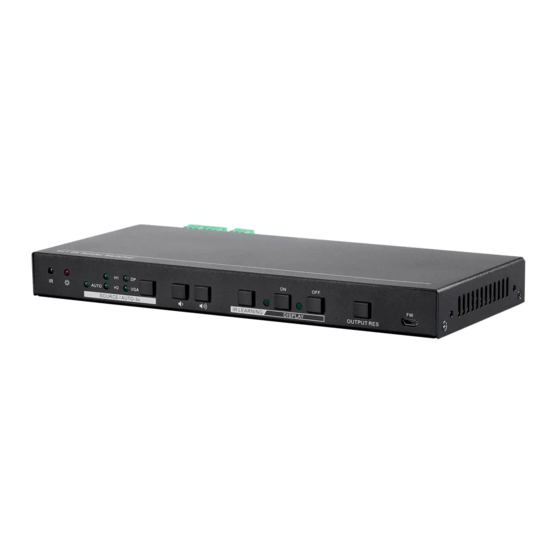
Page 8: Controls
CONTROLS Manual Switching Momentarily press the SOURCE/AUTO-3s button to switch to the next available input. The corresponding LED will illuminate green. If Auto Switching is enabled, this will turn it off and the AUTO LED will extinguish. Auto Switching Press and hold the SOURCE/AUTO-3s button for at least 3 seconds to turn Auto Switching on. -
Page 9: Output Resolution Reset
Output Resolution Reset Press and hold the OUTPUT RES button for at least 5 seconds to reset the output resolution to 720p. Display Control Press the DISPLAY ON and DISPLAY OFF buttons to turn the connected display on or off. Note that the system must be configured to issue the proper CEC commands to the CONFIGURING DISPLAY CONTROLS connected display. -
Page 10: System Configuration
The switch can respond to the following RS-232 commands: System Configuration Command Function Feedback SFUD<CR><LF> Software upgrade Software Update GET VER<CR><LF> Check the software version Version Vx.x.x FRST<CR><LF> Restore factory default settings Factory Reset WAKE<CR><LF> Wake up the system Wake Up STBY<CR><LF>... -
Page 11: Signal Switching
Input: VGA Resolution: 1920x1080 Manual Switching GET STA<CR><LF> Get the system status Source Volume: 60 EDID: Initial HDCP: ON Signal Switching SWIN H1<CR><LF> Switch to the HDMI® 1 input Switch to hdmi SWIN H2<CR><LF> Switch to the HDMI® 2 input Switch to hdmi2 SWIN DP<CR><LF>... -
Page 12: Output Resolution Selection
Set the source volume to xx VOLS xx<CR><LF> Source Volume: xx (xx=0~60) Output Resolution Selection Change output resolution to SRES 01<CR><LF> Resolution: 3840x2160 3840x2160 Change output resolution to SRES 02<CR><LF> Resolution: 1920x1080 1920x1080 Change output resolution to SRES 03<CR><LF> Resolution: 1280x720 1280x720 Automatic image correction for VGAA<CR><LF>... -
Page 13: Baud Rate Setting
Baud Rate Setting BAUD 115200<CR><LF> Set RS-232 baud rate to 115200 Set Baudrate 115200 BAUD 57600<CR><LF> Set RS-232 baud rate to 57600 Set Baudrate 57600 BAUD 38400<CR><LF> Set RS-232 baud rate to 38400 Set Baudrate 38400 BAUD 19200<CR><LF> Set RS-232 baud rate to 19200 Set Baudrate 19200 BAUD 9600<CR><LF>... - Page 14 "XX XX XX XX" is the display control command (HEX, max 48 byte) Example: /-ax:30 31 32 33 "x" represents the baud rate: x=0(2400), 1(4600), 2(9600), 3(19200), 4(38400). 5(57600), 6(115200) /+ax:XXXXXXX XXXXXXX (0123456) "XXXXXXX" is the display control command (ASCII, max 48 byte) Example: /+ax:0123456 Display OFF Command Format...
-
Page 15: Ir Learning
TECHNICAL SUPPORT Monoprice is pleased to provide free, live, online technical support to assist you with any questions you may have about installation, setup, troubleshooting, or product recommendations. If you ever need assistance with your new product, please come online to talk to one of our friendly and knowledgeable Tech Support Associates. -
Page 16: Specifications
9.1" x 3.9" x 0.9" (230 x 100 x 24 mm) Weight 11.3 oz. (320 g) Blackbird™ is a trademark of Monoprice Inc. HDMI®, the HDMI Logo, and High-Definition Multimedia Interface are trademarks or registered trademarks of HDMI Licensing LLC in the United States and other countries.
Need help?
Do you have a question about the Blackbird 31057 and is the answer not in the manual?
Questions and answers