Table of Contents
Advertisement
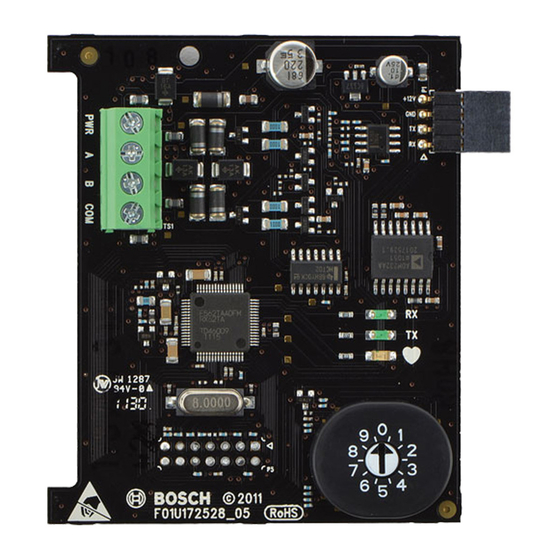
1 | Overview
The B820 SDI2 Inovonics Interface Module
allows a control panel to interface with an
Inovonics EN4200 EchoStream Serial Receiver
through the SDI2 bus.
1
2
6
RX
5
TX
4
3
Figure 1.1: Module overview
Callout ― Description
1 ― SDI2 Terminal strip (to control
panel)
2 ― Serial data port (to Inovonics
receiver)
3 ― Address switch
4 ― Heartbeat LED (blue)
5 ― TX (transmit) LED (green)
6 ― RX (receive) LED (green)
2 | SDI2 address settings
The address switch determines the address
for the B820 module. The control panel
uses the address for communications. Use
a slotted screwdriver to set the address
switch.
Set the address for the module to 1 prior to
installing it in the EN4200 housing. Figure
2.1 shows the address switches setting for
address 1.
Figure 2.1: Address switch
NOTICE!
The module reads the address
switch setting only during power
up. If you change the switch after
you apply power to the module,
you must cycle the power to
the module in order for the new
setting to be enabled.
3 | Installation
After you set the address switch for the
proper address, install the module in the
EN4200 housing, and then wire the module
to the control panel.
CAUTION!
Remove all power (AC and
battery) before making any
connections. Failure to do so
might result in personal injury
and/or equipment damage.
3.1 | Install the B820 into
the EN4200 housing
Installing the module into the housing:
1. Use a slotted screwdriver to press
the housing release tab and separate the
housing. Refer to Figure 3.1.
2. Remove the backing from the Velcro
piece found in the product packaging to
reveal the Velcro adhesive.
3. Place the Velcro's adhesive side onto
the back of the module.
4. Remove the remaining backing to use to
secure the module in the housing.
5. Insert the B820 module into the EN4200
housing, connecting the B820's serial data
port to the EN4200's serial data port. Refer
to Figure 3.2.
6. Gently apply pressure to the B820
module to snap it into the housing clips
and to apply the Velcro adhesive to the
housing.
Figure 3.1: Opening the EN4200 housing
1
2
Figure 3.2: Installing the B820 in the EN4200 housing
Callout ― Description
1 ― Housing clips to secure the module
2 ― B820 serial data port
3 ― EN4200 serial data port
3.2 | Wire the B820 to the control panel
When you wire a B820 to a control panel, use the control panel SDI2 terminals labeled R,
Y, G, B (PWR, A, B, COM). Connect them to the module terminals labeled PWR, A, B, COM.
Refer to Figure 3.3.
Figure 3.3: Wiring to the control panel (GV4 Series control panel shown)
3
Advertisement
Table of Contents

Related Manuals for Bosch B820


Summary of Contents for Bosch B820
- Page 1 4. Remove the remaining backing to use to secure the module in the housing. When you wire a B820 to a control panel, use the control panel SDI2 terminals labeled R, 2 | SDI2 address settings 5. Insert the B820 module into the EN4200 Y, G, B (PWR, A, B, COM).
- Page 2 OFF steady other trouble condition Use the serial number located on the Receiving Centre and Premise prohibits the module from product label and refer to the Bosch Security controlling the heartbeat Systems, Inc. website at ICES-003 - Information Technology Equipment (ITE) LED.
Need help?
Do you have a question about the B820 and is the answer not in the manual?
Questions and answers