Table of Contents
Advertisement
Quick Links
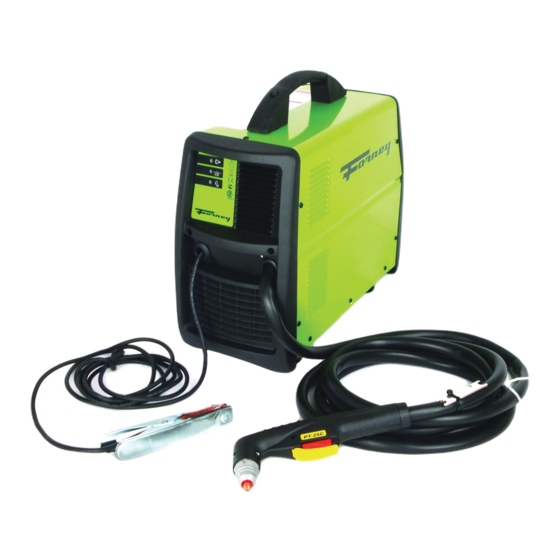
WNER'S MANUAL
WITH BUILT-IN AIR
COM RESSOR
• Uses electrical arc and compressed air to
cut steel, aluminum and other conductive
metals.
• Drag torch technology allows you to move
(drag) torch directly across the metal surface
for more precise cuts.
• Cuts up to 1/8" mild steel and severs up to
1/4" steel.
• Uses standard household 120 VAC current.
LASMA CUTTER
• Built-in piston driven compressor
and lightweight inverter power
supply.
• Thermal overload protection
• Three diagnostic LED lights (power,
temperature, and torch energized/ready
to work).
•
ost-Flow air cooling.
Advertisement
Table of Contents

Related Manuals for Forney 317


Summary of Contents for Forney 317
- Page 1 LASMA CUTTER WNER’S MANUAL WITH BUILT-IN AIR COM RESSOR • Uses electrical arc and compressed air to • Built-in piston driven compressor cut steel, aluminum and other conductive and lightweight inverter power metals. supply. • Drag torch technology allows you to move •...
-
Page 2: Warranty
Purchaser will: A) Contact Forney's customer service at 1-800-521-6038 within 30 days of the defect or failure. B) rovide dated proof of purchase (typically a purchase receipt). ) rovide the serial number. -
Page 3: Table Of Contents
TABLE C NTENTS WARRANTY SA ETY RULES AND GENERAL WARNINGS INTRODUCTION ELECTRICITY EYE AND BODY ROTECTION CUTTING FUMES AND GASES FIRE HAZARDS NOISE BURNS GENERAL INFORMATION L CATI N AND HANDLING THE P WER S URCE P WER SUPPLY C NNECTI N EXTENSI N C RD REC MMENDATI NS GENERAT R REC MMENDATI NS C NNECTI N T GR UND CABLE... -
Page 4: Sa Ety Rules And General Warnings
CAUTI N! RE INSTALLING, PERATING R CARRYING UT MAINTENANCE N THE PLASMA CUTTER, READ THE C NTENTS THIS MANUAL CARE ULLY , PAYING PARTICULAR ATTENTI N T THE SA ETY RULES. In the event of these instructions not being clear, please contact your supplier. CONGRATULATIONS ON YOUR NEW URCHASE! YOU ARE NOW IN THE OSSESSION OF ONE OF THE SAFEST AND MOST TECHNOLOGICALLY ADVANCED LASMA CUTTERS ON THE MARKET. - Page 5 If during the cutting operation a slight electric shock is felt, stop work immediately and do not use the unit until the fault has been discovered and resolved. WWW . RNEYIND.C M...
-
Page 6: Cutting Fumes And Gases
EYE AND B DY PR TECTI N One of the hazards during the welding/cutting process is the emission of electromagnetic waves due to the electric arc. The length of these waves ranges from infrared to ultraviolet. If these rays hit the eyes, they can cause various complaints such as conjunctivitis, burns to the retina, deterioration of sight, etc. - Page 7 Do not cut fuel or lubricant containers even if these are empty. Do not cut containers or casings which contain inflammable material. Never cut in environments which are polluted by inflammable gas or combustible liquid vapors (such as petrol). WWW . RNEYIND.C M...
-
Page 8: Noise
N ISE Noise is generated during the cutting process. The noise level depends on the cutting parameters used. CAUTI N! Noise can damage hearing Wear adequate hearing protection. BURNS The operator should be adequately protected during cutting operations. This should be routine practice. CAUTI N! Do not point the torch jet at people or foreign bodies. -
Page 9: L Cati N And Handling The P Wer S Urce
L CATI N AND HANDLING THE P WER S URCE • Choose location verifying that there is a good air flow and no dust, smoke or gas is present. • lace the unit on a flat and stable surface. • Make sure that obstacles do not prevent the cooling air flow out of front and rear openings of the machine. •... -
Page 10: Uncti Ns And C Ntr Ls
UNCTI NS AND C NTR LS 1. N/ Switch – In the N position the machine is ready for normal operation. All system control circuits are activated. position deactivates control circuits. 2. Green LED– It blinks for a few seconds to show that capacitors are being charged and that the unit is getting ready for operation. -
Page 11: Cutting Perati N
CUTTING PERATI N PRELIMINARIES CAUTI N!: Disonnect power source before disassembly of the torch. VERT SSEMENT: couper l’alimentation avant de désassembler la torche. • Check and follow instructions as foreseen in the paragraphs “Safety and Installation” of the present in- structions manual. PARTS THE T RCH •... -
Page 12: Cutting
CUTTING A. Pilot Arc: Starting the arc. • Upon squeezing the trigger there is a three second safety delay to purge the torch air system. After three seconds the pilot arc ignites, immediately transfer the arc to the work piece and begin the cut. If you fail to transfer the arc within three seconds the pilot arc stop and it will be necessary to release and then squeeze the trigger again to restart the sequence. - Page 13 the cutting line and then continue the cut onto the line. Fig. Fig. D Hold the torch perpendicular to the workpiece after the pierce is complete. Fig. D • Clean spatter and scale from the shield cup and the tip as soon as possible. Spraying or dipping the shield cup in anti-spatter compound will minimize the amount of scale which adheres to it.
-
Page 14: T Rch C Nsumable Parts Selecti N
WARNING! Disconnect primary power at the source and wait that the torch has cooled before disassembling the torch or torch leads. Frequently review the Important Safety recautions at the front of this Manual. Be sure the operator is equipped with proper gloves, clothing, eye and ear protection. Make sure no part of the operator’s body comes into contact with the work piece while the torch is activated. -
Page 15: Perating Aults
PERATING AULTS During cutting operations performance faults may arise which are not caused by equipment malfunctioning but by other operational faults such as: Insufficient penetration : • too high cutting • cutting current too low; speed; • torch parts are worn out; •... - Page 16 WWW . RNEYIND.C M...
-
Page 17: Torch Body, Handle And Cable
T RCH eriodically, according to its use or to cutting faults verify wear of the parts connected to plasma arc: Shield Cup: Unscrew manually from head of the torch. Clean throughly and replace if damaged (burns, distortions or cracks). Verify integrity of superior metal sector (actuator torch safety). Tip: Check wear of plasma arc hole and of inner and outer surfaces. - Page 18 WWW . RNEYIND.C M...
-
Page 19: Tr Ublesh Ting
TR UBLESH TING SYMPT M P SSIBLE CAUSE AND REMEDY 1. lug unit into 120V outlet. GREEN LED OFF , Fan not operating. No Input ower. 1. Make sure the unit has not been operated GREEN LED ON, YELLOW Over-temperature beyond duty cycle limits. -
Page 21: Unit Parts List
UNIT PARTS LIST FIG # OEM # DESCRI TION FORNEY # 04600233 CABLE CLAM 85208 77650239 FRONT LATE 85399 21605023 RUBBER GROMMET 85400 21690505 FRAME 85401 05000225 COVER ANEL 85402 33620217 INTERNAL ANEL 85403 21600030 LASTIC HANDLE 85404 22735221 MOTHER + FRONT ANEL CB... -
Page 23: T Rch Parts List
T RCH PARTS LIST FIG # OEM # DESCRI TION FORNEY # 23010083 T-25C LASMA TORCH WITH 13’ LEAD 85390 23015183 LASMA TORCH BODY 85391 23015187 ELECTRODE 85392 23015179 AIR DISTRIBUTION RING 85393 23015189 ø 0,65 / .025 85392 23015182... - Page 24 INCE 1932...
- Page 26 WWW.FORNEYIND.COM...
- Page 27 Forney Industries Inc. 1830 /D3RUW H $YHQXH )RUW &ROOLQV &2 80526 800-521-6038 ZZZ.IRUQH\LQG.FRP...
Need help?
Do you have a question about the 317 and is the answer not in the manual?
Questions and answers