
Related Manuals for RecorderGear PC900

Summary of Contents for RecorderGear PC900
- Page 1 USER MANUAL www.recordergear.com RecorderGear™ and respective logos are trademarks of Teton Webstores LLC ©2017 ALL RIGHTS RESERVED...
- Page 3 MID: BV-01 1 Year Warranty All RecorderGear™ brand products are backed by our 1 Year Warranty. For full details visit www.recordergear.com...
-
Page 4: Table Of Contents
Table of Contents 1 Basic Device Navigation 2 Charging 3 Insert/Eject Micro SD Card 4 Power On/Off 5 Continuous Video Recording Mode 6 Motion Detection Video Recording Mode 7 Photo Taking Mode 8 Playback Files 9 Download “RORO CAM” APP 10 Connect iOS/Android to the Device’s Wi-Fi Signal 11 Navigating “RORO CAM”... -
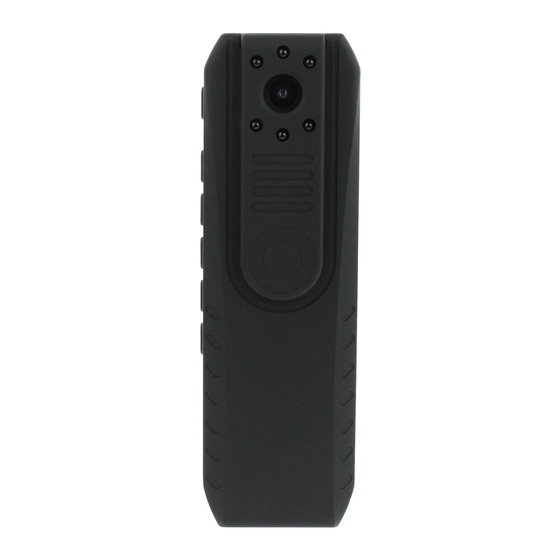
Page 5: Basic Device Navigation
Basic Device Navigation A. Power Button & IR Light On/Off Toggle. B. Mode Button: Toggles Between: 1. Video recording mode. 2. Photo taking mode. 3. Video playback / photo viewer. C. Menu / Settings Button: Toggles Between: 1. “Video” settings. 2. -
Page 6: Charging
Charging It takes approximately 2.5 hours for the PC900 to fully charge. Before first time use, we recommend fully charging the PC900. To charge the PC900, connect it to a wall outlet or PC using the micro USB cable provided. -
Page 7: Insert/Eject Micro Sd Card
Insert/Eject Micro SD Card The PC900 supports up to a 64GB micro SD card. Make sure the PC900 is powered off before inserting or removing the micro SD card. 1. Insert a micro SD card into the memory card slot. We recommend using a brand new class 10 micro SD card. -
Page 8: Power On/Off
To Power On the PC900: 1. Make sure a micro SD card is inserted. 2. Press the power button. 3. When the PC900 turns on it will enter into video recording mode. NOTE: The default mode the PC900 will enter into is the video recording mode, it will not start recording until you press the record button. -
Page 9: Continuous Video
To Start Continuous Recording Mode: 1. Insert a micro SD card. 2. Power on the PC900. 3. While the PC900 is in the video recording mode, press the record button. 4. A red circle will flash in the top left corner indicating continuous video recording has begun. -
Page 10: Motion Detection Video Recording Mode
To Activate/ Deactivate Motion Detection Mode: 1. Power on the PC900. 2. While the PC900 is in video recording mode press the menu/settings button once and you will enter into the video settings menu. 3. Scroll down to motion detection using the down arrow button. -
Page 11: Photo Taking Mode
Photo Taking: 1. Insert a micro SD card. 2. Power on the PC900. 3. While the PC900 is in video recording mode, press the mode button once. 4. The PC900 will enter into photo taking mode indicated by a camera in the top left hand corner. -
Page 12: Playback Files
Playback Files Stored files can be played back on the PC900 or via a PC. There are three methods that can be used to playback files: Connect the PC900 to a PC: 1. With a micro SD card inserted and the PC900 powered off, connect the PC900 to your PC. - Page 13 Remove Micro SD Card: 1. Remove the micro SD card from the PC900. 2. Insert the micro SD card into a card reader (purchased separately) then insert into a PC. 3. Open the drive that appears on the desktop; locate and open the “DCIM” folder.
-
Page 14: Download "Roro Cam" App
Delete Files on PC900: 1. Scroll to the file to be deleted. 2. Press the settings button to open the delete option. 3. Navigate to the “Delete” option. 4. Confirm deletion using the REC button. Download “RORO CAM” APP 1. Visit the App Store for iOS devices or Google Play Store for Android devices. -
Page 15: Connect Ios/Android To The Device's Wi-Fi Signal
1. Download and install the RORO CAM app on your iOS/Android device. 2. Power on your PC900. 3. Enter the PC900 settings using the settings button; click the settings button again to enter into the “Setup” settings page. 4. Scroll down using the arrow keys to the Wi-Fi configuration option in the settings menu. -
Page 16: Navigating "Roro Cam" App
3. Time/Date Stamp watermark. 4. Toggle audio recording. 5. Settings menu. 6. Video resolution. 7. View files on the PC900’s micro SD card. 8. Return to main interface. 9. Recording indicator icon (Red = recording / White = standby). 10. Battery life indicator. - Page 17 A. Add Another Camera: 1. Go to settings and connect to the PC900’s Wi-Fi signal. 2. Open “RORO CAM” and click the “plus” icon located at the top right corner.
- Page 18 3. From this screen the “Video”, “Picture”, and “Lock” items from the PC900’s micro SD card can be downloaded from the app for viewing. 4. From one of the selected tabs, click on the cloud with a down arrow to download files to the app.
- Page 19 7. Confirm delete to remove files from the app. NOTE: The above section will only remove files from the phone application. It will not remove files from the phone’s camera roll or from the micro SD card on your PC900.
-
Page 20: Device Settings
Device Settings To change the PC900’s settings, press the settings button to enter into the settings menu. Use the up and down arrows to navigate through the settings menu and the REC button to select and change settings. 1. Video Settings:... - Page 21 “lock”, or protect, the file. High requires a much greater force to trigger the file “lock”. Date Stamp: Enable/Disable time and date stamp. 2. Picture Settings: NOTE: The picture settings are only accessible when in photo taking mode. Capture Mode: A timer can be set for delayed photo capture.
- Page 22 The setup settings can be accessed from any mode. Wifi: Turn Wifi on and off. Date/Time: Set time and date for the PC900. Auto Power Off: Set how long until PC900 will power off when not in use. Beep Sound: Enable and disable audio feedback (i.e. beep).
-
Page 23: Legend/Symbols
Format: Format the micro SD card. Default Settings: Reset all setting back to the original settings. Version: You are able check the camera’s version here. Legend/Symbols A. Video Recording Mode Screen: 1. Current Mode. 2. Exposure. 3. Wide Dynamic Range. 4. - Page 24 5. Time. 6. Micro SD card indicator. 7. Current resolution. 8. Audio enabled/disabled. 9. Available recording time on inserted micro SD card. 10. Battery life indicator. B. Photo Taking Mode Screen: 1. Current mode. 2. Exposure. 3. White balance. 4. ISO. 5.
- Page 25 8. Quality indicator. 9. Micro SD card indicator. 10. Battery life indicator. C. Playback Mode Screen: 1. Current mode. 2. File name. 3. Video duration. 4. Playback indicator. 5. Play / Pause. 6. Previous file / Slow down playback. 7. Next file / Speed up playback. 8.
-
Page 26: Specs
Specs Night Vision Continuous. Motion Recording modes detection Inferred Memory Support Up to 64GB Time and Date Stamp Recording While Charging Loop Recording Lense Angle 85 degrees Video Recording Continuous 1 min, Motion Segments Detection 30 seconds Wifi / App Control (IOS/ Android) Photo Taking Video File Type... - Page 28 MID: BV-01 1 Year Warranty All RecorderGear™ brand products are backed by our 1 Year Warranty. For full details visit www.recordergear.com...