Table of Contents
Advertisement
Advertisement
Table of Contents

Related Manuals for SAGEMCOM F@st 5260


Summary of Contents for SAGEMCOM F@st 5260
- Page 1 Wireless Router User Manual F@st 5260 V3.0 (April 2017) 253594684...
- Page 2 Copyright © 2014 by Sagemcom Broadband SAS All rights reserved. Rights of modifications reserved. This publication may not be reproduced, in whole or in part, without prior expressed written permission of Sagemcom Broadband SAS. Issued by Sagemcom Broadband SAS...
-
Page 3: Table Of Contents
Sagemcom F@st 5260 Trademarks ............................i Chapter 1: Product Overview ......................1 Package Contents ............................... 1 Hardware Overview ............................2 Front view ................................ 2 Back view ................................4 Side View ................................5 Label ................................... 6 Router Positioning ............................. 7 Wall Mounting (optional) ..........................7 Chapter 2: Getting Started ...................... - Page 4 Problem 6: Locked out of the Web GUI....................48 Appendices ............................49 Appendix A: Technical Specifications ...................... 49 Sagemcom F@st 5260 Specifications ....................49 Sagemcom F@st 5260 Physical Characteristics ................50 Appendix B: Notification of Compliance ....................51 Federal Communications Commission (FCC) Statements ............. 51 Modifications .............................. 51...
-
Page 5: Chapter 1: Product Overview
Product Overview Chapter 1: Product Overview Thank you for choosing Sagemcom. The F@st 5260 router is built with a host of features to deliver maximum speed and performance: • Wireless-AC technology. Using the latest 802.11 ac wireless technology, the F@st 5260 router provides you with maximum speed and range without the hassle of cumbersome wires. -
Page 6: Hardware Overview
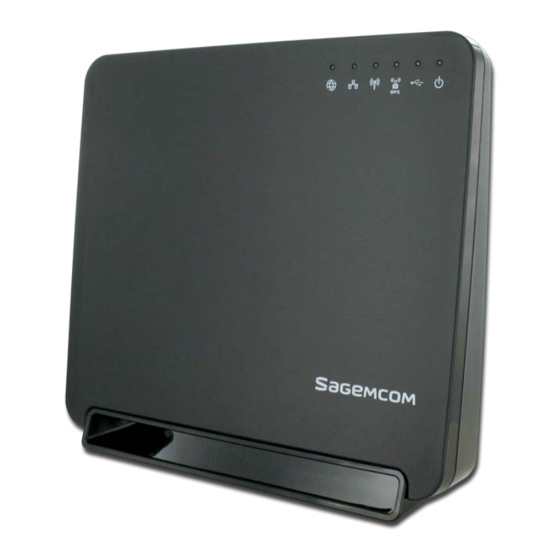
Chapter 1: Sagemcom F@st 5260 Product Overview Hardware Overview Front view Indicator lights There are 6 indicator lights located at the top right-hand corner of your router. See the icon descriptions below to understand what each light indicates. Power • Solid Green. Router is powered on. - Page 7 Chapter 1: Sagemcom F@st 5260 Product Overview Wireless • Solid Green. Wireless network is ready. • Flashing Green. Transmitting or receiving wireless data. • Off. Wireless network is disabled. • Solid Green. Connected to least one Local Area Network (LAN) Ethernet link.
-
Page 8: Back View
Chapter 1: Sagemcom F@st 5260 Product Overview Back view Label The back side of your router has the following switches and connections: 1. Power Switch. Turns your router on or off. 2. LAN Network Ports. Connects to your devices using network cables (Ethernet cables). -
Page 9: Side View
Chapter 1: Sagemcom F@st 5260 Product Overview Off. No Ethernet link present. Solid Green LED. Ethernet link present. Flashing Green LED. Passing Ethernet traffic. Solid Orange LED. Gigabit Ethernet link present. Solid Orange LED with Flashing Green LED. Gigabit Ethernet link present with passing Ethernet traffic. -
Page 10: Label
Chapter 1: Sagemcom F@st 5260 Product Overview NOTE: WPS push-button pairing mode must be enabled through the web GUI before use. The WPS button applies to both 2.4 GHz and 5 GHz according to which is enabled. Label The label is located on the back of your router. It contains important information that you will need to set-up your router, such as your SSID (Network Name), Network Key (Password), Router login Username and Password, as well as your MAC address. -
Page 11: Router Positioning
Chapter 1: Sagemcom F@st 5260 Product Overview Router Positioning The F5260 router provides network access from anywhere within range of your wireless (Wi-Fi) network. However, Wi-Fi signal strength diminishes over distance and as it passes through the construction material of your home such as walls, metal, and water. -
Page 12: Chapter 2: Getting Started
Chapter 2: Sagemcom F@st 5260 Getting Started Chapter 2: Getting Started Before you begin This chapter will outline the procedures required for installing and configuring your router. Installing your router is comprised of two parts: • Installing the hardware • Configuring the router through the web GUI Before you begin, review the system requirements outlined below and write down the router information located on the router's label. -
Page 13: Router And Account Information
Chapter 2: Sagemcom F@st 5260 Getting Started Router and Account Information For future use, print this page, and use it to record your router information. Network Name (SSID): Network Password (key): Guest Network Name: Guest Network Password (key): Web GUI (IP) - Page 14 Chapter 2: Sagemcom F@st 5260 Getting Started 6. Connect the power adapter to the power input of your router, then plug it into an outlet. If no LEDs are lit, press the power On/Off button on the rear panel of the router.
-
Page 15: Configure Your Wireless Router
Chapter 2: Sagemcom F@st 5260 Getting Started Configure your Wireless Router The F5260 router can be easily configured to meet your wireless needs. This section provides instructions on how to: • Connect to the web GUI • Change your local access (router login) username and password •... -
Page 16: A Tour Of Your Web Gui Dashboard
Chapter 2: Sagemcom F@st 5260 Getting Started A Tour of your Web GUI Dashboard The primary function of each option is described below. Provides status and configuration information about your Internet connection. - Page 17 Chapter 2: Sagemcom F@st 5260 Getting Started Includes access to parental controls, passwords, and firewall settings. Configures the router reset and local network settings, and contains maintenance functions. Configures the 2.4 GHz Wi-Fi and Guest network settings. The dashboard icon displays devices that are connected to the 2.4 GHz...
-
Page 18: A Tour Of Your Web Gui (Mobile Edition)
Chapter 2: Sagemcom F@st 5260 Getting Started Configures the 5 GHz and Guest network settings. The dashboard icon displays devices that are connected to the 5 GHz Wi-Fi network. Provides statistics on LAN Ethernet ports. The dashboard icon displays devices connected by Ethernet. - Page 19 Chapter 2: Sagemcom F@st 5260 Getting Started...
-
Page 20: Changing Your Local Access Password
Chapter 2: Sagemcom F@st 5260 Getting Started Changing your Local Access Password Your local access username and password provide access to your web GUI account. Do not share this information as it allows users to change your router settings or disable your Internet connection. - Page 21 Chapter 2: Sagemcom F@st 5260 Getting Started The configuration window for the 2.4 GHz network is shown below. (The 5.0 GHz network window is similar). Turn your Wi-Fi ON/OFF 1. Log in to the web GUI. 2. Click on the network that you want to turn on or off.
- Page 22 Chapter 2: Sagemcom F@st 5260 Getting Started 4. At the bottom right side of the window, click Apply. Change your SSID and stop broadcasting your SSID You can change your network name (SSID), and broadcast the name or keep it hidden.
- Page 23 Chapter 2: Sagemcom F@st 5260 Getting Started Change the Wi-Fi Channel You may want to change your Wi-Fi network channel to avoid other Wi-Fi networks or interfering devices such as microwaves. If you select “Auto” the router will select the best available channel for your wireless network.
-
Page 24: Enabling Wps Push Button Pairing
Chapter 2: Sagemcom F@st 5260 Getting Started Enabling WPS Push Button Pairing Wi-Fi Protected Setup (WPS) push button pairing provides an easy way to join devices to your Wi-Fi network with the push of a button. By default, WPS is disabled. To enable it, follow the instructions below: 1. -
Page 25: Changing Your Time Zone
Chapter 2: Sagemcom F@st 5260 Getting Started Changing your Time Zone You can change your time zone for your location, and to ensure that times for parental controls are administered accurately. The preset time zone is Universal Coordinated Time (UTC). - Page 26 Chapter 2: Sagemcom F@st 5260 Getting Started 1. Log in to the web GUI. 2. Search for the device to be configured under the network where it is connected. Remember: devices highlighted in white are currently active and inactive devices are gray.
-
Page 27: Setting Up Parental Controls
Chapter 2: Sagemcom F@st 5260 Getting Started Setting up Parental Controls Parental Controls can be configured to: • Limit access to the Internet at certain times on particular devices. • Block certain websites across all devices. 1. Log in to the web GUI. - Page 28 Chapter 2: Sagemcom F@st 5260 Getting Started Block Web Sites 1. Under Site Blocking, click URL Filter. 2. Type or copy/paste website address you wish to block. 3. Click Add Address, then click Apply.
-
Page 29: Setting Up Your Guest Network
Chapter 2: Sagemcom F@st 5260 Getting Started NOTE: Entering a site on the blocked sites list prohibits all devices connected to your network from accessing the site at all times of the day. Setting up your Guest Network Provide guests with Internet access while limiting their access to local resources by setting up a separate guest wireless network. - Page 30 Chapter 2: Sagemcom F@st 5260 Getting Started 4. In the SSID field, the guest network name will appear with your network name-Guest. 5. Select a channel for the guest network, or leave at the default AUTO setting. 6. In the Security section, enter a password for the guest network password in the Password field.
-
Page 31: Chapter 3: Usb Sharing
Chapter 3: Sagemcom F@st 5260 USB Sharing Chapter 3: USB Sharing The router allows you to share storage and media files as well as printers and multi-function devices with other users on your network. This chapter will provide instruction on how to: •... -
Page 32: Enabling File Sharing
Chapter 3: Sagemcom F@st 5260 USB Sharing Enabling File Sharing File sharing is enabled by default. Should you need to manually enable it: 1. Log in to the web GUI. 2. Click on Router Settings. 3. Select the Media tab. -
Page 33: Safely Disconnecting A Storage Device
Chapter 3: Sagemcom F@st 5260 USB Sharing To enable the DLNA: 1. Log in to the web GUI. 2. Click on Router Settings. 3. Select the Media tab. 4. In the DLNA section, slide the tab to ON. 5. Click Apply. -
Page 34: Access Shared Files
Chapter 3: Sagemcom F@st 5260 USB Sharing 4. You will be brought back to the dashboard, and the device will no longer appear. 5. If the Eject button does not work, select the Force to eject checkbox. Then click on the Eject button again. -
Page 35: Printer Sharing
Chapter 3: Sagemcom F@st 5260 USB Sharing 6. A window will appear with the contents of your USB drive. 7. You can locate the USB storage device under Computer. WARNING: To safely disconnect a USB storage device, ensure that you follow the directions outlined in this manual. - Page 36 Chapter 3: Sagemcom F@st 5260 USB Sharing Configuring a Printer for Windows XP 1. Start the Add Printer Wizard: • Click Start. • Select Settings Printers and Faxes Add Printer. 2. Select Control Panel Printers and Faxes Add Printer.
- Page 37 Chapter 3: Sagemcom F@st 5260 USB Sharing 8. Choose the applicable printer driver. Click OK. If the printer was previously installed on this PC, then the driver should appear in the list under the proper manufacturer and printer name. If you don’t see your printer, check the bottom of the list for your manufacturer. Printers are not always listed alphabetically.
- Page 38 Chapter 3: Sagemcom F@st 5260 USB Sharing 3. Choose "Add a network, wireless or Bluetooth printer." Click Next. 4. Skip the search by clicking "The printer that I want is not listed." 5. Choose "Select a shared printer by name."...
- Page 39 Chapter 3: Sagemcom F@st 5260 USB Sharing The specific URL may vary for different models of printer. Refer to printer manufacturer's documentation. Some common printer URLs are: • http://192.168.1.1:631/ • http://192.168.1.1:631/IPP/ • http:// 192.168.1.1:631/IPP/port1 NOTE: This step will fail if your printer is not connected or does not support IPP.
- Page 40 Chapter 3: Sagemcom F@st 5260 USB Sharing If the printer was previously installed on this PC, then the driver should appear in the list under the proper manufacturer and printer name. If you don’t see your printer, check the bottom of the list for your manufacturer. Printers are not always listed alphabetically.
- Page 41 Chapter 3: Sagemcom F@st 5260 USB Sharing 5. Skip the search by clicking "The printer that I want isn’t listed." 6. Choose "Select a shared printer by name." 7. Enter the URL: http://192.168.1.1:631/IPP. 8. Click Next. The specific URL may vary for different models of printer. Refer to printer manufacturer's documentation.
- Page 42 Chapter 3: Sagemcom F@st 5260 USB Sharing NOTE: This step will fail if your printer is not connected or does not support IPP. You may also have to power-cycle your printer when changing USB hosts. 9. Choose the applicable printer driver, then click OK.
- Page 43 Chapter 3: Sagemcom F@st 5260 USB Sharing 12. (Optional). You can choose to set this printer as your system Default Printer by selecting the checkbox next to "Set as the default printer." 13. Installation can be verified using the Print a test page button. Click Finish to complete.
- Page 44 Chapter 3: Sagemcom F@st 5260 USB Sharing The specific URL may vary for different models of printer. Refer to printer manufacturer's documentation. Some common printer URLs are: • http://192.168.1.1:631/ • http://192.168.1.1:631/IPP/ • http:// 192.168.1.1:631/IPP/port NOTE: This step will fail if your printer is not connected or does not support IPP.
-
Page 45: Chapter 4: Administration
Chapter 4: Sagemcom F@st 5260 Administration Chapter 4: Administration Rebooting your Router Occasionally, your router may encounter difficulties connecting to the Internet, and you may need to reboot your router. There are two ways you can do this: • Through the web GUI •... -
Page 46: Back Up And Restore Router Configuration
Chapter 4: Sagemcom F@st 5260 Administration Back Up and Restore Router Configuration Should you ever reset your router to its factory defaults, any customized settings would be lost. Follow the directions below to backup and restore your router settings. Back Up Router Configuration 1. -
Page 47: Upgrade Router's Firmware
Chapter 4: Sagemcom F@st 5260 Administration Upgrade Router's Firmware The F5260 router automatically searches and installs upgrades which may add features or fix issues in your router. IMPORTANT: While the firmware is upgrading, the Power indicator light will turn a solid red. Do NOT interrupt the upgrade process as it may permanently damage the router. -
Page 48: Restore Factory Defaults
Chapter 4: Sagemcom F@st 5260 Administration Restore Factory Defaults There are two ways to restore factory defaults: • Through the web GUI • Using the reset button on the router CAUTION: Restoring Factory Defaults will erase customized router settings. Ensure that you backup customized settings before continuing. -
Page 49: Chapter 5: Troubleshooting
Chapter 5: Sagemcom F@st 5260 Troubleshooting Chapter 5: Troubleshooting This chapter provides information on how to resolve some common problems you may encounter with your router. Problem 1: Indicator lights are not turning on. There are a number reasons as to why an indicator light would be inactive. Review the icons below to resolve issues you may be experiencing. - Page 50 Chapter 5: Sagemcom F@st 5260 Troubleshooting The WPS indicator light is off by default. It will only turn on if you have enabled Wi-Fi Protected Setup on your network through the web GUI. Note that the WPS light applies to both 2.4 GHz and 5 GHz according to which is enabled.
-
Page 51: Problem 2: The Internet Stopped Working
Chapter 5: Sagemcom F@st 5260 Troubleshooting Problem 2: The Internet stopped working. Try one of the following solutions: 1. Check to see if your Wi-Fi signal is on. If it is off, log in to web GUI and check that your wireless network is enabled. -
Page 52: Problem 4: The Wi-Fi Signal Drops
Chapter 5: Sagemcom F@st 5260 Troubleshooting Problem 4: The Wi-Fi signal drops. Check to see if another device is using the 2.4 GHz band or a material such as glass, water, or metal are causing interference. If so, reposition your router away from the item. Refer to Router Positioning on page 7. -
Page 53: Appendices
Sagemcom F@st 5260 Appendices Appendices Appendix A: Technical Specifications Sagemcom F@st 5260 Specifications Model Name Sagemcom F@st 5260 Ethernet Port Speed IEEE 802.3 Ethernet: 10-BASE-T, 100-BASE-T, 1000-BASE-T 5 GHz: IEEE 802.11ac 2.0, 802.11n, 802.11a Wireless Standards 2.4 GHz: IEEE 802.11n, 802.11g, 802.11b 2400 MHz –... -
Page 54: Sagemcom F@St 5260 Physical Characteristics
Sagemcom F@st 5260 Appendices Sagemcom F@st 5260 Physical Characteristics Dimensions 8.7” x 2.6” x 8.1” (220 x 65.4 x 206 mm) Weight 1.17 lbs (529 g) Input: 100 V to 120 V ~60 Hz Power Output: 12 VDC @ 2.5 A Temperature 32°F to 104°F (0°C to 40°C) -
Page 55: Appendix B: Notification Of Compliance
Sagemcom F@st 5260 Appendices Appendix B: Notification of Compliance Federal Communications Commission (FCC) Statements This device complies with Part 15 of the FCC Rules. Operation is subject to the following two conditions: 1. This device may not cause harmful interference. -
Page 56: Fcc Radiation Exposure Statement
Sagemcom F@st 5260 Appendices FCC Radiation Exposure Statement This equipment complies with FCC radiation exposure limits set forth for an uncontrolled environment. This transmitter must not be co-located or operating in conjunction with any other antenna or transmitter. This device produces radio frequency energy in the 2.4 GHz and 5 GHz spectrums. The antenna must be positioned to keep a minimum distance of 20 cm (0.65 ft) from the...
Need help?
Do you have a question about the F@st 5260 and is the answer not in the manual?
Questions and answers
TCL Smart TV message says it is not connected to Router (5260CV). all router lights look good. Connections look good. Reboot does not help. Was working fine for years until it wasn't. Help!
To resolve the connection issue between a TCL Smart TV and a SAGEMCOM F@st 5260 router, try the following steps:
1. Check Wi-Fi on the TV: Ensure the TV’s Wi-Fi is enabled.
2. Verify Wi-Fi Signal: Confirm the wireless signal is active on the router. If the Wireless indicator light is off, log in to the Web GUI and enable the wireless network.
3. Confirm Network Settings: Make sure the TV is connecting to the correct SSID (network name) with the correct password.
4. Encryption Compatibility: Ensure the TV supports WPA2 encryption. If not, change the router’s encryption mode.
5. Restart Devices: Restart the TV and the router.
6. Check LAN Connection (if wired): If using Ethernet, ensure the cable is securely connected and try a different cable if needed.
7. Check Indicator Lights: Make sure the LAN and WAN indicator lights are on. The WAN light should be solid green if the router is connected to the modem.
These steps address both wireless and wired connection issues.
This answer is automatically generated
what is my f@st 5260 pin