Table of Contents
Advertisement
Quick Links
Advertisement
Table of Contents

Related Manuals for i-mobile IQ II


Summary of Contents for i-mobile IQ II
- Page 1 USER MANUAL...
- Page 2 Welcome Thank you for purchasing this product. For your cellular phone works properly, please follow the instructions in this manual. To prevent any possible incidents or malfunctions, please follow all safety warnings. Screen displays and illustrations in this user’s manual are designed to help you operate this phone to its optimum performance...
- Page 3 Contents ...
- Page 4 ...
-
Page 5: Introducing Android One
Introducing Android One i-mobile IQ II is an Android One smartphone. It runs Android Lollipop and, unlike other phones, gets updated to the new version of Android soon after it is released. * That means you get the latest features,better performance, beautiful design, and built-in security on a smartphone that’s... -
Page 6: Your Phone
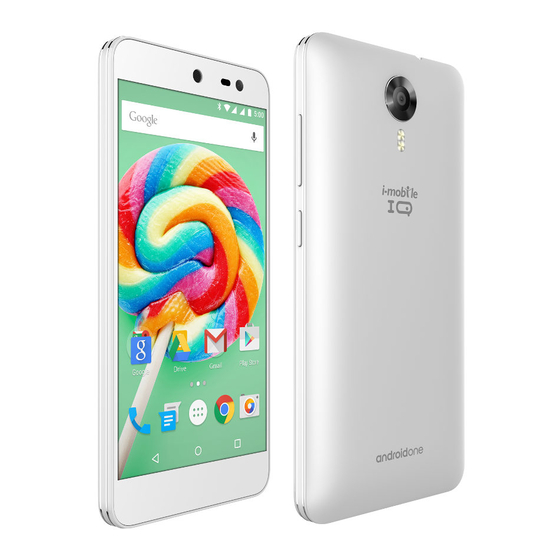
Your phone the important keys & connectors Phone overview 1. Earphone Jack To connect an earphone so you can listen to music/radio. 2. Receiver To hear the voice of the other side when calling. - Page 7 3. Front Camera For taking photos. Lens To adjust the ringer volume, 4. Volume Keys adjust the voice volume during a call, and adjust media volume. 5. Power/Lock Key Switch the phone on and off; Press and hold to open phone options menu.
-
Page 8: Getting Started
10. Charge/USB To connect charger or USB data Port cable for data exchange. 11. Back Camera For taking photos. Lens Getting started let's get you up and running Assemble & charge SIM card in... -
Page 9: Touch Screen & Keys
Make sure that the clipped corner of the SIM card is facing the correct direction and the metallic contacts are facing the correct direction. Slide the SIM card into the card slot until it stops. Charge up Ensure the battery is inserted in the handset. To charge the battery, plug in the charger connector at your phone (USB interface) and then plug the other end into an AC power socket. - Page 10 Here are some tips on how to navigate around your phone. Touch To choose an icon or option, touch it. Touch & hold Open special functions or additional options. Drag To scroll through a list or move slowly, drag across the touch screen.
-
Page 11: Power/Lock Key
Rotate the screen On some screens, the orientation of the screen rotates with the phone as you turn it from upright to its slide and back again. You can turn this feature on and off. Key tips Power/Lock key When powering off status, press and hold to turn on the ... -
Page 12: Volume Keys
Extended Home screen, open the central Home screen. Back key Press Back key to return to the previous screen you were working on. Volume keys Press Volume keys to change the volume. When playing music or video files, press Volume keys to adjust media volume. -
Page 13: Working With Menus
Note: Your Home screen might look a little different. Working with Menus The phone provides you with Options menus and context menus. Options menus Options menus contain tools that apply to the activities of the current screen or application, not to any specific item on the screen. - Page 14 3. Touch and hold an application icon, then back to the Home screen, and drag it to the desired location. To remove a shortcut on Home screen If you want to remove the shortcut, you can touch and hold the shortcut icon on Home screen, and then drag it to Remove tab.
-
Page 15: Arranging Your Home Screen
3. Touch and hold a widget icon to pick up the widget, then back to the Home screen To remove a widget on Home screen If you want to remove the widget, you can touch and hold the widget icon on Home screen, and then drag it to Remove tab. -
Page 16: Changing The Background Of Your Home Screen
Touch and hold the item in a folder, and then drag the item out of the folder. Changing the background of your Home screen Adapt the Home screen to your own style using wallpapers. Touch and hold the Home screen to select wallpapers. Note: You can use camera to take a photo, and then set it as wallpaper. -
Page 17: Checking Notifications And Ongoing Activates
To browse the Application menu Open the Application menu, and then slide the screen left or right. Phone status bar and notifications The status bar at the top of the screen contains icons that tell you about messages and phone status and shows what’s going on in your phone. - Page 18 To open the Notification panel Drag the status bar downwards. To close the Notification panel Drag the bottom of the Notification panel upwards. To open a running application from the Notification panel From the Notification panel, touch the icon for the running application to open it.
-
Page 19: Text Entry
call is in progress, you can put it on hold, initiate a phone conference, mute your microphone etc. Press Volume keys to adjust the call volume. Text entry On-screen keyboard Touch the keys of the on-screen QWERTY keyboard to enter text conveniently. You can open this keyboard by touching a text field. - Page 20 Compose new message 1. From your Menu screen, touch Messages icon or find it: Application menu >Messager. 2. Touch 3. To add recipient(s), touch , then find and mark the contact name. To add more than one contact, mark the contact name for the desired recipients.
- Page 21 3. Touch and hold the message you want to forward. 4. Touch Forward in the menu that opens. 5. Add recipient(s), touch , then find and mark the contact name. To add more than one contact, mark the contact name for the desired recipients. You can also enter the recipient’s phone number manually.
- Page 22 4. Enter the information for contact 5. After you finish, touch Add new contact. Search a people 1. From your Home screen, touch Contacts icon or find it: Application menu > Contacts. 2. Touch 3. Input the first character of the name you are searching for in the cursor, and then all records meeting the conditions will be displayed.
- Page 23 3. Touch . If you want to cancel the favorite, touch Gmail Find it: Application menu > Gmail The Gmail application in your phone offers you to compose, send and receive Emails through your regular Gmail account. You need create account first, and then create Gmail to send.
- Page 24 2. Touch 3. Enter recipients’ addresses, and subject. 4. Compose email. Touch , you can attach a file, select the type of attachment, and select the file which you want to attach from the list that appears. 5. If you want to add Cc/Bcc, Touch More, then touch Add Cc/Bcc.
- Page 25 Forward an email 1. From your Home screen, touch Launcher icon, then find it: Application menu > Gmail. 2. In the email inbox, scroll up or down, and touch the email you want to forward. 3. Touch , to select Forward. 4.
- Page 26 Adjust your picture size, and other settings if you wish. Frame your subject on screen. You can zoom in or out by placing two fingers on the touch screen and pinching them together to zoom out or spreading them apart to zoom in.
- Page 27 The Photos offers you to view photos and play videos which are downloaded as well as those taken by the phone camera. From Photos, you can also share your photos and videos with your friends, via Messager, Bluetooth, or Gmail. 1.
- Page 28 alarm can ring at a specific time you set. Add an alarm 1. From your Home screen, touch Launcher icon, then find it: Application menu > Clock. 2. Touch 3. Touch 4. You need set time, ringtone, repeat, vibrate, etc. Then, turn it on.
-
Page 29: Connect To Networks And Devices
Touch Menu key, you can open advanced panel to do calculation. Touch DEL, you can only erase one numeric before the cursor. Touch and hold DEL, you can erase all numeric before the cursor. Chrome Use your web browser to view and navigate web pages, add pages as bookmarks You can open several windows at the same time and switch among them easily. -
Page 30: Edit Or Create New Access Points
The name of the wireless service provider you are currently registered with is selected in the list. Edit or Create New Access Points If you and your wireless service provider determine that you need to change the settings of your current access point name (APN) or to create a new one, you must obtain the APN and detailed settings from your provider. - Page 31 can connect to them. TIP: Turn off Wi-Fi when you are not using it, to extend the life of your battery. Connect to Wi-Fi Network 1. Touch Launcher icon, and from Application menu, touch Settings. 2. Touch Wi-Fi. 3. Check Wi-Fi to turn it on. The phone scans for available Wi-Fi networks and displays the names of those it finds.
- Page 32 options, check Network notification. You can uncheck t his option to stop receiving notifications. Bluetooth Bluetooth is a short-range wireless communications technology that devices can use to exchange information over a distance of about 10 meters. Turn Bluetooth On/Off 1.
-
Page 33: Connect To A Computer Via Usb
5. Touch the ID of the desired device in the list to pair it. Connect to a computer via USB You can connect your phone to a computer with a USB cable to transfer music, pictures, and other files between your phone’s storage and the computer. - Page 34 Settings Get to know the settings in your phone so that you can personalize them to your own requirements. Go to Settings to configure how your phone looks, sounds, communication, privacy, and operations in a variety of ways: Turn Wi-Fi on or off, scan a Wi-Fi vailable Wi-Fi networks, or add the Wi-Fi network.
- Page 35 More Turn Airplane mode on or off, and configure settings for VPN and mobile networks, and enable your phone to share its mobile data connection as a portable Wi-Fi hotspot, or through USB tethering. Display Let you set the screen brightness, select to switch orientation when you rotate your phone, and configure other screen settings.
- Page 36 Apps Manage applications. Users You can add user and so on. Location Enable or disenable Access to my location and Location sources. Security Protect your phone by setting up different locks and passwords. Accounts Let you add, and manage supported accounts. Enable your phone synchronize data with the synchronization accounts that you add.
- Page 37 Date & time Let you choose preferences such as format and time zone. Accessibility Enable your installed accessibility services and adjust related settings. Printing After you can printer via wi-fi connection, connect printer you can use the printer to print the content on the phone.
-
Page 38: Accessing Password
Accessing Password The cell phone and SIM card use several accessing passwords. These passwords help to prevent the cell phone from being embezzled. You can use the function options in the security settings of settings menu to change accessing password (except for PUK and PUK2). - Page 39 If a wrong PIN2 code has been input for 3 times straight, it is needed to input the PUK2 code, then input a new PIN2 code and input it again for confirmation. PUK Code PUK code (Personal Unlock Key) is used to change locked PIN code.
-
Page 40: Frequently Asked Questions And Troubleshooting
Frequently Asked Questions and Troubleshooting Cause and Solution Fail to Weak signal. Please try and move to a connect location with strong signal and try network connecting to the network again; Please ensure that you are not beyond the network coverage of service providers; Please ensure you have a valid SIM card. - Page 41 Cause and Solution example: basement, the signal might be weak. Try searching a location with stronger signal reception and call again. While using the mobile phone in the peak period of communication, like commute time, you may be unable to call because of line congestion.
- Page 42 Cause and Solution SIM Card Dirt on the metal surface of an SIM card. Error Use clean cloth to wipe the metal touch point on an SIM card. The SIM card is not installed. The SIM card is damaged. Please contact your network service provider.
-
Page 43: Specific Absorption Rate (Sar) Information
If the instruction above can not help you solve problems, please record, Mobile phone model and serial number,Specific content of warranty, Clear statement of problems,Then contact your local dealer or an i-mobile authorized service center in your area. Specific Absorption Rate (SAR) information Your phone has been designed to comply with applicable safety requirements for exposure to radio waves. - Page 44 designed to assure the safety of all persons, regardless of age and health. • The radio wave exposure guidelines employ a unit of measurement known as the Specific Absorption Rate, or SAR. Tests for SAR are conducted by using standardized method with the phone transmitting at its highest certified power level in all used frequency bands.
-
Page 45: Battery Informations
Battery Informations Type Capacity Li-Polymer 2500 mAh • The battery life depends on many factors, including the SIM card, network conditions, settings, usage and enviorenment. • Making calls, turning on the backlight and music player will consume more battery power. •... -
Page 46: Condition Of Waranty
Within the warranty period, maintenance or parts replacement is free of charge. Should be noted that i-mobile reserves the rights no return the damaged part. i-mobile provides warranty for mobile phone and accessory with the terms and conditions that are stated... - Page 47 In cellular network / signal and sounds that are used with mobile phone and accessory is the service of independent operators, not i-mobile. Therefore, i-mobile will not be responsible for the working process, the readiness of the service, and the area covered.
- Page 48 Using of mobile phone and accessory together with, or connect with the mobile phone or accessory that are neither provided nor certified by i-mobile including any accessory are inappropriate to use together with mobile phone and accessory.
- Page 49 additional...
- Page 50 Customer has already purchased. The warranty will not cover the damage that occurs from the use of any device under “i-mobile brand” with other products which are not the product of i-mobile. The warranty will not cover any expenses in the...
Need help?
Do you have a question about the IQ II and is the answer not in the manual?
Questions and answers