Table of Contents
Advertisement
SETUP & OPERATION MANUAL
FEATURES
New! Combination riving style splitter and
blade guard with anti-kickback pawls and
a second European style riving knife also
included.
Large, precision-ground, 44" x 27" cast-iron
table with two extension wings.
4" dust port allows easy connection to a
dust collection system.
Unique digital display for blade angle.
Large paddle-style stop switch.
Ruggedly built saw carriage with solid cast-
iron trunnions.
Large motor access door for quick clean-
ing and easier maintenance.
Convenient arbor lock for fast one-tool
blade changes.
3 Fence options including new Excalibur
aluminum T-fence (50-220R), and made in
Canada General "T-Fence" system with 28"
(50-220RC M1) or 50" (50-220RCL M1) guide
rails.
SPECIFICATIONS
BLADE DIAMETER
10" (254 MM)
ARBOR DIAMETER
5/8" (16 MM)
ARBOR TILT RANGE
0° À 45°
MAXIMUM DEPTH OF CUT AT 90°
3 1⁄8" (80 mm)
MAXIMUM DEPTH OF CUT AT 45°
2 1⁄4" (57 MM)
DADO CAPACITY
3⁄4" (19 MM)
DUST PORT DIAMETER
4" (102 MM)
ARBOR SPEED
4200 RPM
TABLE HEIGHT
35 3⁄8" (899 MM)
TABLE SIZE (W/EXTENSION WINGS)
44" X 27" (1118 X 686 MM)
TABLE SIZE (W/O EXTENSION WINGS)
20" X 27" (508 X 686 MM)
BASE DIMENSIONS (L X W)
20" X 20" (508 X 508 MM)
MOTOR (PRE-WIRED 110 V)
2 HP , 110/220 V, 13/6.5 A
WEIGHT
312 LBS (142 KG)
10" TILTING ARBOR SAW
– LEFT TILT
MODEL
#50-220R M1
#50-220RC M1
#50-220RCL M1
REVISION 1 - June 17/08
© Copyright General® International 06/2008
Advertisement
Table of Contents

Related Manuals for General 50-220R MI


Summary of Contents for General 50-220R MI
-
Page 1: Specifications
Convenient arbor lock for fast one-tool blade changes. 3 Fence options including new Excalibur aluminum T-fence (50-220R), and made in Canada General “T-Fence” system with 28" (50-220RC M1) or 50" (50-220RCL M1) guide rails. SPECIFICATIONS BLADE DIAMETER 10"... - Page 2 GENERAL® INTERNATIONAL 8360 Champ-d’Eau, Montreal (Quebec) Canada H1P 1Y3 Telephone (514) 326-1161 • Fax (514) 326-5555 • www.general.ca THANK YOU for choosing this General ® International model 50-220R M1/ 50- 220RC M1 / 50-220RCL M1 10" Tilting Arbor Saw. This saw has been carefully tested and inspec- ted before shipment and if properly used and maintained, will provide you with years of reli- able service.
- Page 3 Warranty does not include failures, breakage or defects deemed after inspection by General® MFG or General® International to have been directly or indirectly caused by or resulting from; improper use, or lack of or improper maintenance, misuse or abuse, negligence, accidents, damage in handling or transport, or normal wear and tear of any generally considered con- sumable parts or components.
-
Page 4: Table Of Contents
MAINTENANCE & ADJUSTMENTS ....Install the General “T-Fence” assembly Periodic maintenance ..... .23 Front fence rails . -
Page 5: Rules For Safe Operation
To help ensure safe operation, please take a moment to learn the machine’s applications and limitations, as well as poten- tial hazards. General® International disclaims any real or implied warranty and holds itself harmless for any injury that may result from improper use of its equipment. -
Page 6: Electrical Requirements
We suggest you ask your local General International distributor to recommend qualified electricians in your area (or perhaps one of their own technicians) who can make this conversion properly and safely. -
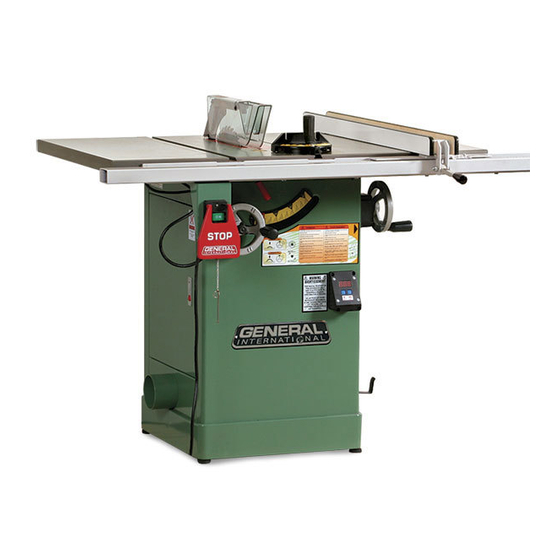
Page 7: Identification Of Main Parts And Components
10" TILTING ARBOR SAW 50-220R M1 IDENTIFICATION OF MAIN PARTS AND COMPONENTS 50-220R VERSION SHOWN - 50-220RC & 50-220RCL VERSION VARY SLIGHTLY LEFT TABLE EXTENSION* FRONT RAIL MAIN TABLE BLADE TILT HANDWHEEL BLADE GUARD AND SPLITTER ASSEMBLY ON/OFF SWITCH MITER GAUGE BEVEL SCALE FENCE DIGITAL BEVEL INDICATOR... -
Page 8: Basic Functions
3/4". Note: for safer dado cutting, an optional dado table insert (part number #50-230R) can be pur- chased through your General International distributor. The 50-220R is supplied with both a riving style splitter/blade guard assembly and a European style riving knife that are both designed to raise or lower and tilt with the blade, and maintain a consistent distance to the blade at all times, regardless of the height or angle of the blade. -
Page 9: Placement Within The Shop / Establishing Asafety Zone
PLACEMENT WITHIN THE SHOP / ESTABLISHING A SAFETY ZONE THIS MODEL 50-220R 10" TILTING ARBOR SAW IS HEAVY. DO NOT OVER-EXERT. A HOIST OR FORKLIFT WITH STRAPS SHOULD BE USED TO LIFT THIS MACHINE. TO LIMIT THE RISK OF SERIOUS INJURY OR DAMAGE TO THE MACHINE, ANY EQUIPMENT USED TO LIFT THIS MACHINE SHOULD HAVE A RATED CAPACITY IN EXCESS OF 312 LBS (142 KGS). -
Page 10: Assembly Instructions
T-fence and guide rail system. The following instructions are specifically related to the installation of this fence option. If you have purchased either 50-220RC M1 (General T-Fence with 28" rails) or 50-220RCL M1 (General T-Fence with 52" rails) then the following instructions do not apply – please skip ahead to the “Install the General T-Fence” installation instructions on page 12. -
Page 11: Rear Fence Rails
FLUSH HERE Set the left end of the rail flush to the outside edge From the left side of the saw, slide the upper slot of the extension wing. of the left (shorter) front rail onto the square head bolts From the right side of the saw, slide the upper slot of Fit the 2 rails together the right front rail onto the square head bolts... -
Page 12: Install The General "T-Fence" Assembly
- MODEL 50-220RC M1 & 50-220RCL M1 ONLY Note: The model 50-220R saw is sold with 3 different fence options: If you have purchased either 50-220RC M1 (General T- Fence with 28" rails) or 50-220RCL M1 (General T-Fence with 52" rails) the following instructions are specifically related to the installation of these 2 fence options. -
Page 13: Rear Fence Rails
REAR FENCE RAILS The illustrations below show how the bolt holes in the T-28 and T-52 rear fence rails align with those on model #50-220RC and 50-220RCL respectively. Assemble the rear rail to the rear of the saw using 4 pan head phillips screws, lock washers and nuts T-28 FOR MODEL 50-220RC... -
Page 14: Install / Remove A Saw Blade
INSTALL / REMOVE A SAW BLADE NOTE This saw is intended for use with 10" (250mm) diameter or less saw blades having a center hole diameter of 5/8". There are many types of blades available to perform specific cutting jobs, such as crosscuts or ripping only, or for use with plywood, panelling and other products. -
Page 15: Install And Adjust Riving Knife
INSTALL AND ADJUST RIVING KNIFE SELECT A RIVING KNIFE Two riving knives are provided: - A combination riving style splitter and blade guard with anti-kickback pawls - A European style riving knife without blade guard The riving knife must always be used with a blade guard. If you already own an independently attached blade- guard such as our Excalibur 50-EXBC10, use the riving knife . -
Page 16: Level The Table Insert
LEFT SIDE RIGHT SIDE Place a straightedge against a front and back If needed, center the splitter/riving knife to the tooth of the blade . There should be a more or blade by placing one, two or all three spacers less equal gap between the straightedge and the provided into the mounting bracket... -
Page 17: Align The Rip Fence 90º To The Table
If the fence is not parallel, it can be adjusted by using an Allen key to turn one or both of the screws . Do this slowly, just an eighth to a quarter turn at a time, or you will quickly overshoot the desired adjust- ment. -
Page 18: Connecting To A Dust Collector
• If you do not already own a dust collection system consider contacting your General® International dis- tributor for information on our complete line of dust col- lection systems and accessories or visit our website at www.general.ca... -
Page 19: Blade Height & Tilt Adjustment
BLADE HEIGHT & TILT ADJUSTMENT BLADE HEIGHT ADJUSTMENT The blade height adjustment handwheel is located on the front of the saw and there is a lock knob on the handwheel that allows you to lock the wheel and secure the blade at the desired height. To raise or lower the blade: 1. -
Page 20: Operating Instructions
Tilt the blade to 45° and use a bevel gauge or trian- gle square to validate the angle Press the 45° set button on the digital readout, it will show “45.0” . Bevel readout calibration is now complete. Note: • The bevel angle calibration must be reset each time you plug in the machine. -
Page 21: Bevel Ripping
As you complete the rip, the wood will either remain on the table, tilt up to be caught on the end of the guard, or fall onto the floor (or outfeed table). The waste part of the stock remains on the table to be removed only after the saw is stopped (unless it is large enough for immediate safe removal). -
Page 22: Adjusting And Using The Miter Gauge
ADJUSTING AND USING THE MITER GAUGE The miter gauge supplied with your saw has accurately UNDERSIDE VIEW adjusted index stops at 90° and 45° to the right and left, with a 30° maximum. To use a setting other than 90°, loosen the lock knob turning it counter-clockwise, pull the stop-lock pin LARGER VIEW rotate the miter head to 45°, or any angle shown on... -
Page 23: Using A Dado Head Blade
USING A DADO HEAD BLADE Dadoing is cutting a “rabbet” or a wide groove into the work. A dado blade (not supplied with your saw) usu- ally consists of two outer blades and several interior cut- ters. These can be adjusted to cut grooves from 1/8" to 3/4"... -
Page 24: Adjusting The 45 º & 90 º Bevel Stops
ADJUSTING THE 45° & 90° BEVEL STOPS 1. Disconnect the machine from the power source. Raise the blade to its highest position and lift the blade guard. Loosen the bevel lock knob and turn the blade tilting handwheel clockwise until it stops. Verify the angle of the blade with a combination square from the left side of the blade, keep the square flat against the table and against the flat part of the... -
Page 25: Recommended Optional Accessories
RECOMMENDED OPTIONAL ACCESSORIES We offer a large variety of products to help you increase convenience, productivity, accuracy and safety when using your saw Here’s a small sampling of optional accessories available from your local General International dealer. For more information about our products, please visit our website at www.general.ca... -
Page 26: Parts List And Diagrams
CABINET AND TABLE Not supplied or required with model 50-220REX 40/60 where specified:**. - Page 27 PARTS LIST 50-220R REF. N0. PART N0. DESCRIPTION SPECIFICATION 50220-09 TABLE EXTENSION (1 only for Model 50-220REX) 50220-02 HEX HEAD BOLT (4 only for Model 50-220REX) M8X1.25PX20 50220-01 LOCK WASHER (4 only for Model 50-220REX) 8.2 X 15.4 50221-01 MAIN TABLE 50221-02 TABLE INSERT 50220-03...
- Page 28 FENCE & RAILS MODEL 50-220R and 50-220REX ONLY. See your F36-T28/T52 fence manual for models 50-220RC & 50-220RCL except where specified:*. Model 50-220R only where specified:**. Model 50-220REX only where specified:***. 45 46 37-1 29-1 26-1...
- Page 29 PARTS LIST 50-220R REF. N0. PART N0. DESCRIPTION SPECIFICATION 50221-34 FENCE ASSEMBLY 50221-35 END CAP 50221-36 CONNECTION PLATE 50221-37 HEX HEAD BOLT M6X1.0PX50 50221-38 LOCK PLATE 50221-39 STOP PAD 50221-40 SQUARE HEAD BOLT 50221-41 POINTER 50221-42 FLAT WASHER 6.3X13X2t 50221-43 PHILLIPS HEAD SCREW M6X1.0X10 50221-44...
- Page 30 PARTS LIST 50-220R REF. N0. PART N0. DESCRIPTION SPECIFICATION 50221-86 5X5X22 50221-87 SET SCREW M8X1.25PX8 50221-88 MOTOR PULLEY 50221-89 SET SCREW M6X1.0PX50 50221-90 STRAIN RELIEF SB8R-3 50221-91 MOTOR 2HPX1103X-220VX60HZX1PHX2P 50221-92 FLAT WASHER 10.5X23X3.0T...
- Page 31 PARTS LIST 50-220R REF. N0. PART N0. DESCRIPTION SPECIFICATION 50220-120 LOCK WASHER 10.2X18.5 50221-93 HEX HEAD BOLT M10X1.5PX30 50220-01 LOCK WASHER 8.2X15.4 50221-94 LOCK NUT M10X1.5P(17BX12H) 50221-95 LOCK WASHER 6.1X12.3 50221-96 MOTOR MOUNT ROD 50221-97 BELT 170 J6 50221-98 SET SCREW M8X1.25PX8 50221-99 PULLEY...
- Page 32 PARTS LIST 50-220R REF. N0. PART N0. DESCRIPTION SPECIFICATION 50221-142 FLAT WASHER 8.5X23X2.0t 50221-143 FLAT WASHER 8X30X3.0t 50220-125 E-RING ETW-8 50220-122 SPRING 50221-144 HANDLE 50220-124 LOCKING SHAFT 50221-145 4X4X12 50220-BLADE BLADE 50221-146 SPRING 50221-147 ARBOR LOCK 50221-148 FLAT WASHER 6.3X13X1.0t 50221-149 STEP SCREW 50221-150...
- Page 33 SPLITTER / BLADE GUARD ASSEMBLY PARTS LIST 50-220R PART N0. REF. N0. DESCRIPTION SPECIFICATION 50221-153 SPLITTER / BLADE GUARD ASSEMBLY 50221-154 HEX HEAD BOLT M6X1.0PX50 50221-155 LOCK NUT M6X1.0P(10BX7H) 50220-173 SELF-TAPPING SCREW M4X0.7PX6 50221-156 CONNECTION PLATE 50221-157 PIVOT BLOCK 50221-158 PIVOT PIN 50221-159 SPRING...
-
Page 34: Miter Gauge
MITER GAUGE PARTS LIST 50-220R PART N0. REF. N0. DESCRIPTION SPECIFICATION 50221-173 MITER GAUGE ASSEMBLY 50220-152 HANDLE 50220-153 FLAT WASHER 8.5X16X2.0t 50220-154 MITER GAUGE BODY 50220-155 PHILLIPS HEAD SCREW M4X0.7PX20 50220-156 HEX NUT M4X0.7P(7BX3.2H) 50220-157 PHILLIPS HEAD SCREW M5X0.8PX10 50220-158 POINTER 50220-159 50220-160... - Page 35 Notes...
-
Page 36: Contact Information
Fax: (514) 326-5565 - Fax: (514) 326-5555 - Parts & Service / Order Desk orderdesk@general.ca www.general.ca IMPORTANT When ordering replacement parts, always give the model number, serial number of the machine and part number. Also a brief description of each item and quantity desired.
Need help?
Do you have a question about the 50-220R MI and is the answer not in the manual?
Questions and answers