Table of Contents
Advertisement
Advertisement
Table of Contents

Related Manuals for Fuller Brush FB-DCC


Summary of Contents for Fuller Brush FB-DCC
- Page 1 Owner's Manual Dual Cyclonic Bagless Canister FB-DCC...
-
Page 2: Important Safety Instructions
IMPORTANT SAFETY INSTRUCTIONS When using an electrical appliance, basic precautions should always be followed, including the following: READ ALL INSTRUCTIONS BEFORE USING THIS APPLIANCE WARNING: The manufacturer cannot accept responsibility for damage caused when the appliance is not used according to the instructions, or for uses other than those for which it was intended. -
Page 3: Table Of Contents
CONTENTS Polarization Instructions & Safety Precautions . . . . . . . . . . . . . . . . . . 2 Canister Description . -
Page 4: Polarization Instructions & Safety Precautions
Polarization Instructions Power Cord - 2-Wire Polarized To reduce the risk of electric shock this product is equipped with a polarized alternating current line plug (a plug having one blade wider than the other) . This plug will fit into the power outlet only one way . -
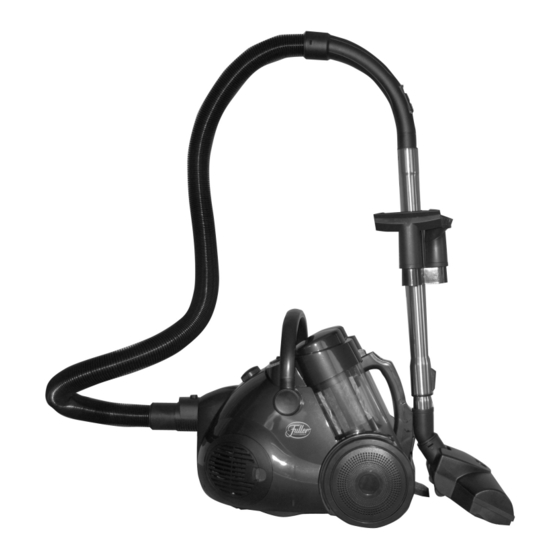
Page 5: Canister Description
Canister Description Hose Adaptor Automatic Cord Rewind • To remove the hose, press the release button on the hose connector while pulling the hose from the vacuum . Automatic Cord Rewind Power Control Cleaning Tools and Caddy • Adjust the power of the motor by turning the power control knob toward maximum or minimum . -
Page 6: Turbo Floor Tool
Canister Description cont. On/Off Switch Handle Suction Control • Pull the suction control slide upward to relieve the suction . Reducing the suction is suggested for cleaning delicate items such as sheer curtains . Turbo Floor Tool • Attach the turbo floor tool to the end of the telescopic wand for cleaning area rugs or carpets . -
Page 7: Canister Description
Canister Description cont. Blower Function Parking Device • Vacuum can be converted to a blower. • A parking device on the dust bin handle First remove the cover over the air blower holds the turbo floor tool when the port on the side of the vacuum . vacuum is not in use . -
Page 8: Assembling The Vacuum
Assembling the Vacuum NOTE: Always unplug the vacuum before assembling or removing accessories . 1. Attach the flexible hose by pressing the hose adapter into the hose connection portion the canister . (See Fig . 1) 2 . Insert the curved handle into the end of the telescopic wand . Then attach the turbo floor tool to the other end of the wand. -
Page 9: Turning On The Vacuum
Turning On the Vacuum Insert the power plug into a wall outlet and press the on/off button located on the canister . Press the on/off button again to turn off the unit before unplugging it from the wall . (See Fig . 4) Press the cord rewind button to rewind the power cord . While rewinding the cord, hold the plug with your other hand to prevent the cord from whipping . -
Page 10: Emptying The Dust Bin
Emptying the Dust Bin Warning: Always unplug the vacuum from the electrical outlet before removing the dust bin. 1 . Turn the canister vacuum off and unplug the power cord from the wall outlet . 2 . Empty the dust bin when the contents reach the MAX line . -
Page 11: Cleaning The Nylon And Pleated Filters
Cleaning the Nylon & Pleated Filters Warning: Always unplug the vacuum from the electrical outlet before removing the filters. 1 . Push the release button and lift the dust bin from the vacuum . 2 . Push the release button at the top of the dust bin handle and lift the filter assembly out of the dust bin . -
Page 12: Replacing The Exhaust And Post Filters
Replacing the Exhaust Pleated Filter and Post Filter Every six months, replace the post filter by following these steps: 1 . Remove the grid from the side of the vacuum and slide the pleated filter out . (See Fig . 12) 2 . -
Page 13: Troubleshooting Guide
Troubleshooting Guide Problem Check Point Possible Solution Suction power is • Dust bin • If the dust bin is full, empty it. weak . • Wand or hose • If clogged, remove the object. • Clean or replace filters. The vacuum does Is the hose adapter Insert it completely .
Need help?
Do you have a question about the FB-DCC and is the answer not in the manual?
Questions and answers