Wayne DW-10 Operation Manuals

Wayne DW-10 Operation Manuals

Dispenser printers

Advertisement

Operation
DW-10 and DW-12 Dispenser Printers
P/N 000-920921-
Rev D

Advertisement

Table of Contents
loading

Summary of Contents for Wayne DW-10

  • Page 1 Operation DW-10 and DW-12 Dispenser Printers P/N 000-920921- Rev D...
  • Page 2 Make sure that you know how to turn OFF power to the dispenser and submersible pumps in an emergency. Be sure to adhere to the list of cautions contained in this manual for the DW-10 and DW-12 printers. HOW TO CONTACT WAYNE Trouble with the operation of the printer should be referred to your authorized Wayne ser- vice personnel or the Wayne Help Desk (1-800-289-2963).
  • Page 3: Table Of Contents

    Contents Title Page Introduction Paper Type Printer Operation 
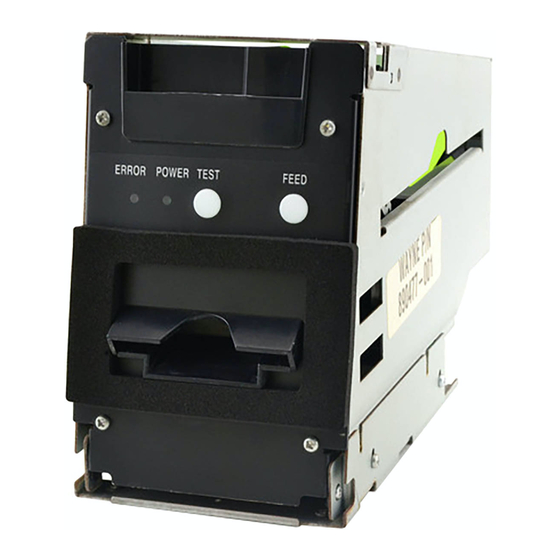
Controls and Indicator Lights Opening/Closing Printer Door Loading Paper Internal Components Clearing Paper Jams Setting the Paper Width Adjust Lever Low Paper Sensor Position Error Lights and Paper Jams Error Lights Clearing Paper Jams Safety Precautions Service Technician Information DIP Switch Settings...
  • Page 4 ____________________________________________________________________________________ P/N 000-920921- Rev 0D 04/2015...
  • Page 5: Introduction

    INTRODUCTION This manual explains the operation of Wayne DW-10 and DW-12 thermal printers used in Wayne Vista™ and Ovation™ fuel dispensers. The manual contains typical operator procedures, which includes loading paper, use of the proper paper, clearing paper jams and a list of printer precautions. The manual also contains a section on service for Wayne certified technicians.
  • Page 6 Paper Type, continued Adhere to the cautions below when using or when storing the paper. Caution: Avoid allowing the surface of the paper to contact with chemicals or oils as this may cause the paper to become colored or the printed data on it may become erased.
  • Page 7: Printer Operation

    To exit the HEX-DUMP mode, press the TEST button briefly and release. PRINTER INFO: When the printer door is opened and then closed, the Wayne print out shown above is printed. This printout includes printer Model name, Firmware version, baud rate, DIP switches, and built-in fonts.
  • Page 8: Opening/Closing Printer Door

    2.2 Opening/Closing Printer Door 1. At the top of the printer, pull the front door handle down to open the printer door as shown below. 2. Push the printer door up and close until a click is heard which locks the door.
  • Page 9: Loading Paper

    Loading Paper Follow the instructions below and refer to the photos on the next page for loading paper. 1. Unlock and open the bezel printer access door on the front of the dispenser. 2. Pull down the print door. 3. Remove old paper core. 4.
  • Page 10 Bezel Printer Door Lock LOADING PAPER ____________________________________________________________________________________ P/N 000-920921- Rev 0D 04/2015...
  • Page 11: Internal Components Clearing Paper Jams

    * With power on, the paper feeds automatically when inserted into the paper inlet. 2.5 Setting the Paper Width Adjust Lever The printer is set to 60mm paper width when shipping. Wayne supplied paper is 60mm. If the 58 mm paper width is used, adjust the paper width lever as shown below.
  • Page 12: Low Paper Sensor Position

    2.6 Low Paper Sensor Position Position Paper diameter Length of the remaining paper About 23.5 Not used About 28.0 About 2 meters 3 Default Setting About 33.0 About 6 meters About 37.5 About 11 meters The printer has adjustable paper near end (low paper) sensor. Set the sensor to the appropriate position depending of the paper roll core diameter and the length of the remaining paper when you wish to be notified of the low paper.
  • Page 13: Error Lights

     Cutter lock: If the auto cutter blade stops operating due to a jam, the ERROR light blinks. Clear the jam and press the FEED button. If the blade does not move, refer to section 3.2.  Paper jam: When paper is fed 3 inches, the receipt sensor detects it. After the paper is cut, it is determined to be a jam when the paper doesn't reach the sensor position at that time.
  • Page 14: Clearing Paper Jams

    3.2 Clearing Paper Jams If paper exit is blocked, the paper is bent and stored in the paper chute. Three receipts will be stored in the chute before a jam occurs. Follow the steps below and the numbered photos on the adjacent page to clear a paper jam: 1.
  • Page 15 3.2 Clearing Paper Jams, continued _____________________________________________________________________________________ P/N 000-920921- Rev 0D 04/2015...
  • Page 16: Safety Precautions

    SAFETY PRECAUTIONS Before using this printer for the first time, carefully read these “Safety precautions”. Incorrect operation may result in unexpected accidents (fire, shock, or injury). Neglecting the warnings below may result in printer failure, overheating, emission of smoke, fire, or electric shock. Warnings: Do not use this printer other than for its intended application in the dispenser.
  • Page 17 Cautions: Do not use the printer under conditions where the printer ventilation holes are blocked, where any object is placed on the printer or where the printer is covered or wrapped by a cloth or other materials. The printer may have an adverse effect on nearby radio or TV transmissions. There may also be cases when nearby electrical appliances adversely affect the printer, causing data errors or malfunction.
  • Page 18: Service Technician Information

    SERVICE TECHNICIAN INFORMATION The information in this section is provided for Wayne certified service technicians only. 5.1 DIP Switch Settings DIP switches are on the control board as shown below. Turn off the power before setting DIP switches. 8 7 6 5 4 3 2 1 The function of each switch is as follows: Switch No.
  • Page 19: Component Locations

    5.2 Component Locations Print Head Auto cutter Chute Access Door Paper adjust lever Out of Paper Sensor Paper Inlet Paper manual Feed Gear Receipt sensor Head-up lever Front Door Open Sensor Paper supporter Low Paper Sensor Paper holder Rear Side Data Power supply Connector...
  • Page 20: Tech Tip

    5.3 Tech Tip When replacing the DW-10 or DW-12 printer on 4/Vista™ dispensers, the printer door must be fully opened before securing the printer bracket to the bezel mounting screws. This will allow the printer to rise up slightly and the top screws should grip the bracket properly. Note that if the 4/Vista fixed mount printer is allowed to drop down too low on the top screws, paper loading will not be possible because the printer door will not fully open.
  • Page 21 This publication is intended for informational purposes only and this material is subject to change without notice. Wayne Fueling Systems has not made, and does not make, any representations or warranties of any kind, expressed or implied, with respect to any information in the publication, including any warranty as to the accuracy, correctness, or completeness of any of the information.
  • Page 22 Modifications: Any modifications made to this product that are not approved by Wayne Fueling Systems could void your authority to operate this equipment.

This manual is also suitable for:

Dw-12

Table of Contents