Table of Contents
Advertisement
Quick Links
Advertisement
Table of Contents

Related Manuals for Ancona AN-2402


Summary of Contents for Ancona AN-2402
-
Page 1: Induction Cooktop
Ancona Chef Induction Cooktop 30” & 36” User Manual & Installation Instructions IMPORTANT SAFETY INSTRUCTIONS Carefully read the important information regarding installation, safety and maintenance. Keep these instructions for future reference. MAAN2402-EN-01... -
Page 2: Table Of Contents
Table of Contents IMPORTANT SAFETY INFORMATION ................. 3 INTRODUCTION TO INDUCTION COOKING ............. 9 CARE AND CLEANING ....................12 IMPORTANT INSTALLATION INSTRUCTIONS ............13 COUNTER INSTALLATION INSTRUCTIONS ............. 15 CONTROL PANEL OVERVIEW ..................16 SPECIFICATIONS ....................... HOW TO USE ......................19 OTHER FUNCTIONS ....................21 TROUBLESHOOTING ERROR CODES .............. -
Page 3: Important Safety Information
Important Safety Information READ ALL INSTRUCTIONS BEFORE USE Read and follow all instructions before using the cooktop to prevent the risk of fire, electric shock, personal injury, or damage when using the cooktop or appliances with the cooktop. This guide does not cover all possible conditions that may occur. Always contact your service technician or manufacturer about problems that you do not understand. -
Page 4: Safety Precautions
Important Safety Information READ ALL INSTRUCTIONS BEFORE USE SAFETY PRECAUTIONS • Do not attempt to repair or replace any part of your cooktop unless it is specifically recommended in this manual. All other service should be referred to a qualified technician. Remove all tape and packaging wrap before using the appliance. -
Page 6: Safety During Use
Important Safety Information READ ALL INSTRUCTIONS BEFORE USE SAFETY DURING USE • This appliance may only be used for normal cooking and frying in the home. It is not designed for commercial or industrial purposes. Do not use the cooktop to heat the room. •... -
Page 7: Safety When Cleaning
Important Safety Information READ ALL INSTRUCTIONS BEFORE USE SAFETY DURING USE • Do not clean or operate a broken cooktop. If cooktop should break, cleaning solutions and spillovers may penetrate the broken cooktop and create a risk of electric shock. Contact a qualified technician immediately. - Page 8 Important Safety Information READ ALL INSTRUCTIONS BEFORE USE HOW TO AVOID DAMAGE TO THE APPLIANCE • Prior to using your cooktop for the first time, apply the recommended cooktop cleaning cream to the ceramic surface. Buff with a non-abrasive cloth or pad. This will make cleaning easier when soiled from cooking.
-
Page 9: Introduction To Induction Cooking
Introduction to Induction Cooking INDUCTION COOKING How Induction Cooking Works An induction coil is beneath the ceramic glass cooking surface. This generates magnetic fields, which act directly on the base of the pots and pans as compared to methods that first heat the ceramic glass. This means that the base of the pan is immediately heated up, saving time and energy. -
Page 10: Selecting Cookware
Introduction to Induction Cooking Selecting Cookware CAUTION The pan base of suitable kitchenware heats up within a few seconds! The water should boil rapidly. • You can also check cookware suitability with a magnet. If the magnet remains fixed to the base of the pan, the pan is suitable for induction cooking. - Page 11 Introduction to Induction Cooking Selecting Cookware Cookware Selection and Placement It is important that the proper cookware be used and placed correctly on the cooktop. ANY one of the incorrect conditions shown below may be detected by the sensors located below the ceramic cooktop surface.
-
Page 12: Care And Cleaning
Care and Cleaning Cleaning the Cooktop General cleaning for induction ceramic glass cooking surfaces is considerably easier than for cooking surfaces with radiant heating. NOTE: To prevent accidental activation of the controls, it is recommended that you set the CHILD LOCK feature before cleaning. IMPORTANT •... -
Page 14: Important Installation Instructions
Important Installation Instructions Dimensions and Clearances Overhead cabinet should not exceed a maximum depth of 13” (33 cm). 30” (76.2 cm) min. clearance between the top of the Min. recommended distance cooktop and the bottom of between rear edge of cut-out an unprotected wood or and nearest combustible metal cabinet. -
Page 15: Counter Installation Instructions
Cable from Power Supply box, connect appliance and power supply cable wires as shown below. Red Wire AN-2402: Circuit breaker fuse rating must be above 40 A, and wire should be 2/8 or 3/8 Black Wire copper. AN-2412: Circuit breaker fuse rating must... -
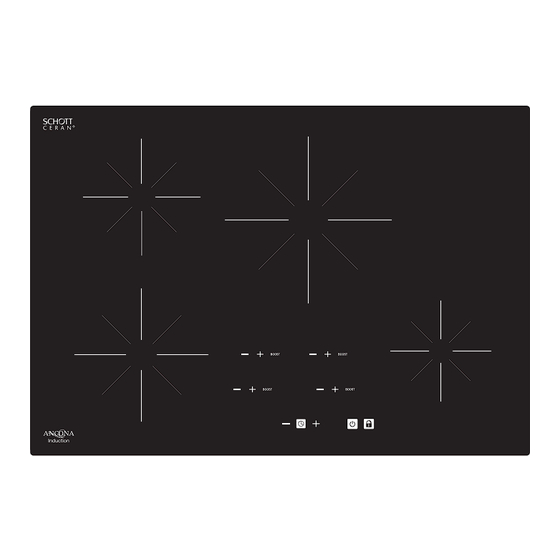
Page 16: Control Panel Overview
Control Panel Overview Model: AN-2402 Front left cooking zone Back left cooking zone Back right cooking zone Front right cooking zone Ceramic glass Touch control panels Timer control keys Lower time key Raise time key Raise power key Power boost... - Page 17 Control Panel Overview Model: AN-2412 Front left cooking zone Back left cooking zone Back right cooking zone Front right cooking zone Middle cooking zone Ceramic glass Touch control panels Timer control keys Lower time key Raise time key Raise power key Power boost Lower power key or power off Power button...
-
Page 18: Specifications
36"W x 21"D x 2 5/32"H Installation Type Drop-in Installs Over Built-in Oven Installation Dimensions (WxD) 28 3/4" x 19 11/16" Min 34 7/16" X 19 11/16" Min Heating Power of Each Cooking Zone Model: AN-2402 Model: AN-2412 — 18 —... -
Page 19: How To Use
How to Use Standby Mode Upon inserting the power plug into an electric socket, the induction cooktop will make a sound once, and all the digital lights on the cooktop will blink once, indicating the unit enters into Standby Mode. Readiness Mode While on standby mode, press the main key, the induction cooktop will... -
Page 21: Other Functions
Other Functions Other Functions Power Sharing Your cooktop is equipped with four induction Cooking Zones within two heating sections. The right and left Cooking Zones are powered by two independent induction inverters, one inverter for each of the two heating sections. Two Cooking Zones in a heating section share the power of one inverter. -
Page 22: Troubleshooting Error Codes
Troubleshooting Error Codes If the display shows an error code, please refer to this sheet for a potential solution. Error Code Possible Cause Solution • Cooktop controls are locked. • Make sure Lock mode is turned off. • Circuit breaker has tripped or •... - Page 23 Troubleshooting Error Codes If the display shows an error code, please refer to this sheet for a potential solution. Error Code Possible Cause Solution "E" appears on • Electronics fault error message of • See E0, E1, E2, E3, E7, E8, E9, EE the Power display specific cooking zone.
Need help?
Do you have a question about the AN-2402 and is the answer not in the manual?
Questions and answers