Table of Contents
Advertisement
Quick Links
Download this manual
See also:
Owner's Manual
Instrukcja obsługi i instalacji
Εγχειρίδιο Λειτουργίας & Εγκατάστασης
Instrukcja obsługi i instalacji
Εγχειρίδιο Λειτουργίας & Εγκατάστασης
Bluetooth
CD/USB/MP3/WMA RECEIVER
®
LECTEUR CD/USB/MP3/WMA Bluetooth
Bluetooth
-CD/USB/MP3/WMA-RECEIVER
®
SINTOLETTORE CD/USB/MP3/WMA Bluetooth
Bluetooth
CD/USB/MP3/WMA-ONTVANGER
®
RECEPTOR Bluetooth
Bluetooth
CD/USB/MP3/WMA-RECEIVER
®
ODTWARZACZ CD/USB/MP3/WMA
z interfejsem Bluetooth
Bluetooth
CD/USB/MP3/WMA ΔΕΚΤΗΣ
®
Bluetooth
CD/USB/MP3/WMA RECEIVER
®
LECTEUR CD/USB/MP3/WMA Bluetooth
Bluetooth
-CD/USB/MP3/WMA-RECEIVER
®
SINTOLETTORE CD/USB/MP3/WMA Bluetooth
Bluetooth
CD/USB/MP3/WMA-ONTVANGER
®
CD/USB/MP3/WMA
®
®
®
®
®
®
®
Advertisement
Chapters
Table of Contents

Related Manuals for Clarion CZ500A


Summary of Contents for Clarion CZ500A
- Page 1 Instrukcja obsługi i instalacji Εγχειρίδιο Λειτουργίας & Εγκατάστασης Instrukcja obsługi i instalacji Εγχειρίδιο Λειτουργίας & Εγκατάστασης Bluetooth CD/USB/MP3/WMA RECEIVER ® LECTEUR CD/USB/MP3/WMA Bluetooth ® Bluetooth -CD/USB/MP3/WMA-RECEIVER ® SINTOLETTORE CD/USB/MP3/WMA Bluetooth ® Bluetooth CD/USB/MP3/WMA-ONTVANGER ® RECEPTOR Bluetooth CD/USB/MP3/WMA ® Bluetooth CD/USB/MP3/WMA-RECEIVER ®...
-
Page 2: Table Of Contents
Contents 1. FEATURES ........................3 2. PRECAUTIONS ......................... 4 Front Panel / Generalities ....................5 Remove the DCP ......................6 Re-attach the DCP ......................6 Storing the DCP in the DCP Case ..................6 3. CONTROLS ........................7 Operational Panel ......................7 Names of Buttons ...................... -
Page 3: Features
1. FEATURES • Built in Bluetooth handsfree (HFP) and audio streaming (A2DP & AVRCP) • Front USB and SD card available • IR remote controller included iPhone Expanding Systems Expanding audio features 4-Channel Amplifier iPod USB Memory Portable Player ® Bluetooth cellular phone Note:... -
Page 4: Precautions
2. PRECAUTIONS WARNING For your safety, the driver should not operate the controls while driving. Also, while driving, keep the volume to a level at which external sounds can be heard. 1. When the inside of the car is very cold and the player is used soon after switching on the heater, moisture may form on the disc or the optical parts of the player and... -
Page 5: Front Panel / Generalities
Front Panel / Generalities For a longer service life, be sure to read the following cautions. • Do not allow any liquids on the set from drinks, umbrellas, etc. Doing so may damage the internal circuitry. • Do not disassemble or modify the set in any way. -
Page 6: Remove The Dcp
Remove the DCP The control panel can be detached to prevent theft. When detaching the control panel, store it in the DCP (DETACHABLE CONTROL PANEL) case to prevent scratches. We recommend taking the DCP with you when leaving the car. 1. -
Page 7: Controls
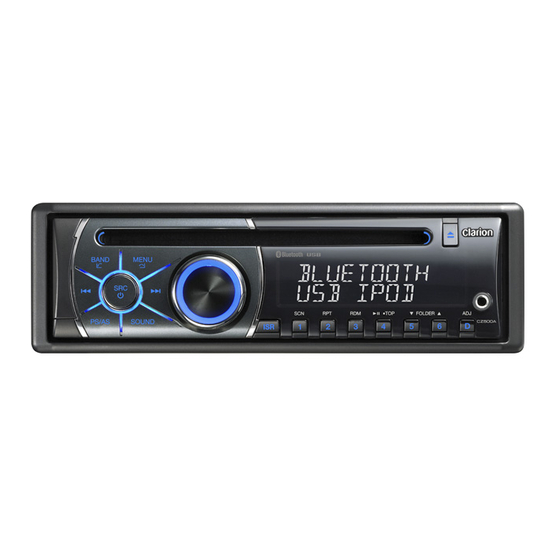
3. CONTROLS Operational Panel [BAND/ [MENU/ Disc Slot [PS/AS] [SOUND] [ISR] [1~6] AUX Jack [OPEN] [POWER/SRC] [VOLUME] [ADJ] Names of Buttons / SRC] Key [ISR] Key • Power / Toggle the audio source • Traffic announcement [BAND / ] Key [1~6] Key •... -
Page 8: Remote Control
Remote Control [POWER/SRC] Key • POWER / Toggle the audio source ] Key • Previous(Next) / Search [POWER/ [BND/DISC [SCN/PS/AS] Key SRC] UP/TOP] • Scan play / Auto memory store / POWER DISC UP MP3 search [BND/DISC UP/TOP] Key • Select tuner band / Top play ] Key •... -
Page 9: Cautions On Handling
4. CAUTIONS ON HANDLING Handling Discs Handling Storage • New discs may have some roughness • Do not expose discs to direct sunlight or around the edges. If such discs are used, any heat source. the player may not work or the sound •... -
Page 10: Operations
5. OPERATIONS Basic Operations Note: Mute • Be sure to read this chapter referring to the Press the [MUTE] key on the remote control chapter “3. CONTROLS” to mute the volume from the unit. Note CAUTION Doing the operation above again or adjusting volume will release muting. -
Page 11: Radio Operations
Radio Operations Select tuner as playing source Manual save Press [SRC] button once or more to enter radio mode. When one expected radio station has been detected, press and hold number key 1~6 to save it in the memory. Select one radio band Press the [BAND] key on the panel or [BND] Recall the stored stations key on the remote control to select one radio... -
Page 12: Cd/Mp3/Wma Operations
CD/MP3/WMA Operations This unit can play back MP3/WMA 2. The folder name and file name can be files displayed as the title during MP3/WMA play but the title must be within 64 single Notes: byte alphabetical letters and numerals • If you play a file with DRM (Digital Rights (including an extension). -
Page 13: Displaying Cd Titles
CD/MP3/WMA Operations Notes: 3. Press and hold the [ 6 ] button to move • Never insert foreign objects into the CD ahead to +10 tracks. SLOT. • If the CD is not inserted easily, there may Track-down be another CD in the mechanism or the 1. -
Page 14: Usb Operations
CD/MP3/WMA Operations Repeat play 3. Press [RPT] button repeatedly until [RPT This function allows you to play the current OFF] appears on the LCD to cancel repeat track repeatedly or play a track currently playback. b e i n g p l a y e d i n t h e M P 3 / W M A f o l d e r repeatedly. -
Page 15: Bluetooth Operations
Same operation as “Direct Number Call”. operate improperly with some Bluetooth audio players. • Dialled/Missed/ Received Call History • Clarion cannot guarantee the compatibility You can search any Dialled/Missed/Received of all mobile phones together with CZ500. Call History. • Audio playback will be set to the same 1. -
Page 16: Audio Streaming Operations
Information tracks through the car’s speakers. Please about tracks (e.g. the elapsed playtime, song consult your nearest Clarion dealer for more title, etc.) cannot be displayed on this unit. information on the product of wireless audio When A2DP device is disconnected, “BT... -
Page 17: Audio Setup
Audio Setup Press the [SOUND] key to enter sound effect Press the [SOUND] key, then press [ setting mode. First Press shows current EQ. to select USER preset including: Rotate the volume knob to changes BEAT BALANCE -> FADER -> M-B EX -> LPF(low EQ in this order: pass filter) ->... -
Page 18: Troubleshooting
6. TROUBLESHOOTING GENERAL Turn off the power, then press the [OPEN] button and remove the DCP. - Page 19 USB Devices USB Devices Problem Cause Measure USB device cannot The USB device has been Reversing the connection direction of the USB be inserted. inserted with wrong device, try it again. direction. The USB connector is Replace with a new USB device. broken.
-
Page 20: Specifications
7. SPECIFICATIONS FM Tuner Input Frequency range: 87.5-108.0MHz (Europe) Audio input sensitivity: Usable sensitivity: 8dBμ High: 0.65 V (at 2V output) Frequency response: 30Hz-15kHz Mid: 1.3V (at 2V output) Stereo separation: 30dB(1kHz) Low: 2.0V (at 2V output) Signal/noise ratio: >55dB (input impedance 10 k or greater) Aux-in level:... -
Page 21: Installation / Wire Connection Guide
For tough dirt, installation, consult your dealer or an apply a little cold or warm water to a authorized Clarion service center. soft cloth and wipe off the dirt gently. -
Page 22: Cautions On Installation
Notes: 1. Some car models require special mounting kits for proper installation. Consult your Clarion dealer for details. 2. Fasten the front stopper securely to prevent the source unit from coming loose. • Console opening dimensions 7-3/16"... -
Page 23: Unit Installation
Notes of installation positive pole first and then the negative pole. 1. Before installation, please make sure 7. DO NOT block the cooling fan exit to proper connections are conducted and ensure sufficient heating dissipation of this the unit operates normally. Improper unit, or it may result in damage to this unit. -
Page 24: Removing The Source Unit
6) Removing the Source Unit Method B Disassemble trim ring 1. Push the trim ring upward and pull out the upper part. 2. Push the trim ring downward and pull out the lower part. 1. Insert this unit directly to the opening of the Disassemble the unit dashboard. -
Page 25: Wiring And Connections
7) Wiring and Connectors Purple Subwoofer output 1 White Rear audio Left output terminal Right Black Purple Subwoofer output 2 White Left Front audio Black Black output terminal Steering wheel Right Gray control terminal Black Black Microphone Black 4-Channel Amplifier USB connector Refer to the right. - Page 26 16-Pin Connector Extension Lead (attched to the source unit) + Gray Front Right - Gray/Black + White Front Left Yellow wire (Memory back-up lead) Connect directly to battery - White/Black + Purple Rear Right - Purple/Black Red wire (Power lead) Accessory + 12V + Green Rear Left...
- Page 27 Clarion Co., Ltd. All Rights Reserved. Copyright © 2009: Clarion Co., Ltd. Printed in China...
- Page 28 FCC WARNING STATEMENT FCC NOTE: THE MANUFACTURER IS NOT RESPONSIBLE FOR ANY RADIO OR TV INTERFERENCE CAUSED BY UNAUTHORIZED MODIFICATIONS TO THIS EQUIPMENT. SUCH MODIFICATIONS COULD VOID USER’S AUTHORITY TO OPERATE THE EQUIPMENT. This device complies with Part 15 of the FCC Rules. Operation is subject to the following two conditions: 1.
Need help?
Do you have a question about the CZ500A and is the answer not in the manual?
Questions and answers