Kramer VS-48HDCPxl User Manual
4x8 dvi matrix switcher
Hide thumbs
Also See for VS-48HDCPxl:
- User manual (30 pages) ,
- User manual (29 pages) ,
- User manual (28 pages)
Table of Contents
Advertisement
Quick Links
Download this manual
See also:
User Manual
Advertisement
Table of Contents

Related Manuals for Kramer VS-48HDCPxl


Summary of Contents for Kramer VS-48HDCPxl
- Page 1 Vertrieb von CAMBOARD Electronics K R A ME R E LE CT R O N IC S L T D . USER MANUAL MODEL: VS-48HDCPxl 4x8 DVI Matrix Switcher P/N: 2900-300015 Rev 4 www.camboard.de Tel. 07131 911201 ce-info@camboard.de Fax 07131 911203...
- Page 2 im Vertrieb von CAMBOARD Electronics www.camboard.de Tel. 07131 911201 ce-info@camboard.de Fax 07131 911203...
-
Page 3: Table Of Contents
Default Communication Parameters Kramer Protocol 2000 Figures Figure 1: VS-48HDCPxl 4x8 DVI Matrix Switcher Front Panel Figure 2: VS-48HDCPxl 4x8 DVI Matrix Switcher Rear Panel Figure 3: Connecting the VS-48HDCPxl 4x8 DVI Matrix Switcher Figure 4: Local Area Connection Properties Window... -
Page 4: Introduction
Vertrieb von CAMBOARD Electronics Introduction Welcome to Kramer Electronics! Since 1981, Kramer Electronics has been providing a world of unique, creative, and affordable solutions to the vast range of problems that confront the video, audio, presentation, and broadcasting professional on a daily basis. In recent years, we have redesigned and upgraded... -
Page 5: Getting Started
Achieving the Best Performance To achieve the best performance: • Use only good quality connection cables (we recommend Kramer high- performance, high-resolution cables) to avoid interference, deterioration in signal quality due to poor matching, and elevated noise levels (often associated with low quality cables) •... -
Page 6: Safety Instructions
Kramer Electronics has made arrangements with the European Advanced Recycling Network (EARN) and will cover any costs of treatment, recycling and recovery of waste Kramer Electronics branded equipment on arrival at the EARN facility. For details of Kramer’s recycling arrangements in your particular country go to our recycling pages at http://www.kramerelectronics.com/support/recycling/. -
Page 7: Overview
CAMBOARD Electronics Overview The high quality Kramer VS-48HDCPxl is an HDCP compatible 4 x 8 DVI Matrix Switcher that accepts up to four DVI inputs and routes the selected DVI input signal to any or all of eight DVI outputs. -
Page 8: Defining The Vs-48Hdcpxl 4X8 Dvi Matrix Switcher
Vertrieb von CAMBOARD Electronics You can control the VS-48HDCPxl using the front panel buttons or remotely via: • RS-232 serial commands transmitted by a touch screen system, PC or other serial controller • The Kramer infrared remote control transmitter •... -
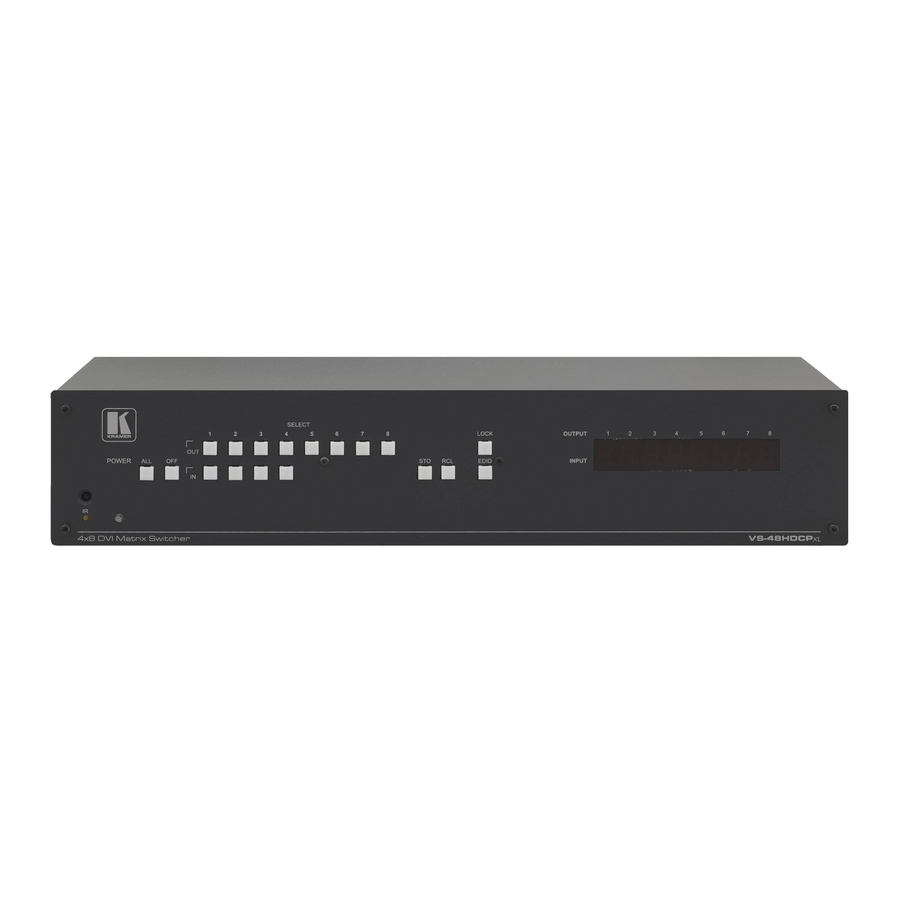
Page 9: Figure 1: Vs-48Hdcpxl 4X8 Dvi Matrix Switcher Front Panel
Vertrieb von CAMBOARD Electronics Figure 1: VS-48HDCPxl 4x8 DVI Matrix Switcher Front Panel Feature Function IR Receiver and LED IR remote control sensor. LED lights yellow when receiving an IR signal POWER LED Lights green when the unit is turned on... -
Page 10: Figure 2: Vs-48Hdcpxl 4X8 Dvi Matrix Switcher Rear Panel
Vertrieb von CAMBOARD Electronics Figure 2: VS-48HDCPxl 4x8 DVI Matrix Switcher Rear Panel Feature Function INPUT DVI Connectors Connect to the DVI sources (from 1 to 6) OUTPUT DVI Connectors Connect to the DVI acceptors (from 1 to 6) -
Page 11: Using The Ir Transmitter
This distance can be extended to up to 60 meters when used with three extension cables (Model: C-A35M/A35F-50). Before using the external IR receiver, be sure to arrange for your Kramer dealer to insert the internal IR connection cable (P/N: 505-70434010-S) with the 3.5mm connector that fits into the REMOTE IR opening on the rear panel. -
Page 12: Installing In A Rack
Vertrieb von CAMBOARD Electronics Installing in a Rack VS-48HDCPxl - Installing in a Rack www.camboard.de Tel. 07131 911201 ce-info@camboard.de Fax 07131 911203... -
Page 13: Connecting The Vs-48Hdcpxl
VS-48HDCPxl. After connecting your VS-48HDCPxl, connect its power and then switch on the power to each device. To connect the VS-48HDCPxl as illustrated in the example in Figure 1. Connect up to four DVI sources (for example, DVD players) to the IN DVI connectors. -
Page 14: Connecting To The Vs-48Hdcpxl Via Rs-232
Figure 3: Connecting the VS-48HDCPxl DVI Matrix Switcher Connecting to the VS-48HDCPxl via RS-232 You can connect to the VS-48HDCPxl via an RS-232 connection using, for example, a PC. Note that a null-modem adapter/connection is not required. To connect to the VS-48HDCPxl via RS-232: •... -
Page 15: Operating Via The Ethernet
5.2.1 Connecting the Ethernet Port Directly to a PC (Crossover Cable) You can connect the Ethernet port of the VS-48HDCPxl to the Ethernet port on your PC, via a crossover cable with RJ-45 connectors. This type of connection is recommended for identifying the VS-48HDCPxl with the factory configured default IP address. -
Page 16: Figure 4: Local Area Connection Properties Window
5. You can use any IP address in the range 192.168.1.1 to 192.168.1.255 (excluding 192.168.1.39) that is provided by your IT department. 7. Click OK. Figure 5: Internet Protocol (TCP/IP) Properties Window VS-48HDCPxl - Connecting the VS-48HDCPxl www.camboard.de Tel. 07131 911201 ce-info@camboard.de Fax 07131 911203... - Page 17 CAMBOARD Electronics 5.2.2 Connecting the Ethernet Port to a Network Hub You can connect the Ethernet port on the VS-48HDCPxl to the Ethernet port on a network hub or router using a straight-through cable with RJ-45 connectors. 5.2.3 Control Configuration via the Ethernet Port To control several units via the Ethernet, connect the Master unit (Machine # 1) via the Ethernet port to the LAN port of your PC.
-
Page 18: Operating The Vs-48Hdcpxl 4X8 Dvi Matrix Switcher
You can use the STO and RCL buttons to store up to 12 setups and then recall them as illustrated in Figure IN 1 is used for setup number 1 and OUT 1 is used for setup number 7. VS-48HDCPxl - Operating the VS-48HDCPxl 4x8 DVI Matrix Switcher www.camboard.de Tel. 07131 911201 ce-info@camboard.de... -
Page 19: Figure 6: Selector Buttons
2. Press the relevant OUT or IN button that stored the setup. In this example, press OUT 6 for preset 10. 3. Press the RCL button to recall the stored setup. VS-48HDCPxl - Operating the VS-48HDCPxl 4x8 DVI Matrix Switcher www.camboard.de Tel. 07131 911201 ce-info@camboard.de... -
Page 20: Acquiring The Edid
1. Connect the required acceptors to the outputs from which you want to acquire the EDID. 2. Press the EDID and STO buttons simultaneously and hold them for 3 seconds. Both buttons flash. VS-48HDCPxl - Operating the VS-48HDCPxl 4x8 DVI Matrix Switcher www.camboard.de Tel. 07131 911201 ce-info@camboard.de Fax 07131 911203... - Page 21 2. Press the SELECT IN button to which the EDID will be copied. The selected input number flashes on the display. 3. Press the OFF button until a "0" (zero) appears on the display. VS-48HDCPxl - Operating the VS-48HDCPxl 4x8 DVI Matrix Switcher www.camboard.de Tel. 07131 911201 ce-info@camboard.de...
-
Page 22: Locking And Unlocking The Front Panel
Ethernet port on your PC. Use your PC to configure the initial settings (see Section 5.1). Firmware Upgrade Instructions for upgrading the firmware can be found in the STC Firmware Upgrade document. VS-48HDCPxl - Operating the VS-48HDCPxl 4x8 DVI Matrix Switcher www.camboard.de Tel. 07131 911201 ce-info@camboard.de Fax 07131 911203... -
Page 23: Technical Specifications
19" x 9.3" x 2U W, D, H WEIGHT: 2.5kg (5.5lbs) approx. ACCESSORIES: Power cord, IR transmitter, rack “ears” OPTIONS: External remote IR receiver cable Specifications are subject to change without notice at http://www.kramerelectronics.com VS-48HDCPxl - Technical Specifications www.camboard.de Tel. 07131 911201 ce-info@camboard.de Fax 07131 911203... -
Page 24: Default Communication Parameters
None Command Format: Example (Output 1 to Input 1): 0x01, 0x81, 0x81, 0x81 Ethernet IP Address: 192.168.1.39 TCP Port Number: 5000 Network Mask: 255.255.255.0 Default Gateway: 192.168.1.1 VS-48HDCPxl - Default Communication Parameters www.camboard.de Tel. 07131 911201 ce-info@camboard.de Fax 07131 911203... -
Page 25: Kramer Protocol 2000
Vertrieb von CAMBOARD Electronics Kramer Protocol 2000 The Kramer Protocol 2000 RS-232/RS-485 communication uses four bytes of information as defined below. DESTINATION INSTRUCTION 1st byte INPUT 2nd byte OUTPUT 3rd byte MACHINE NUMBER 4th byte 1st BYTE: Bit 7 – Defined as 0. - Page 26 7 and 8 respectively. For example, if the present status of machine number 5 is breakaway setting, then the reply to the HEX code would be HEX codes VS-48HDCPxl - Kramer Protocol 2000 www.camboard.de Tel. 07131 911201 ce-info@camboard.de...
- Page 27 NOTE 16 - The reply to the “REQUEST WHETHER PANEL IS LOCKED” is as in NOTE 4 above, except that here the OUTPUT is assigned with the value 0 if the panel is unlocked, or 1 if it is locked. VS-48HDCPxl - Kramer Protocol 2000 www.camboard.de Tel.
- Page 28 im Vertrieb von CAMBOARD Electronics www.camboard.de Tel. 07131 911201 ce-info@camboard.de Fax 07131 911203...
- Page 29 Vertrieb von CAMBOARD Electronics For the latest information on our products and a list of Kramer distributors, visit our Web site where updates to this user manual may be found. We welcome your questions, comments, and feedback. Web site: www.kramerelectronics.com...
Need help?
Do you have a question about the VS-48HDCPxl and is the answer not in the manual?
Questions and answers