
Related Manuals for Kramer VS-48H


Summary of Contents for Kramer VS-48H
- Page 1 Kramer Electronics, Ltd. Preliminary USER MANUAL Model: VS-48H 4x8 HDMI Matrix Switcher...
-
Page 2: Table Of Contents
Acquiring the Default EDID Storing and Recalling a Switching Setting from a Preset Resetting the VS-48H 4x8 HDMI Matrix Switcher’s IP Parameters Connecting to the VS-48H 4x8 HDMI Matrix Switcher via RS-232 Connecting to the VS-48H 4x8 HDMI Matrix Switcher via Ethernet 7.6.1 Connecting the Ethernet Port directly to a PC 7.6.2... - Page 3 Table 1: VS-48H 4x8 HDMI Matrix Switcher Front Panel Features Table 2: VS-48H 4x8 HDMI Matrix Switcher Rear Panel Features Table 3: Technical Specifications of the VS-48H 4x8 HDMI Matrix Switcher Table 4: Default Communication Parameters Table 5: Protocol Definitions...
-
Page 4: Introduction
Congratulations on purchasing your Kramer VS-48H 4x8 HDMI Matrix Switcher. The VS-48H is ideal for conference room presentations and advertising applications as well as for rental and staging. Each package includes the following items: • VS-48H 4x8 HDMI Matrix Switcher •... -
Page 5: Quick Start
Getting Started Quick Start This quick start chart summarizes the basic setup and operation steps. KRAMER: SIMPLE CREATIVE TECHNOLOGY... -
Page 6: Overview
Overview Overview The VS-48H is a high quality 4 x 8 matrix switcher for HDMI signals that fits into one vertical space of a standard 19” professional rack enclosure. In particular, the VS-48H features: • Up to 2.25Gbps bandwidth per graphic channel •... -
Page 7: About Hdmi
It delivers the highest high-definition image and sound quality. Note that Kramer Electronics Limited is an HDMI Adopter and an HDCP Licensee. In particular, HDMI: • Provides a simple... -
Page 8: Recommendations For Best Performance
(often associated with low quality cables). • Avoid interference from neighboring electrical appliances that may adversely influence signal quality and position your Kramer VS-48H away from moisture, excessive sunlight and dust Defining the VS-48H 4x8 HDMI Matrix Switcher... -
Page 9: Table 1: Vs-48H 4X8 Hdmi Matrix Switcher Front Panel Features
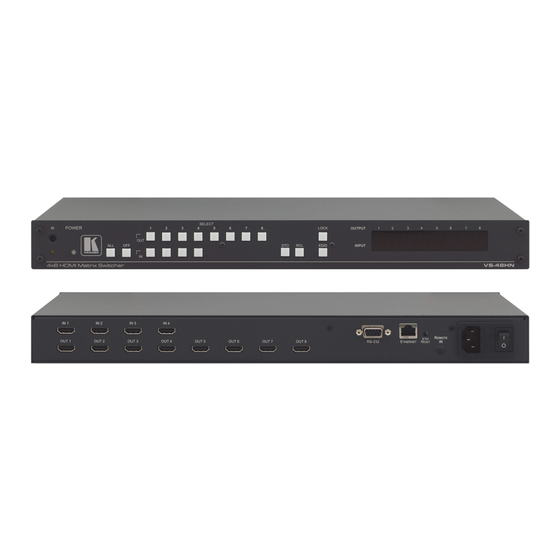
Defining the VS-48H 4x8 HDMI Matrix Switcher Figure 1: VS-48H 4x8 HDMI Matrix Switcher Front Panel Table 1: VS-48H 4x8 HDMI Matrix Switcher Front Panel Features Feature Function IR LED Lights yellow when receiving signals from the infrared remote control transmitter... -
Page 10: Table 2: Vs-48H 4X8 Hdmi Matrix Switcher Rear Panel Features
Switch for turning the device on or off 1 First turn the VS-48H off and then turn it on again while pressing the ETH RESET button. The device will power up and load its memory with the factory default IP parameters... -
Page 11: Using The Ir Transmitter
This distance can be extended to up to 60m (197ft) when used with three extension cables Before using the external IR receiver, be sure to arrange for your Kramer dealer to insert the internal IR connection cable with the 3.5mm jack that 1 9 F fits into the REMOTE IR opening on the rear panel. -
Page 12: Installing The Vs-48H In A Rack
Installing the VS-48H in a Rack Installing the VS-48H in a Rack This section provides instructions for rack mounting the device. -
Page 13: Connecting The Vs-48H 4X8 Hdmi Matrix Switcher
Figure 3: Connecting the VS-48H 4x8 HDMI Matrix Switcher 1 Switch off the power on each device before connecting it to your VS-48H. After connecting your VS-48H, switch on its power and then switch on the power on each device... -
Page 14: Operating The Vs-48H 4X8 Hdmi Matrix Switcher
• Storing and recalling switch settings (see Section 7.3) • Resetting the VS-48H (see Section 7.4) • Connecting to the VS-48H via RS-232 (see Section 7.5) • Connecting to the VS-48H via Ethernet (see Section 7.6) Switching an Input to an Output To switch an input to an output: •... -
Page 15: Acquiring The Edid From Several Outputs
Operating the VS-48H 4x8 HDMI Matrix Switcher 7.2.2 Acquiring the EDID from Several Outputs To acquire the EDID from several outputs (for example, OUT 1 to IN 1 and OUT 6 to IN 3): 1. Connect the display devices to the outputs from which you want to acquire the EDIDs. -
Page 16: Storing And Recalling A Switching Setting From A Preset
To connect to the product via RS-232: • Connect the RS-232 9-pin D-sub on the rear panel of the VS-48H via a 9-wire straight cable (only pin 2 to pin 2, pin 3 to pin 3, and pin 5 to pin 5 need to be connected) to the RS-232 9-pin D-sub port on your PC 1 You can set each of the inputs/outputs independently;... -
Page 17: Connecting To The Vs-48H 4X8 Hdmi Matrix Switcher Via Ethernet
7.6.2) for connection via a network hub or network router 7.6.1 Connecting the Ethernet Port directly to a PC You can connect the Ethernet port of the VS-48H to the Ethernet port on your PC via a crossover cable with RJ-45 connectors. -
Page 18: Connecting The Ethernet Port Via A Network Hub
Figure 5: Internet Protocol (TCP/IP) Properties Window 7.6.2 Connecting the Ethernet Port via a Network Hub You can connect the Ethernet port of the VS-48H to the Ethernet port on a network hub or network router, via a straight through cable with RJ-45 connectors. -
Page 19: Technical Specifications
White point (default)..Wx 0.284 - Wy 0.293 Additional descriptors... None 1 Specifications are subject to change without notice 2 For best results, use Kramer cables such as the C-HM/HM series, the C-HM/DM series and/or our HDMI over fiber optics C-FOHM/FOHM series KRAMER: SIMPLE CREATIVE TECHNOLOGY... - Page 20 Default EDID Timing characteristics Horizontal scan range..31-94kHz Vertical scan range..50-85Hz Video bandwidth..170MHz CVT standard..... Not supported GTF standard..... Not supported Additional descriptors... None Preferred timing..Yes Native/preferred timing.. 1280x720p at 60Hz Modeline...."1280x720" 74.250 1280 1390 1430 1650 720 725 730 746 +hsync -vsync Detailed timing #1..
- Page 21 Rear LFE....No CE vendor specific data (VSDB) IEEE registration number. 0x000C03 CEC physical address..1.0.0.0 Maximum TMDS clock..165MHz Report information Date generated... 08/03/2011 Software revision..2.52.0.857 Data source....Real-time 0x0031 Operating system..5.1.2600.2.Service Pack 3 KRAMER: SIMPLE CREATIVE TECHNOLOGY...
-
Page 22: Default Communication Parameters
Default Communication Parameters Default Communication Parameters Table 4: Default Communication Parameters EDID EDID data is passed between Output 1 and Input 1 RS-232 Protocol 2000 Baud Rate: 9600 Data Bits: Stop Bits: Parity: None Command Format: Example (Output 1 to Input 1): 0x01, 0x81, 0x81, 0x81 Ethernet Default Settings... -
Page 23: Kramer Protocol 2000
Kramer Protocol 2000 Kramer Protocol 2000 The VS-48H is compatible with Kramer’s Protocol 2000 (version 0.50). This RS-232/RS-485 communication protocol uses four bytes of information as defined below. Table 5: Protocol Definitions DESTI- INSTRUCTION NATION 1st byte INPUT 2nd byte... -
Page 24: Table 6: Instruction Codes For Protocol 2000
Kramer Protocol 2000 For a single machine controlled via the serial port, always set M4…M0 = 1, and make sure that the machine itself is configured as MACHINE NUMBER = 1. Table 6: Instruction Codes for Protocol 2000 Note: All values in the table are decimal, unless otherwise stated. - Page 25 NOTE 16 - The reply to the “REQUEST WHETHER PANEL IS LOCKED” is as in NOTE 4 above, except that here the OUTPUT is assigned with the value 0 if the panel is unlocked, or 1 if it is locked. KRAMER: SIMPLE CREATIVE TECHNOLOGY...
- Page 26 1. Any product which is not distributed by us or which is not purchased from an authorized Kramer dealer. If you are uncertain as to whether a dealer is authorized, please contact Kramer at one of the agents listed in the Web site www.kramerelectronics.com.
- Page 27 For the latest information on our products and a list of Kramer distributors visit www.kramerelectronics.com where updates to this user manual may be found. We welcome your questions, comments and feedback. Safety Warning: Disconnect the unit from the power supply before opening/servicing.
Need help?
Do you have a question about the VS-48H and is the answer not in the manual?
Questions and answers