Table of Contents
Advertisement
Quick Links
Advertisement
Chapters
Table of Contents

Subscribe to Our Youtube Channel
Related Manuals for R&S NRP2


Summary of Contents for R&S NRP2
- Page 1 ® R&S NRP2 Power Meter User Manual (;×éÇ2) 1173.9157.02 ─ 03...
- Page 2 Rohde & Schwarz GmbH & Co. KG. Trade names are trademarks of the owners. ® ® The following abbreviations are used throughout this manual: R&S NRP2 is abbreviated as R&S NRP2, and the R&S NRP-Zxx Power Sensors are abbreviated as R&S NRP-Zxx.
-
Page 3: Basic Safety Instructions
Basic Safety Instructions Always read through and comply with the following safety instructions! All plants and locations of the Rohde & Schwarz group of companies make every effort to keep the safety standards of our products up to date and to offer our customers the highest possible degree of safety. Our products and the auxiliary equipment they require are designed, built and tested in accordance with the safety standards that apply in each case. - Page 4 Basic Safety Instructions Tags and their meaning The following signal words are used in the product documentation in order to warn the reader about risks and dangers. indicates a hazardous situation which, if not avoided, will result in death or serious injury.
- Page 5 Basic Safety Instructions Electrical safety If the information on electrical safety is not observed either at all to the extent necessary, electric shock, fire and/or serious personal injury or death may occur. 1. Prior to switching on the product, always ensure that the nominal voltage setting on the product matches the nominal voltage of the AC supply network.
- Page 6 Basic Safety Instructions 14. Use suitable overvoltage protection to ensure that no overvoltage (such as that caused by a bolt of lightning) can reach the product. Otherwise, the person operating the product will be exposed to the danger of an electric shock. 15.
- Page 7 Basic Safety Instructions Repair and service 1. The product may be opened only by authorized, specially trained personnel. Before any work is performed on the product or before the product is opened, it must be disconnected from the AC supply network.
- Page 8 Informaciones elementales de seguridad 2. Handles on the products are designed exclusively to enable personnel to transport the product. It is therefore not permissible to use handles to fasten the product to or on transport equipment such as cranes, fork lifts, wagons, etc. The user is responsible for securely fastening the products to or on the means of transport or lifting.
- Page 9 Informaciones elementales de seguridad Se parte del uso correcto del producto para los fines definidos si el producto es utilizado conforme a las indicaciones de la correspondiente documentación del producto y dentro del margen de rendimiento definido (ver hoja de datos, documentación, informaciones de seguridad que siguen). El uso del producto hace necesarios conocimientos técnicos y ciertos conocimientos del idioma inglés.
- Page 10 Informaciones elementales de seguridad Palabras de señal y su significado En la documentación del producto se utilizan las siguientes palabras de señal con el fin de advertir contra riesgos y peligros. PELIGRO identifica un peligro inminente con riesgo elevado que provocará...
- Page 11 Informaciones elementales de seguridad Seguridad eléctrica Si no se siguen (o se siguen de modo insuficiente) las indicaciones del fabricante en cuanto a seguridad eléctrica, pueden producirse choques eléctricos, incendios y/o lesiones graves con posible consecuencia de muerte. 1. Antes de la puesta en marcha del producto se deberá comprobar siempre que la tensión preseleccionada en el producto coincida con la de la red de alimentación eléctrica.
- Page 12 Informaciones elementales de seguridad 12. Si un producto se instala en un lugar fijo, se deberá primero conectar el conductor de protección fijo con el conductor de protección del producto antes de hacer cualquier otra conexión. La instalación y la conexión deberán ser efectuadas por un electricista especializado. 13.
- Page 13 Informaciones elementales de seguridad 5. Ciertos productos, como p. ej. las instalaciones de radiocomunicación RF, pueden a causa de su función natural, emitir una radiación electromagnética aumentada. Deben tomarse todas las medidas necesarias para la protección de las mujeres embarazadas. También las personas con marcapasos pueden correr peligro a causa de la radiación electromagnética.
- Page 14 Informaciones elementales de seguridad 6. En caso de falta de estanqueidad de una celda, el líquido vertido no debe entrar en contacto con la piel ni los ojos. Si se produce contacto, lavar con agua abundante la zona afectada y avisar a un médico.
- Page 15 Safety Instructions Kundeninformation zum Batteriegesetz (BattG) Dieses Gerät enthält eine Batterie bzw. Akkumulator. Die- se dürfen nicht mit dem Hausmüll entsorgt werden. Nach Ende der Lebensdauer darf die Entsorgung nur über eine geeignete Sammelstelle oder eine Rohde & Schwarz- Kundendienststelle erfolgen. Beachten Sie unbedingt die Hinweise zu Batterien und Akkumulatoren in den grundlegenden Sicherheitshinwei- sen.
- Page 16 Customer Information Regarding Product Disposal The German Electrical and Electronic Equipment (ElektroG) Act is an implementation of the following EC directives: • 2002/96/EC on waste electrical and electronic equipment (WEEE) and • 2002/95/EC on the restriction of the use of certain hazardous substances in e lectrical and electronic equipment (RoHS).
- Page 17 Qualitätszertifikat Certified Quality System ISO 9001 Certificate of quality Certified Environmental System Certificat de qualité ISO 14001 Sehr geehrter Kunde, Dear Customer, Cher client, Sie haben sich für den Kauf eines You have decided to buy a Vous avez choisi d’acheter un pro- Rohde &...
- Page 18 Certificate No.: 2010-71 This is to certify that: Equipment type Stock No. Designation NRP2 1144.1374.02 POWER METER complies with the provisions of the Directive of the Council of the European Union on the approximation of the laws of the Member States...
- Page 19 Customer Support Technical support – where and when you need it For quick, expert help with any Rohde & Schwarz equipment, contact one of our Customer Support Centers. A team of highly qualified engineers provides telephone support and will work with you to find a solution to your query on any aspect of the operation, programming or applications of Rohde &...
-
Page 21: Table Of Contents
Unpacking the meter.....................8 Setting up the meter.....................8 Front panel tour......................9 Rear Panel........................15 Connecting the instrument to the AC supply............17 Starting the R&S NRP2....................18 2 Getting Started..................23 Requirements......................23 Brief introduction to the operation................24 Preset and zeroing......................27 Measuring average power (Cont Av mode)..............29 Window handling......................35... - Page 22 ® Contents R&S NRP2 Displaying traces......................112 Management of settings...................139 System settings......................143 Messages and alarms....................163 5 Remote Control Fundamentals............167 Differences between Remote Control and Manual Control........167 Connecting a Controller to the Base Unit...............168 Switchover to Remote Control (REMOTE)..............170 Return to Manual Operation (LOCAL)..............170 Automatic Settings when Switching between Local and Remote......170...
- Page 23 ® Contents R&S NRP2 7 Maintenance..................333 Sensor test.........................333 Instrument selftest....................333 Cleaning the exterior....................333 Storage........................333 8 Error Messages and Troubleshooting..........335 Status and Error Messages in Manual Control............335 SCPI-Specific Error Messages.................336 Bootmenu........................342 A Remote control interfaces..............349 GPIB Bus Interface....................349 Ethernet........................352 Ethernet interface......................355 USB interface......................363...
- Page 24 ® Contents R&S NRP2 User Manual 1173.9157.02 ─ 03...
-
Page 25: Putting Into Operation
Putting into Operation R&S NRP2 Notes on putting into operation 1 Putting into Operation This section describes the basic steps to be taken when setting up the R&S NRP2 for the first time. It contains the following topics: ● unpacking ●... -
Page 26: Emc
1.4.1 Carrying handle If the R&S NRP2 is not installed in a rack, it should be set up so that the viewing angle for the display is optimal. The carrying handle can be locked in a variety of positions to act as a stand. -
Page 27: Front Panel Tour
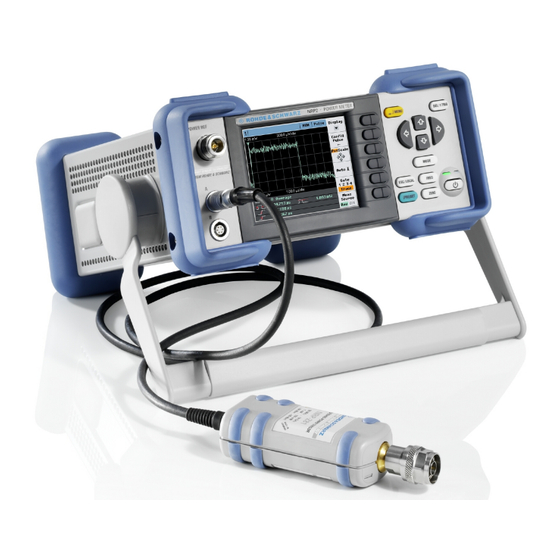
Front panel tour 1.4.2 Bench top operation If the R&S NRP2 is operated on a bench top, the surface should be flat. The instrument can be used in horizontal position, standing on its feet, or with the support feet on the bottom extended. - Page 28 7 = Sensor connectors 1.5.1 Display The R&S NRP2 displays results in windows. Depending on the measurement mode, values are displayed digitally, in a combined digital and analog mode, or graphically. The display mode can be selected individually for each measurement, i.e. you can per- form both graphical and numerical representations simultaneously.
- Page 29 ® Putting into Operation R&S NRP2 Front panel tour Graphical display Fig. 1-2: Trace in Pulse display in 'Trace&Statistic' mode The meter shows the results in a measurement curve, i.e. as a function of time. This presentation is obtained in "Trace & Statistics" mode, see ...
- Page 30 Numerical measuring windows indicate the readings digitally, or provide the values in form of an analog meter. A maximum of four windows can displayed on the screen, while their size is determined by the number of windows. The R&S NRP2 indicates either all windows simultaneously, or individually expanded.
- Page 31 49. ● as the LOCAL key, it is used to switch the R&S NRP2 from remote control mode (all controls disabled) to manual mode. The key is automatically assigned its function according to context - in other words, there is no manual assignment by the operator.
- Page 32 To the left of the display, the R&S NRP2 provides a power reference signal connector and two sensor connectors. If option R&S NRP-B5 is installed, the R&S NRP2 offers two sensor ports at the rear. Thus, you can perform measurements with a maximum of 4 connected sensors simul- taneously.
-
Page 33: Rear Panel
1.6 Rear Panel This section gives an overview of the control elements and the connectors on the rear panel of the R&S NRP2. Each element and connector is briefly described and a reference is given to the chapters containing detailed information. - Page 34 149. ETHERNET The Ethernet connector is an RJ45 socket for remote controlling the R&S NRP2 via a network. USB (Universal Serial Bus) interface of type B. This connector is used for remote control of the instrument (see ...
-
Page 35: Connecting The Instrument To The Ac Supply
AC supply voltage The R&S NRP2 can be operated from AC lines with a voltage range of 100 V to 240 V and a frequency range of 50 Hz to 60 Hz. Note that a restricted voltage range (100 V to 120 V) applies to 400 Hz networks. -
Page 36: Starting The R&S Nrp2
1.8.2 Startup ► Press the ON/STANDBY key to switch to ready state. The R&S NRP2 initiates its startup procedure, i.e. it boots the operating system, automatically performs a selftest and starts the instrument firmware. If the previous session was terminated regularly, the instrument uses the last setup with the relevant instrument settings. - Page 37 1.8.2.1 Start screen Immediately after turning on the start screen appears, and the R&S NRP2 provides short- term access to the boot menu and the firmware update menu. The bootmenu provides service and system functions, e.g. resetting the internal memory, see ...
- Page 38 . When finished, the instrument displays the result under the net- work icon, i.e. "OK" indicates that the interface can be addressed. If the R&S NRP2 is not connected to a network hub or if a connection cannot be established during booting, the message (Not Connected) is displayed instead of "OK".
- Page 39 If an error is detected when the non-volatile memory containing instrument settings is checked, an error message is displayed when booting is completed. The non-volatile memory is then re-initialized completely and the R&S NRP2 goes into the preset state. All instrument settings that have been saved are lost as a result of this procedure.
- Page 40 ® Putting into Operation R&S NRP2 Starting the R&S NRP2 User Manual 1173.9157.02 ─ 03...
-
Page 41: Getting Started
Getting Started R&S NRP2 Requirements 2 Getting Started This chapter introduces the main functions and settings of the R&S NRP2, by means of some basic power measurement examples. Included topics: ● B rief introduction to the operation, on page 24 provides a quick introduction on how to operate the instrument. -
Page 42: Brief Introduction To The Operation
Brief introduction to the operation Recommended first steps Before you set up a new measurement, we recommend that you preset the R&S NRP2. Thus, the instrument is in a defined initial state. This prevents any previous settings from causing incorrect results. In addition, a zero calibration of the sensors is required. Follow the steps in ... - Page 43 ® Getting Started R&S NRP2 Brief introduction to the operation Using the softkeys To quickly allocate the softkey to a menu item, all the menus open directly next to the softkey bar, i.e. on the right side of the display.
- Page 44 ® Getting Started R&S NRP2 Brief introduction to the operation Check boxes ► To toggle between the two states of "Global" press the right side of the softkey. Note: The left side of the softkey activates the entry of the "Global" value, see below' 'Entry fields'.
-
Page 45: Preset And Zeroing
When the preset is completed, the "File" menu disappears and the meter is in the preset state. The preset settings provide a reproducible initial basis for all other settings. For a detailed description of the R&S NRP2’s initial state including a list of the default parameters, see c hapter 4.1.1, "Preset hardkey", on page 61. - Page 46 Zeroing of all connected sensors is performed. The correction measurement takes several seconds. When completed, the R&S NRP2 displays a message indicating success or failure of zeroing. If zeroing fails, the most frequent cause for this error is a signal that is applied to the sensor and prevents zeroing.
-
Page 47: Measuring Average Power (Cont Av Mode)
After preset, one result window indicates the result (in dBm) obtained with sensor A. Fig. 2-3: Result window (dBm) Setting the frequency The R&S NRP2 must be set to the carrier frequency of the applied signal if the specified measurement accuracy is to be reached. To set the frequency 1. - Page 48 ® Getting Started R&S NRP2 Measuring average power (Cont Av mode) The dialog box for entering the frequency appears. Fig. 2-4: Frequency dialog box 3. Press the associated softkey to activate the entry of the frequency value. A digit panel is displayed to insert the frequency. The panel also includes unit letters.
- Page 49 The result is displayed in W. Fig. 2-6: Result window (W) Setting a fixed offset correction The R&S NRP2 provides an offset correction to the displayed measurement result. To set a fixed offset correction 1. Select the "Sensor" menu. The "Sensor" menu opens.
- Page 50 7. Press the ↵MENU hardkey twice to exit the dialog box and the menu. If you have connected an attenuator and entered its attenuation, the R&S NRP2 will display about the same value as before. User Manual 1173.9157.02 ─ 03...
- Page 51 Performing relative power measurements The R&S NRP2 calculates and displays also the relative difference between a measured value and a reference value. The reference value can be a measured value that has been saved or an arbitrary value that is entered.
- Page 52 ® Getting Started R&S NRP2 Measuring average power (Cont Av mode) "Reset" will set the current power result as new reference value. After the reset, rel- ative measurement is automatically active again. If the power has not changed in the meantime, the indicated value is close to 0 dB.
-
Page 53: Window Handling
↵MENU hardkey and press the "Arrange" softkey. 2.5 Window handling Up to four windows can be indicated simultaneously on the R&S NRP2‘s display. Each window can be configured for a separate measurement. The following examples show how to handle windows. - Page 54 ® Getting Started R&S NRP2 Window handling Fig. 2-17: Windows menu The cursor keys can, in most cases, be used to select windows instead of the soft- keys. This also applies to opened dialog boxes. 3. Select window 1. The third softkey is now labeled "Close | Expand".
- Page 55 ® Getting Started R&S NRP2 Window handling Opening, creating and closing windows. 1. Activate the analog display of results "D&A". 2. Switch to the "Measurement" menu and select "Relative On". 3. Return to the "Windows" menu. Window 1 now displays the "A Rel" function on an analog scale.
- Page 56 ® Getting Started R&S NRP2 Window handling Fig. 2-20: Result window / initialized / full height Display options 1. The "Dig" and "D&A" softkeys are used to select the display mode. The standard display mode is "Dig"ital measurement result. Fig. 2-21: Windows menu / digital display mode 2.
- Page 57 ® Getting Started R&S NRP2 Window handling Fig. 2-23: Windows menu / digital and analog display mode 3. Switch back to "Dig" display mode. Auxiliary values (Maximum, Minimum, Max, Min, …). 1. Select the "Measurement" menu. 2. Select "Function..." in this menu.
-
Page 58: Setting Measurement Functions
"Single". Performing ratio measurements 1. Connect the two sensors to connectors A and B on the R&S NRP2 and apply an unmodulated signal with a level between –10 dBm and +10 dBm to each of the sen- sors. - Page 59 ® Getting Started R&S NRP2 Setting measurement functions Fig. 2-27: Result windows / sensor A and B 3. Select the "Measurement" menu and then select "Function..." for window 1 this menu. 4. Open the "Function & Unit" dialog box. Fig. 2-28: Function & Unit dialog box / ratio In this dialog box, you can select the function used to calculate the result in the selected window.
-
Page 60: Graphically Representing Power Versus Time
If you wish to carry out measurements on signals with modulated power envelope (in the Burst or Timeslot mode), initially displaying the signal in the Trace mode is always recommended. Stable triggering by the R&S NRP2 can more easily be accomplished in this mode. - Page 61 ® Getting Started R&S NRP2 Graphically representing power versus time 3. Press the (PRE)SET hardkey twice. A measurement window appears. 4. Change to the "Sensor" menu and select "Mode". Fig. 2-31: Sensor menu 5. Switch to the "Trace & Statistics" mode.
- Page 62 ® Getting Started R&S NRP2 Graphically representing power versus time Note: If you do not see a trace, the trigger threshold probably does not match the signal. In this case, a highlighted appears in the info panel of the trace window.
- Page 63 ® Getting Started R&S NRP2 Graphically representing power versus time 6. Open the second page of the "Trigger" dialog box. Fig. 2-36: Trigger dialog box / page 2 7. Set the trigger delay time. If you set a positive value, the trigger event will become effective only after the selected period of time.
-
Page 64: Measuring Average Burst Power (Burst Av Mode)
10 kHz. Setting the burst mode. 1. Connect the power sensor to connector A on the R&S NRP2 and apply a pulsed signal with a level between –10 dBm and +10 dBm. 2. Press the (PRE)SET hardkey twice. - Page 65 ® Getting Started R&S NRP2 Measuring average burst power (Burst Av mode) The parameter "Dropout" helps to reliably detect the end of modulated-signal bursts (e.g. NADC). With unmodulated pulses as in this case, it should be set to 0. Fig. 2-39: Burst av result window For a detailed description of burst av power measurement, see ...
- Page 66 ® Getting Started R&S NRP2 Measuring average burst power (Burst Av mode) User Manual 1173.9157.02 ─ 03...
-
Page 67: Manual Operation
D ialog boxes and their control elements, page 53 3.2 Screen layout The R&S NRP2 screen displays the menu bar with the menu names and at least one or more measurement result window. The folded-out menu and the setting dialog boxes may overlay the result windows. - Page 68 NRP2 Screen layout The R&S NRP2 displays results in windows. A maximum of four windows can be dis- played simultaneously on the screen. They are numbered 1 to 4. Windows have a title bar which contains the number (fixed) and, optionally, the window name (user-definable).
-
Page 69: Menu Layout
3.3 Menu layout This section describes the menu provided by the R&S NRP2. The meter displays the menu names in the menu bar at the top of the screen. The menus are selected by the top-most rocker switch. - Page 70 ® Manual Operation R&S NRP2 Menu layout Sensor menu Windows menu Measurement File menu System menu menu Sensor menu All sensor settings can be made using the "Sensor" menu. The type and details of data acquisition can be specified with this menu.
-
Page 71: Menu Handling
® Manual Operation R&S NRP2 Menu handling 3.4 Menu handling The menus can contain up to eight menu items which are used to perform an action, open a dialog box or set a parameter. Perform an action If the menu contains only one or two descriptive terms, an action is performed directly. - Page 72 ↵MENU hardkey. Settings made in dialog boxes are immediately set on the R&S NRP2 - in other words you do not need to close the dialog box to activate the settings in the box.
- Page 73 ® Manual Operation R&S NRP2 Dialog boxes and their controls The editor is activated by pressing the appropriate rocker switch. Editing can be performed in overwrite mode, indicated by the marked character being in inverse video. Modifications can be made either with the ⇧ ⇩ cursor keys or numeric/digit softkeys which are provided in a digit or letter panel when the editor is activated.
- Page 74 ® Manual Operation R&S NRP2 Dialog boxes and their controls If you enter a new value with the digit/letter panel (see below), the new value has to be confirmed before it is accepted. The symbol ↵ appears above the editing field to indicate that the new value is not accepted until you confirm it with the ↵MENU hardkey.
-
Page 75: Display Windows
® Manual Operation R&S NRP2 Display windows 3.6 Display windows 3.6.1 Window sizes and types Results are displayed in the main section of the screen in windows. Windows come in three sizes: half height, quarter height and full height. In windows, measurement results are displayed digitally, in a combined digital and analog mode, and graphically. -
Page 76: Special Symbols
® Manual Operation R&S NRP2 Display windows "D&A" window, full height "D&A" window, half height "Dig" window, quarter height "D&A" window, quarter height You can expand all opened windows to full height by activating the "Expand" function from the "Windows" menu. In this state, the full-height windows can be displayed con- secutively using the window "1 2 3 4"... - Page 77 ® Manual Operation R&S NRP2 Display windows Duty cycle correction ON Trigger Offset correction ON Free-running trigger Twoport correction ON (S-param- Trigger event missing eter) Filter Single-shot mode, trigger expec- Averaging filter Single-shot mode, measurement over Filter size with auto-filter (normal...
- Page 78 ® Manual Operation R&S NRP2 Display windows Table 3-3: Symbols for time slot measurement Time slot start of measurement Time slot end of measurement Time slot length of measurement User Manual 1173.9157.02 ─ 03...
-
Page 79: Instrument Functions
Main Settings 4 Instrument Functions Chapter "Instrument functions" explains the functions of the R&S NRP2 and its options. The associated SCPI command is specified for each parameter (where applicable). The description starts with general instrument settings accessed by the SETUP hardkeys. - Page 80 ® Instrument Functions R&S NRP2 Main Settings ● absolute power measurement in dBm ● one window per channel opened ● offset: 0 dB ● automatic filtering (normal mode) (PRE)SET does not reset the following settings: ● offset tables ● address of the remote interface ●...
- Page 81 SCPI command: on page 235 C ALibration<[1]..4>: Z ERO: A UTO 4.1.3.2 Zeroing failure If the power measured during zeroing is too large, the R&S NRP2 reports an error. Fig. 4-3: Zeroing error message User Manual 1173.9157.02 ─ 03...
-
Page 82: Data Acquisition And Parameters
Depending on the options that have been installed, up to four sensors can be connected to the R&S NRP2. The sensors perform the complete power measurement from the acquisition of the RF signal to every aspect of result processing. All important parameters for configuring data acquisition are therefore entered in the "Sensor"... - Page 83 4.2.1.2, "Continuous average-power measure- ments", on page 66). "Trace&Statis- In the Trace & Statistics mode, the R&S NRP2 analyzes the power tics" envelope of the test signal and displays the power envelope either as a function of time or in its probability distribution and probability density distribution function (see ...
- Page 84 ® Instrument Functions R&S NRP2 Data acquisition and parameters "Burst Av" The Burst Average mode is used to measure the average burst power of pulsed signals. The acquisition interval is automatically derived from the signal (see c hapter 4.2.1.3, "Measuring the average power of burst signals", on page 68).
- Page 85 ® Instrument Functions R&S NRP2 Data acquisition and parameters The more modulation periods fit into an acquisition interval, the less critical it is whether N is an integer or not. With smoothing on, about five periods are enough to reduce fluc- tuations caused by modulation to an acceptable level - if N is not an integer.
- Page 86 ® Instrument Functions R&S NRP2 Data acquisition and parameters 4.2.1.3 Measuring the average power of burst signals The "Burst Av" mode is the simplest way of measuring the average burst power. It is available with the multipath power sensors (R&S NRP-Z11/21/22/23/24/28/31/32) and the R&S NRP-Z8x wideband power sensors.
- Page 87 ® Instrument Functions R&S NRP2 Data acquisition and parameters Excluded from Start/End Set the time interval at the beginning or end of the burst that is excluded from the mea- surement. SCPI command: on page 281 [ SENSe<[1]..4>]: T IMing: E XCLude: S TOP...
- Page 88 ® Instrument Functions R&S NRP2 Data acquisition and parameters No of Timeslots Sets the number of subsequent timeslots within a frame, i.e. a period of the signal. SCPI command: on page 275 [ SENSe<[1]..4>][: P OWer]: T SLot: C OUNt...
- Page 89 ® Instrument Functions R&S NRP2 Data acquisition and parameters Start/Length of Fence ← Config Fence … Within the measurement period, a "fence", i.e. an exclusion interval, can be set. The fence is defined by its start time and length. The start time refers to the start of a timeslot.
- Page 90 ® Instrument Functions R&S NRP2 Data acquisition and parameters The end of the gate is determined by the start time and the length of the gate. SCPI command: on page 273 [ SENSe<[1]..4>][: P OWer]: T GATe<[1]..4>: O FFSet: T IME...
- Page 91 ® Instrument Functions R&S NRP2 Data acquisition and parameters signal. Samples at equal time intervals over each acquisition interval are taken. From the sum of the samples partial measurement results are formed. By forming the difference from adjacent acquisitions, an improved result is achieved, that is, the DC offset voltage and 1/f noise of the sensor amplifiers are significantly reduced.
- Page 92 ® Instrument Functions R&S NRP2 Data acquisition and parameters are needed. Taking a 100 µs idle time of these sensors into consideration, a reduction of the aperture time even below 500 µs will merely speed up measurements but significantly increase noise.
- Page 93 ® Instrument Functions R&S NRP2 Data acquisition and parameters Dropout Power Last falling edge in the burst Trigger event Trigger threshold Time Excluded from End Excluded from Start Measurement interval Fig. 4-11: Timing diagram of burst signals Timing diagram of T'Slot Av signals...
-
Page 94: Offset Correction
® Instrument Functions R&S NRP2 Data acquisition and parameters Trigger event (internal) Trigger threshold (internal) Measurement interval # Time Excluded from End Width Fig. 4-13: Measurement on timeslot signal with internal triggering 4.2.2 Offset correction The "Offset" dialog box is for activating and entering dB offsets to effect an increase or decrease in the measurement result which is not level-dependent. - Page 95 ® Instrument Functions R&S NRP2 Data acquisition and parameters Fig. 4-14: Offset dialog box A | B | C | D Tabs for selecting the sensor. Note: In remote-control commands, select the sensor with the suffix in command SENSe<[1]..4>:..., i.e. choose suffix 1 for channel A, channel 2 for B, and so on.
- Page 96 268 [ SENSe<[1]..4>]: C ORRection: S PDevice: S TATe 4.2.2.2 Table editor for offset tables The R&S NRP2 provides a list editor for defining the frequency / offset value pairs. Two table-editor modes are available: ● Selection mode In this mode, using the cursor keys ⇧...
- Page 97 ® Instrument Functions R&S NRP2 Data acquisition and parameters Edit Activates the edit mode in the selected field. The entry can be confirmed with the ↵MENU or aborted with the ESC/LOCAL key. After- wards, the table editor is again in the selection mode.
- Page 98 ® Instrument Functions R&S NRP2 Data acquisition and parameters acquisitions have been evaluated. The oldest result is taken out of the averaging filter and a new average value is calculated. The averaging number can be selected automatically or it can be manually set to a fixed value.
- Page 99 ® Instrument Functions R&S NRP2 Data acquisition and parameters This entry field always shows the current averaging number. With automatic averaging, the displayed value is grayed out and cannot be changed manually. If manual filtering is selected, the desired averaging number can be set. Changes are immediately imple- mented when a key is pressed.
-
Page 100: Measurement Ranges
® Instrument Functions R&S NRP2 Data acquisition and parameters Ref Timeslot ← Auto Config... Specifies the timeslot from which the autofilter setting, i.e. the averaging number, is derived for measurements in the "T'slot Av" mode. This parameter is not available in the other measurement modes. - Page 101 ® Instrument Functions R&S NRP2 Data acquisition and parameters The performance of the sensors can effectively be improved by this measure with respect to linearity errors when applying signals with high peak-to-average ratios. However, there is a certain downside regarding speed and noise. If an offset value of e.g. -10 dB is entered, this means that paths can be underdriven by an amount of 10 dB with respect to the default setting.
-
Page 102: Effect Of The Rf Source
® Instrument Functions R&S NRP2 Data acquisition and parameters Offset Negative dB value as a measure for the shift of the transition region(s). Modifications are immediately effective after each keystroke (see c hapter 3.5, "Dialog boxes and their controls", on page 53). - Page 103 ® Instrument Functions R&S NRP2 Data acquisition and parameters Source Γ Magnitude Magnitude of the source reflection coefficient Γ. SCPI command: on page 277 [ SENSe<[1]..4>]: S GAMma[: M AGNitude] Source Γ Phase Phase angle of the source reflection coefficient Γ in degrees.
- Page 104 ® Instrument Functions R&S NRP2 Data acquisition and parameters "Single" "Trace&Statistics" mode only. This setting disables continuous trigger- ing so that only one trigger event at a time is executed. To enable trig- gering again, press the (DEL/1TRIG) key. The symbol appears in the display (see ...
- Page 105 ® Instrument Functions R&S NRP2 Data acquisition and parameters The falling edge of the trigger signal is active. "Negative" SCPI command: on page 330 T RIGger<[1]..4>: S LOPe Level Sets the trigger threshold for internal triggering. Depending on the slope polarity, a rising or a falling edge will execute a trigger event when crossing the threshold.
- Page 106 ® Instrument Functions R&S NRP2 Data acquisition and parameters Dropout ← Trigger dialog box (2) Sets the dropout time. The dropout time prevents the trigger system from being activated by signal excursions prior to the trigger event targeted. The parameter is set to a value that is slightly higher than the maximum duration of power drops that are supposed to execute triggering.
-
Page 107: Trigger Sequence Control
® Instrument Functions R&S NRP2 Data acquisition and parameters Modifications of the holdoff time are effective immediately (see c hapter 3.5, "Dialog boxes and their controls", on page 53). Page ← Trigger dialog box (3) Switches to the next page of the dialog box. -
Page 108: Displaying Measurement Results
The R&S NRP2 provides a total of four windows for displaying results. 4.3.1 Arranging windows Windows are displayed in numerical order from the top to the bottom of the screen. The R&S NRP2 automatically selects the window size according to the number of displayed windows. User Manual 1173.9157.02 ─ 03... -
Page 109: The Windows Menu
® Instrument Functions R&S NRP2 Displaying measurement results Fig. 4-23: Arranging windows 4.3.2 Labeling windows The windows are numbered from 1 to 4 and are therefore clearly identifiable. By default, they are labeled by the window’s number (1 to 4). The label is displayed in the top left of the title bar. - Page 110 ® Instrument Functions R&S NRP2 Displaying measurement results 4.3.3.1 Selecting a window The window to be configured is selected by the tab. Window dialog box tabs Each window is assigned a tab. All the parameters settings in the "Window" dialog box act on the selected window.
- Page 111 ® Instrument Functions R&S NRP2 Displaying measurement results Full height windows display all relevant parameters. The enhanced control functions offered by the "Trace & Statistics" mode are available only if the windows are full height. For a graphical representation of the various window types and a description of symbols see ...
- Page 112 ® Instrument Functions R&S NRP2 Displaying measurement results "D&A" The hybrid digital & analog display mode shows the measured value on an analog scale and numerically. "Graph" In the graphical display mode, the power meter displays the envelope power as a function of time or in its distribution and distribution density function (CCDF, CDF, PDF).
- Page 113 ® Instrument Functions R&S NRP2 Displaying measurement results Fig. 4-26: Display mode-specific settings The available configuration parameters depend on the selected display mode. ● "Dig" In the digital display, the resolution is adjustable, see S etting the resolution. For "TimeSlot AV" measurements, the timeslot to be displayed can be chosen.
-
Page 114: Configuring Measurements
246 D ISPlay[: W INDow]<[1]..4>: T SLot 4.4 Configuring measurements The R&S NRP2 can perform up to four measurements simultaneously. Each measure- ment is configured separately in a window. Measurement parameters are set in the "Measurement" menu. For every window opened via the "Windows" menu, a measurement in the "Measure- ment"... -
Page 115: The Measurement Menu
® Instrument Functions R&S NRP2 Configuring measurements Configuring a measurement does not change the sensor operating modes that have been set in the "Mode" menu. In remote control mode, the instrument allows the configuration of a total of 8 measure- ments. - Page 116 4.5, "Displaying traces", on page 112 The R&S NRP2 can display the measurement result of one channel (sensor) or combine measured values from two channels (sensors) using a mathematical function and display the result in the selected window. The necessary settings are made in the "Function..."...
- Page 117 Function The list of functions itemizes all the measurement functions provided by the R&S NRP2. Any of the four channels can be assigned primary or secondary channel. The available units depend on the selected function, see tables ...
- Page 118 "Prim. / Sec. channel " if impedance measurement func- tions such as "SWR", "RCoeff" and "RLoss" are selected. 4.4.3.2 Measuring power in gates For time-gated power measurements the R&S NRP2 power meter offers two modes: ● T'gate Av ●...
- Page 119 ® Instrument Functions R&S NRP2 Configuring measurements Fig. 4-32: Measurement within a gate (T'gate Av mode) Trace & Statistics In this mode, the peak power (Pk) or the Pk/Av ratio can be measured within a user- definable gate in addition to the average power (Av). However, the time resolution is limited to the length of one point (pixel) of the display.
- Page 120 ® Instrument Functions R&S NRP2 Configuring measurements Fig. 4-34: Measurement within a gate (Trace&Statistics mode/Dig display mode) In "Dig"/"D&A" display modes, the results can be correlated to any other measured value ("Function"). If you want to combine the measurement results of different channels by using functions, not all combinations are supported.
- Page 121 Reading out values on page 223 C ALCulate<[1]..8>: D ATA? 4.4.3.3 Measuring power in timeslots As with time-gated power measurements, the R&S NRP2 power meter also offers two measurement modes for measurements within timeslots ● T'Slot Av ● Trace & Statistics...
- Page 122 ® Instrument Functions R&S NRP2 Configuring measurements To configure the measurement of Av, Pk and Pk/Av ratio: 1. Select "Trace & Statistics" in the "Mode" dialog box of the "Sensor" menu 2. Select "T'slot" mode in the "Display" control panel of the Trace display 3.
- Page 123 ® Instrument Functions R&S NRP2 Configuring measurements Fig. 4-39: Function & Unit dialog box, sensors are operated in timeslot mode Timeslot Determines which timeslot is to be evaluated. Only one value for both channels can be selected. Eval. This selection is only available in the "Trace & Statistics" mode. In the T'Slot Av mode, evaluation is fixed to 'Avg' = average power in the timeslot.
- Page 124 I.e. absolute power values are displayed in W, dBm or dBμV , and relative values in 1, dB or Δ%, respectively. The following tables show how the R&S NRP2 calculates the measurement results for the different units either in absolute notation or relative to a reference value, see ...
- Page 125 ® Instrument Functions R&S NRP2 Configuring measurements Table 4-5: Formulas for sum and difference of power Unit Function dbμV Sum (A+B) P ...
- Page 126 58 for information concerning the displayed symbols and values. The R&S NRP2 continuously saves the data that is required for the display of extreme and statistic values. The data memory can be erased any time with "Aux Val Reset" in the "Measurement"...
- Page 127 The reference value can be a previously stored reading or an entered value. The R&S NRP2 calculates the ratio of measurement result and reference value and the rel- ative deviation of the measured value from the reference value and indicates the result.
-
Page 128: Limit Monitoring
® Instrument Functions R&S NRP2 Configuring measurements 4.4.4.1 Relative The "Relative" settings activate or deactivate relative power measurement, or assign a measurement result as reference. Off On Reset Relates a power or a power ratio to a reference value. "Off"... - Page 129 C ALCulate<[1]..8>: L IMit: B EEP 4.4.6 Resetting auxiliary information For each window, the R&S NRP2 continuously saves data that is required for displaying the extreme values and statistical values. These values can be reset any time. To reset the auxiliary values press the lowest softkey in the "Measurement" menu.
-
Page 130: Displaying Traces
4.5.1 Basic settings for trace display The trace display can be quickly selected after a preset. 1. Connect a sensor to the R&S NRP2 (any channel). The sensor must support trace measurements (true for all sensors except for the R&S NRP-Z9x, R&S NRP-Z5x, and R&S NRP-Z27/-Z37 sensors) - Page 131 ® Instrument Functions R&S NRP2 Displaying traces 6. Only for R&S NRP-Z8x wideband power sensors and if a time resolution beyond the sample period is required: Enable automatic activation of "Equivalent Time Sampling". 7. Close the "Mode" dialog (MENU key).
- Page 132 NRP2 Displaying traces In full height window, the R&S NRP2 provides additional control elements such as trigger, marker or scale-setting parameters in the control panel on the right of the screen. At the bottom of the screen, info panels indicate measurement results or instrument settings.
- Page 133 ® Instrument Functions R&S NRP2 Displaying traces Fig. 4-46: Trace display mode Plot = channel / meas. function; display type VBW / Avg = video bandwidth / averaging number Trigger = trigger slope and source Offset / dB = level offset to take gain/attenuation at the sensor input into account The following sections describe the functions of the control panel and diagram settings in detail.
- Page 134 ® Instrument Functions R&S NRP2 Displaying traces Trace Func ... Opens the "Trace Function" subdialog, see c hapter 4.5.3.4, "Trace function settings", on page 118. One or two waveforms can be selected for display. Each waveform rep- resents either the absolute envelope power of one measurement channel over time or it represents the ratio of the envelope power of two channels over time.
- Page 135 ® Instrument Functions R&S NRP2 Displaying traces Unit Sets the result unit. 4.5.3.3 Filtering settings You can smooth the trace in the "Average" display by means of an averaging filter. For this purpose, a number of sweeps are recorded and the power of points of the same position in time is averaged ("Trace Averaging").
- Page 136 ® Instrument Functions R&S NRP2 Displaying traces Fig. 4-48: Filter dialog box in Trace display mode A | B | C | D Tabs for selecting the sensor. Note: In remote-control commands, select the sensor with the suffix in command SENSe<[1]..4>:..., i.e.
- Page 137 ® Instrument Functions R&S NRP2 Displaying traces Trace 1 / 2 Selects the trace (waveform) to be configured. Up to two traces can be selected. This is also true if only one measurement channel (sensor) is present. In this case, one trace for example can represent the average enve- lope power and the other trace the peak or random power (available for the R&S NRP-...
- Page 138 ® Instrument Functions R&S NRP2 Displaying traces Fig. 4-50: Gates display mode Gate = channel; measurement function; display type Average = average power within gate Peak = peak power within gate Peak / Avg = peak power / average power (ratio) within gate...
- Page 139 ® Instrument Functions R&S NRP2 Displaying traces Define calculation of measurement result: on page 223 C ALCulate<[1]..8>: F EED<[1]|2> Read result: on page 209 F ETCh? 4.5.4.1 Measurement results The measured values for the selected gate and trace (waveform) are indicated in the info panel below the graph (see also ...
- Page 140 ® Instrument Functions R&S NRP2 Displaying traces "[3] [4]" Sets the fence, provided "Fence" has been activated in the "Config Gates" dialog box, see c hapter 4.5.4.3, "Gate diagram settings", on page 122. This setting applies to R&S NRP-Z8x wideband power sensors only.
- Page 141 ® Instrument Functions R&S NRP2 Displaying traces Within the measurement period, a "fence", i.e. an exclusion interval, can be set. The fence is defined by its start time and its length. The start time refers to the start of the gate.
- Page 142 ® Instrument Functions R&S NRP2 Displaying traces 4.5.5.1 Controls in Marker display mode Display Selects another view, see c hapter 4.5.2, "Trace window", on page 113. Config Marker... Opens the subdialog to manually define the marker positions, see ...
- Page 143 4.5.6 Pulse display mode The R&S NRP2 performs automatic analysis of pulsed signals (with wideband power sensor R&S NRP-Z-Z8x only). The measurement is either performed over the visible portion of the trace (entire screen width), or within the active gate of the selected trace (waveform).
- Page 144 ® Instrument Functions R&S NRP2 Displaying traces Fig. 4-55: Definition of the pulse analysis parameters 4.5.6.1 Controls in Pulse display mode Display Selects another view, see c hapter 4.5.2, "Trace window", on page 113. Config Pulse... Opens the subdialog to configure the pulse analysis and to select the power/time param- eters for the info panel display, see ...
- Page 145 Window→Graph→"Display"→"Pulse" control panel ("Trace&Statistics" sensor mode). The R&S NRP2 indicates the total number of the activated parameters in the header of the dialog box. You can activate up to 6 items out of 15 for display. As a prerequisite of pulse analysis, the parameters selected for display must be included in the analysis window.
- Page 146 ® Instrument Functions R&S NRP2 Displaying traces Pulse Measurements / Power Fig. 4-57: Pulse Measurements / Power tab The pulse power parameters to be displayed in the info panel are selected on the "Power" tab. Indication of the power of the pulse top / base, defined in the ...
- Page 147 ® Instrument Functions R&S NRP2 Displaying traces "Reference" This reference level is used to define the pulse width, pulse start time and pulse stop time. "Ref's related Selects how the threshold parameters are to be interpreted, either volt- to" age related or power related. Changing from a power based definition to a voltage based definition and vice versa affects the analysis, because different points of the waveform are analyzed.
- Page 148 ® Instrument Functions R&S NRP2 Displaying traces ► Select "T'Slots" in the control panel opened via the Window→Graph→"Display" dialog box ("Trace&Statistics" sensor mode). Fig. 4-59: T'Slot display mode Slot = channel, measurement function, display type Average = average power within the selected timeslot...
- Page 149 ® Instrument Functions R&S NRP2 Displaying traces Select sensor function: on page 268 [ SENSe<[1]..4>]: F UNCtion[: O N] Define calculation of measurement result: on page 223 C ALCulate<[1]..8>: F EED<[1]|2> Read result: on page 209 F ETCh?...
- Page 150 ® Instrument Functions R&S NRP2 Displaying traces Trigger Opens the "Trigger" dialog box. For description refer to c hapter 4.2.6, "Trigger settings", on page 85. Slot Selects a timeslot for which the power values in the info panel are displayed.
- Page 151 ® Instrument Functions R&S NRP2 Displaying traces Example: If measurements are performed on TDMA signals (GSM/EDGE, PDC, NADC, PHS etc), the nominal timeslot length must be entered here, i.e. the frame length divided by the number of timeslots. Table 4-10: GSM signal Frame length: 4.615 ms...
- Page 152 ® Instrument Functions R&S NRP2 Displaying traces ► Select "Stat's" in the control panel opened via the Window→Graph→"Display" dialog box ("Trace&Statistics" sensor mode). Fig. 4-61: Statistics display mode with one trace Fig. 4-62: Statistics display mode with two traces (AWGN) From the gathered samples, four parameters for each trace are indicated in the info panel: ●...
- Page 153 ® Instrument Functions R&S NRP2 Displaying traces Config Grid... Activates the additional tabular display of values or opens the subdialog to configure the diagram and to numerically set the marker positions, see c hapter 4.5.8.2, "Statistics dia- gram settings", on page 135.
- Page 154 ® Instrument Functions R&S NRP2 Displaying traces Activating tabular indication of statitical values for CDF and CCDF ► Select "Stat's Config..." in the control panel opened via the Window→Graph→"Dis- play"→"Stat's" → control panel ("Trace&Statistics" sensor mode). Fig. 4-63: Statistics display with additional table The table always indicates the logarithmic values independent of the settings for the graph.
- Page 155 ® Instrument Functions R&S NRP2 Displaying traces Y Start ← Stat's Config / Scale Enters the start value of the Y axis. Depending on the distribution function only a restricted range of value or no entry at all is allowed.
- Page 156 ® Instrument Functions R&S NRP2 Displaying traces Fig. 4-66: Stat's Function dialog box Statistics evaluation function Note: A linear (lin) or logarithmic (log) scale is available for "CCDF" and "CDF". The "PDF" can only be displayed linearly. "CCDF" Complementary Cumulative Distribution Function. Displays the proba- bility of the envelope power being higher than the corresponding X axis power value.
-
Page 157: Management Of Settings
After "Preset", the sensors operate in "Cont Av" mode with sensor-specific aperture time. 4.6.2 Storing user-defined settings The R&S NRP2 provides 19 memory spaces in which complete device settings can be stored (Setup memory). Settings can be stored by using the "Save Setup" dialog box of the "File"... - Page 158 ® Instrument Functions R&S NRP2 Management of settings Fig. 4-67: Save Setup dialog box Select setting Selects a memory space. Setup Name Names or renames the selected memory space. A letter panel opens after pressing the associated softkey. SCPI command: ...
-
Page 159: Loading Settings For Mobile Radio Standards
® Instrument Functions R&S NRP2 Management of settings Recall Loads the selected setting. After the settings are loaded successfully, the dialog box closes automatically. The same effect can be achieved by pressing the ↵MENU key. SCPI command: on page 196 * RCL... -
Page 160: Programming Aids
If the device is already in the remote state, the menu bar is replaced and the error list can be opened with the topmost softkey. ↵DEL If the "Error List" is open, the error queue of the R&S NRP2 can be deleted by pressing the DEL/1TRIG hardkey. SCPI command: ... -
Page 161: System Settings
The R&S NRP2 provides different interfaces for remote control. The settings are config- ured in the "Remote Interfaces" dialog box. In addition, the R&S NRP2 supports command sets of power meters from other manu- facturers. Thus, it is possible for example, to conveniently replace a power meter by the R&S NRP2. - Page 162 ® Instrument Functions R&S NRP2 System settings Overview of the remote control interfaces The following table gives a detailed overview on the supported interfaces. Table 4-11: Remote control interfaces and protocols Interface Remarks Protocols, VISA address string GPIB (IEC/ The GPIB bus interface according to standard IEC 625.1/IEEE...
- Page 163 The available instrument types are listed. This feature allows to replace a power meter by an R&S NRP2 in existing test setups. Refer to Application Note 1G83 at the download area of the product site on the Internet for details and up-to-date information (http:// www.rohde-schwarz.com/product/nrp2.html).
- Page 164 4.7.1.2 GPIB settings Fig. 4-74: Remote Interfaces / GPIB For configuring the R&S NRP2 for remote control using the GPIB interface, just enter its GPIB address. GPIB Address Selects the address in the range 0 to 30 (factory preset is 20). The set GPIB address is unchanged after a reset of the instrument settings.
- Page 165 R&S NRP2 and the IP address for the local default gateway from your network adminis- trator. If the network consists only of the R&S NRP2 and the control computer, the two units can be connected with each other directly using a special network crossover cable. The IP addresses can be selected according to the following table: User Manual 1173.9157.02 ─...
- Page 166 ® Instrument Functions R&S NRP2 System settings Table 4-12: Example of a network configuration for a direct R&S NRP2 – PC connection using a cross- over cable. R&S NRP2 "IP Address" 192.168.0.2 192.168.0.1 "Mask" 255.255.255.0 255.255.255.0 "Gateway" 192.168.0.3 192.168.0.3 DHCP ← IP Config Fig.
- Page 167 4.7.2 Setting the analog outputs and the trigger input There are two multifunction BNC connectors at the rear of the R&S NRP2 (TRIG IN / OUT2 and OUT1 / TRIG OUT). They can be used as either trigger input or trigger output, or as analog output.
- Page 168 ® Instrument Functions R&S NRP2 System settings Fig. 4-80: I/O dialog box For background information on the analog outputs see c hapter 4.7.2.3, "Voltage at the analog outputs", on page 155. 4.7.2.1 Out1 interface This section describes the functions of the analog signal output at the "OUT1 / TRIG OUT"...
- Page 169 ® Instrument Functions R&S NRP2 System settings Fig. 4-82: Out1 mode / Analog SCPI command: on page 256 O UTPut: R ECorder<[1]..2>[: S TATe] Window 1 2 3 4 ← Analog ← Mode Selects the window the output refers to.
- Page 170 ® Instrument Functions R&S NRP2 System settings Fig. 4-83: Out1 mode / Pass/Fail SCPI command: on page 258 O UTPut: T TL[: S TATe] Window 1 2 3 4 ← Pass/Fail ← Mode Selects the window the output refers to.
- Page 171 ® Instrument Functions R&S NRP2 System settings Fig. 4-84: Out1 mode / TrigOut The trigger signal is either supplied by one of the connected sensors, i.e. the trigger master, or via the "TRIG IN / OUT2" socket, see c hapter 4.2.6, "Trigger settings",...
- Page 172 ® Instrument Functions R&S NRP2 System settings Fig. 4-86: I/O / I/O 2 tab Mode Selects the function of the TRIG IN / OUT2 connector. "Analog Out" and "Trigger In" are available. Note: For remote control, only suffix 2 is allowed in the command header for the setting theTRIG IN / OUT2 connector functions.
- Page 173 66. The time between two updates of the output voltage is approximately twice the length of the aperture time. The lower limit of this length of time, during which the R&S NRP2 can still regularly update the output voltage, depends on the User Manual 1173.9157.02 ─ 03...
-
Page 174: System Information
For applications having high requirements on the dynamic behavior of the analog outputs, for example leveling loops, it is advisable to freeze the screen of the R&S NRP2 to avoid interruptions caused by writing to the display memory (... - Page 175 on page 322 S YSTem: S ENSor<[1]..4>: I NFO? 4.7.4.2 Information on the R&S NRP2 ► Select "System Info..." in the "System" menu. Fig. 4-90: System info dialog (System info) The system info dialog displays information concerning hardware and firmware of your R&S NRP2.
- Page 176 Firmware Keybd. Ctrl. Version of the keyboard controller software. Options Short name of the installed options. Hardware Serial No Serial number of the R&S NRP2. Stock No R&S material number. MAC Address Ethernet hardware address. RAM size. Flash Flash memory size, holding the operating system, the firmware and the stored data (non-volatile).
- Page 177 Since the scope of testing is limited, test measurements cannot replace a regular reca- libration of the sensor. The "Test..." function offers tests for the internal circuitry of the sensor (selftest 1) as well as simple tests with applied RF (option R&S NRP2-B1 required). User Manual 1173.9157.02 ─ 03...
- Page 178 ® Instrument Functions R&S NRP2 System settings 4.7.6.1 Internal sensor selftest ► Open the "Sensortest" dialog box in the "System"→"Test..." menu. Fig. 4-92: Sensortest dialog box / page 1 The first page of the "Sensortest" dialog box covers the settings for performing an internal selftest of the sensor without using the reference signal.
- Page 179 NRP2 System settings 4.7.6.2 Sensor test with applied RF Testing the sensor with the RF reference signal requires option R&S NRP2-B1, Sensor Check Source. ► Open the "Sensortest" dialog box in the "System"→"Test..." menu and select the sec- ond page.
- Page 180 When the dialog box opens, it shows the data of the sensor last tested. The measured values are lost when the R&S NRP2 is switched off. Fig. 4-97: Sensor test report, page 1 Page 1 shows the test results for the sensor section.
-
Page 181: Messages And Alarms
R&S NRP2 Messages and alarms With multipath power sensors (R&S NRP-Z11, R&S NRP-Z21/22/23/24/28, R&S NRP- Z31 and R&S NRP-Z91/92/98), the R&S NRP2 displays the test result of each individual path separately. Config… Open the dialog box for entering tolerance limits. -
Page 182: Errors And Warnings
® Instrument Functions R&S NRP2 Messages and alarms 4.8.1 Errors and warnings Overload Fig. 4-100: Error message / Overload One or more sensors are subjected to overload. NOTICE! Overload can destroy the sensor (depending on the amount of power and the duration of the overload condition). - Page 183 ® Instrument Functions R&S NRP2 Messages and alarms Sample Error Fig. 4-102: Error message / Sample Error The message indicates that samples were lost while sampling the signal. The measured value can thus be incorrect. Trunc. Meas. Fig. 4-103: Error message / Trunc. Meas.
- Page 184 Automatic window initialization Fig. 4-105: Information / New Window If an additional sensor is connected to the R&S NRP2 during operation and if no currently open window displays the values measured in the channel concerned, the R&S NRP2 automatically offers to open a window and to configure it for measurements with the additional sensor connected.
-
Page 185: Remote Control Fundamentals
NRP2 Differences between Remote Control and Manual Control 5 Remote Control Fundamentals The Power Meter R&S NRP2 is equipped with various interfaces that can be connected to a controller for remote control. ● IEC/IEEE-bus interface (standard equipment) in line with the standards IEC 60625.1 (IEEE 488.1) and IEC 60625.2 (IEEE 488.2) -
Page 186: Connecting A Controller To The Base Unit
5.1.3 Calculate Blocks The R&S NRP2 manages 8 internal calculate blocks. Each calculate block has two input channels (primary and secondary channel) to which one of up to 4 power sensors can be assigned. The channels can be processed together by means of a selectable function. -
Page 187: Hardware Requirements
4. Enter the port address ("PortNo"). Incoming connections from a controller have to use this port number in order to establish a connection to the R&S NRP2. 5. Define the IEEE protocol mode. For example select "IEEE 488.0" mode in order to use raw socket communication. -
Page 188: Switchover To Remote Control (Remote)
Switchover to Remote Control (REMOTE) GPIB (IEC/IEEE bus) In order to remote control the R&S NRP2 via the GPIB bus, a controller with the respective bus interface and the bus cable is required. The R&S NRP2 automatically recognizes a controller connected to the USB1.1 interface. -
Page 189: Communication On Data Lines
The GPIB bus is the most common remote interface for measuring instruments. It has also been implemented in the R&S NRP2. The remote controller and the R&S NRP2 communicate by means of messages. The messages sent on the data lines (... - Page 190 5.6.2.1 Commands Commands are messages sent by the controller to the R&S NRP2. They control the device functions and request information. The commands are classified according to the effect they have on the device: ●...
-
Page 191: Structure And Syntax Of Device-Dependent Messages
® Remote Control Fundamentals R&S NRP2 Structure and Syntax of device-dependent Messages 5.6.2.2 Responses Responses are messages sent by the device to the controller after a query. This may be measurement results, for instance, or device status information. 5.7 Structure and Syntax of device-dependent Messages 5.7.1 SCPI Standard... - Page 192 ® Remote Control Fundamentals R&S NRP2 Structure and Syntax of device-dependent Messages 5.7.2.2 Device-specific Commands Hierarchy Device-specific commands have a hierarchical structure, see tree, S CPI command f ig- 5-1. The various levels are represented by compound headers. Headers at the high- est level (root level) have one keyword only.
- Page 193 ® Remote Control Fundamentals R&S NRP2 Structure and Syntax of device-dependent Messages compatibility with the SCPI standard, the device must be able to recognize the full length of the command. Some of the commands become considerably shorter when the optional keywords are omitted.
-
Page 194: Structure Of A Program Message
® Remote Control Fundamentals R&S NRP2 Structure and Syntax of device-dependent Messages Example: SENSe2:FUNCtion "POWer:AVG" This command sets the measurement mode of sensor 2 to the ContAv mode. 5.7.3 Structure of a Program Message A program message may contain one or several commands. Several commands in a program message are separated by a semicolon (;). -
Page 195: Responses To Queries
® Remote Control Fundamentals R&S NRP2 Structure and Syntax of device-dependent Messages Processing of a program message is aborted if an error occurs. If only sensor 2 is con- nected to a multichannel device, for example, the program message SENS1:FREQ 50 GHZ;:SENS2:FREQ 50 GHZ will be aborted after the first command and a second frequency setting will not be per- formed. - Page 196 O or DPCT. The unit DPCT designates the deviation of a measurand from 100%. A power ratio of 95% thus corresponds to -5Δ%. SCPI notation Unit used in the R&S NRP2 Watt dBµV DBUV O (as in One) Δ%...
- Page 197 ® Remote Control Fundamentals R&S NRP2 Structure and Syntax of device-dependent Messages MIN/MAX MINimum and MAXimum denote the minimum and maximum value. DEFault denotes a preset value. This value is identical to the basic setting called by the *RST command.
-
Page 198: Device Model And Command Processing
® Remote Control Fundamentals R&S NRP2 Device Model and Command Processing The ASCII character # denotes the beginning of the data block. The next numeral speci- fies the number of subsequent digits defining the length of the data block. In the example above, the four digits specify a length of 9600 bytes. -
Page 199: Data Base And Device Hardware
® Remote Control Fundamentals R&S NRP2 Device Model and Command Processing 5.8.3 Data Base and Device Hardware The term "device hardware" refers to that part of the device which performs the mea- surement function. The data base contains all parameters required for setting the device hardware. Setting commands cause a modification of the data set. -
Page 200: Automatic Settings For Manual Selection Of A Measurement Mode
Programming of controller *OPC Sets the Operation Complete bit in the ESR Set bit 0 in the ESE of the R&S NRP2. after all commands sent prior to *OPC have Set bit 5 in the SRE of the R&S NRP2. - Page 201 ® Remote Control Fundamentals R&S NRP2 Automatic Settings for Manual Selection of a Measurement Mode SCPI command Value Remark TRIGger[1..4]:SLOPe Unchanged, is irrelevant. TRIGger[1..4]:COUNt Cannot be modified in manual mode. TRIGger[1..4]:DELay Unchanged, is irrelevant. TRIGger[1..4]:HOLDoff Depends on sensor User-selectable. TRIGger[1..4]:LEVel Depends on sensor User-selectable.
-
Page 202: Correspondence Between Remote Control And Manual Control
® Remote Control Fundamentals R&S NRP2 Correspondence between Remote Control and Manual Control SCPI command Value Remark TRIGger[1..4]:SOURce EXTernal | User-selectable. INTernal TRIGger[1..4]:SLOPe POSitive | User-selectable. NEGative TRIGger[1..4]:COUNt Cannot be modified in manual mode. TRIGger[1..4]:DELay Cannot be modified in manual mode. - Page 203 ® Remote Control Fundamentals R&S NRP2 Correspondence between Remote Control and Manual Control Menu item in manual control SCPI command in short form Sensor→Mode→Timeslot→Fence→Length SENS[1..4]:TSL:EXCL:MID:TIME SENS[1..4]:TGAT:SEL Sensor→Mode→T'gate→Gate # Sensor→Mode→T'gate→Start of Gate SENS[1..4]:TGAT[1..4]:OFFS:TIME SENS[1..4]:TGAT[1..4]:TIME Sensor→Mode→T'gate→Length SENS[1..4]:TGAT[1..4]:EXCL:MID:OFFS Sensor→Mode→T'gate→Fence→Start SENS[1..4]:TGAT[1..4]:EXCL:MID:TIME Sensor→Mode→T'gate→Fence→Length SENS[1..4]:TRAC:POIN Sensor→Mode→Trace & Statistics→Points SENS[1..4]:CORR:OFFS...
- Page 204 ® Remote Control Fundamentals R&S NRP2 Correspondence between Remote Control and Manual Control Menu item in manual control SCPI command in short form Sensor→Filter→Auto Config...→Fixed SENS[1..4]:AVER:COUN:AUTO:NSR Noise→Noise Content In Trace mode: SENS[1..4]:TRAC:AVER:COUN:AUTO:NSR SENS[1..4]:AVER:COUN:AUTO:MTIM Sensor→Filter→Auto Config...→Fixed Noise→Max. Settl. Time In Trace mode: SENS[1..4]:TRAC:AVER:COUN:AUTO:MTIM...
- Page 205 ® Remote Control Fundamentals R&S NRP2 Correspondence between Remote Control and Manual Control Menu item in manual control SCPI command in short form Windows→Analog Meter... →Right DISP[1..4]:MET:UPP DISP[1..4]:ANAL:UPP CALC[1..8]:MATH:EXPR Measurement→Function...→Primary Channel Measurement→Function...→Secondary Chan- Measurement→Function...→Function UNIT:POW and UNIT:POW:RAT Measurement→Function...→Unit DISP[1..8]:AVAL Measurement→Function...→Auxiliary Value CALC[1..8]:MAX:DATA?
- Page 206 ® Remote Control Fundamentals R&S NRP2 Correspondence between Remote Control and Manual Control Menu item in manual control SCPI command in short form System→Remote... →GPIB→GPIB Address SYST:COMM:GPIB:ADDR System→I/O... →Out 1 1234 OUTP:REC1:FEED OUTP:TTL:FEED System→I/O... →Out 1→Analog OUTP:REC1:STAT ON System→I/O... →Out 1→Pass/Fail OUTP:TTL:STAT ON System→I/O...
- Page 207 ® Remote Control Fundamentals R&S NRP2 Correspondence between Remote Control and Manual Control Menu item in manual control SCPI command in short form FREQ SENS[1..4]:FREQ ZERO/CAL CAL:ZERO:AUTO Sensor→Mode→Trace&Statistics Windows→Graph Trace→Config... →Display SENS[1..4]:AUX Sensor→Mode→Trace&Statistics Windows→Graph Stats→Config... →Scale/x/Max SENS[1..4]:STAT:SCAL:X:RLEV SENS[1..4]:STAT:SCAL:X:RANG Sensor→Mode→Trace&Statistics Windows→Graph Stats→Config...
- Page 208 ® Remote Control Fundamentals R&S NRP2 Correspondence between Remote Control and Manual Control Menu item in manual control SCPI command in short form Sensor→Mode→Trace&Statistics Windows→Graph Display→Pulse→ SENS:TRAC:MEAS:PULS:DUR? Pulse Width SENS:TRAC:MEAS:PULS:PER? Pulse Period SENS:TRAC:MEAS:PULS:DCYC? Duty Cycle SENS:TRAC:MEAS:TRAN:POS:DUR? Pulse Off Time SENS:TRAC:MEAS:TRAN:NEG:DUR?
-
Page 209: Remote Control - Commands
® Remote Control - Commands R&S NRP2 Notation 6 Remote Control - Commands 6.1 Notation In the following sections, all commands implemented in the device are listed according to the command system and then described in detail. For the most part, the notation used complies with SCPI specifications. -
Page 210: Common Commands To Ieee 488.2
® Remote Control - Commands R&S NRP2 Common Commands to IEEE 488.2 Example: Definition: OUTPut:AUDiobits <audiobits> Command: OUTP:AUD 24 Special characters | and { } A vertical bar in parameter definitions indicates alternative possibilities in the sense of "or". The effect of the command differs, depending on which parameter is used. - Page 211 R&S NRP2 Common Commands to IEEE 488.2 status reporting system which is described in detail in c hapter 6.13, "STATus", on page 292. Commands available in the R&S NRP2 ..........................193 *CLS ..........................193 *ESE ...........................194 *ESR? ..........................194 *IDN?...
- Page 212 IDeNtification queries the instrument identification. Note: The return string can be customized using SYSTem:IDN and SYSTem:IDN:AUTO commands Example: Return values Rohde&Schwarz, NRP2, 10001, 07.03 The strings have the following meanuing: Rohde&Schwarz = manufacturer NRP2 = instrument type 10001 = serial number 07.03 = firmware version...
- Page 213 ® Remote Control - Commands R&S NRP2 Common Commands to IEEE 488.2 Since *OPC? waits until all previous commands are executed, "1" is returned in all cases. *OPC? basically functions like the *WAI command, but **WAI does not return a response.
- Page 214 ® Remote Control - Commands R&S NRP2 Common Commands to IEEE 488.2 The query form *PSC? reads out the contents of the power-on-status-clear flag. The response can be 0 or 1. Parameters: <Function> 0 | 1 Causes the contents of the status registers to be preserved. Thus a service request can be generated when switching on the instru- ment, if the status registers ESE and SRE are suitably configured.
- Page 215 ® Remote Control - Commands R&S NRP2 Common Commands to IEEE 488.2 Command Preset and *RST value Remark CALC<[1]..8>:LIM:FAIL? Limit violation. CALC<[1]..8>:LIM:FCO? Number of limit violations is reset. CALC<[1]..8>:LIM:UPP:DATA 0 W or 0 DB Upper limit value for measure- ments.
- Page 216 ® Remote Control - Commands R&S NRP2 Common Commands to IEEE 488.2 Command Preset and *RST value Remark DISP:SIZE NORM Automatic window sizes. DISP<[1]..4> ON | OFF A window will automatically be opened for each sensor. DISP<[1]..4>:TRAC:LOW -120 DBM Lower limit of power axis in Trace mode DISP<[1]..4>:TRAC:UPP...
- Page 217 ® Remote Control - Commands R&S NRP2 Common Commands to IEEE 488.2 Command Preset and *RST value Remark SENS<[1]..4>:AC:RANG 1 | 2 | 3 Depending on sensor. SENS<[1]..4>:AC:RANG:AUT ON | OFF Depending on sensor. SENS<[1]..4>:AC:RANG:CLEV <NRf> Depending on sensor. SENS<[1]..4>:APER <NRf>...
- Page 218 ® Remote Control - Commands R&S NRP2 Common Commands to IEEE 488.2 Command Preset and *RST value Remark SENS<[1]..4>:FUNC "POW:AVG"| Depending on sensor. "POW:BURS:AVG"| "POW:TSL:AVG"| "XTIM:POW" SENS<[1]..4>:TGAT<[1]..4>:MID: <NRf> Depending on sensor. OFFS SENS<[1]..4>:TGAT<[1]..4>:MID ON | OFF Depending on sensor. SENS<[1]..4>:TGAT<[1]..4>:MID: <NRf>...
- Page 219 ® Remote Control - Commands R&S NRP2 Common Commands to IEEE 488.2 Command Preset and *RST value Remark SENS<[1]..4>:TIM:EXCL:STARt <NRf> Depending on sensor. SENS<[1]..4>:TIM:EXCL:STOP <NRf> Depending on sensor. SENS<[1]..4>:TRAC:AVER ON | OFF Depending on sensor. SENS<[1]..4>:TRAC:AVER:COUN <NR1> Depending on sensor.
- Page 220 ® Remote Control - Commands R&S NRP2 Common Commands to IEEE 488.2 Command Preset and *RST value Remark TRIG[1..4|:ALL]:HYST <NRf> Depending on sensor. TRIG[1..4|:ALL]:LEV <NRf> Depending on sensor. TRIG[1..4|:ALL]:MAST ON | OFF Depending on sensor. TRIG[1..4|:ALL]:SLOP POS | NEG Depending on sensor.
-
Page 221: Overview Of Scpi Command Systems
® Remote Control - Commands R&S NRP2 Overview of SCPI Command Systems *TRG TRiGger generates a BUS-trigger event. If the sensor is in the WAIT_FOR_TRG state and the source for the trigger is set to BUS (TRIG:SOUR BUS), the sensor enters the MEASURING state. - Page 222 Fig. 6-1: Overview of SCPI command systems and their mutual interaction The figure above gives an overview of the SCPI command systems of the R&S NRP2. The measured values are forwarded to the SENSe block where they are processed and handed to the CALCulate blocks.
- Page 223 STATus c hapter 5.8.4, "Status Reporting System", on page 181. SYSTem Performs different system settings that affect the operation of the R&S NRP2. TRIGger Configures timing conditions for start of measurement UNIT Sets output unit of the measured values. 6.3.1 SENSe System Fig.
-
Page 224: High-Level Measurement Commands (Configure, Measure, Read And Fetch)
FETCh combine several low level setting commands and thus simplify programming of the R&S NRP2. The most convenient command is MEASure. This command configures sen- sors and calculate blocks, initiates a measurement and provides measurement results. The other commands perform only portions of these functions and thus allow the user to make specific modifications between the individual steps. - Page 225 ® Remote Control - Commands R&S NRP2 High-Level Measurement Commands (CONFigure, MEASure, READ and FETCh) Strictly speaking, the CONFigure command is not a measurement command because it does not yield data and only configures a measurement. It differs from the other three high-level measurement commands as follows: a question mark at the end of the com- mand provides information on current settings.
- Page 226 ® Remote Control - Commands R&S NRP2 High-Level Measurement Commands (CONFigure, MEASure, READ and FETCh) CONFigure:... The Configure:... commands define the calculation function and configure the associated sensors by means of the parameter list (see c hapter 6.4.4, "Parameter list description",...
- Page 227 ® Remote Control - Commands R&S NRP2 High-Level Measurement Commands (CONFigure, MEASure, READ and FETCh) Example: Valid command sequence: FETCh:TSLot:SUM? 577us,8,0,0 FETCh:TSLot:SUM:RELative? 577us,8,0,0 invalid command sequence: FETCh:BURSt:SUM? 0,0,0 FETCh:TSLot:SUM? 577us,8,0,0 READ:...? The READ:...? command starts a measurement without further configuration and returns the measurement result.
- Page 228 ® Remote Control - Commands R&S NRP2 High-Level Measurement Commands (CONFigure, MEASure, READ and FETCh) <head><meas_mode>[<calc_function>][?] <parameter_list> Table 6-5: Syntactical Structure of High-Level Measurement Commands <head> <head> = These keywords select the high level command subsystem. Command keywords ● CONFigure<[1]..8>...
- Page 229 ® Remote Control - Commands R&S NRP2 High-Level Measurement Commands (CONFigure, MEASure, READ and FETCh) <tslot_width>, <no_slots>, <start_exclude>, <end_exclude>, [<expected_value> [,<resolution>]] [,<source_list>] ● measurement mode Burst: <dtolerance>, <start_exclude>, <end_exclude>, [<expected_value> [,<resolution>]] [,<source_list>] ● measurement mode ContAv (with data buffering) (<buffered_size>), [<expected_value>[,<resolution>]] [,<source_list>]...
- Page 230 Specifies the limit up to which the measurement result should be free of noise. The R&S NRP2 tries to set an adequate window for the averaging filter. This does not affect the accuracy of the measured data. The window can only be set if auto- matic setting of the filter window has not been disabled by the user (SENSe:AVERage:COUNt:AUTO OFF).
- Page 231 ® Remote Control - Commands R&S NRP2 High-Level Measurement Commands (CONFigure, MEASure, READ and FETCh) <start_exclude> Value range: depending on sensor Default value: depending on sensor Unit: S Amount of time at the beginning of a timeslot or integration period that should not be taken into account.
- Page 232 ® Remote Control - Commands R&S NRP2 High-Level Measurement Commands (CONFigure, MEASure, READ and FETCh) Table 6-8: Two-channel functions ( <source_list> = (@n),(@m); n = 1,2,3,4; m = 1,2,3,4 ) DIFFerence PC Yields the difference between the PC and SC. This means that two sensors must be specified in <source_list>.
- Page 233 ® Remote Control - Commands R&S NRP2 High-Level Measurement Commands (CONFigure, MEASure, READ and FETCh) 6.4.6 CONFigure commands This chapter lists all CONFigure commands. For a description of the command syntax, the calculation functions and the parameter list see ...
- Page 234 ® Remote Control - Commands R&S NRP2 High-Level Measurement Commands (CONFigure, MEASure, READ and FETCh) CONFigure<[1]..8>[:SCALar][:POWer]:BURSt:REFLection CONFigure<[1]..8>[:SCALar][:POWer]:BURSt:RLOSs <dtolerance>, <start_exclude>, <end_exclude>, [<expected_value> [,<resolution>]] [,<source_list>] CONFigure commands for measurement mode Burst. CONFigure<[1]..8>:ARRay[:POWer][:AVG] CONFigure<[1]..8>:ARRay[:POWer][:AVG]:RELative CONFigure<[1]..8>:ARRay[:POWer][:AVG]:DIFFerence CONFigure<[1]..8>:ARRay[:POWer][:AVG]:DIFFerence:RELative CONFigure<[1]..8>:ARRay[:POWer][:AVG]:SUM CONFigure<[1]..8>:ARRay[:POWer][:AVG]:SUM:RELative CONFigure<[1]..8>:ARRay[:POWer][:AVG]:RATio CONFigure<[1]..8>:ARRay[:POWer][:AVG]:RATio:RELative CONFigure<[1]..8>:ARRay[:POWer][:AVG]:SWR CONFigure<[1]..8>:ARRay[:POWer][:AVG]:REFLection CONFigure<[1]..8>:ARRay[:POWer][:AVG]:RLOSs (<buffered_size>), [<expected_value>[,<resolution>]] [,<source_list>]...
- Page 235 ® Remote Control - Commands R&S NRP2 High-Level Measurement Commands (CONFigure, MEASure, READ and FETCh) commands", on page 213, and tions - High level c hapter 6.4.4, "Parameter list descrip- tion", on page 210. FETCh<[1]..8>[:SCALar][:POWer][:AVG] FETCh<[1]..8>[:SCALar][:POWer][:AVG]:RELative FETCh<[1]..8>[:SCALar][:POWer][:AVG]:DIFFerence FETCh<[1]..8>[:SCALar][:POWer][:AVG]:DIFFerence:RELative FETCh<[1]..8>[:SCALar][:POWer][:AVG]:SUM FETCh<[1]..8>[:SCALar][:POWer][:AVG]:SUM:RELative...
- Page 236 ® Remote Control - Commands R&S NRP2 High-Level Measurement Commands (CONFigure, MEASure, READ and FETCh) FETCh<[1]..8>:ARRay[:POWer][:AVG] FETCh<[1]..8>:ARRay[:POWer][:AVG]:RELative FETCh<[1]..8>:ARRay[:POWer][:AVG]:DIFFerence FETCh<[1]..8>:ARRay[:POWer][:AVG]:DIFFerence:RELative FETCh<[1]..8>:ARRay[:POWer][:AVG]:SUM FETCh<[1]..8>:ARRay[:POWer][:AVG]:SUM:RELative FETCh<[1]..8>:ARRay[:POWer][:AVG]:RATio FETCh<[1]..8>:ARRay[:POWer][:AVG]:RATio:RELative FETCh<[1]..8>:ARRay[:POWer][:AVG]:SWR FETCh<[1]..8>:ARRay[:POWer][:AVG]:REFLection FETCh<[1]..8>:ARRay[:POWer][:AVG]:RLOSs (<buffered_size>), [<expected_value>[,<resolution>]] [,<source_list>] FETCh commands for measurement mode ContAv with buffering. FETCh<[1]..8>:XTIMe[:POWer] FETCh<[1]..8>:XTIMe[:POWer]:RATio (<scope_size>), <capture_time>...
- Page 237 ® Remote Control - Commands R&S NRP2 High-Level Measurement Commands (CONFigure, MEASure, READ and FETCh) READ<[1]..8>[:SCALar][:POWer]:TSLot READ<[1]..8>[:SCALar][:POWer]:TSLot:RELative READ<[1]..8>[:SCALar][:POWer]:TSLot:DIFFerence READ<[1]..8>[:SCALar][:POWer]:TSLot:DIFFerence:RELative READ<[1]..8>[:SCALar][:POWer]:TSLot:SUM READ<[1]..8>[:SCALar][:POWer]:TSLot:SUM:RELative READ<[1]..8>[:SCALar][:POWer]:TSLot:RATio READ<[1]..8>[:SCALar][:POWer]:TSLot:RATio:RELative READ<[1]..8>[:SCALar][:POWer]:TSLot:SWR READ<[1]..8>[:SCALar][:POWer]:TSLot:REFLection READ<[1]..8>[:SCALar][:POWer]:TSLot:RLOSs <tslot_width>, <no_slots>, <start_exclude>, <end_exclude>, [<expected_value> [,<resolution>]] [,<source_list>] READ commands for measurement mode T'Slot. READ<[1]..8>[:SCALar][:POWer]:BURSt READ<[1]..8>[:SCALar][:POWer]:BURSt:RELative...
-
Page 238: Measurement Commands
® Remote Control - Commands R&S NRP2 High-Level Measurement Commands (CONFigure, MEASure, READ and FETCh) READ<[1]..8>:XTIMe[:POWer] READ<[1]..8>:XTIMe[:POWer]:RATio (<scope_size>), <capture_time> [,<source_list>] READ commands for measurement mode Trace. READ<[1]..8>:STATistics:CCDF READ<[1]..8>:STATistics:PDF (<statistics_size>), <capture_time> [,<source_list>] READ commands for measurement mode Statistics. 6.4.9 MEASurement commands This chapter lists all MEASurement commands. -
Page 239: Calculate (Configuration Of Calculate Blocks)
® Remote Control - Commands R&S NRP2 CALCulate (Configuration of Calculate Blocks) MEASurement<[1]..8>[:SCALar][:POWer]:BURSt MEASurement<[1]..8>[:SCALar][:POWer]:BURSt:RELative MEASurement<[1]..8>[:SCALar][:POWer]:BURSt:DIFFerence MEASurement<[1]..8>[:SCALar][:POWer]:BURSt:DIFFerence:RELative MEASurement<[1]..8>[:SCALar][:POWer]:BURSt:SUM MEASurement<[1]..8>[:SCALar][:POWer]:BURSt:SUM:RELative MEASurement<[1]..8>[:SCALar][:POWer]:BURSt:RATio MEASurement<[1]..8>[:SCALar][:POWer]:BURSt:RATio:RELative MEASurement<[1]..8>[:SCALar][:POWer]:BURSt:SWR MEASurement<[1]..8>[:SCALar][:POWer]:BURSt:REFLection MEASurement<[1]..8>[:SCALar][:POWer]:BURSt:RLOSs <dtolerance>, <start_exclude>, <end_exclude>, [<expected_value> [,<resolution>]] [,<source_list>] MEASurement commands for measurement mode Burst. MEASurement<[1]..8>:ARRay[:POWer][:AVG] MEASurement<[1]..8>:ARRay[:POWer][:AVG]:RELative MEASurement<[1]..8>:ARRay[:POWer][:AVG]:DIFFerence MEASurement<[1]..8>:ARRay[:POWer][:AVG]:DIFFerence:RELative MEASurement<[1]..8>:ARRay[:POWer][:AVG]:SUM MEASurement<[1]..8>:ARRay[:POWer][:AVG]:SUM:RELative... - Page 240 (CALC:MATH), the channels can be processed together. Suffix <1..8>behind the CALCulate key word denotes the CALCulate block. Each CALCulate block is assigned a measurement window. The R&S R&S NRP2 can display up to four windows with measurement results.
- Page 241 Usage: Query only CALCulate<[1]..8>:EXTRemes:RESet The R&S NRP2 stores the maximum and minimum values for each calculate block. The current measured value is stored with CALC[1..8]:EXTR:RES as the new minimum and maximum value. The extreme values can be queried with CALC[1..8]:MIN:DATA? and CALC[1..8]:MAX:DATA?.
- Page 242 "PDF:TRACe" Note: Every measured value displayed in the R&S NRP2 (also every point of a trace) is aver- aged in the sensor via a series of samples. If a RANDom feed is selected, a random value is taken from these samples and forwarded to the base unit as a measured value.
- Page 243 ® Remote Control - Commands R&S NRP2 CALCulate (Configuration of Calculate Blocks) CALCulate<[1]..8>:LIMit:BEEP <beep> Switches the acoustic warning for limit violations on or off. Parameters: <beep> ON | OFF *RST: Usage: Setting only CALCulate<[1]..8>:LIMit:CLEar[:IMMediate] Resets the limit monitoring state and the internal counter for limit violations.
- Page 244 ● The CALCulat<[1]..8>:LIMit:CLEar command is sent. Usage: Query only CALCulate<[1]..8>:LIMit:LOWer[:DATA] <lower_limit> Sets a lower limit for the measured values. The R&S NRP2 can respond when the values drop below this limit (see other CALCulate<[1]..8>:LIMit commands). Parameters: <lower_limit> float_value The value range depends on the current output unit of the calcu- late block's measured value, see table below.
- Page 245 ON | OFF *RST: Usage: Setting only CALCulate<[1]..8>:LIMit:UPPer[:DATA] <upper_limit> Sets an upper limit for the measured values. The R&S NRP2 can respond when this limit is exceeded (see other CALCulate<[1]..8>:LIMit commands). Parameters: <upper_limit> float_value The value range depends on the current output unit of the calcu- late block's measured value, as shown in ...
- Page 246 *RST: 0 DBM Default unit: DBM CALCulate<[1]..8>:LIMit:UPPer[:DATA]:RATio <ratio> Sets an upper limit for the measured power ratios. The R&S NRP2 can respond when this limit is exceeded (see other CALCulate<[1]..8>:LIMit commands). Parameters: <ratio> float_value, units: DB | DPCT | O...
- Page 247 ® Remote Control - Commands R&S NRP2 CALCulate (Configuration of Calculate Blocks) string Meaning "(SENSn+SENSm)" The calculate block outputs the sum of the measured values of sensor n and sensor m. "(SENSn /SENSm)" The calculate block outputs the quotient of the values measured by sensor n and m.
- Page 248 ® Remote Control - Commands R&S NRP2 CALCulate (Configuration of Calculate Blocks) CALCulate<[1]..8>:MAXimum:DATA? CALCulate<[1]..8>:MINimum:DATA? Queries the maximum/minimum of all measured values that previously occurred in this calculate block. The limit value is set to the current measured value when ●...
- Page 249 ® Remote Control - Commands R&S NRP2 CALCulate (Configuration of Calculate Blocks) Table 6-11: Output unit of measured value of calculate block CALC:MATH? CALC:REL:STAT OFF CALC:REL:STAT ON "(SENSn)" DBM | W | DBUV DB | DPCT | O "(SENSn-SENSm)" DBM | W | DBUV DB | DPCT | O "(SENSn+SENSm)"...
- Page 250 ® Remote Control - Commands R&S NRP2 CALCulate (Configuration of Calculate Blocks) CALCulate<[1]..8>:RELative:RATio[:MAGNitude] <value> Has the same direct effect as CALC:REL on the reference value for measured values that share the unit of a power ratio. Parameters: <value> float_value, units: DB | PCT Range: -200..200 DB | 1e-18..1e22 PCT...
- Page 251 ® Remote Control - Commands R&S NRP2 CALCulate (Configuration of Calculate Blocks) CALCulate<[1]..4>:STATistics:MARKer: HORIzontal:POSition[:X][:POWer] <power> Is available with statistics measurements (CCDF and PDF). It sets the horizontally shift- able marker on the power axis. The absolute position is specified. The statistics measured value can then be read out with CALC:STAT:MARK:HOR:DATA? if the measurement at this position has a valid value.
-
Page 252: Calibration
® Remote Control - Commands R&S NRP2 CALibration Density/Distribution CALC:STAT:MARK:VERT:POS:Y CALC:STAT:MARK:HOR:DATA? Power CALC:STAT:MARK:VERT:DATA:POW? CALC:STAT:MARK:HOR:POS:X:POW Fig. 6-7: Meaning of the marker commands for the Statistics mode Usage: Query only CALCulate<[1]..4>:STATistics:POWer:AVG:DATA? Returns the average value of the power in the time window of a statistics measurement. - Page 253 Another possibility to perform zeroing faster is to use the command CALibration<[1]..4>:ZERO:FAST:AUTO in the trace mode. The commands are overlapping, i.e. other commands can be sent to the R&S NRP2 while one or more calibrations are running. Zeroing is recommended if ●...
-
Page 254: Display
The DISPlay command system is mainly used to configure the display of windows on the R&S NRP2. The WINDow commands are assigned to the calculate blocks 1 to 4. The values calculated from the sensor values by the respective calculate block with the aid of the measurement function are displayed. - Page 255 ® Remote Control - Commands R&S NRP2 DISPlay ......................237 DISPlay: E RRorlist .....................237 DISPlay: I LLumination ....................238 DISPlay: M ESSage[: S TATe] ..................238 DISPlay: M ESSage: T EXT: C LEar ..................238 DISPlay: M ESSage: T EXT[: D ATA]...
- Page 256 ® Remote Control - Commands R&S NRP2 DISPlay Parameters: <state> ON | OFF *RST: DISPlay:MESSage[:STATe] <state> Displays a window containing a user-defined message. The message text is defined via DISP:MESS:TEXT. In addition, DISP:MESS:TYPE can select between two types of message windows. Calling the command with the OFF parameter is ignored if DISP:MESS:TYPE QUERy is set, because in this case a window must be closed by pressing the MENU key.
- Page 257 ® Remote Control - Commands R&S NRP2 DISPlay DISPlay:PIXMap? Supplies the display content as binary block data. The block data consists of a block data header (#577110) and the display content in Microsoft Windows (R) BMP format (version 3). A color depth of 8 bit per pixel is used.
- Page 258 ® Remote Control - Commands R&S NRP2 DISPlay Parameters: <avalue> NONE | NORMal | EXTRemes | STATistics NONE No additional information about the measured values is displayed. NORMal The display is a function of the SENS:FUNCtion of the measure- ment mode of the primary channel and the CALC:FEED setting.
- Page 259 ® Remote Control - Commands R&S NRP2 DISPlay Parameters: <display_mode> DIGital | ANALog | GRAPhical DIGital Measured values are displayed in numeric format. If the primary channel is operated in Trace mode, the (scalar) measured values of the currently selected timegate are displayed here.
- Page 260 ® Remote Control - Commands R&S NRP2 DISPlay DISPlay[:WINDow]<[1]..4>:METer:LOWer:POWer <lower_power> DISPlay[:WINDow]<[1]..4>:ANALog:LOWer:POWer <lower_power> Sets the lower limit value of the analog scale. This value is used if the unit of the mea- surement result is Watt, dBm or dBµV, i.e. the measurement result is a power.
- Page 261 Specifies the number of significant places of the mantissa when the measurement result is displayed on a linear scale. The R&S NRP2 tries to adjust the averaging filter range so that the display noise decreases with increasing resolution. The values of the transfer...
- Page 262 ® Remote Control - Commands R&S NRP2 DISPlay This command corresponds to the <resolution> option of the high-level measurement commands CONFigure, FETCH, READ and MEASure. Note: Automatic filter ranging must be switched on (SENSe<[1]..4>:AVERage:COUNt:AUTO ON). DISP<[1]..8>:RES has an effect on the setting SENS<[1]..4>:AVER:COUN:AUTO:RES of the sensors used in the mea- surement function (CALC<[1]..8>:MATH).
- Page 263 ® Remote Control - Commands R&S NRP2 DISPlay Parameters: <window_size> NORMal | ZOOMed NORMal The window size is determined automatically and depends on the total number of open windows. ZOOMed The selected window (DISP:WIND:SEL[?]) is set to maximum size, regardless of the the number of visible windows. All other open windows are covered.
-
Page 264: Format
*RST: 6.8 FORMat The FORMat command system sets the format of numeric data (measured values) that is exchanged beween the remote control computer and the R&S NRP2 if high-level mea- surement commands are used..................246 FORMat[: R EADings]: B ORDer... -
Page 265: Memory
® Remote Control - Commands R&S NRP2 MEMory Parameters: <type> ASCii | REAL *RST: ASCii FORMat:SREGister <format> Specifies wich format s used for the return value of *STB?. Parameters: <format> ASCii | BINary | HEXadecimal | OCTal *RST: ASCii 6.9 MEMory The MEMory system is used for storing device states (:STATe) and correction tables (:TABLe). - Page 266 ® Remote Control - Commands R&S NRP2 MEMory ..................251 MEMory: T ABLe: D ATA: P OINts? ...................251 MEMory: T ABLe: F REQuency ................251 MEMory: T ABLe: F REQuency: P OINts? .................251 MEMory: T ABLe: G AIN[: M AGNitude]...
- Page 267 ® Remote Control - Commands R&S NRP2 MEMory This command cannot be cancelled. Cleared values are irretrievably lost. Parameters: <name> string Usage: Event MEMory:CLEar:TABLe This command may be used as an alternative to MEMory:CLEar[:NAME] <string>. The content of the table currently selected with MEMory:TABLe:SELect <string> is cleared.
- Page 268 ® Remote Control - Commands R&S NRP2 MEMory Return values: <names> Usage: Query only MEMory:STATe:DEFine <string>, 1...19 MEMory:STATe:MAP <string> The value 0 to 19 are assigned to the memory locations of the device states, where the memory location with the number 0 is the factory-set state and cannot be changed.
- Page 269 ® Remote Control - Commands R&S NRP2 MEMory MEMory:TABLe:DATA:POINts? The command returns the number of stored entries in the currently selected offset table. Usage: Query only MEMory:TABLe:FREQuency <NRf> {, <NRf>} This command enters frequencies in the first column of the table selected with MEM:TABL:SEL.
- Page 270 ® Remote Control - Commands R&S NRP2 MEMory Parameters: <NRf> {, <NRf>} Enters offset values in the second column of the table selected with MEM:TABL:SEL. *RST: Tables are not changed in case of a *RST. Default unit: DB MEMory:TABLe:GAIN:POINts? Returns the number of entries (lines) in the table selected with MEM:TABL:SEL <string>.
-
Page 271: Output
"File name not found": A table named <select> is not known . 6.10 OUTPut The OUTPut system serves for generator configuration. The R&S NRP2 can be equipped with an optional RF test generator which produces a reference power of 1 mW at 50 MHz. -
Page 272: Output:recorder<[1]..2>:Limit:lower
® Remote Control - Commands R&S NRP2 OUTPut OUTPut:RECorder<[1]..2>:LIMit:LOWer <lower_limit> Voltage 3.3 V 3.0 V Power 0.0 V OUTP:REC:LIM:LOW OUTP:REC:LIM:UPP Fig. 6-8: Characteristic of analog outputs Specifies the lower power limit of the characteristic for one of the two analog outputs . -
Page 273: Output:recorder<[1]..2>:Limit:upper:power
® Remote Control - Commands R&S NRP2 OUTPut Parameters: <lower_limit> float_value Range: -200 DB .. 200 DB *RST: 0 DB Default unit: DB OUTPut:RECorder<[1]..2>:LIMit:UPPer <upper_limit> Specifies the upper power limit of the characteristic for one of the two analog outputs (see ... - Page 274 The number of the potentiometer (1 to 4) is indicated with the parameter <NR1>. The response is an 8-bit integer with a sign (-128 to 127). Query parameters: <NR1> 1...4 Return values: Setting 8-bit integer Usage: Query only Options: R&S NRP2-B1 OUTPut:ROSCillator:CALibration:WRIte <NR1>,<NR1> Sets the test generator. User Manual 1173.9157.02 ─ 03...
- Page 275 0 if 1st parameter 04, 09 or 10. Usage: Event Options: R&S NRP2-B1 OUTPut:TTL:ACTive <string> Specifies whether the value set via OUTP:TTL:LVOL (LOW) or via OUTP:TTL:HVOL (HIGH) should be applied if the measured value causes a limit violation at the TTL output.
-
Page 276: Output: T Tl: H Voltage
® Remote Control - Commands R&S NRP2 OUTPut OUTPut:TTL:FEED <calculate_block> Sets the calculate block whose limit handling controls the TTL voltage. If the measured value of this calculate block violates a limit and limit monitoring is active, the voltage specified in ... -
Page 277: Sense (Sensor Commands)
Trace), the offset corrections and the filter settings. Suffix [1]..4 denotes the sensor channel. When the sensors are connected to the R&S NRP2, they inform the device about the SENSe and TRIGger commands supported and about the value ranges for parameters. - Page 278 ® Remote Control - Commands R&S NRP2 SENSe (Sensor Commands) .................265 [SENSe<[1]..4>]: A VERage[: S TATe] ................265 [SENSe<[1]..4>]: A VERage: T CONtrol .................265 [SENSe<[1]..4>]: B ANDwidth: V IDeo ..................265 [SENSe<[1]..4>]: B WIDth: V IDeo ................265 [SENSe<[1]..4>]:...
- Page 279 ® Remote Control - Commands R&S NRP2 SENSe (Sensor Commands) ..............280 [SENSe<[1]..4>]: S TATistics: S CALe: X : P OINts ..............280 [SENSe<[1]..4>]: S TATistics: S CALe: X : R ANGe ..............280 [SENSe<[1]..4>]: S TATistics: S CALe: X : R LEVel...
- Page 280 By averaging the measured values in the sensors, extreme values are lost. Using [SENSe<[1]..4>]:AUXiliary MINMax , a sensor can be assigned to transmit to the R&S NRP2 the minima and maxima that occurred in the Trace mode together with the measured value.
- Page 281 *RST: depending on sensor [SENSe<[1]..4>]:AVERage:COUNt:AUTO:MTIMe <mtime> If the R&S NRP2 has to determine the filter length automatically, the filter length can become large and thus also the measurement time. An upper time limit can be set via SENS<[1]..4>:AVER:COUN:AUTO:MTIME (maxi- mum time). It should never be exceeded. Undesired long measurement times can thus be prevented (in the SENS:AVER:COUN:AUTO:TYPE NSR mode) if the automatic filter length switchover is on.
- Page 282 ® Remote Control - Commands R&S NRP2 SENSe (Sensor Commands) Parameters: <<resolution>> 1 | 2 | 3 | 4 Range: depending on sensor *RST: depending on sensor [SENSe<[1]..4>]:AVERage:COUNt:AUTO:SLOT <slot> Sets a timeslot whose measured value is used to automatically determine the filter length.
- Page 283 ® Remote Control - Commands R&S NRP2 SENSe (Sensor Commands) [SENSe<[1]..4>]:AVERage[:STATe] <state> Activates or deactivates the filter function of a sensor. If the filter is switched on, the individual measured values set with SENSe<[1]..4>]:AVERage:COUNt are aver- aged. This reduces the impact of noise and helps to achieve measured values that are more stable.
- Page 284 [SENSe<[1]..4>]:CORRection:DCYCle[:INPut][:MAGNitude] <magnitude> Informs the R&S NRP2 about the duty cycle of the power to be measured. The duty cycle correction is only applied in the ContAv mode where measurements are performed con- tinuously without taking the timing of the signal into account.
- Page 285 R&S NRP2 can manage up to ten tables (MEMory commands). The frequency-dependent offset tables consist of two columns; the first containing the frequencies, the second the associated correction values. When the R&S NRP2 is informed about the signal fre- quency with command [SENSe<[1]..4>]:FREQuency[:CW|:FIXed] <float_value>, an appropriate correction factor is determined by means of the table.
- Page 286 [SENSe<[1]..4>]:FREQuency[:CW] <frequency> [SENSe<[1]..4>]:FREQuency[:FIXed] <frequency> Informs the R&S NRP2 about the frequency of the power to be measured since this frequency is not automatically determined. The frequency is used to determine a fre- quency-dependent correction factor for the measurement results.
- Page 287 (CCDF). The mea- surement time is set using the SENS:STAT commands. The R&S NRP2 returns in response to READ? or FETCh? an array of density values which are spread over the power axis. The value range of the power axis is also set using the SENS:STAT:SCAL:X commands.
- Page 288 ® Remote Control - Commands R&S NRP2 SENSe (Sensor Commands) Like "XPOWer:CCDF", except that a PDF is calculated instead of a CCDF. "XTIMe:POWer" A sequence of measurements is performed. The individual mea- sured values are determined as in the ContAv mode. The length...
- Page 289 ® Remote Control - Commands R&S NRP2 SENSe (Sensor Commands) [SENSe<[1]..4>][:POWer][:AVG]:RANGe <range> Selects a measurement range in which the corresponding sensor is to perform a mea- surement. This setting will only become effective if SENS<[1]..4>:RANG:AUTO OFF is set. Parameters: <range>...
- Page 290 ® Remote Control - Commands R&S NRP2 SENSe (Sensor Commands) [SENSe<[1]..4>][:POWer]:BURSt:DTOLerance <tolerance> The end of a burst (power pulse) is recognized when the signal level drops below the trigger level. Especially with modulated signals, this may also happen for a short time within a burst.
- Page 291 ® Remote Control - Commands R&S NRP2 SENSe (Sensor Commands) [SENSe<[1]..4>][:POWer]:TGATe[:EXCLude]:MID[:STATe] <state> Activates/deactivates the blanking out of time intervals in the timegates, affects all gates. Parameters: <state> ON | OFF *RST: [SENSe<[1]..4>][:POWer]:TGATe<[1]..4>[:EXCLude]:MID:TIME <time_interval> Together with SENS:TGAT:MID:OFFS, allows a time interval in a timegate to be blanked out.
- Page 292 ® Remote Control - Commands R&S NRP2 SENSe (Sensor Commands) Power Trigger event Trigger level Delayed trigger point Time Trigger Gate 1 Gate 2 Gate 3 Gate 4 delay SENS:TGAT1:OFFS:TIME SENS:TGAT1:TIME SENS:TGAT2:TIME SENS:TGAT2:OFFS:TIME Fig. 6-12: Timing parameters for the Timegate mode Parameters: <time>...
- Page 293 ® Remote Control - Commands R&S NRP2 SENSe (Sensor Commands) [SENSe<[1]..4>][:POWer]:TSLot:COUNt <number> Sets the number of simultaneously measured timeslots in the Timeslot mode (see f ig- ure 6-13 T imeslot parameters). Parameters: <number> int_value Range: depending on sensor...
- Page 294 ® Remote Control - Commands R&S NRP2 SENSe (Sensor Commands) [SENSe<[1]..4>][:POWer]:TSLot:[AVG]:WIDTh <time> Sets the length of the timeslot in the Timeslot mode (see figure below). SENS:TSLOT:COUNT 3 T'Slot 1 T'Slot 2 T'Slot 3 Power Trigger event Trigger level Time SENS:TSLOT:MID:OFFS:TIME...
- Page 295 *RST: depending on sensor [SENSe<[1]..4>]:SGAMma[:MAGNitude] <magnitude> The R&S NRP2 can perform a measured-value correction taking the complex reflection coefficient (source gamma) of the signal source into account. SENS<[1]..4>:SGAM:CORR:STAT ON must be set. The magnitude of the reflection coefficient is set with SENS<[1]..4>:SGAM[:MAGN].
- Page 296 ® Remote Control - Commands R&S NRP2 SENSe (Sensor Commands) [SENSe<[1]..4>]:SGAMma:CORRection:STATe <state> Activates/deactivates the measured-value correction of the reflection coefficient effect of the source gamma. Parameters: <state> ON | OFF *RST: depending on sensor Usage: Setting only [SENSe<[1]..4>]:STATistics:AVERage? <power_value> Returns the average power value calculated during a statistics measurement (CCDF/ PDF).
- Page 297 ® Remote Control - Commands R&S NRP2 SENSe (Sensor Commands) Parameters: <time_interval> float_value Range: depending on sensor *RST: depending on sensor Default unit: S [SENSe<[1]..4>]:STATistics:PEAK? Returns the peak power value calculated during a statistics measurement (CCDF/PDF). Usage: Query only [SENSe<[1]..4>]:STATistics:OFFSet[:TIME] <time_interval>...
- Page 298 Query only [SENSe<[1]..4>]:STATistics:SCALe:X:POINts <number> Determines the number of samples on the power axis for the Statistics modes or returns the current setting. Due to the limited storage capacity of the R&S NRP2, the number is limited to 1024. Parameters: <number>...
- Page 299 ® Remote Control - Commands R&S NRP2 SENSe (Sensor Commands) Parameters: <rlevel> float_value Range: depending on sensor *RST: depending on sensor Default unit: DBM [SENSe<[1]..4>]:STATistics:TIME < time_interval> Determines, together with the SENS:STAT:OFFS command, the time interval in which the power for the statistical evaluation is measured. SENS:STAT:TIME determines the length of the interval (see also ...
- Page 300 ® Remote Control - Commands R&S NRP2 SENSe (Sensor Commands) Parameters: <exclude_stop> float_value Range: depending on sensor *RST: depending on sensor [SENSe<[1]..4>]:TRACe:AVERage[:STATe] <state> Switches the filter function of a sensor on or off for the Trace mode. When the filter is switched on, the number of measured values set with [SENSe<[1]..4>]:AVERage:COUNt is averaged.
- Page 301 [SENSe<[1]..4>]:TRACe:AVERage:COUNt:AUTO:MTIMe <mtime> If the R&S NRP2 has to determine the filter length automatically in the Trace mode, the filter length can become large and thus also the time to fill the filter. An upper time limit (maximum time) can be set via SENS<[1]..4>:AVER:COUN:AUTO:MTIME. It should never be exceeded.
- Page 302 ® Remote Control - Commands R&S NRP2 SENSe (Sensor Commands) Parameters: <resolution> 1 | 2 | 3 | 4 Range: depending on sensor *RST: depending on sensor [SENSe<[1]..4>]:TRACe:AVERage:COUNt:AUTO:POINt <value> Specifies the measured value in the Trace mode used for the automatic determination of the filter length.
- Page 303 ® Remote Control - Commands R&S NRP2 SENSe (Sensor Commands) [SENSe<[1]..4>]:TRACe:AVERage:TCONtrol <terminal_control> As soon as a new single value is determined, the filter window is advanced by one value so that the new value is taken into account by the filter and the oldest value is forgotten.
- Page 304 ® Remote Control - Commands R&S NRP2 SENSe (Sensor Commands) [SENSe<[1]..4>]:TRACe:MEASurement:DEFine:DURation:REFerence <ref_level> Sets the medial reference level in terms of percentage of the pulse power amplitude. This level is used to define the pulse width, pulse start time and pulse stop time.
- Page 305 ® Remote Control - Commands R&S NRP2 SENSe (Sensor Commands) [SENSe<[1]..4>]:TRACe:MEASurement:POWer:AVG? Returns the measured average power in the current trace. Usage: Query only [SENSe<[1]..4>]:TRACe:MEASurement:POWer:MAX? Returns the measured maximum power in the current trace. Usage: Query only [SENSe<[1]..4>]:TRACe:MEASurement:POWer:MIN? Returns the measured minimum power in the current trace.
- Page 306 ® Remote Control - Commands R&S NRP2 SENSe (Sensor Commands) [SENSe<[1]..4>]:TRACe:MEASurement:PULSe:SEParation? Returns the time from "Stop Time" to "Start Time" of the first detected pulse. Usage: Query only [SENSe<[1]..4>]:TRACe:MEASurement:TIME <time> Parameters: <time> float_value Range: depending on the sensor *RST: depending on the sensor Default unit: S [SENSe<[1]..4>]:TRACe:MEASurement:TRANSition:ESAMpling:AUTO[:STATe]?
- Page 307 ® Remote Control - Commands R&S NRP2 SENSe (Sensor Commands) [SENSe<[1]..4>]:TRACe:MEASurement:TRANSition:POSitive:OCCurrence? Returns the start point of the current pulse, i.e. the time when the signal passes through the medial reference level with rising edge. The medial level can be adjusted using the command SENS:TRAC:MEAS:DEF:DUR:REF.
-
Page 308: Service
® Remote Control - Commands R&S NRP2 SERVice Parameters: int_value Range: depending on sensor *RST: depending on sensor [SENSe<[1]..4>]:TRACe:REALtime <state> In the default state (OFF), each measurement from the sensor is averaged. With [SENSe<[1]..4>]:TRACe::REALtime ON , this behaviour can be switched off, which may increase the measurement speed. - Page 309 ® Remote Control - Commands R&S NRP2 SERVice ....................292 SERVice<[1]..4>: R ESult ....................292 SERVice<[1]..4>: S ERRors ....................292 SERVice<[1]..4>: U NLock SERVice<[1]..4>:CALibration:TEST? <NR1> Tests the consistency of the calibration data set according to three criteria: If the following bit is set in the following action is executed.
-
Page 310: Status
W, 3 W, 4W, ..) from now on. SERVice<[1]..4>:SERRors <state> The sensors signal an error to the R&S NRP2 if samples are lost while a signal is sampled (sampling), as may be the case with high sampling rates. In such a case, the measure- ment is less accurate. - Page 311 Remote Control - Commands R&S NRP2 STATus The R&S NRP2 uses the following status registers: ● Standard Event Status Register (specified in IEEE 488.2. Reading and configuring with *ESR? and *ESE. This register is not handled by the STATus system.) ●...
- Page 312 ® Remote Control - Commands R&S NRP2 STATus Command Status register STATus:OPERation:ULFail[:SUMMary]? Operation Upper Limit Fail STATus:OPERation:MEASuring[:SUMMary]? Operation Measuring STATus:OPERation:SENSe[:SUMMary]? Operation Sense STATus:OPERation:TRIGger[:SUMMary]? Operation Trigger STATus:QUEStionable? Questionable Status STATus:QUEStionable:CALibration[:SUMMary]? Questionable Calibration STATus:QUEStionable:POWer[:SUMMary]? Questionable Power STATus:QUEStionable:WINDow[:SUMMary]? Questionable Window 6.13.2 Configuration Commands...
- Page 313 ® Remote Control - Commands R&S NRP2 STATus Command Parameter Remark <srsc>:PTRansition[?] 0..32767 |<non-decimal numeric> STATus:PRESet t able 6-32 The status reporting system stores all information about the current operating status of the device and errors that occur. The information is stored in the status registers and the error queue.
- Page 314 ® Remote Control - Commands R&S NRP2 STATus States, events or summary bits of other registers CONDition register PTRansition register NTRansition register Logic OR Logic AND of Simplified of all bits EVENT and ENABle bits diagram EVENt register Summary bit of SCPI register, &...
- Page 315 ® Remote Control - Commands R&S NRP2 STATus NTRansition register The Negative TRansition register also acts as a transition filter. Upon transition of a bit of the CONDition register from 1 to 0, the associated NTR bit determines whether the EVENt bit is set to 1.
- Page 316 ® Remote Control - Commands R&S NRP2 STATus Output Queue Device Status (output buffer) Register Sensor A connected Sensor B connected Sensor A error Sensor B error Sensor A Front/Rear Sensor B Front/Rear Sensor C connected Sensor D connected Sensor C error...
- Page 317 ® Remote Control - Commands R&S NRP2 STATus Operation Calibrating Status Register Sensor A calibrating Summary Sensor B calibrating Sensor C calibrating Sensor D calibrating STAT:OPER:CAL Operation Measuring Sensor A measuring Status Register Summary Sensor B measuring Sensor C measuring...
- Page 318 ® Remote Control - Commands R&S NRP2 STATus Questionable Power Status Register Sensor A Power Sensor B Power Sensor C Power Sensor D Power Sensor A please zero Sensor B please zero Sensor C please zero Questionable Status Sensor D please zero...
- Page 319 ® Remote Control - Commands R&S NRP2 STATus 6.13.5 Status Byte (STB) and Service Request Enable Register (SRE) The STB is already defined in IEEE 488.2. It gives a rough overview of the device status, collecting information from the lower-level registers. It is comparable with the CONDition register of a SCPI defined register and is at the highest level of the SCPI hierarchy.
-
Page 320: Device Status Register
® Remote Control - Commands R&S NRP2 STATus 6.13.6 IST Flag and Parallel Poll Enable Register (PPE) Similar to the SRQ, the IST flag combines the complete status information in a single bit. It can be queried by a parallel poll (see ... - Page 321 Questionable Calibration Status Register summary bit Corresponds to the summary bit of the Questionable Calibration Status Register. POST Failure The built-in test of the R&S NRP2 carried out automatically upon power-up has generated an error. 10 to 13 Not used Warning Bit 15 will never be used.
- Page 322 ® Remote Control - Commands R&S NRP2 STATus Table 6-21: Meaning of bits used in the Standard Event Status Register Bit No. Meaning Operation Complete When the *OPC command is received, this bit is set if all previous commands have been executed.
- Page 323 ® Remote Control - Commands R&S NRP2 STATus Bit No. Meaning Operation Trigger Status Register summary bit This bit is set if a sensor is in the WAIT_FOR_TRG state, i.e. waiting for a trigger event. Not used 7 to 9...
- Page 324 ® Remote Control - Commands R&S NRP2 STATus EVENt register indicates whether a measurement was started or completed since the last readout of this register. The Operation Measuring Status Register can be read by the following commands: STATus:OPERation:MEASuring[:SUMMary]:CONDition? STATus:OPERation:MEASuring[:SUMMary][:EVENt]?. Table 6-24: Meaning of bits used in the Operation Measuring Status Register Bit No.
- Page 325 ® Remote Control - Commands R&S NRP2 STATus Bit No. Meaning Sensor C waiting for trigger Sensor C is in the WAIT_FOR_TRG state and is waiting for a trigger event that will change it to the MEASURING state. Sensor D waiting for trigger Sensor D is in the WAIT_FOR_TRG state and is waiting for a trigger event that will change it to the MEASURING state.
- Page 326 ® Remote Control - Commands R&S NRP2 STATus 6.13.15 Operation Lower Limit Fail Status Register The CONDition register contains information as to whether a displayed value is currently below a configured lower limit and the EVENt register indicates whether a measured value dropped below a limit value since the last readout of the Operation Lower Limit Fail Status Register.
- Page 327 ® Remote Control - Commands R&S NRP2 STATus exceeded since the last readout of the Operation Upper Limit Fail Status Register. Details of the behavior are defined by the transition register. The limit value can be set with the command CALC:LIM:UPP:DATA <float_value> . Command...
- Page 328 ® Remote Control - Commands R&S NRP2 STATus Table 6-29: Meaning of bits used in the Questionable Power Status Register Bit No. Meaning Not used Sensor A Power The measurement data of sensor A is corrupt. Sensor B Power The measurement data of sensor B is corrupt.
- Page 329 ® Remote Control - Commands R&S NRP2 STATus Bit No. Meaning Window 3 Power The measured values returned by Calculate block 3 are corrupt. Window 4 Power The measured values returned by Calculate block 4 are corrupt. Window 5 Power The measured values returned by Calculate block 5 are corrupt.
- Page 330 ® Remote Control - Commands R&S NRP2 STATus Bit No. Meaning 5 to 14 Not used Bit 15 will never be used. 6.13.20 Use of Status Reporting System For an efficient use of the status reporting system, the information it contains has to be transferred to the controller and further processed.
- Page 331 ® Remote Control - Commands R&S NRP2 STATus 6.13.20.2 Serial Poll Like the *STB? command, the serial poll is used to query the status byte of a device. Querying is implemented by interface messages, however, and is therefore much quicker. The serial poll method has already been defined in the IEEE 488.1 standard, and used to be the only standard method of querying the Status Byte Register.
-
Page 332: System
® Remote Control - Commands R&S NRP2 SYSTem 6.13.21 Initialization of the SCPI Status Registers The commands *RST, *DCL and SYSTem:PRESet as well as powering on the device also affect the status reporting system. status, I nitialization of device... - Page 333 ® Remote Control - Commands R&S NRP2 SYSTem ● IEC/IEEE-bus address ● resetting the R&S NRP2 ● setting the date and time ● audible signals ● version numbers of hardware and software ● setting the system speed ..................315 SYSTem: B EEPer[: I MMediate]...
- Page 334 ® Remote Control - Commands R&S NRP2 SYSTem SYSTem:BEEPer:NOTify:OVERload <state> Determines if the R&S NRP2 shall emit an acoustic signal when the power at a sensor exceeds the power limit. Parameters: <state> ON | OFF *RST: Usage: Event SYSTem:BEEPer:NOTify:KEY <state>...
- Page 335 This setting is not changed by *RST. SYSTem:COMMunicate:INET[:SELF]:ADDRess <ip1>,<ip2>,<ip3>,<ip4> Sets the IP address of the R&S NRP2. Note: This command cannot be used, while VXI11 or Ethernet is in use. Note: Choosing an invalid IP-Address may disturb the traffic on your LAN. If you are not sure how to configure these settings, please ask your network administrator.
- Page 336 Event SYSTem:DATE <year>,<month>,<day> Sets the date. Since the R&S NRP2 has no battery-backed clock, the date has to be reset if the clock was not set after the last power-on of the R&S NRP2. The date is set in the format yyyy,(m)m,(d)d. This setting is not changed by *RST.
- Page 337 Query only SYSTem:ERRor? This query returns error numbers and text from the error/event queue of the R&S NRP2. A specific error number with text is entered in the error/event queue for each error that occurs in the R&S NRP2. The queue functions according to the FIFO principle. The mes- sage entered first in the queue is also output first when a SYST:ERR? query is sent.
- Page 338 SYSTem:KEY <key_stroke> This command is used for testing purposes only and simulates a single stroke of an R&S NRP2 frontpanel key. The key stroke to be simulated is described either in plain text (<character_value>) or by a key code (<NR1>) , see following table.
- Page 339 ⇩ DOWN ⇦ LEFT ⇨ RIGHt Note: The R&S NRP2 can be switched off via remote control by means of the SYSTem:KEY POWER command. Parameters: <key_stroke> <NR1> | <character_value> (see table) <NR1> System will be switched off SYSTem:KEY 17 <character_value>...
- Page 340 Usage: Event SYSTem:SENSor<[1]..4>:RESet From the point of view of the R&S NRP2 base unit, the sensors are stand-alone meas- uring devices. They communicate with the R&S NRP2 via a command set complying with SCPI. SYST:SENS<[1].48>:RES prompts the base unit to send an *RST to the sensor in question.
- Page 341 Usage: Query only SYSTem:STANdard:PRESet <string> The R&S NRP2 can be easily configured for measuring standardized signals (e.g. mobile radio standards). For this purpose, the standards listed in the annex ( c hapter B, "Standard Configurations", on page 365) are stored in the R&S NRP2. The SYST:STAN:PRES command sets the listed parameters and, if desired, also configures front-panel display windows (if SYST:STAN:PWS ON).
-
Page 342: Trigger
NRP2 TRIGger SYSTem:TIME <hour>,<minute>,<second> Sets the time. Since the R&S NRP2 has no battery-backed clock, the time has to be reset if the clock was not set after the last power-on of the R&S NRP2. (see also S YSTem:... - Page 343 ® Remote Control - Commands R&S NRP2 TRIGger .....................328 TRIGger: A LL: D ELay: A UTO ....................328 TRIGger<[1]..4>: D TIMe .......................328 TRIGger: A LL: D TIMe ....................329 TRIGger<[1]..4>: H OLDoff ....................329 TRIGger: A LL: H OLDoff...
- Page 344 ® Remote Control - Commands R&S NRP2 TRIGger Parameters: <state> ON | OFF Continuous measurements are performed. If a measurement is completed, the respective sensors do not return to the IDLE state but are immediately set to INITIATED and then to WAIT_FOR_TRG.
- Page 345 As the initiation of measurements in the sensors is serialized in the R&S NRP2 it is possible that a sensor is triggered before another sensor is initiated (if synchronization is off). Sensors to be synchronized are required to have the same TRIG:SLOP setting, otherwise a SCPI error -221, "Settings conflict"...
-
Page 346: Trigger: A Ll: D Elay: A Uto
® Remote Control - Commands R&S NRP2 TRIGger TRIGger<[1]..4>:DELay <delay> TRIGger:ALL:DELay <delay> Defines the delay between the trigger event and the beginning of the actual measurement (integration). Parameters: <delay> float_value Range: depending on sensor *RST: depending on sensor Default unit: S TRIGger<[1]..4>:DELay:AUTO <state>... -
Page 347: Trigger:all[:Immediate]
® Remote Control - Commands R&S NRP2 TRIGger A similar response is achieved with the SENSe:BURSt:DTOLerance command in the Burst mode. However, the Burst mode makes certain that a burst measurement is not discontinued too early, whereas TRIGger:DTIMe suppresses a new measurement that is performed too early. - Page 348 EXT). The trigger signal generated by the trigger master is routed via the connecting cable to the R&S NRP2 and from there distributed to the other sensors and the trigger output. Only one sensor can be trigger master at a time.
-
Page 349: Unit
® Remote Control - Commands R&S NRP2 UNIT Parameters: <state> BUS | EXTernal | HOLD | IMMediate | INTernal The trigger event is initiated by TRIG:IMM or *TRG. In this case, the other trigger setting are meaningless. EXTernal Triggering is performed with an external signal applied to the trig- ger connector. - Page 350 ® Remote Control - Commands R&S NRP2 UNIT This setting also determines the unit for the parameters of the following commands: ● CALC:REL ● CALC:LIM:UPP ● CALC:LIM:LOW ● DISP:MET:UPP ● DISP:MET:LOW ● OUTP:REC:LIM:LOW ● OUTP:REC:LIM:UPP Parameters: <output_unit> DBM | W | DBUV *RST: UNIT<[1]..8>:POWer:RATio <output_unit>...
-
Page 351: Maintenance
The sensor selftest is described in c hapter 4.7.6.1, "Internal sensor selftest", on page 160. 7.2 Instrument selftest The R&S NRP2 carries out a selftest during booting. This selftest is described in c hap- ter 1.8.2, "Startup", on page 18. 7.3 Cleaning the exterior To clean the exterior, use a soft, lintfree cloth and an alcohol-free solvent, e.g. - Page 352 ® Maintenance R&S NRP2 Storage User Manual 1173.9157.02 ─ 03...
-
Page 353: Error Messages And Troubleshooting
® Error Messages and Troubleshooting R&S NRP2 Status and Error Messages in Manual Control 8 Error Messages and Troubleshooting 8.1 Status and Error Messages in Manual Control Special characters and symbols indicated on the display inform about the status of the power meter, see ... -
Page 354: Scpi-Specific Error Messages
® Error Messages and Troubleshooting R&S NRP2 SCPI-Specific Error Messages 8.2 SCPI-Specific Error Messages The list below contains error messages that may occur in the instrument. Negative error numbers are defined in the SCPI standard, positive error numbers identify device-specific errors. - Page 355 ® Error Messages and Troubleshooting R&S NRP2 SCPI-Specific Error Messages Error code Error text returned upon queue query Explanations -113 "Undefined header" The header is not defined for the device. -114 "Header suffix out of range" The header contains an illegal numeric suffix.
- Page 356 ® Error Messages and Troubleshooting R&S NRP2 SCPI-Specific Error Messages Error code Error text returned upon queue query Explanations -168 "Block data not allowed" The command contains a legal block data element at a point where it is not allowed.
- Page 357 ® Error Messages and Troubleshooting R&S NRP2 SCPI-Specific Error Messages Error code Error text returned upon queue query Explanations -224 "Illegal parameter value" The parameter value is invalid. -225 Out of memory The device has insufficient memory to perform the required operation.
-
Page 358: Query Errors
® Error Messages and Troubleshooting R&S NRP2 SCPI-Specific Error Messages Error code Error text returned upon queue query Explanations -350 "Queue overflow" This code is entered into the queue in lieu of the code that caused the error. It indicates that an error occurred but was not recorded. - Page 359 Attempt was made to send a command to a sensor that does not support this command. This may depend on the current sensor status. The sensors can inform the R&S NRP2 at any point which commands they support or do not support. This mainly concerns commands of the Sense and Trigger systems.
-
Page 360: Bootmenu
57 "Standard settings incomplete" is generated. 8.3 Bootmenu The boot menu of the R&S NRP2 offers service and troubleshooting functions. It is pass- word protected. The start display indicates the "Bootmenu" button for a few seconds after power-on. The bootmenu requires a password. - Page 361 Fig. 8-2: Bootmenu button The login window opens. Fig. 8-3: Login 2. Enter the password. The password is 7396 and cannot be changed. After entering the last digit the R&S NRP2 automatically opens the boot menu. User Manual 1173.9157.02 ─ 03...
- Page 362 Opens the system info menu. This menu provides soft- and hardware information to the instrument, e.g. serial numbers, firmware version or ethernet address. Fig. 8-5: Boot menu / System Info Service Opens the R&S NRP2 service menu, see c hapter 8.3.2, "Service Menu", on page 345. Erase Nonvol-Data Deletes the non-volatile memory containing instrument settings.
- Page 363 Activates that an error message is displayed if a sample error occurs. 8.3.2 Service Menu The R&S NRP2 offer various service functions to perform system tests that are not part of the selftest, to install / deinstall options or to configure the reference signal.
- Page 364 Press some of the numbers shown on the right to check the correct display. To exit press the "Exit" softkey, or the ESC key. Key Test Tests all hardkeys of the R&S NRP2 located at its front panel. User Manual 1173.9157.02 ─ 03...
- Page 365 Fig. 8-10: Service menu / Keyboard test Press each key once, in any order. Each time a key is pressed, the R&S NRP2 responds acoustically and marks the identified key. If you press a key more than once the instrument displays a warning message. This dialog box closes if you either have pressed all keys, or if you have not pressed any key within 15 seconds.
- Page 366 ® Error Messages and Troubleshooting R&S NRP2 Bootmenu User Manual 1173.9157.02 ─ 03...
-
Page 367: A Remote Control Interfaces
® Remote control interfaces R&S NRP2 GPIB Bus Interface A Remote control interfaces This section covers hardware related topics on the remote control interfaces, like pin assignment of the GPIB bus interface. For information on how to set up a remote control connection via the different interfaces, see ... - Page 368 ® Remote control interfaces R&S NRP2 GPIB Bus Interface A.1.2 Pin assignment NRFD DIO3 DIO1 Shield NDAC DIO4 DIO2 12 11 10 GND(11) GND(9) GND(7) DIO8 DIO6 DIO5 logic GND GND(10) GND(8) GND(6) DIO7 Fig. 1-1: Pin assignment of GPIB-bus interface A.1.3 Bus lines...
- Page 369 GPIB Bus Interface A.1.4 GPIB bus interface Instruments which can be controlled via GPIB bus can be equipped with different interface functions. The interface function for the R&S NRP2 are listed in the following table. Table 1-1: GPIB bus interface functions Control...
-
Page 370: Ethernet
Configures device for parallel poll. A.2 Ethernet For remote control via a TCP/IP-based LAN, the R&S NRP2 can be fitted with an optional 10/100BaseT Ethernet interface (option R&S NRP2-B4). The female connector is located on the rear panel of the R&S NRP2. Via this interface, a controller can remote-control the R&S NRP2 by means of the power meter's SCPI commands, using the VXI11 protocol... - Page 371 The VXI11 protocol uses ONC RPC (open network computing remote procedure calls), making it possible to call R&S NRP2 functions at the source code level as if they were running locally on the controller. The table below shows the relationships of the relevant protocol layers in the OSI reference model.
- Page 372 111. The portmapper subsequently activates the channel in the R&S NRP2 and tells the client at which ports channel services can be addressed. For this reason, it is important that any firewalls or routers between the client and the R&S NRP2 enable free access from the controller to the R&S NRP2 (core and abort...
-
Page 373: Ethernet Interface
LAN, based on TCP/IP. The female connector is located on the instrument rear. The interface enables a controller to operate the R&S NRP2 by remote control using the SCPI commands of the R&S NRP2. The commands of the IEC/IEEE 488.1 and IEC/IEEE 488.2... - Page 374 ® Remote control interfaces R&S NRP2 Ethernet interface standards are partly emulated via special software commands. The remote control pro- tocol for this interface is based on an IEC/IEEE draft protocol, described below. A.3.1 IEC/IEEE 1174 draft The IEC/IEEE 1174 draft (in the current version D2) defines communications via a serial RS-232-C interface which is based on the existing IEC/IEEE 488.1 and IEC/IEEE 488.2...
- Page 375 ® Remote control interfaces R&S NRP2 Ethernet interface This means the following for communications via RS-232-C and Ethernet in mode 1174.1: ● The special control sequences are permitted throughout the data stream. They are recognized and filtered out by the driver. In particular, the control sequences are also permitted within the block data and SCPI commands.
- Page 376 ® Remote control interfaces R&S NRP2 Ethernet interface Table 1-6: Control sequences of the IEC/IEEE 1174 draft Control sequence Transmitter Function &SRQ <CR>< LF> Device Service request &ddd <CR><LF> Device Sends STB and RQS as a three-digit decimal value ddd (response to &POL)
- Page 377 The R&S NRP2 offers a listener socket for connection queries. If the listener socket accepts a connection query, two related peer sockets will be created (link 1 and link 2) via which communications take place. The R&S NRP2 accepts the role of the server, and the remote control program is the client.
- Page 378 /* INCLUDE FILES *******************************************************/ #include <stdio.h> #include <winsock2.h> /* LOCAL DEFINES *******************************************************/ #define IP_ADDR "192.168.1.2" // IP address of NRP2 #define PORT_NO 3000 // Port number of NRP2 #define MAX_RECV 200 // Max response len /* MAIN FUNCTION *******************************************************/ int main(int argc, char* argv[]) nRet;...
- Page 379 = socket(AF_INET, SOCK_STREAM, IPPROTO_TCP); soLink2 = socket(AF_INET, SOCK_STREAM, IPPROTO_TCP); if ((soLink1 == INVALID_SOCKET) || (soLink2 == INVALID_SOCKET)) printf("Creation of Sockets failed.\n"); return(1); //--------------------------- // IP Address and Port of NRP2 //--------------------------- saDevice.sin_addr.s_addr = inet_addr(IP_ADDR); saDevice.sin_port = htons((u_short) PORT_NO); saDevice.sin_family = AF_INET;...
- Page 380 = recv(soLink1, ResponseMessage, MAX_RECV, 0); if (nRet == 0) closesocket(soLink2); closesocket(soLink1); printf("Receive *IDN? response message failed.\n"); else //------------- // Show Answer: //------------- ResponseMessage[nRet] = 0; printf("Response from NRP2: %s", ResponseMessage); //-------------- // Disconnecting //-------------- closesocket(soLink2); closesocket(soLink1); //---------------- User Manual 1173.9157.02 ─ 03...
-
Page 381: Usb Interface
} // Ende main() A.4 USB interface If the R&S NRP2 is connected to a controller via a USB 1.1 interface, it logs on as a USB test and measurement class (USBTMC) device, provided that USB is selected as a remote interface in the System(Remote USB menu. - Page 382 ® Remote control interfaces R&S NRP2 USB interface User Manual 1173.9157.02 ─ 03...
-
Page 383: B Standard Configurations
Standard Configurations R&S NRP2 B Standard Configurations The following tables list the settings that can be made when configuring the R&S NRP2 with the SYST:STAN:PRES <string> remote control command. The following values are provided for the <string> parameter. ● GSM/EDGE ●... -
Page 384: Standard Configurations
® Standard Configurations R&S NRP2 Sensor parameter Remote control command in Value short form Timegate Offset SENS:TGAT:OFFS:TIME 1: 20 µs 2: 2.328 ms Timegate Length SENS:TGAT:TIME 1: 527 µs 2: 527 µs Timegate Fence SENS:TGAT:MID Trace Offset Time SENS:TRAC:OFFS:TIME -50 µs... - Page 385 ® Standard Configurations R&S NRP2 Sensor parameter Remote control command in Value short form Exclude Time Start SENS:TIM:EXCL:STAR 130 µs Exclude Time End SENS:TIM:EXCL:STOP 140 µs Number Of Timeslots SENS:TSL:COUN Timeslot Width SENS:TSL:WIDT 6.667 ms Timeslot Fence SENS:TSL:MID SENS:TGAT:OFFS:TIME Timegate Offset 1: 130 µs...
- Page 386 ® Standard Configurations R&S NRP2 Table 2-5: PDC/UPLINK Sensor parameter Remote control command in Value short form Sensor Mode SENS:FUNC POW:XTIM SENS:APER Aperture Time 40 ms Duty Cycle SENS:DCYC 16.25 % Duty Cycle Correction SENS:DCYC:STAT Smoothing SENS:SMO Dropout Tolerance SENS:BURST:DTOL...
- Page 387 ® Standard Configurations R&S NRP2 Sensor parameter Remote control command in Value short form Duty Cycle Correction SENS:DCYC:STAT Smoothing SENS:SMO Dropout Tolerance SENS:BURST:DTOL 416.7 µs Exclude Time Start SENS:TIM:EXCL:STAR 15 µs Exclude Time End SENS:TIM:EXCL:STOP 25 µs SENS:TSL:COUN Number Of Timeslots...
- Page 388 ® Standard Configurations R&S NRP2 Sensor parameter Remote control command in Value short form Filter Length SENS:AVER:COUN Trigger Source TRIG:SOUR Table 2-8: WCDMA/3GPP TDD DL Sensor parameter Remote control command in Value short form Sensor Mode SENS:FUNC POW:XTIM Aperture Time...
- Page 389 ® Standard Configurations R&S NRP2 Table 2-9: WCDMA/3GPP TDD UL Sensor parameter Remote control command in Value short form Sensor Mode SENS:FUNC POW:XTIM SENS:APER Aperture Time 10 ms Duty Cycle SENS:DCYC 6.420 % Duty Cycle Correction SENS:DCYC:STAT Smoothing SENS:SMO Dropout Tolerance SENS:BURST:DTOL 666.667 µs...
- Page 390 ® Standard Configurations R&S NRP2 Sensor parameter Remote control command in Value short form Duty Cycle Correction SENS:DCYC:STAT Smoothing SENS:SMO Timegate Offset SENS:TGAT:OFFS:TIME 1: 20 µs 2: 710 µs 3: 835 µs 4: 5.970 ms SENS:TGAT:TIME Timegate Length 1: 620 µs 2: 30 µs...
- Page 391 ® Standard Configurations R&S NRP2 Sensor parameter Remote control command in Value short form Timegate Length SENS:TGAT:TIME 1: 341 µs 2: 341 µs Timegate Fence SENS:TGAT:MID Trace Offset Time SENS:TRAC:OFFS:TIME -30 µs Trace Capture Time SENS:TRAC:TIME 1.280 ms Trace Number Of Points...
- Page 392 ® Standard Configurations R&S NRP2 Sensor parameter Remote control command in Value short form Trigger Delay TRIG:DEL Trigger Level TRIG:LEV -30 dBm Trigger Source TRIG:SOUR Trigger Slope TRIG:SLOP Trigger Holdoff TRIG:HOLD 4.980 ms TRIG:DTIM Trigger Dropout Time Trigger Hysteresis TRIG:HYST...
- Page 393 ® Standard Configurations R&S NRP2 Sensor parameter Remote control command in Value short form Trigger Dropout Time TRIG:DTIM Trigger Hysteresis TRIG:HYST 3 dB Table 2-14: CDMA2000 Sensor parameter Remote control command in Value short form Sensor Mode SENS:FUNC POW:AVG Aperture Time...
- Page 394 ® Standard Configurations R&S NRP2 User Manual 1173.9157.02 ─ 03...
-
Page 395: C Programming Measurements
The short form is normally used. However, commands are sometimes indi- cated in their long form so that their meaning is easier to understand. The R&S NRP2 makes no distinction between upper case and lower case letters; they are only used to distinguish between the short and long form. - Page 396 The reference value also must have a power unit and be set with CALC:REL:RAT. The R&S NRP2 stores the reference values for power values and power ratios independently of each other and automatically uses the correct reference value depending on the unit of the measurement result.
- Page 397 ® Programming Measurements R&S NRP2 Measuring with high-level commands The measurement commands are obtained by adding one of the following keywords: :DIFF (difference) :DIFF:REL (difference with reference value) :RAT (ratio) :RAT:REL (ratio with reference value) :SWR (standing wave ratio) :RLOS (return loss)
- Page 398 1 (default). The instrument is triggered by an external signal, which must be routed to the R&S NRP2 rear panel via the trigger input. The mea- surement result is a list of 8 measured values separated by a comma for the timeslots.
- Page 399 ® Programming Measurements R&S NRP2 Measuring with high-level commands Example: MEAS:ARRay? (1000) 1000 measured values are recorded in the ContAv mode. After termination of the last measurement, the results are stored in the output queue. There is no triggering as in the ContAv mode.
- Page 400 ® Programming Measurements R&S NRP2 Measuring with high-level commands Measurement function Output unit :SWR :RLOS :REFL The UNIT commands affect the parameters of the following commands: CALC:LIMit:UPPer, CALC:LIMit:LOWer, CALC:RELative, DISP:METer:UPPer and DISP:METer:LOWer. C.1.6 Division of MEAS? MEAS? can be divided into other high-level measurement commands.
-
Page 401: Trigger State System
R&S NRP2 waits for such a value and then answers the query. During this time, no other command should be sent to the R&S NRP2, since the query has to be answered first. If a command is sent to the R&S NRP2, the SCPI error -410, "Query interrupted", is output. - Page 402 The R&S NRP2 is in the idle state and performs no measurement. On power-up of the R&S NRP2, it is in the LOCAL mode and in the IDLE state. All connected sensors are set to INIT:CONT ON to allow measurements to be continuously dis- played.
-
Page 403: Logic Relationship Of Command Systems Sense, Calculate And Unit
6, "Remote Control - Commands", on page 191. To perform measurements with the R&S NRP2, the user should have a good under- standing of the trigger system and be familiar with the result processing. The measured values delivered by the sensors cannot be directly queried. As shown in figure below, the raw data is first determined in the sensors taking into account the SENSe settings. - Page 404 Measuring with low-level commands Each measurement configuration should begin with the *RST command, which sets the R&S NRP2 to a defined output state. The accurate settings are described in the docu- mentation of remote control command SYSTem:PRESet. The most important settings are listed below: ●...
- Page 405 WAIT_FOR_TRG to MEASURING. *TRG delivers no measurement result and has no effect if TRIG:SOUR is not set to BUS or if the instrument is not in the state WAIT_FOR_TRG. The latter situation applies, for example, if the R&S NRP2 is IDLE, i.e. INIT:CONT ON is not set nor was INIT executed.
- Page 406 ® Programming Measurements R&S NRP2 Measuring with low-level commands TRIG:DEL 50 US 'starts measurement 50 µs after the trigger event TRIG:HOLD 800 US 'starts next trigger event 800 µs 'after the trigger event at the earliest INIT FETCh? Another way to modify the trigger system timing is to set a holdoff time (TRIG:HOLD).
- Page 407 ® Programming Measurements R&S NRP2 Measuring with low-level commands Power Time EXCLude:STARt EXCLude:STOP Integration interval Fig. 3-4: Exclude parameter Moreover, in Timeslot and Timegate it is possible to exclude time domains also during measurement. (...[:EXCL]:MID:OFFS and ...:[:EXCL]:MID:TIME). Example: GSM measurement: The average power in the fifth GSM slot is to be measured. The burst power fails by 50 µs and this range is to be excluded from the measurement..
- Page 408 ® Programming Measurements R&S NRP2 Measuring with low-level commands Gate 5 Power Trigger event Trigger level Time SENS:TRAC2:MID:TIME SENS:TRAC2:MID:OFFS:TIME SENS:TRAC2:OFFS:TIME SENS:TRAC2:TIME Fig. 3-5: Measurement of a GSM slot with Fence(Mid)-Exclude domain C.4.2.4 Level, hysteresis and dropout time With internal and external triggering (TRIG:SOUR INT | EXT), a trigger event is rec- ognized when the level of a trigger signal exceeds a specific value.
- Page 409 ® Programming Measurements R&S NRP2 Measuring with low-level commands ContAv mode: SENS:FUNC "POW:AVG" Continuous measurement with only one integration time specified (SENS:APER), within which the power is integrated as a measurement result. *RST SENS:FUNC "POW:AVG" SENS:APER 10 MS INIT FETCh? Timeslot mode: SENS:FUNC "POW:TSL:AVG"...
- Page 410 ® Programming Measurements R&S NRP2 Measuring with low-level commands INIT FETCh? C.4.3.2 Averaging/filters The power values to be measured are sampled by the sensors. The sampling values then undergo two-stage filtering before they are made available as measured values. The first filter stage is a time integration. The integration time is either set explicitly (Con- tAv mode: SENS:APER, Timeslot mode: SENS:TSL:WIDT and Trace mode: SENS:SWE:POIN and -:TIME) or determined automatically ("BurstAv mode").
- Page 411 C.4.3.3 Measured-value corrections The R&S NRP2 offers different options for correcting measured values in the instrument. These options all require an existing knowledge of the test setup or the time structure of the signal. Offsets in the result can be corrected globally and depending on the frequency, and it is possible to consider the duty cycle of a signal and the influence of the complex reflection coefficient (Γ) of the power source.
- Page 412 FETCh? This example assumes that a table called "Table 1" is available. Duty cycle If the duty cycle of a pulsed signal (SENS:DCYC) is reported to the R&S NRP2, the R&S NRP2 delivers the average power in the pulse. Example...
-
Page 413: Statistics Measurements
® Programming Measurements R&S NRP2 Statistics measurements Keyword for selecting a calculation Corresponding low-level commands (n,m=1,2,3,4) function with high-level commands :DIFF (Difference) CALC:MATH "(SENSn-SENSm)";REL:STAT OFF :DIFF:REL (Difference with refer- CALC:MATH "(SENSn-SENSm)";REL:STAT ON ence value) :RAT (Ratio) CALC:MATH "(SENSn/SENSm)"; REL:STAT OFF... - Page 414 ® Programming Measurements R&S NRP2 Statistics measurements SENS:STAT:SCAL:X:RANG commands. The RANGe is divided into measurement inter- vals by specifying SENS:STAT:SCAL:X:POIN. You are therefore retrieve the measure- ment values in response to FETCh? SENS:STAT:SCAL:X:POIN. *RST UNIT:POWER:RATIO O 'output unit 1 TRIG:SOUR INT...
-
Page 415: Pulse Analysis Measurements
® Programming Measurements R&S NRP2 Pulse Analysis Measurements C.6 Pulse Analysis Measurements Pulse analysis measurements are always coupled to trace measurements. Thus, a trace measurement has to be set up and the pulse analysis algorithms have to be activated. before the measurement is started. The sensors send the trace data together with the pulse measurement results. -
Page 416: Synchronizing Measurements
® Programming Measurements R&S NRP2 Synchronizing Measurements C.7 Synchronizing Measurements Some sensors (e.g. R&S NRP-Z81/85/86) are able to generate signals on the (external) trigger bus, when an internal trigger was detected. This allows for synchronized meas- urements with multiple sensors. - Page 417 ® Programming Measurements R&S NRP2 Optimization of measurement speed SENS:FUNC "POW:AVG" 'ContAv mode SENS:BUFF:STAT OFF 'no buffered measurements SENS:APER MIN 'integration time as short as possible SENS:RANG:AUTO OFF 'automatic range selection OFF SENS:CORR:OFFS:STAT OFF 'no global offset correction SENS:CORR:DCYC:STAT OFF...
- Page 418 ® Programming Measurements R&S NRP2 Optimization of measurement speed User Manual 1173.9157.02 ─ 03...
-
Page 419: D Compatibility Information
NRP2 D Compatibility Information This section contains information regarding the compatibility of the R&S NRP2 remote control commands with those of the "E4418B" and "E4419B" power meters from Agilent. The R&S NRP2 is largely downward-compatible to the above-mentioned instruments but offers additional capabilities. -
Page 420: Compatibility Information
:RWLock TRACe:STATe Is not implemented in the R&S NRP2. TRACe:DATA? Is not implemented in the R&S NRP2 in this form. Data of the trace mode can only be queried via the high-level commands (FETCh?, READ?, MEAS?) and CALC:DATA?. TRACe:UNIT? The UNIT node is only globally available in the R&S NRP2 and affects... - Page 421 :RATio :RATio:RELative SENSe:POWer:AC:RANGe:AUTO The R&S NRP2 also recognizes these commands but :AVG should be used instead of :AC since R&S NRP-Zxx Power Sensors sensors eventually also measure DC components and the designation in the R&S NRP2 is not used in the sense of SCPI.
- Page 422 ® Compatibility Information R&S NRP2 User Manual 1173.9157.02 ─ 03...
-
Page 423: List Of Commands
® List of Commands R&S NRP2 List of Commands *CLS ................................193 *ESE ................................193 *ESR? ................................194 *IDN? ................................194 *IST? ................................194 *OPC ................................194 *OPT? ................................195 *PRE ................................195 *PSC ................................195 *RCL ................................196 *RST ................................196 *SAV ... - Page 424 ® List of Commands R&S NRP2 CALCulate<[1]..8>: M EAN: D ATA? .........................230 CALCulate<[1]..8>: M INimum: D ATA? ......................230 CALCulate<[1]..8>: P TPeak: D ATA? .......................230 CALCulate<[1]..8>: R ELative: P OWer[: M AGNitude] ..................231 CALCulate<[1]..8>: R ELative: R ATio[: M AGNitude] ..................232 CALCulate<[1]..8>:...
- Page 425 ® List of Commands R&S NRP2 CONFigure<[1]..8>[: S CALar][: P OWer]: T SLot: D IFFerence ................215 CONFigure<[1]..8>[: S CALar][: P OWer]: T SLot: D IFFerence: R ELative ............215 CONFigure<[1]..8>[: S CALar][: P OWer]: T SLot: R ATio ..................215 CONFigure<[1]..8>[:...
- Page 426 ® List of Commands R&S NRP2 DISPlay[: W INDow]<[1]..4>: R ESolution ......................243 DISPlay[: W INDow]<[1]..4>: T RACe: L OWer ....................245 DISPlay[: W INDow]<[1]..4>: T RACe: U PPer ....................245 DISPlay[: W INDow]<[1]..4>: T SLot ........................246 DISPlay[: W INDow]<[1]..4>[: S TATe] ......................245 FETCh<[1]..8>:...
- Page 427 ® List of Commands R&S NRP2 FETCh<[1]..8>[: S CALar][: P OWer][: A VG]: R ELative ..................217 FETCh<[1]..8>[: S CALar][: P OWer][: A VG]: R LOSs ..................217 FETCh<[1]..8>[: S CALar][: P OWer][: A VG]: S UM .....................217 FETCh<[1]..8>[: S CALar][: P OWer][: A VG]: S UM: R ELative ................217 FETCh<[1]..8>[:...
- Page 428 ® List of Commands R&S NRP2 MEASurement<[1]..8>[: S CALar][: P OWer]: T SLot: R LOSs ................220 MEASurement<[1]..8>[: S CALar][: P OWer]: T SLot: S UM .................220 MEASurement<[1]..8>[: S CALar][: P OWer]: T SLot: S UM: R ELative ..............220 MEASurement<[1]..8>[:...
- Page 429 ® List of Commands R&S NRP2 OUTPut: R OSCillator[: S TATe] ........................256 OUTPut: T RIGger[: S TATe] ..........................259 OUTPut: T TL: A CTive ............................257 OUTPut: T TL: F AIL ............................257 OUTPut: T TL: F EED ............................258 OUTPut:...
- Page 430 ® List of Commands R&S NRP2 READ<[1]..8>[: S CALar][: P OWer][: A VG]: R ATio .....................218 READ<[1]..8>[: S CALar][: P OWer][: A VG]: R ATio: R ELative ................218 READ<[1]..8>[: S CALar][: P OWer][: A VG]: R EFLection ..................218 READ<[1]..8>[:...
- Page 431 ® List of Commands R&S NRP2 SYSTem: T IME ...............................324 SYSTem: V ERSion? ............................324 TRIGger: A LL: A TRigger[: S TATe] ........................327 TRIGger: A LL: C OUNt .............................327 TRIGger: A LL: D ELay ............................328 TRIGger: A LL: D ELay: A UTO ...........................328 TRIGger:...
- Page 432 ® List of Commands R&S NRP2 [SENSe<[1]..4>]: C ORRection: F DOTable[: S ELect] ..................267 [SENSe<[1]..4>]: C ORRection: O FFSet ......................266 [SENSe<[1]..4>]: C ORRection: O FFSet: S TATe ....................266 [SENSe<[1]..4>]: C ORRection: S PDevice: S ELect ..................267 [SENSe<[1]..4>]:...
- Page 433 ® List of Commands R&S NRP2 [SENSe<[1]..4>]: T RACe: M EASurement: P ULSe: D URation? .................287 [SENSe<[1]..4>]: T RACe: M EASurement: P ULSe: P ERiod? ................287 [SENSe<[1]..4>]: T RACe: M EASurement: P ULSe: S EParation? ..............288 [SENSe<[1]..4>]: T RACe: M EASurement: T IME ....................288 [SENSe<[1]..4>]:...
-
Page 434: Index
® Index R&S NRP2 Index Offset ................ 84 Config Grid..............115 0 V Equivalent - Analog ........151, 155 Config Pulse..............126 1 TRIG ................58 Config… ................ 163 3 V Equivalent - Analog ........151, 155 Cont(inuous) (statistics display) ........135 24, "Sensor mode not supported"... - Page 435 ® Index R&S NRP2 Function ................ 119 Limit Fail ................ 335 Function test ..............18 LIMIT FAIL ..............58 Limit warning ..............159 Low reference power (pulse) ........128 Gamma correction) ............84 Gate ................ 71, 122 Gate (pulse) ..............126 Manual operation ............
- Page 436 ® Index R&S NRP2 Peak (gate) ..............121 Sample Error ..............165 Peak (time slot) .............. 131 Sample error message ..........345 Peak power (gate) ............102 Samples (statistics display) ..........139 Positive overshoot ............128 Sampling rate ..............67 Pos Scale ........
- Page 437 ® Index R&S NRP2 Start display booting ..............18 Versions+Options (remote control) ........ 194 function test .............. 18 welcome screen ............18 Video BW ..............118 VISA resource identifier ..........363 Starting the meter ............18 Start of Fence ..............71 VISA Resource Identifier ..........
Need help?
Do you have a question about the NRP2 and is the answer not in the manual?
Questions and answers