Table of Contents
Advertisement
Quick Links
Table of Contents
Introduction ............................................................................ 1
Before you Start .................................................................... 1
Button Functions ................................................................... 2
Reading the Display .............................................................. 3
Using the Monitor .................................................................. 5
Carbon Dioxide Levels and Guidelines ................................. 7
Specifications ........................................................................ 8
Software Installation .............................................................. 9
Software Application ............................................................ 12
Data Logging ....................................................................... 13
Automatic Baseline Calibration ........................................... 18
Manual Calibration .............................................................. 19
Contact Us ........................................................................... 20
www.CO2Meter.com
Carbon Dioxide Monitor
Advertisement
Table of Contents

Subscribe to Our Youtube Channel
Related Manuals for Co2meter XT-10


Summary of Contents for Co2meter XT-10
-
Page 1: Table Of Contents
Using the Monitor ..............5 Carbon Dioxide Levels and Guidelines ......... 7 Specifications ................ 8 Software Installation .............. 9 Software Application ............12 Data Logging ............... 13 Automatic Baseline Calibration ........... 18 Manual Calibration .............. 19 Contact Us ................20 www.CO2Meter.com... -
Page 2: Introduction
PC USB port or the supplied 5.0V DC power adapter. Only use the power Package Contents adapter that comes with the monitor. • Monitor • 110-220VAC to 5V DC Power Adapter • USB Cable • Instruction Manual www.CO2Meter.com www.CO2Meter.com... -
Page 3: Button Functions
Button Functions Power Button – turns the power ON / OFF Up Arrow Button – change between degrees Fahrenheit and °C/°F Centigrade. When MODE pressed, used as up arrow or to increase the value. www.CO2Meter.com www.CO2Meter.com... -
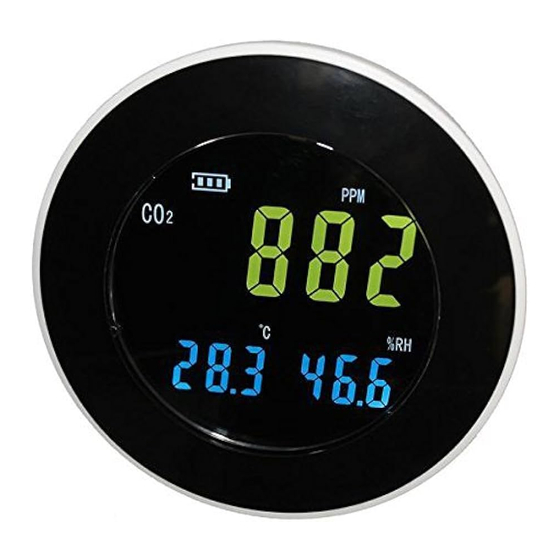
Page 4: Reading The Display
YEAR : year 1. Carbon dioxide display area HOUR: hour : Battery level indicator :Sound alarm enabled PPM: Concentration units (parts per million) 3. Humidity display area CO2: Chemical symbol for carbon dioxide %RH: humidity unit MON: month www.CO2Meter.com www.CO2Meter.com... -
Page 5: Using The Monitor
Press the MODE button for two seconds to begin. The first setting is the CO2 alarm level. Press the left and right arrow buttons to select the digit to change. The selected digit will flash. Press the up and down arrows to change it. www.CO2Meter.com www.CO2Meter.com... -
Page 6: Carbon Dioxide Levels And Guidelines
Storage Conditions: -20~60℃, 0~90%RH (no condensation) of concentration and increased likelihood of spreading respiratory viruses like colds, etc. >5,000ppm OSHA and NIOSH first threshold for safety. maximum allowed concentration within a 8 hour working period Guidelines are average CO2 levels over time. www.CO2Meter.com www.CO2Meter.com... -
Page 7: Software Installation
“Browse” to create a new one. Download software at CO2Meter.com/pages/downloads Download the XT-10 Setup file to your Windows PC. Double-click the file to start the installation. Click “Next” to begin: Click “Next” after confirmation and click “Next” again to start the installation. -
Page 8: Software Application
Setting the Date / Clock After connecting to the computer, click “Set Time” to automatically set the clock. The monitor will sync with the computer’s built-in clock. After installation is complete click “Close”. The software is now installed. 11 www.CO2Meter.com www.CO2Meter.com 12... -
Page 9: Data Logging
Click the “Immediately” button to tell the software you want to log data from the software, then click “OK” to begin data logging. Save the data as a file to your PC as shown here: 13 www.CO2Meter.com www.CO2Meter.com 14... - Page 10 Start by connecting the monitor to a PC and running the software. After connecting click the “Set Param” button to enter the parameter setting interface as shown in the figure below: 15 www.CO2Meter.com www.CO2Meter.com 16...
-
Page 11: Automatic Baseline Calibration
If it shows 0PPM, the you should get in the habit of saving your data files every time you create one. change failed. Step 7: Press MODE again to restart the monitor normally. 17 www.CO2Meter.com www.CO2Meter.com 18... -
Page 12: Manual Calibration
Step 4: Press the MODE button to start the manual calibration Address: process. The screen should show approximately 400ppm. CO2Meter, Inc. Step 5: Walk away from the monitor so that your breath does not 131 Business Center, A3 influence the manual calibration. Manual calibration will take Ormond Beach, FL 32174 between 5-10 minutes to complete.
Need help?
Do you have a question about the XT-10 and is the answer not in the manual?
Questions and answers