Nu-Flame CHESNEYS ALCHEMY EVOLUTION PLUS N2 Use & Maintenance Instructions
Natural gas only for decorative purposes only chesneys alchemy evolution plus series
Hide thumbs
Also See for CHESNEYS ALCHEMY EVOLUTION PLUS N2:
- Use & maintenance instructions (11 pages)
Advertisement
CHESNEYS
ALCHEMY EVOLUTION PLUS GAS FIRE
by
Unit 4, Kimpton Trade & Business Centre
Minden Road, Sutton, Surrey SM3 9PF
Tel: 020 8254 6802
USE & MAINTENANCE INSTRUCTIONS
FOR CHESNEYS ALCHEMY EVOLUTION PLUS GAS FIRES
a. This fire must be installed by a properly qualified (in accordance with National & Local Regulations) Installation Engineer.
b. The connection of this appliance, and ventilation requirements (if any) are to be according to National & Local Codes.
c. The chimney should be swept before the appliance is installed.
d. Open fires are a hazard; it is recommended that a guard be fitted to provide protection for children, the elderly or infirm. (See
National & Local Regulations if any.)
e. This appliance is intended for decorative purposes only.
f. Do not throw rubbish on, or attempt to burn any materials on this appliance. Any debris or foreign matter must be removed
from the fire.
g. The appliance should be serviced by a qualified gas fitter every 12 months.
FOR A FIRE WITH THERMATRONIC ELECTRONIC CONTROL SYSTEM SEE SEPARATE OPERATING INSTRUCTIONS
a. Turning pilot on from off position depress knob and turn anti-clockwise until it sparks.
More than one attempt may be required to light the pilot. Once lit hold in for about 10
seconds.
Release knob and turn to pilot position.
b. To turn burner on from pilot position depress knob and turn anti-clockwise to low flame.
To go to high flame depress knob again and turn anti-clockwise as far as it will go.
The flame can be varied to any point between high and low as desired.
c. To turn off depress knob and turn clockwise depressing knob at each point as you go
all the way round to off.
d. This appliance is fitted with an oxygen depletion sensing system, which automatically shuts off the gas supply to the main
burner if the oxygen level in the room is depleted, due to a lack of primary air, or obstructed flue that would lead to incomplete
combustion of the gas.
e. In the event that the fire shuts down due to any reason, attempt to restart it. If there is a continuing problem call in a properly
qualified specialist engineer.
f. There are no user replaceable parts in this appliance.
g. Do not change the fire front or fret supplied without checking with the supplier of this unit. A minimum primary air
inlet area of 50 sq. cm is required for the safe and efficient operation of the fire. Failure to observe this instruction is
potentially dangerous and will possibly invalidate the guarantee.
h. Regularly inspect the purpose provided ventilator (if fitted) to check that it is free from any obstruction.
i. The chimney should be regularly checked to ensure that all the products of combustion are entering the flue & that there is no
build-up of soot. If there is, the appliance must be cleaned.
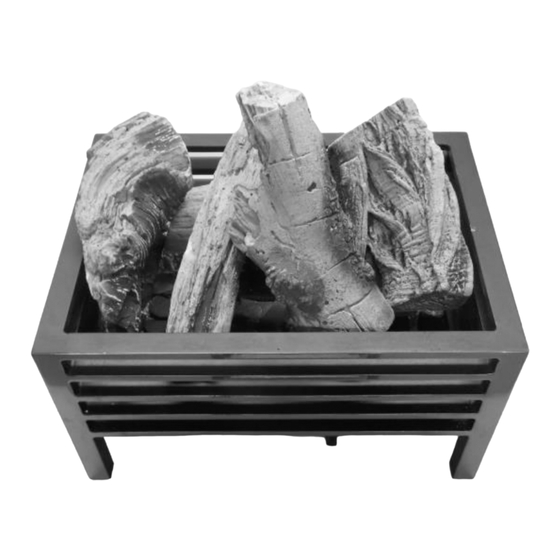
CLEANING THE FIRE
a. Do not use a vacuum cleaner to clean the appliance as you will suck up the vermiculite.
b. Gently remove the Embaglow material & fuel effect pieces one by one. Remove soot deposits with a soft brush.
c. The vermiculite granules should be level with the top edge of the burner tray. Top up the vermiculite granules if
required. Ensure that vermiculite granules are not obstructing the burner slots or fouling the pilot burner assembly.
d. Re-lay the fuel effect as shown on the relevant drawing. Do not add more simulated coals, logs or black bark pieces
or change the firebed layout in anyway.
(NATURAL GAS ONLY)
FOR DECORATIVE PURPOSES ONLY
NATURAL GAS MODELS: N2, N2I, N3R, N3I, N5R & N5
LIGHTING & CONTROLLING THE FIRE – MANUAL FIRE
IMPORTANT NOTES
IMPORTANT NOTE
Simulated coals, or simulated logs, together with
simulated
black
appliance.
refractory fibre. Do not use real coals, logs or bark,
as this is dangerous. If the simulated coals, simulated
logs or simulated black bark need renewing please
obtain suitable replacements from your stockist.
GENERAL
Page 1 of 12
bark, are
supplied
These
are
all
manufactured
with
this
from
Advertisement
Table of Contents

Related Manuals for Nu-Flame CHESNEYS ALCHEMY EVOLUTION PLUS N2


Summary of Contents for Nu-Flame CHESNEYS ALCHEMY EVOLUTION PLUS N2
- Page 1 CHESNEYS IMPORTANT NOTE Simulated coals, or simulated logs, together with ALCHEMY EVOLUTION PLUS GAS FIRE simulated black bark, are supplied with this appliance. These manufactured from refractory fibre. Do not use real coals, logs or bark, as this is dangerous. If the simulated coals, simulated logs or simulated black bark need renewing please obtain suitable replacements from your stockist.
-
Page 2: Installation & Servicing Instructions
SIMULATED LOGS OR SIMULATED BLACK BARK NEED RENEWING PLEASE OBTAIN SUITABLE REPLACEMENTS FROM YOUR STOCKIST. APPLIANCE DATA GAS TYPE: SEE DATA PLATE. BURNER: NU-FLAME EVOLUTION PLUS STAINLESS STEEL FLAME SAFETY: OXYGEN DEPLETION & FLAME FAILURE DEVICE STANDARD TO ALL MODELS. APPLIANCE INLET WORKING PRESSURE: SEE DATA PLATE. IGNITION: PIEZO. - Page 3 INSTALLATION & SERVICING INSTRUCTIONS continued) Natural Gas Models (For G20 Gas) – Manual Control (M) ALCHEMY kW Input Net Burner Pressure Burner Model Flue Classes Category Injector Size (High Flame) (High Flame) Classes 1 & 2 16.5 mbar Class 1 Only 14.7 mbar Classes 1 &...
-
Page 4: Appliance Location
INSTALLATION & SERVICING INSTRUCTIONS continued) APPLIANCE LOCATION a. This appliance must be hearth mounted in a builders opening or under an associated independent canopy or a fireplace recess. b. On NO ACCOUNT must this appliance be sited on combustible materials or carpets. It is not suitable for combustible walls. c. - Page 5 Typical burner in basket showing black insulation pad in position and vermiculite fill, ready to lay ceramics Vermiculite and burner insulation pads are consumable items and spares can be purchased from Nu-Flame by quoting the ‘N’ number on the top right hand side of the data plate – e.g. N2.
- Page 6 INSTALLATION & SERVICING INSTRUCTIONS continued) Depending on the model chosen your fire might be a different shape and size to the one shown below, but for all models begin by applying a layer of black bark chipping over the vermiculite bedding and the black burner insulation pad. This is to break up the regular appearance of the base.
- Page 7 ALCHEMY 18 DUCKNEST FUEL EFFECT LAYOUTS Before commencing please also refer to the Tips section on page 6 When laying the logs ensure that the burner slots There are many shapes and sizes of coal but for the are kept clear. purposes of the layout we will describe them as small medium and large.
- Page 8 ALCHEMY 22” DUCKNEST FUEL EFFECT LAYOUTS Uses Alchemy 18 Universal / 22 Ducknest Gas Burner Before commencing please also refer to the Tips section on page 6 When laying the logs ensure that the burner slots There are many shapes and sizes of coal but for the are kept clear.
- Page 9 ALCHEMY 18 UNIVERSAL FUEL EFFECT LAYOUTS Uses Alchemy 18 Universal / 22 Ducknest Gas Burner Before commencing please also refer to the Tips section on page 6 When laying the logs ensure that the burner slots There are many shapes and sizes of coal but for the are kept clear.
- Page 10 ALCHEMY 22 UNIVERSAL FUEL EFFECT LAYOUTS Before commencing please also refer to the Tips section on page 6 When laying the logs ensure that the burner slots There are many shapes and sizes of coal but for the are kept clear. purposes of the layout we will describe them as small medium and large.
-
Page 11: Commissioning The Fire
INSTALLATION & SERVICING INSTRUCTIONS continued) LIGHTING & CONTROLLING THE FIRE – MANUAL FIRE FOR A FIRE WITH THERMATRONIC ELECTRONIC CONTROL SYSTEM SEE SEPARATE OPERATING INSTRUCTIONS a. Turning pilot on from off position depress knob and tur anti-clockwise until it sparks. More than one attempt may be required to light the pilot. -
Page 12: Servicing Instructions
Nu-Flame Warranty and Repair Procedure Nu-Flame fires are guaranteed for 1 year from the date of installation. During that time our guarantee is to repair at our option, or replace at no charge a fire that proves to have faulty components or workmanship.
Need help?
Do you have a question about the CHESNEYS ALCHEMY EVOLUTION PLUS N2 and is the answer not in the manual?
Questions and answers